Audizine - An Automotive Enthusiast Community

Page 1 of 3 123 LastLast
Results 1 to 40 of 81
  1. #1
    Senior Member Two Rings xmoox's Avatar
    Join Date
    Aug 11 2008
    AZ Member #
    31860
    My Garage
    2000 audi s4
    Location
    Portland OR

    DIY 2.0 FSI Conversion Solder method.

    Guest-only advertisement. Register or Log In now!
    I did not come up with this, nor was it my idea. All credit goes to infinkc and his thread. Original Thread
    I would recommend reading through this thread before you get started.
    This will be an explanation of what I did for the 2.0 FSI conversions on my car.
    I am in no way responsible if you mess up your car, but if you follow this you shouldn’t!
    My goal for this is to make the install easy and answer any questions that I had. I will try to keep this up to date with answers to people’s questions. Expect to spend 6 to 8 hours on this. (Based on my own experience. Your time might vary)
    If you see anything incorrect or have suggestions please let me know so I can correct it.

    Tools

    Soldering iron: this doesn’t matter, but I recommend over 35 watts. I soldered all mine about 650 degrees.

    I would recommend watching this video, it's very informative.


    Solder: I got .032 inch in diameter 60/40 Rosin-core Solder from radio shack. When selecting solder, make sure you get solder with Rosin core or get a separate container of flux. (This helps the solder adhere to the wire.) (Sorry couldn’t find a link to the solder all the ones on radio shacks website are missing led)

    Heat shrink: Best stuff I found was from harbor freight for the price. It will do the job and can withstand around 230 degrees F. Found it for about 4.99 a box. I bought regular heat shrink and then marine grade heat shrink with adhesive lining for a watertight seal.

    http://www.harborfreight.com/120-pie...set-67530.html
    http://www.harborfreight.com/42-piec...ing-67598.html

    Wire cutters: Big enough to cut through 4 strands of wire at once and insulation.

    Wire strippers: Wire strippers are extremely important so I recommend that you get them or you will go insane! There are a couple options here and I used these. The only problem with them is the wire has to be a certain length for them to work. In my case the wire was too short and they didn’t work very well on the original wires. Worked great though on the new coil plugs wires. Radio Shack wire Strippers

    If I did it again I would probably get some designed like the ones from harbor freight. The reason these would be better is because you can strip the wire from end without needed a lot of extra wire to grip. I read the reviews about the harbor freight version so it’s possible that these are bad now. I used to have some but they broke because they were made out of plastic. These should last the life of the install and will make your life so much easier (its only 5 bucks). This is what took a lot of my time was having to strip the original wire with a knife and made me a little insane.
    http://www.harborfreight.com/6-1-2-h...ent-66690.html

    Heat gun: I got this at harbor freight a while ago very useful tool I use it all the time. This is for the heat shrink (if you choose to use a lighter don’t! I don’t recommend it go buy a heat gun it has many uses.) I set it to about 450 to melt the heat shrink.
    http://www.harborfreight.com/12-inte...9343-9184.html

    Step 1 Get supplies!
    Coil connectors 6x http://www.ebay.com/itm/Ignition-Coi...d28e8f&vxp=mtr
    You can get this version as well http://www.amazon.com/2011340-Igniti...vglnk-c1005-20

    6x adaptor plates - I got mine from a member here for $65 but the Touareg adaptor plates will work (part 077 905 390).

    06E905115E 2.07T coil packs x6 http://www.amazon.com/Standard-Motor...rds=06e905115e
    Bought from amazon because of amazon prime free shipping ftw

    Step 2 Now comes the good part
    Now that you read through the tools and parts now comes the fun part.
    Take a deep breath and get ready for some cutting. Just tell yourself your car will start again. Don’t freak out!!!

    ############################# ICM #####################################

    I decided to cut and directly solder the ICM instead of buying the $35 dollar connector and building it.


    !!!IMPORTANT ONLY CUT ONE ICM OFF AT A TIME!!!!

    Only cut the other ICM after you have soldered and shrink wrapped the other one.
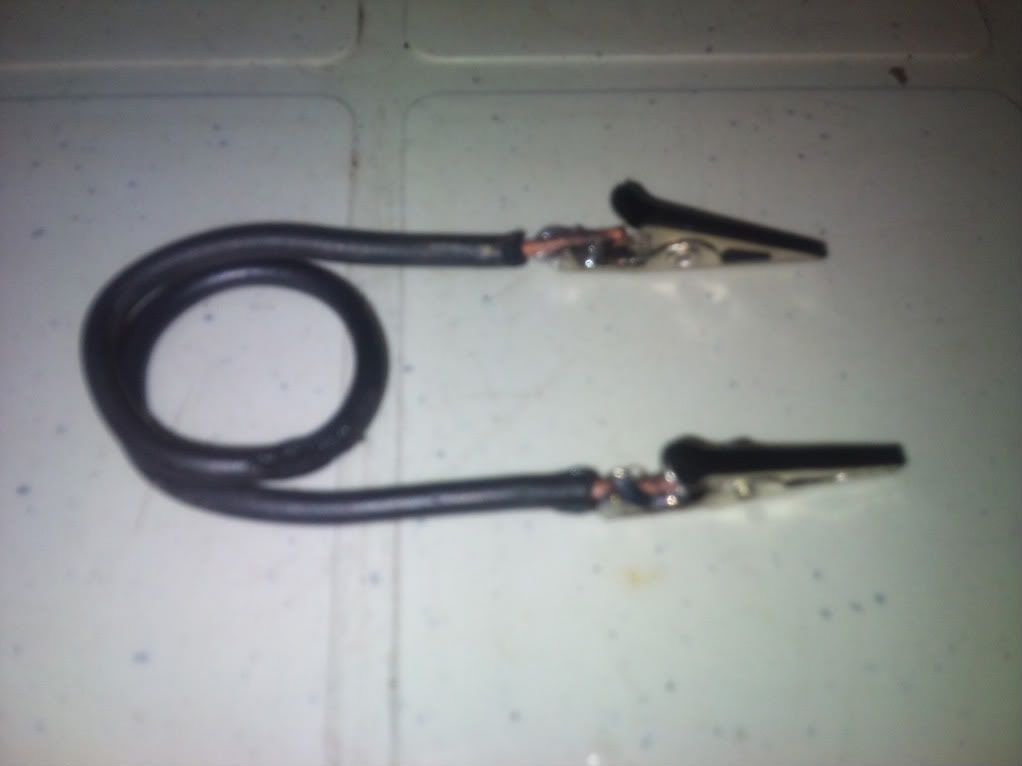
    I started with the ICM take the wire cutters and cut one off! I cut it off maybe half an inch from the rubber boot. The length that you cut off can vary depending on how clean you want to make it. Use your wire stripper and strip about a ¼ inch of the insulation. Follow these colors from infinkc.
    [IMG][/IMG]
    This is an example of how much I cut off from the ICM
    [IMG][/IMG]

    Bank 1 (Cylinder 1,2,3 ICMs)

    4 Wire plug - Grey/Yellow (Pin 1) goes to 3 Wire plug Brown/Grey (Pin 3)
    4 Wire plug - Pin 2 Brown Unused
    4 Wire plug - Green/Grey (Pin 3) goes to 3 Wire plug Brown/Green (Pin 2)
    4 Wire plug - White/Green (Pin 4) goes to 3 Wire plug Brown/Blue (Pin 1)

    Bank 2 (Cylinder 4,5,6 ICMs)

    4 Wire plug - Grey/Brown (Pin 1) goes to 3 Wire plug Brown/Grey (Pin 3)
    4 Wire plug - Pin 2 Brown Unused
    4 Wire plug - Green/Brown (Pin 3) goes to 3 Wire plug Brown/Green (Pin 2)
    4 Wire plug - White/Brown (Pin 4) goes to 3 Wire plug Brown/Blue (Pin 1)

    Follow the color chart above and solder and shrink wrap and then repeat for the next one
    [IMG][/IMG]

    This is what it should look like when done. Yes the large brown wire is to be left alone!
    Personal note: I ran into a problem with bank 2. Grey/Brown looks an awful lot like White/Brown so make sure when soldering bank 2 that you pay attention! Use a very bright light so you can get a clear view of the colors.
    Once done pat yourself on the back and don’t try to start your car!

    ######################### COIL PACKS ###################################

    Time to cut the coil packs! I recommend that you finish soldering and heat shrinking the solder joints before moving to the next one.
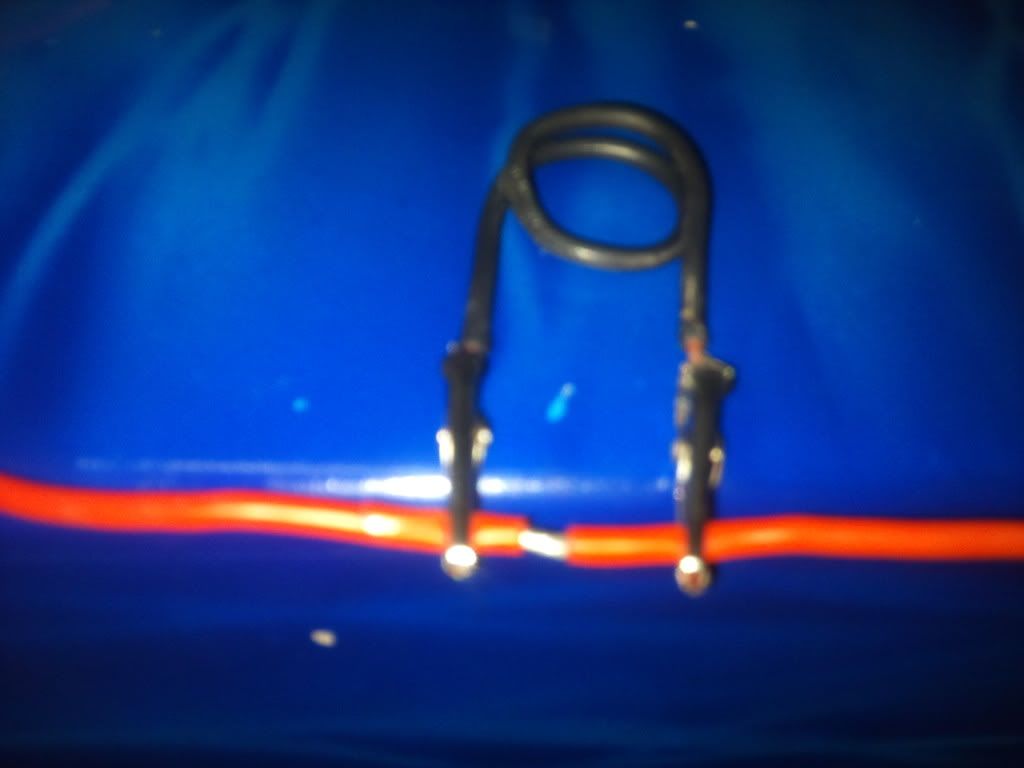
    As for where to cut the wire, it all depends on the location of the wire. With solder the wire will become very stiff at the joint. We also don’t want any stress on it so I would cut the wire at an area where there won’t be a bend and the wire would lay flat. See picture.

    [IMG][/IMG]
    [IMG][/IMG]
    [IMG][/IMG]
    These are examples of how much I cut off.


    First put on the heat shrink as far away from the solder join as possible (it is possible that you can heat the wire up enough that it will activate the heat shrink). I placed a larger heat shrink over both pin 2 and 4 for the grounds. Next connect the wires as shown below

    Coils:
    New 4 wire plug (Pin1) - Red/Green on s4 harness
    New 4 wire plug (Pin2) - Brown/Yellow Ground on s4 harness
    New 4 wire plug (Pin3) - brown w/(blue, green, grey,) stripe on s4 harness
    New 4 wire plug (Pin4) – Brown/Yellow Ground on s4 harness

    Here are some pictures of the process.
    Before shrink wrap
    [IMG][/IMG]


    I was surprised that cylinder 1 and cylinder 4 only had 3 wires each. For soldering those just connect pin 2 and 4 together and solder to the Brown and yellow wire. On all the other cylinders there are 4 wires. I ended up soldering both brown/yellow wires to pin 2 and 4 together in a bundle. (Not sure if you can solder brown/yellow to pin 2 and the other to pin4 and keep them separate.)
    Example of the two ground wires soldered together.
    [IMG][/IMG]

    Once soldered place the heat shrink over the solder and shrink it using the heat gun taking care not to heat up other components in your engine bay.

    [IMG][/IMG]

    Repeat this for the other 5 coils.
    Double check your wiring
    Check it again!
    Now start your car and profit!!!!
    If you have any problems then there is probably a problem with connections or wiring is backwards.
    Once done pat yourself on the back but you’re not quite done!

    ######################### MAKING IT CLEAN ###################################

    So I recommend heat shrinking all the connections and wires that you just added. This will protect everything from the high heat as well as make it look stock.
    I will include diameter of the heat shrink I currently don’t have it.
    I reused the boots from my old terminals.
    I had to take the connector apart and pull all the pins out. (I ended up modifying a paperclip to push down the tab. (I will expand on this)
    Once all the pins are out of the connector slide over the heat shrink and then the boot.
    Put the pins back into the appropriate holes.
    The reason for the other heat shrink was I had to cut the boot to fit the pins into the boot. I then placed the heat shrink over the boot. The heat shrink that I use has adhesive that melts when heated and seals the connection.
    This is what the final product will look like:
    [IMG][/IMG]


    Now you can pat yourself on the back!! Congrats you did it!!
    I’m still expanding on this DIY and I will continue to update it with corrections.

    Questions/Comments
    Let me know if you have any suggestions or comments. I hope this helps and answers some questions people have.

    If anything is wrong let me know! I don't want to spread misinformation
    Last edited by xmoox; 09-10-2013 at 08:50 PM.
    Moo
    Come join us in Audizine chat
    http://www.gamesurge.net/chat
    then type /join #audizine

  2. #2
    Veteran Member Three Rings
    Join Date
    Feb 21 2011
    AZ Member #
    71259
    Location
    WA

    Thanks for putting this together. I would also use the HFT heat shrink for the exposed solder points due to the price point but I'd finish up with a good self-sealing silicone tape for a really clean finish.

  3. #3
    Senior Member Two Rings xmoox's Avatar
    Join Date
    Aug 11 2008
    AZ Member #
    31860
    My Garage
    2000 audi s4
    Location
    Portland OR

    Quote Originally Posted by waB5S4 View Post
    Thanks for putting this together. I would also use the HFT heat shrink for the exposed solder points due to the price point but I'd finish up with a good self-sealing silicone tape for a really clean finish.
    I use none adhesive heat shrink on the solder joints then cover everything in adhesive heat shrink to seal it all up(is that what you meant). Ill be sure to make that more clear. Im at work atm so it will be a bit until I can edit it. Ive only finished one coil pack wire completely I still have to put the boots and everything on 5 more.

    If anything is wrong let me know! I dont want to spread misinformation
    Last edited by xmoox; 09-10-2013 at 08:52 PM.
    Moo
    Come join us in Audizine chat
    http://www.gamesurge.net/chat
    then type /join #audizine

  4. #4
    Veteran Member Four Rings rtl5009's Avatar
    Join Date
    Jul 28 2009
    AZ Member #
    45630
    Location
    Philadelphia PA

    awesome
    b5 s4 built bottom stg3 on E - Sold- Never felt happier
    c8 a6 allroad

  5. #5
    Veteran Member Four Rings topquarkpc's Avatar
    Join Date
    Aug 03 2009
    AZ Member #
    45871
    Location
    PNW

    There you go...!!!

    thank you!
    '01 Imola Yellow Avant Sport Package 6-Speed (stage 3 w/Frankenturbo F4H)

  6. #6
    Veteran Member Three Rings udcc11's Avatar
    Join Date
    Oct 17 2011
    AZ Member #
    82682
    Location
    west virginia

    Just out of curiosity, why didn't you cut the ICM leads shorter? Those leads seem excessively long.
    2000 Nogaro S4 Six-Speed Stage 3 Frankenturboed
    Totaled 2002 Santorin S4 Six-Speed Stage II+

  7. #7
    Veteran Member Four Rings getslideways's Avatar
    Join Date
    May 16 2008
    AZ Member #
    28851
    Location
    WA

    Thank you very much!

    In case you missed any pictures, feel free to drive up north and take them while you are doing my harness

    I'll provide the beer and painkillers for your back haha

  8. #8
    Veteran Member Three Rings Dr.d's Avatar
    Join Date
    Jun 20 2012
    AZ Member #
    95544
    My Garage
    2001 S4, 2024 Model 3
    Location
    Vancouver, WA

    nice work! i did the same thing last weekend. one thing i would suggest would be to "tin" the wires before hand. pretty much rather than twist them together, coat both wires with solder then join them together. that will give you the best solder joint possible. the way you did it is fine though and easier than the tinning method i described..

  9. #9
    Senior Member Two Rings xmoox's Avatar
    Join Date
    Aug 11 2008
    AZ Member #
    31860
    My Garage
    2000 audi s4
    Location
    Portland OR

    Thank you for the input!

    Quote Originally Posted by udcc11 View Post
    Just out of curiosity, why didn't you cut the ICM leads shorter? Those leads seem excessively long.
    You can and I probably will. I just was being lazy and didn't want to spend the time to cut wire sleeve. I was also thinking it would be good to keep it as far from the engine so the heat doesn't cause problems.


    Quote Originally Posted by getslideways View Post
    Thank you very much!
    In case you missed any pictures, feel free to drive up north and take them while you are doing my harness
    I'll provide the beer and painkillers for your back haha
    Haha thanks. I don't know if my back has any more installs in it lol unless you got Morphine! If you do need help though I can answer any of your questions, in my experience its relatively strait forward.


    Quote Originally Posted by Dr.d View Post
    nice work! i did the same thing last weekend. one thing i would suggest would be to "tin" the wires before hand. pretty much rather than twist them together, coat both wires with solder then join them together. that will give you the best solder joint possible. the way you did it is fine though and easier than the tinning method i described..
    Thanks that's a good suggestion. I thought about doing it that way but I didn't have an extra pair of hands.
    Moo
    Come join us in Audizine chat
    http://www.gamesurge.net/chat
    then type /join #audizine

  10. #10
    Veteran Member Three Rings Dr.d's Avatar
    Join Date
    Jun 20 2012
    AZ Member #
    95544
    My Garage
    2001 S4, 2024 Model 3
    Location
    Vancouver, WA

    Quote Originally Posted by xmoox View Post
    that's a good suggestion. I thought about doing it that way but I didn't have an extra pair of hands.

    funny that you say that. My dad actually invented a soldering vice on a gooseneck with a spring clamp to essentially give you an extra hand in situations like that. I used it to do my conversion and it made things A LOT easier. We're marketing it to a few specialty vice companies at the moment. If anyone's interested I can get you one.

  11. #11
    Veteran Member Four Rings getslideways's Avatar
    Join Date
    May 16 2008
    AZ Member #
    28851
    Location
    WA

    Quote Originally Posted by Dr.d View Post
    funny that you say that. My dad actually invented a soldering vice on a gooseneck with a spring clamp to essentially give you an extra hand in situations like that. I used it to do my conversion and it made things A LOT easier. We're marketing it to a few specialty vice companies at the moment. If anyone's interested I can get you one.
    Do you have a picture? Or can you PM me a price and info? Thanks!

  12. #12
    Veteran Member Four Rings infinkc's Avatar
    Join Date
    Feb 13 2004
    AZ Member #
    465
    Location
    S Ã C, CÃ*

    Looks great! I will add a link in my post to link your DIY.

    Its amazing how cheap you can put this all together now for. When i did it, it was more of a proof of concept to get rid of the ICMs.
    There are 10 kinds of people in this world, those who know binary and those who don't.

  13. #13
    Veteran Member Four Rings 8520's Avatar
    Join Date
    Feb 07 2008
    AZ Member #
    25012
    My Garage
    2011 F350 Diesel, 2006 Touareg V8, 2002 RS6 Avant project
    Location
    The boonies, near Seattle

    This is the way I did it 2 or so years ago, but I'm an a-hole and didn't post a write up.
    -dre

  14. #14
    Veteran Member Three Rings mightemouce's Avatar
    Join Date
    Mar 12 2007
    AZ Member #
    16346
    My Garage
    01 S4
    Location
    NY

    Quote Originally Posted by 8520 View Post
    This is the way I did it 2 or so years ago, but I'm an a-hole and didn't post a write up.
    Same here

    Props for putting this up !
    07 - RS4
    05.5 - 2.7t B7 -Sold
    Insta-Ste3v3_0

  15. #15
    Veteran Member Four Rings
    Join Date
    Nov 21 2012
    AZ Member #
    104451
    Location
    Ohio

    My wiring harness is so bad that the wires in it are extremely hard to solder to or together. I even have a mini torch I tried to use and even coated in flux the wires wont take any solder. This is the point in which you break down and buy a new engine harness (should be here by the end of the week) I'm surprised my car still runs. Damn 2.7t's and their heat.

  16. #16
    Veteran Member Four Rings Timtheguru's Avatar
    Join Date
    Dec 30 2009
    AZ Member #
    52711
    Location
    Seattle

    Quote Originally Posted by Dr.d View Post
    nice work! i did the same thing last weekend. one thing i would suggest would be to "tin" the wires before hand. pretty much rather than twist them together, coat both wires with solder then join them together. that will give you the best solder joint possible. the way you did it is fine though and easier than the tinning method i described..
    I don't think so, this will cause cold solder joints... you want a good mechanical connection first (twisting the wires together), then heat the wire for the solder to flow into the mechanical connection. Solder is not a substitute for a mechanical connection.

    Edit: Also, the only thing that should ever be tinned is the soldering tip to prevent it from oxidizing as they are typically made of iron and with that kind of heat oxidize easily.
    2001.5 S4 Sedan
    2002 A4 Avant 1.8t - Traded in
    2001.5 A4 1.8t - Sold for $5
    2013 Q7 TDI Premium Plus (RIP, rear ended and totaled, assholes)
    2013 Q7 TDI Prestige S-Line
    2018 Q5 2.0t
    2022 e-Tron Chronos Edition

  17. #17
    Senior Member Three Rings
    Join Date
    Jul 26 2008
    AZ Member #
    31287
    Location
    Brisbane, Australia

    Nice, many thanks.

  18. #18
    Veteran Member Four Rings getslideways's Avatar
    Join Date
    May 16 2008
    AZ Member #
    28851
    Location
    WA

    Here is also a quick, cheap, and easy tool for holding wires together made from solid house style electrical wire, and two alligator clips


    Similar idea for use on a workbench, when your project is a bit more portable:


  19. #19
    Active Member Four Rings britishturbo's Avatar
    Join Date
    Sep 18 2012
    AZ Member #
    100686
    Location
    State College PA

    Quote Originally Posted by getslideways View Post
    Here is also a quick, cheap, and easy tool for holding wires together made from solid house style electrical wire, and two alligator clips


    Similar idea for use on a workbench, when your project is a bit more portable:

    Haha coolest idea ever!

  20. #20
    Veteran Member Three Rings
    Join Date
    Feb 21 2011
    AZ Member #
    71259
    Location
    WA

    Quote Originally Posted by OHS4 View Post
    My wiring harness is so bad that the wires in it are extremely hard to solder to or together. I even have a mini torch I tried to use and even coated in flux the wires wont take any solder. This is the point in which you break down and buy a new engine harness (should be here by the end of the week) I'm surprised my car still runs. Damn 2.7t's and their heat.
    That's... odd.. I know you're already replacing the harness from your other thread but is the work area particularly dirty? FWIW, I'm considering buying a new harness just because mine is aged (wish I didn't miss the $400 batch Scotty had) but I can't imagine it being beyond repairs unless there are large severed sections.

  21. #21
    Veteran Member Four Rings
    Join Date
    Feb 07 2012
    AZ Member #
    87872
    Location
    CO

    My recommendation would be to do the ICMs last. That way if you need to check the icm connectors for the signal wire they aren't already spliced.

    I double checked all mine before I spliced the wires to ensure it was correct since they colors weren't very easy to distinguish.
    2002 Silver S4 Avant 6MT Stage 3 - SOLD
    2012 Dark Flint Metallic Touareg TDI Exec - FOR SALE
    2010 Sapphire Blue Pearl Touareg TDI Lux Limited

  22. #22
    Senior Member Two Rings GSXeclipsePSI's Avatar
    Join Date
    May 09 2012
    AZ Member #
    93305
    My Garage
    2000 A6 2.7t
    Location
    Hudson, FL

    To anyone on the nefmoto.com site, and has done the coil conversion can you take a look at my post on nefmoto?

    I'm trying to make sure I input the 2.0T coil dwell changes in my tune correctly. I'm double checking cause yes I bought used coils, but I blew one the 1st high boost run from 1st gear and IDK if it was a grounding issue with it or the settings in the file. I have 7 coils, so I put in my spare and car runs fine on stock coil settings of course. I just wanted to make proper changes and to see if the settings might have helped blow out the coil. The coils were from a friend, he said about 30k on the coils. They are Bremi 077 "H".... Reason I say grounding is cause of the double wire grounds on all but cylinders the front 2 on each bank. The coil that blew out was also my last one I wired in, maybe I got a little excited. When the magnetic field collapsed to fire coil and maybe the extra ground didn't make contact so well this could blow a coil.... idk someone more into ignition electronics could tell me.


    I'm AudiMan85 on there:
    http://nefariousmotorsports.com/foru...p?topic=6381.0

  23. #23
    Established Member Two Rings verstappen's Avatar
    Join Date
    May 05 2014
    AZ Member #
    210973
    My Garage
    B5 S4, B6 S4, B8.5 A4, 11 Audi Q5
    Location
    Phoenix

    Quote Originally Posted by GSXeclipsePSI View Post
    To anyone on the nefmoto.com site, and has done the coil conversion can you take a look at my post on nefmoto?

    I'm trying to make sure I input the 2.0T coil dwell changes in my tune correctly. I'm double checking cause yes I bought used coils, but I blew one the 1st high boost run from 1st gear and IDK if it was a grounding issue with it or the settings in the file. I have 7 coils, so I put in my spare and car runs fine on stock coil settings of course. I just wanted to make proper changes and to see if the settings might have helped blow out the coil. The coils were from a friend, he said about 30k on the coils. They are Bremi 077 "H".... Reason I say grounding is cause of the double wire grounds on all but cylinders the front 2 on each bank. The coil that blew out was also my last one I wired in, maybe I got a little excited. When the magnetic field collapsed to fire coil and maybe the extra ground didn't make contact so well this could blow a coil.... idk someone more into ignition electronics could tell me.


    I'm AudiMan85 on there:
    http://nefariousmotorsports.com/foru...p?topic=6381.0
    I don't think a bad ground or bad connection would have blown your coil, though you probably figured out by now. One thing someone posted in a different forum is that the grounds shouldn't be bridged, but I did it before I saw that comment, my car seems to be running great after the conversion but we will see.

    On a different note, I see you mentioned nefmoto, what are you using to tune your car? I had maestro 7 in my GTI which I sold and I am saving to buy it again, unless of course I find a cheaper alternative.

  24. #24
    Established Member Two Rings T.pops's Avatar
    Join Date
    Mar 06 2014
    AZ Member #
    151905
    My Garage
    2001.5 pearl S4
    Location
    north east ohio

    So just curious but what is the random pin 2 brown wire that isn't used? Thinking about doing a conversion. Just did the valve cover gasket and one coil was bad. Did all the plugs as well. But i felt a miss last night during a full load run. So its a guess but probably coils... yay also is there any big benefits from this conversion other than no bolts on the coils and icm delete? Thanks

  25. #25
    Senior Member Two Rings GSXeclipsePSI's Avatar
    Join Date
    May 09 2012
    AZ Member #
    93305
    My Garage
    2000 A6 2.7t
    Location
    Hudson, FL

    Tunerpro but I gave way to figuring out how to fine tune and asked for help.

    My problem was my coil repair pigtails from online where alittle skimp of wire inside the pins. I had to redo a few. Some dielectric grease and codes are gone.

  26. #26
    Veteran Member Three Rings e30mclow's Avatar
    Join Date
    Feb 08 2015
    AZ Member #
    314258
    Location
    An Irishman living in Canada

    Followed this guide yesterday, and it worked out as described.

    I'd recommend practicing soldering if you're not used to it. Space is pretty tight, so you only really get one chance on certain coils.

    The repair plugs used to piece the kit together are extremely fragile/brittle. Don't pop them onto the coils when you're playing around before soldering them up, you will break them taking them off - I broke 3 unfortunately, despite being very careful.

    I took off the y-pipe for better access.
    Also, I had initially ordered the Toureg adapters, but they're really not suitable given their shape/thickness.

    I caved an used the 034 spacers.

    Thanks very much for the write up, greatly appreciated!

  27. #27
    Veteran Member Four Rings Tjtalan's Avatar
    Join Date
    Jul 19 2014
    AZ Member #
    265689
    Location
    Tulsa

    Great write up, Daz hooked me up with his kit. I couldn't even believe the price. Anybody thats thinking about doing this you need to look here first.

    http://vagautowerks.com/

  28. #28
    Senior Member Two Rings GSXeclipsePSI's Avatar
    Join Date
    May 09 2012
    AZ Member #
    93305
    My Garage
    2000 A6 2.7t
    Location
    Hudson, FL

    That's a great price for what you get. I was looking at building plug and play harnesses but I don't have the funds to build more then 3 for a 1.8t or 2 for 2.7t and not have to order the parts when someone needs a kit. Wish had a investor I could do some nice kits. Plus a few places have some great prices on plug n play... and not 034...

    Sent from my SM-G900T using Tapatalk

  29. #29
    Veteran Member Three Rings e30mclow's Avatar
    Join Date
    Feb 08 2015
    AZ Member #
    314258
    Location
    An Irishman living in Canada

    A month down the road, and things have been going excellent until I started getting open circuit faults.

    I started a thread here

    It is likely an error of my own doing, but I figured if it can happen me, it could happen others.
    I'm currently re-doing my solders in an attempt to eliminate the codes/misfires.

    I'll update the other thread with my experiences.

  30. #30
    Established Member Two Rings stevesS4's Avatar
    Join Date
    Jan 06 2012
    AZ Member #
    86295
    Location
    FL

    Quote Originally Posted by Tjtalan View Post
    Great write up, Daz hooked me up with his kit. I couldn't even believe the price. Anybody thats thinking about doing this you need to look here first.

    http://vagautowerks.com/
    I wouldn't bother with soldering if that kit is any good at that price. Is there anybody around running their car with this kit? I wonder how it compares to the 034 kit, which I just read in another thread has an error and can cause electrical interference. It's far cheaper than the ECS kit and just a little cheaper than the 034 kit since that's just been reduced in price.

  31. #31
    Veteran Member Four Rings Zba's Avatar
    Join Date
    Nov 05 2009
    AZ Member #
    50303
    Location
    Denver

    That kit still requires splicing. Whether you solder or crimp is up to you.

  32. #32
    Established Member Two Rings stevesS4's Avatar
    Join Date
    Jan 06 2012
    AZ Member #
    86295
    Location
    FL

    Ah ok I wasn't really paying attention to the details on that one. Also the 034 kit doesn't include the coils or plugs at the $295 I just saw, so I guess the two aren't that close in price. I've been thinking about doing the coil conversion for a long time but leaning towards a plug and play kit since every time I work on the car I break some old brittle wire. I feel like I might create a lot of new issues fiddling with them. I'll sit on the idea for a long while longer I'm sure, this thread is already almost 2 years old.

  33. #33
    Veteran Member Three Rings okkim's Avatar
    Join Date
    Dec 07 2004
    AZ Member #
    4397
    Location
    Finland

    The grounds should not be connected together (pins 2 and 4 ). It will work if they are together, but it isn't working as intended. The power ground should be grounded to the intake manifold where the wiring harness grounding point is, and the TTL ground to the original ground wire which goes to the coils. Those are separated for a reason in TFSI engines, and that is a electrical interference. It can sound stupid that the grounds need to be in different places, but it helps to avoid high frequency interferencing signals.

    I have tested both ways, and ME7 logger had a lots of errors with both grounds wired together, but after I changed the wires correctly, I had no errors and the logging didn't get interrupted! Also my friend noticed the same.

    Unfortunately there are so many guides on the Internet that have this same error.

  34. #34
    Veteran Member Three Rings e30mclow's Avatar
    Join Date
    Feb 08 2015
    AZ Member #
    314258
    Location
    An Irishman living in Canada

    To those considering carrying out this method of conversion, please read this thread here - http://www.audizine.com/forum/showth...oil-Swap/page2

    As per my post above, I was having open circuit and misfire faults resulting in poor running condition.
    The issue was eventually solved via grounding each pin# 2 brown wire to the cam cover, rather than linking back into the original wiring harness.

  35. #35
    Veteran Member Four Rings Zba's Avatar
    Join Date
    Nov 05 2009
    AZ Member #
    50303
    Location
    Denver

    Quote Originally Posted by e30mclow View Post
    To those considering carrying out this method of conversion, please read this thread here - http://www.audizine.com/forum/showth...oil-Swap/page2

    As per my post above, I was having open circuit and misfire faults resulting in poor running condition.
    The issue was eventually solved via grounding each pin# 2 brown wire to the cam cover, rather than linking back into the original wiring harness.
    Refresh my memory, You were having misfires as well?

  36. #36
    Veteran Member Three Rings e30mclow's Avatar
    Join Date
    Feb 08 2015
    AZ Member #
    314258
    Location
    An Irishman living in Canada

    Quote Originally Posted by Zba View Post
    Refresh my memory, You were having misfires as well?
    Yes I was.
    Upon doing exactly what this DIY outlined, I was getting the codes noted within my sideline thread.

    Once I looped pin 2 to the heads, I have since had zero issues.
    I don't know the reasons for that, but all I know is that I've had no misfires in the last 2-3 months.

  37. #37
    Veteran Member Four Rings Zba's Avatar
    Join Date
    Nov 05 2009
    AZ Member #
    50303
    Location
    Denver

    So I did this on Sunday, except I did the grounds to each ground pin, so pin 2 has it's own ground wire and pin 4 has it's own ground wire. Forget for a moment that a couple of the cylinders only have one ground wire. I used new RS6, 1.8T coils from an eBay seller (more on that later). As soon as I started it up I had a dead miss on cylinder 3. I had power, ground on both pins and signal but still had a miss and an open circuit fault. I bunched all of the ground wires together, fired it up and had it was good to go.

    Or so I thought. I go drive it and as soon as I boost I blew out two of my brand new coil packs. Great. I find used ones locally, install them and drive again. As soon as I boost I get more misfires. I blew out my remaining 4 brand new coil packs. Now I am only 2 miles from my house so I limp it home and inspect all of the coils. Every single coil pack has carbon tracking on them aside from the used ones I just put in. I'm working on a refund now but I was so fucking pissed. That's what I get for going for the cheapest "OE" coils I could find. They are either older than dirt or really good knock offs.

    I borrowed some FSI coils form a friend of mine, boost it, no problems whatsoever. Again, or so I thought.

    Now I'm getting the damn CEL with open circuit faults but no misfires. I'm debating whether or not I want to just group the grounds together or supply an external ground for pin 2. I just want my car running well with no CEL.

    Now please excuse me, I'm going to go put my head in a vice.
    Last edited by Zba; 11-05-2015 at 02:57 PM.

  38. #38
    Veteran Member Three Rings e30mclow's Avatar
    Join Date
    Feb 08 2015
    AZ Member #
    314258
    Location
    An Irishman living in Canada

    Doesn't sound too unlike my experiences, except I didn't manage to burn out coils.

    It was fine, but when boosting it would misfire. I gapped the new plugs a dozen times, and ultimately pulled out the wallet on some side fire plugs - boost misfires gone.
    After this, I was still getting open circuit faults on 3 of the 6 cylinders.

    After I took the pin 2 grounds to the heads I've experienced no issues.

    I used the perhaps now outdated coilpacks used in the above tutorial.

    Better coil options are now available.

  39. #39
    Veteran Member Three Rings killerkali's Avatar
    Join Date
    Jan 01 2011
    AZ Member #
    68913
    Location
    Nor cal

    make sure you have your ignition dwell lowered for the 2.0t coils, can attribute to burning them out quicker

  40. #40
    Veteran Member Four Rings Zba's Avatar
    Join Date
    Nov 05 2009
    AZ Member #
    50303
    Location
    Denver

    Quote Originally Posted by killerkali View Post
    make sure you have your ignition dwell lowered for the 2.0t coils, can attribute to burning them out quicker
    This has nothing to do with them burning out due to this dwell baloney. It is one hundred percent eBay shit, the price I pay for trying to cheap out on the bane of every S4 owners existence: misfires.

    The lower tube (for lack of a better term) is cracked, not the upper primary or secondary part.

    Lesson learned: Go OE from your local dealership on this stuff.

Bookmarks

Posting Permissions

  • You may not post new threads
  • You may not post replies
  • You may not post attachments
  • You may not edit your posts
  •  


    © 2001-2025 Audizine, Audizine.com, and Driverzines.com
    Audizine is an independently owned and operated automotive enthusiast community and news website.
    Audi and the Audi logo(s) are copyright/trademark Audi AG. Audizine is not endorsed by or affiliated with Audi AG.