Audizine - An Automotive Enthusiast Community

Page 1 of 2 12 LastLast
Results 1 to 40 of 52
  1. #1
    Established Member Two Rings RastAudiA4's Avatar
    Join Date
    Aug 26 2014
    AZ Member #
    277952
    Location
    United States

    Cool That Other Guy With A Brilliant Yellow B5: The Banana - BT Build & Story PICS WORK!!!

    Guest-only advertisement. Register or Log In now!

    SPOILER ALERT, HUGE SNAILS TAKING OVER


    It's about that time, finally I am worthy enough to create a build thread. My B5 is in the process now of being Holset powered and I've always wanted to have my BT build thread...however I won’t be talking about that in this post specifically though, this is just meant to be an intro piece…an intro to a brilliant story!

    I've been in the community for a while and this is my first Audi, a 2000 Brilliant Yellow B5. This build thread is not going to be like the normal or others, it's my story. I love my car and was always a dream to turn it into a track car, so it will take a few updates to get to the current juicy stuff, then hopefully I will have some help along the way to track status. I enjoy sharing about my banana (no pun intended lol) SOOO in other words, this will be full of detail and lots pictures and TLDRs, not about just the build but my process...this is not for someone who wants to have a boner in the first post lol, but for someone to drink a beer (or a glass of Glenlivet 18year whiskey as I) and have a good read. Also, I'm making this so that when the car is said and gone, hopefully i can come back to Audizine in the future and reminisce about the banana.
    Aaannnd here we are (see I told you TLDRs lol), which all takes place around 2012-2013 and will update and progress forth on; here is part 1 of the brilliant journey…lol…

    Alas, here is my beloved banana, it is a 2000 b5 Audi A4 1.8t with a very rare brilliant yellow (LY1B) factory color option. I can say it's rare because out of the 5 active Audi forums I am a member of I can only count a few brilliant yellows and have never seen another in person.


    I was very lucky to find her. The Audi b5 era whether a4/s4 was my childhood dream car that was realistic, I just thought they were beautiful cars that still had those cutting-edge body lines from front to back and had a modern and older look all in one. With that being said, I searched craigslist day after day, took me 2 years to even come across a b5, the first was silver and didn't work out, then I met her, the brightest crayon in the box. Trust me the yellow was distasteful at first, but like any relationship, it grew and grew, I just had to have it…

    I purchased her for ~3 grand off someone who was in over their head and just wanted it gone, she was rough and was in need of LOTS of TLC, pretty much limped her home but the engine and tranny was solid, I knew I had my work cut out for me.


    THE DAY I LIMPED HER HOME


    When I bought her, she was like a time machine with some of the rarest mods no longer available today, not including the paint. The interior was sort of immaculate with just a rip in the driver seat, notorious for b5s. The owner had put this gorgeous bronze carbon fiber interior trim from lltek that made the black leather interior just pop. It had old school Nuespeed exhaust that I can't even locate today, HR coils, and some euro spec side skirts and front bumper. Last but not least, she came with super rare Gotti G67 3-piece wheels, the cherry on the top. Again but even more serious...it was like someone spent a lot of money on her and put her in a garage for 14 years only to emerge with some of the rarest items.


    But as she was, holy hell did she need some TLC, she was neglected for a while and it was obvious, the turbo plumbing was all mixed up, codes galore, beeping, yelling and crying as much as she could, the first time I scanned for codes I pulled 27, lol it was a nightmare. But I loved the car, so it made me want to take my time and effort to try my best to make her whole again.


    ARE WE ROLLIN COAL?


    THATS WATER POOLING WTF? 0_O


    After about a year of owning I managed to clear all codes, fix all fluid and air leaks, I had no idea of any maintenance she endured so I started from step one all belts, tensioners, and pumps, ac was trashed so removed it completely, brake fluid, fuel filter the whole 9 yards....


    The result was a beautiful car that was once again loved.


    Last edited by RastAudiA4; 09-15-2019 at 12:35 AM. Reason: PICS WORKING NOW

  2. #2
    Established Member Two Rings RastAudiA4's Avatar
    Join Date
    Aug 26 2014
    AZ Member #
    277952
    Location
    United States

    After the maintenance cloud cleared over my head, I started modding. I learned a lot in the maintenance stage for the vehicle, that’s when I became very attached to Audizine. I studied the car and can almost point out every electrical plug, part, nook and cranny in the engine bay. At this time, the car already had a K04 strapped to it from purchase, so I wanted to utilize the power. And as most of you know those turbos do pack a nice punch, but they leave you hanging when we need power up top. I wanted to be cheap and test the power band so I decided to purchase the turbo XS manifold.

    XS power manifiold, you can find that thread here:
    https://www.audizine.com/forum/showt...-Flange-Turbos Look for the banana lol


    Along with that came the tt225 injectors, (blue ones) and lots of clean up. I tried to tuck most I could, emissions, any kind of boost aids (N75 etc)..put it this way the only connections plugged in where the essentials, AC removed, and ABS remained. Eventually I want to relocate the battery, ABS, reservoirs…After that went ahead and added the braided SS coolant and oil lines for the turbo. This wasn’t’ too hard to do and added that bling effect to the engine bay.


    As for the wire tuck, I never cut anything from the original harness but instead tucked them all under the secondary firewall, or along side it and used resistors when needed. Eventually this will be done even better and once the battery is relocated, as some of you may have seen already, the ABS, and PS res will house there along with the entire engine harness routed through.


    deletion of nonsense from the engine bay. (thanks to walky talky's posts).

    Deleted/relocated
    All the solenoids under the intake manifold, (forgot what was there)
    N75, SAI, all emissions, block breather dumped to the ground by the tranny, added a MBC in place, routed the O2 wiring under and along the firewall as well. Cut the ignition harness and cleaned that up as well. Went to the junkyard and found a really clean harness and spliced it to mine and bought the ecs coil plate to go along with the 2.0 coils


    The tune was already there so I just had to add the supporting mods. To be honest, that cheap ass manifold did the trick. After installing, the K04 had power up top, not more, but think of it being consistent. After 4k that little turbo kept at 20lbs until redline each gear.


    Added some cool factor, oil gauge, boost turbo timer things like that


    Last edited by RastAudiA4; 09-15-2019 at 12:11 AM.

  3. #3
    Established Member Two Rings RastAudiA4's Avatar
    Join Date
    Aug 26 2014
    AZ Member #
    277952
    Location
    United States

    After I was sort of satisfied with the engine bay, I turned to some other key items…The Gotti’s cracked so ended up making $ on that, and settled for some cheap wheels that sort of had a nice OEM look to it.


    The Offset was 55+…so of course needed spacers, I think they were HR 30mm in the rear…the front just barely fit


    here is a quick list in its previous state

    ENGINE
    Partial wire tuck
    2.0 coils with ECS plate
    Ngk bkr7e gapped at .30
    Replaced trash coil wires
    K04-15 turbo with SS lines -6 coolant feed, -4 oil feed, and kept the original drain lines
    XS PowerTubular turbo mani
    ~18psi tune, peaks ~22psi all the way to red
    Stainless steel braided turbo oil/coolant supply lines
    034 test pipe to straight pipe to Nuespeed muffler
    Jhm short throw with linkage and bushings
    Forge SPLITR hybrid DV
    Upgraded Samco inlet pipe
    FMIC

    INTERIOR
    apexi boost gauge
    oil pressure gauge idk brand
    Lltek interior piece trim
    S4 mats

    EXTERIOR
    Euro spec lltek front bumper
    Euro spec lltek skirts
    One piece yellow marker headlights

    SUSPENSION
    FCP euro lower control arms
    FCP euro sway bar links
    S4 control arms upper
    S4 tie rod ends
    nuespeed sway bar
    Now sitting on RH wheels +55 offset ---> (DAYUM)
    H&R 30mm spacers rear
    H&R sport red coilovers
    034 street mounts


    Should be about it as far as money spent from around 2013-16...Which brings use to basically the next chapter ORDERING BIG TURBO PARTS!!….coming soon, aka when I’m up at 2am and nothing to do..

    Next update i'll list the parts ordered and my plan for going BT
    Last edited by RastAudiA4; 09-15-2019 at 12:31 AM.

  4. #4
    Active Member Two Rings
    Join Date
    Feb 26 2016
    AZ Member #
    369420
    Location
    Cincinnati,OH.

    Pics are not loading.

  5. #5
    Established Member Two Rings RastAudiA4's Avatar
    Join Date
    Aug 26 2014
    AZ Member #
    277952
    Location
    United States

    awww what I can see them, ugh sorry guys let me find out why..........ugh

  6. #6
    Veteran Member Four Rings A1 A2 German's Avatar
    Join Date
    Feb 28 2005
    AZ Member #
    5519
    My Garage
    Audi A4 B5, Audi Fox, Audi AMLS TT, GS450, CB175, CL175
    Location
    Tempe

    1) No pickies work except pic #1
    2) Glad to see this wasn't a ~2010 thread bumped 9 years later
    3) Shameless plug, have some killer ~delete/engine tighty kits in the B5 classifieds.

    - ABS can fit in thee most passenger side space within the battery tray and still connect to the OEM abs harness.
    - You'll have plenty of room to place a p/s reservior there too
    - Cutting out the donut humb in your spare tire well and install/weld in a plate which produces a large space for your battery......or 8.....tons of space.
    - #1 tip is after the battery reroute, you cut a ~6" x ~6" square hole to the left of the heater hoses where the battery used to sit.....and drop 100% all fuel lines, harnesses, connectors, ~4G battery cable now coming from the trunk, down the rabbit hole which bring everything down by the bellhousing to the back of the head where everything can fan out. When you cut said square, touch up edges with paint and press on automotive rubber trim onto the lip(s)...clean oem look, protects the fresh cut metal more, and shields wiring loom from laying on cut metal.
    - #Walkawayfromcatchcans No doubt a catch can eclipses the pvc system in aesthetics and simplicity....yet delete the catch can too by doing a scavenger system.

  7. #7
    Established Member Two Rings RastAudiA4's Avatar
    Join Date
    Aug 26 2014
    AZ Member #
    277952
    Location
    United States

    Images keep breaking when using Google photos bear with me I will update with another hosting service....literally spent all day going through photos for them not to work lol...
    Last edited by RastAudiA4; 09-14-2019 at 11:15 PM.

  8. #8
    Established Member Two Rings RastAudiA4's Avatar
    Join Date
    Aug 26 2014
    AZ Member #
    277952
    Location
    United States

    Images are now updated!! And working!!! Thanks for stopping everyone, hope to get a big crowd, stay tuned for an update this coming week on the turbo of choice and new pats list


    Quote Originally Posted by A1 A2 German View Post
    1) No pickies work except pic #1
    2) Glad to see this wasn't a ~2010 thread bumped 9 years later
    3) Shameless plug, have some killer ~delete/engine tighty kits in the B5 classifieds.

    - ABS can fit in thee most passenger side space within the battery tray and still connect to the OEM abs harness.
    - You'll have plenty of room to place a p/s reservior there too
    - Cutting out the donut humb in your spare tire well and install/weld in a plate which produces a large space for your battery......or 8.....tons of space.
    - #1 tip is after the battery reroute, you cut a ~6" x ~6" square hole to the left of the heater hoses where the battery used to sit.....and drop 100% all fuel lines, harnesses, connectors, ~4G battery cable now coming from the trunk, down the rabbit hole which bring everything down by the bellhousing to the back of the head where everything can fan out. When you cut said square, touch up edges with paint and press on automotive rubber trim onto the lip(s)...clean oem look, protects the fresh cut metal more, and shields wiring loom from laying on cut metal.
    - #Walkawayfromcatchcans No doubt a catch can eclipses the pvc system in aesthetics and simplicity....yet delete the catch can too by doing a scavenger system.
    Pics working for you now?
    6"x 6" square, got it, did you just use a distribution block up front for the positive to travel to the rear? Next project will be to move the battery to the back...I can't wait to rid the harness even more out of sight....
    has anyone had any luck reusing the old abs lines? and when moving the PS res...does the length of fluid travel on the hoses going to the PS res matter?
    And yes lol, didn't mean to ghost you on the accessory deletes lol i ran out of money , definitely something i was very interested in though, I love the clean look from it


    SPOILER ALERT: TURBO MANIFOLD HAS TWO WEIRD HOLES!!!
    Last edited by RastAudiA4; 09-15-2019 at 01:08 AM.

  9. #9
    Veteran Member Four Rings xdewaynex's Avatar
    Join Date
    May 24 2009
    AZ Member #
    42854
    My Garage
    98.5 A4 1.8TQM
    Location
    Danville, KY

    Nice to see another Brilliant Yellow owner active on the boards. Your paint looks so much better than and makes me jealous. Hoping to have rest of my engine built, standalone ecu and holset installed next year on mine.
    1998.5 A4 1.8TQM My Build

  10. #10
    Veteran Member Four Rings Blazius's Avatar
    Join Date
    Mar 15 2018
    AZ Member #
    415568
    Location
    Europe

    there was no need to remove ABS , with that you lost all traction and safety features with motronic including ABS, vehicle wheel speed detection, ESP , and EDL.

    Nice build though.

  11. #11
    Established Member Two Rings RastAudiA4's Avatar
    Join Date
    Aug 26 2014
    AZ Member #
    277952
    Location
    United States

    Quote Originally Posted by Blazius View Post
    there was no need to remove ABS , with that you lost all traction and safety features with motronic including ABS, vehicle wheel speed detection, ESP , and EDL.

    Nice build though.
    Good to know, I won't be removing it though, come across too many horror stories in relation to what you just mentioned. I just want to relocate it where the battery is.

    And thanks! Plenty more to come

    Quote Originally Posted by xdewaynex View Post
    Nice to see another Brilliant Yellow owner active on the boards. Your paint looks so much better than and makes me jealous. Hoping to have rest of my engine built, standalone ecu and holset installed next year on mine.
    Good to be out in the open finally! I've been following your build thread also, got some good info from it i might add, and man i still want to respray the thing, but everyone is afraid to touch it in my parks...

  12. #12
    Veteran Member Four Rings A1 A2 German's Avatar
    Join Date
    Feb 28 2005
    AZ Member #
    5519
    My Garage
    Audi A4 B5, Audi Fox, Audi AMLS TT, GS450, CB175, CL175
    Location
    Tempe

    I wasn't even aware I had spoken to you .

    You can not reuse your abs lines, aswell will not be too length anyways, you'll need 6 total. 2 to go from master cylinder to abs module (easy), 2 to go to front calipers via the rabbit hole, another 2 down the rabbit hole meet up with and tie into the rears under the drivers frame rail oem brake lines, to feed the rears. Do NOT toss your OEM lines as the hydraulic shop needs your flare nuts off the old lines to place onto the new lines. I used coat hangers to determine length from the abs's final resting place.

    Placing the p/s reservior in the battery tray will not effect the hydraulics. Your electrical cluster under the cosmetic plastic p/s reservior cover will move under your drivers headlight. This is the setup I used, upgraded to an aluminum res, and mounted a real cooler (as dink dink OEM one goes in trash). Aluminum reservoir mounted to left of brake booster after heater hose delete, hoses through rabbit hole, cooler was mount under the battery tray next to steering rack:


    You'll need two tees for battery relocate, one to supply the fuse terminal block, the other to split the power left and right for starter & alternator.

    - Yellow is OEM path, all tossed in trash, you can pull the OEM ~8g wire that feeds the terminal block through the firewall grommet and toss. I tossed as increased it's size from the dinky 8G, my wire is now ~6" long opposed to 4' long as the tee is mounted on the aluminum dash support.
    - Green is new path with blue tees.

    Last edited by A1 A2 German; 09-15-2019 at 04:20 PM.

  13. #13
    Veteran Member Four Rings
    Join Date
    Jun 08 2014
    AZ Member #
    250808
    Location
    Vancouver, Washington

    Man I almost flipped my table when I saw those silver wheels! At first glance I thought you had TSW Imolas which I had on my old S4. Still bitter the guy did me dirty and didn’t give them back


    Sent from my iPhone using Tapatalk

  14. #14
    Veteran Member Four Rings xdewaynex's Avatar
    Join Date
    May 24 2009
    AZ Member #
    42854
    My Garage
    98.5 A4 1.8TQM
    Location
    Danville, KY

    Quote Originally Posted by RastAudiA4 View Post

    Good to be out in the open finally! I've been following your build thread also, got some good info from it i might add, and man i still want to respray the thing, but everyone is afraid to touch it in my parks...
    Hopefully not having pics in most of the thread didnt throw you off. Photobucket ruined a lot when they stopped hosting for free. Ive still got quite a bit to do before my engine is done, then I still need to do an abs delete (mine has never worked in the 10yrs of owning the car) Paint will probably be the last thing I do honestly. I talked to one body shop and they talked about how much paint it was going to take (yellow is so opaque, that its going to take a lot of coats and clear to not fade like it has)
    1998.5 A4 1.8TQM My Build

  15. #15
    Established Member Two Rings RastAudiA4's Avatar
    Join Date
    Aug 26 2014
    AZ Member #
    277952
    Location
    United States

    Selling and getting the B5 back and BT dreams

    Finally got some time to update this...

    So basically from where we I left off with the K04 and the xspower manifold it stayed like that for the time i had it.

    .


    Me parking in spots on purpose at work so i can play where's waldo with my car at work lol


    My days are mostly spent playing IT systems administrator for my company, back then when I had the b5 I was traveling often driving 6+ hours every week to a new location for project I was on, and then when i had time to go home it all depended on where i was in the state. I daily'd the b5 at the time and she faithfully carried me like a captain's seasoned ship that hadn't seen land in years. Long story short I was now making more money, got greedy,(and in my offense was time to grow up, that and the car had no AC and driving in the FL heat in a suit and tie gets to your head) and bought a BMW .


    Lol it was a 2006 550i 4.8L v8, fun little thing, and 6 speed. I was able to keep both cars as i wanted to completed my dream of slapping a fat turbo on it and tracking it...but I let go the b5 until 2019......
    Sold it to a good guy, someone i know that would have definitely cared for the car and felt very good overall about the sale. We spoke for maybe 2 or 3 months before the transaction. He took somewhat care of it cosmetically but he did a great job mechanically, even fixing somethings i couldn't get to at the time. Lol I kind of gave the story away a little bit but, oh well.

    I had a blast with the 550i and was a great car, grew me up a little bit, well not really because i put QTP cutouts on it lol...right after the headers! Was living the dream, quiet when i want and trolled mustangs when bored lol...


    After that my girlfriend at the time totaled the 550i unfortunately...however it was my fault, i let her drive the car and was attempting to teach her to drive stick in it, I bought it with a decent warranty so why not......yeah right

    ended up smacking a curb at a decent speed coming in to my neighborhood, and damaging the A frame on the cross member or something like that, insurance totaled it....Till this day i still see the missing concrete out of the curb lol. She is now long gone!

    After that i bought an e60 M5 and a Z3 as my daily since that 5.0L v10 cost me 200$ a week in gas, ended up putting full bolt ons on it so its like 8mpg untuned lol but thats another story!


    After the dust settles and im approaching in 2019, I get a phone call from a familiar contact, it's the gentleman whom I sold the car to in 2016! Glad we kept in contact; over the years I'd follow up in his adventures with the B5 to see how it's doing, and i tried to help as much as i could when she yelled at the new owner. Well he called to offer the vehicle back to fund a jeep he had wanted.

    So alas, the B5 was again back in my possession and I could tell it had been a long couple of years. The body didn't last, the fancy sideskirts were gone, the bumper all the goodies. The paint was now torn into by the FL heat, and the interior trim succumbed to the same fate. I was a little salty about it but i couldn't be, because when i popped the hood, I saw some key things that i was too lazy to do or didn't want to tackle had been done. SO i was thankful for that at the least.

    This now brings us to where I thrive to complete the dream I had before selling the car. I had done extensive research before and lots of forum browsing of others who went a similar route, so it was easy to get back into clicking that search button here on Audizine.

    I knew i wanted a Holset turbo because simply bang for buck can't beat 400$ for a brand new genuine holset, I knew i could net 400 - 500HP from the turbo and that was good enough. The gentleman who i sold the car to mainly used it for autocross, which is why the body had been ripped up. With that in mind I wanted to try it too and gave me the idea to focus this build on not just raw HP but i wanted it to spool quick.

    So i started the general research on what factors made a turbo spool faster, i started with the housing and sourced what holset housing might be small enough to spool and large enough to exhaust the air it pulls in, so the right ratio of a small housing and a big compressor, I chose an HX35W with a twin scroll 8cm2 hosing which is about a .55-.57 AR in that range with a 54mm compressor and a 57mm hot-side, 7 blade of course.


    After buying the turbo and now obsessed with the idea of this size turbo hitting boost at 3000-3500, I began to follow through with getting a custom twin scroll manifold created with dual waste gates

    SO in all the parts list now that will start this BT thread that have been already ordered
    Larger intercooler and S4 bumper
    HX35W with twin scroll housing
    Custom twin scroll manifold with twin waste-gates
    twin JGS precision waste-gates
    IE Rods Rifled and drilled
    630cc injectors
    RA4 Clutch kit with ECS LW flywheel
    I purchased the awm ECU for wideband along with the unitronic conversion
    sent the ECU to get a mafless tune started, plan on going stand alone here soon once i find out what to use
    034 bosch 044 drop in pump
    034 trans mounts and billet engine mounts
    Manifold has EGT bungs on each runner so i can monitor egts, I purchased this need little controller board to monitoring and data logging along with a 4 channel EGT amplifier. Nice little add from Reveltronics


    Alright that's all im doing tonight, right now most of these parts are on the car and ran into some hiccups, and had to order a few more fittings. So when those arrive i'll do another update of some issued i went through during install.

    Thanks for those of you interested!

  16. #16
    Veteran Member Four Rings xdewaynex's Avatar
    Join Date
    May 24 2009
    AZ Member #
    42854
    My Garage
    98.5 A4 1.8TQM
    Location
    Danville, KY

    Curious as to how the RA4 is going to handle the Holset, as that is the clutch that is currently on my car. Im expecting to swap the clutch once I finish my build and it starts slipping on the dyno.
    1998.5 A4 1.8TQM My Build

  17. #17
    Veteran Member Four Rings Blazius's Avatar
    Join Date
    Mar 15 2018
    AZ Member #
    415568
    Location
    Europe

    RA4 is fine, if you couple it with a B7 RS4 clutch( which are dirt cheap) , then you are set for any street car power.

  18. #18
    Established Member Two Rings RastAudiA4's Avatar
    Join Date
    Aug 26 2014
    AZ Member #
    277952
    Location
    United States

    Update

    Got a chance to update this, so far here's whats new on the build side, basically just playing Legos at this point...I chose to mount everything and start the car and get everything the way I want it in the engine bay, once done, gonna pull the engine put the clutch in and have the rods done, either that or source another bottom end and take my time with it because i never have time to wrench as much as I used to...

    Posted the parts list in earlier may or may not have missed something, but here are some more photos to throw in of the turbo goods


    Here comes the blood sweat and tears....
    By the way, that XS power manifold did what everyone else's did in the XSpower thread...broke clean at the weld for the flange at the neck bolting up to the turbo, I didn't put a brace so oh well...


    I Fought with old Xspower manifold and lets say I went to the extreme to win this battle...I don't know how the hell I installed in the first damn place, but man taking it off was impossible....I even hacked the !@# out of it to then finishing two studs that I couldn't reach to save my life....decided to weld new nuts on there and move on...


    After celebrating that win, started mounting the new manifold, which looks damn good...had this fully custom made, started test fitting all the other goods and planed for pipe routing of the down pipe and wastegate dumps, took some good pics, this was a very exciting moment being always drooling over other b5 setups, finally get to drool over my own setup


    After mounting the turbo and test fitting, found a few normal bs hiccups to figure out...One being the the HX35W i have has an internal wastegate housing, so it's a tad different in the way it mounts in order to accessorize the mounting brackets for the internal wastegate....so it being slightly different threw off the mounting and where i need to vband a downpipe has a corner tab of the valve cover in its way....


    Also need to clock the turbo just a tad, on first test fit the drain fitting was hitting a runner....


    Next few weekends I tackled the valve cover in the way of the downpipe issue, got lucky, there is a tab on the cover that looked like it can be shaved without interfering with the machined gasket surface, also picked up some SS flex pipe to mock up the routing of the wastegate dumps, that way I can drive it to a fab shop and have them recreate piping with similar shape to the flex, also went ahead and fully bolt the turbo mani, and installed the metal coolant flange on the back, and just wipe down a few grimy areas


    Which should update us to current, next post i'll try to get the oil feed and drain lines figured out, the downpipe figured out to see if my shaving did the trick, just need to hack that thing up too...gotta reroute the coolant line from the hardpipe back into the block, source fittings, crush washers etc, till next time! Thanks again for the interest, need all the motivation

  19. #19
    Veteran Member Three Rings ktsimp721's Avatar
    Join Date
    Feb 22 2018
    AZ Member #
    414497
    Location
    San Jose California

    Quote Originally Posted by RastAudiA4 View Post
    Got a chance to update this, so far here's whats new on the build side, basically just playing Legos at this point...I chose to mount everything and start the car and get everything the way I want it in the engine bay, once done, gonna pull the engine put the clutch in and have the rods done, either that or source another bottom end and take my time with it because i never have time to wrench as much as I used to...

    Posted the parts list in earlier may or may not have missed something, but here are some more photos to throw in of the turbo goods


    Here comes the blood sweat and tears....
    By the way, that XS power manifold did what everyone else's did in the XSpower thread...broke clean at the weld for the flange at the neck bolting up to the turbo, I didn't put a brace so oh well...


    I Fought with old Xspower manifold and lets say I went to the extreme to win this battle...I don't know how the hell I installed in the first damn place, but man taking it off was impossible....I even hacked the !@# out of it to then finishing two studs that I couldn't reach to save my life....decided to weld new nuts on there and move on...


    After celebrating that win, started mounting the new manifold, which looks damn good...had this fully custom made, started test fitting all the other goods and planed for pipe routing of the down pipe and wastegate dumps, took some good pics, this was a very exciting moment being always drooling over other b5 setups, finally get to drool over my own setup


    After mounting the turbo and test fitting, found a few normal bs hiccups to figure out...One being the the HX35W i have has an internal wastegate housing, so it's a tad different in the way it mounts in order to accessorize the mounting brackets for the internal wastegate....so it being slightly different threw off the mounting and where i need to vband a downpipe has a corner tab of the valve cover in its way....


    Also need to clock the turbo just a tad, on first test fit the drain fitting was hitting a runner....


    Next few weekends I tackled the valve cover in the way of the downpipe issue, got lucky, there is a tab on the cover that looked like it can be shaved without interfering with the machined gasket surface, also picked up some SS flex pipe to mock up the routing of the wastegate dumps, that way I can drive it to a fab shop and have them recreate piping with similar shape to the flex, also went ahead and fully bolt the turbo mani, and installed the metal coolant flange on the back, and just wipe down a few grimy areas


    Which should update us to current, next post i'll try to get the oil feed and drain lines figured out, the downpipe figured out to see if my shaving did the trick, just need to hack that thing up too...gotta reroute the coolant line from the hardpipe back into the block, source fittings, crush washers etc, till next time! Thanks again for the interest, need all the motivation
    I like how the manifold moves the turbo back a bit it’ll be less tight by that headlight later on hhehehe


    Sent from my iPhone using Audizine

  20. #20
    Veteran Member Four Rings xdewaynex's Avatar
    Join Date
    May 24 2009
    AZ Member #
    42854
    My Garage
    98.5 A4 1.8TQM
    Location
    Danville, KY

    Looks like its coming along pretty good. Im hoping to make some lead way on mine shortly.
    1998.5 A4 1.8TQM My Build

  21. #21
    Established Member Two Rings RastAudiA4's Avatar
    Join Date
    Aug 26 2014
    AZ Member #
    277952
    Location
    United States

    Quote Originally Posted by xdewaynex View Post
    Curious as to how the RA4 is going to handle the Holset, as that is the clutch that is currently on my car. Im expecting to swap the clutch once I finish my build and it starts slipping on the dyno.
    Do you have the RS4 version?

    Quote Originally Posted by Blazius View Post
    RA4 is fine, if you couple it with a B7 RS4 clutch( which are dirt cheap) , then you are set for any street car power.
    Good to know, because I did purchase the kit that is the RS4 version

    Quote Originally Posted by ktsimp721 View Post
    I like how the manifold moves the turbo back a bit it’ll be less tight by that headlight later on hhehehe
    I am in love with this manifold, hope fully it performs well, probably the most expensive part of this build

    Quote Originally Posted by xdewaynex View Post
    Looks like its coming along pretty good. Im hoping to make some lead way on mine shortly.
    Thanks! Takes much motivation to get this done with the hours i put in at work...so many times i want to give up...

  22. #22
    Veteran Member Four Rings xdewaynex's Avatar
    Join Date
    May 24 2009
    AZ Member #
    42854
    My Garage
    98.5 A4 1.8TQM
    Location
    Danville, KY

    The RA4 kit I bought was the S4 version, when I done the Frankenturbo swap back in 2011.
    1998.5 A4 1.8TQM My Build

  23. #23
    Established Member Two Rings RastAudiA4's Avatar
    Join Date
    Aug 26 2014
    AZ Member #
    277952
    Location
    United States

    Alright guys, got some more done and time to update...Lol over the past few weekends may have done some desperate jankyness but thats the best part about playing legos lol if it doesnt fit you make it!

    With that being said, I've gotten the oil feed and drain squared away...As with most who caution when using holstes, they'll tell you that our stock oil pump is way to powerful and we either run a restrictor or come up with some other idea to drain the oil quickly. Theres a chart here and on the DSM forums somewhere explaining where the oil pressure sweet spots are for the holset, so I also decided to come up with a way to watch the feed pressure as well. The stock suggested drain for a holset from factory was close to about 1in, so i decided to go with a -16an drain which is about 1in.


    From there I got the 034 drain flange thats -10, and addapted to -12, and to -16.


    Most run -6an feed, as so did the diesel boys, but considering our high pump pressure, I stayed with -4an feed and found a neat fitting that has a 1/8npt port so i can use a pressure gauge...


    The goal here is to start with the big -16 drain and the -4 feed and hope the pressure is where i want it and the big drain gets the oil out quick enough. Otherwise i'll add a restrictor and move from there.


    To deal with the coolant feed and drain from the K04, I just bought a -6an to barb fitting and going to plumb the coolant coming off the hardpipe back into the block


    I planned this out in my head and didn't really consider how large the -16 fittings are LOL


    So I played fabricator here and decided to get desperate. I was very careful around the snap ring lip and don't see an issue here, but im glad it fits and it looks good, put everything back with out an issue.


    (SNAP RING WAS A BITCH)


    Next I had to find a way to keep the internal wastegate shut as i have a HX35W model. I did not want to weld the gate as I think these housings are rare being 8cm2, so if i decided to sell it might bring some value. So i decided to head to Ace hardware and find something to make a bracket with.


    Went to town on it with my dremel and honestly it holds really tight, and looks good. I plan on ceramic coating the exhaust housing and will just hit it with some paint.


    Next need to order lines and fittings for my Wastegate plumbing, they are super close to the wastegate dump tubes so I will need to go SS AN lines to deal with the heat, going with -4 to to make this plumbing for twin wastegates


    While i was checking out and measuring lines, I decided to put some shielding over my fuel lines, might need to do a better job at it, but might end up making an fuel lines anyway to get them away from the heat


    That's it for now, thanks for anyone who actually reads this lol....as i said next update is -04AN SS wastegate plumbing with MBC in series and finding better heat shielding. After that its to a fab shop to finish the Downpipe and WG dumps, and then running all the wiring for the sensors using the UTCOMP PRO controller board, next we crank up and see how this base mafless file works


    Not sure why these came out so small res but here's pics of the oil lines, will post much better ones again apologies


  24. #24
    Veteran Member Three Rings ktsimp721's Avatar
    Join Date
    Feb 22 2018
    AZ Member #
    414497
    Location
    San Jose California

    That Other Guy With A Brilliant Yellow B5: The Banana - BT Build & Story

    Looks like im seeing some of the same issues... hopefully it drains well enough, I thought about hogging the compressor but i went with 12 there I didn’t like how oil drain 034 male fitting is Angled off the oil pan the oil looked like it needed to travel up wards to get back into the pan it def looks big enough idk how picky you are on it but it’ still like 5/8 at the fitting and 3/4 at oil pan i def wasn’t trying to drill that out


    Sent from my iPhone using Audizine

  25. #25
    Veteran Member Four Rings Blazius's Avatar
    Join Date
    Mar 15 2018
    AZ Member #
    415568
    Location
    Europe

    God, that charge control setup is making me cringe... I hope you have h beams.

  26. #26
    Established Member Two Rings RastAudiA4's Avatar
    Join Date
    Aug 26 2014
    AZ Member #
    277952
    Location
    United States

    Quote Originally Posted by Blazius View Post
    God, that charge control setup is making me cringe... I hope you have h beams.
    Yeah i got rods for it, still makes me cringe the way it has to be setup though, and by charge control im assuming you mean the choice of plumbing for the WG? I figured the route im going is the safest bet, going SS hoses, and gonna wrap them in something to prevent more heat exposure....Any other ideas on how to make the WG plumbing safer and still keeping the setup for dual WG


    Quote Originally Posted by ktsimp721 View Post
    Looks like im seeing some of the same issues... hopefully it drains well enough, I thought about hogging the compressor but i went with 12 there I didn’t like how oil drain 034 male fitting is Angled off the oil pan the oil looked like it needed to travel up wards to get back into the pan it def looks big enough idk how picky you are on it but it’ still like 5/8 at the fitting and 3/4 at oil pan i def wasn’t trying to drill that out


    Sent from my iPhone using Audizine
    I hope it will too, there's a company here i found in Orlando that goes by Improved racing and makes their own inhouse fittings under the brand RaceFlux, I want to check them out to see if they can come up with a better solution. I bought a -16 drain for the oil pan, but the 034 bung was easier; figured ll source a pan and weld it on later. On the turbo side used a drain fitting from a t4 borg warner, i think its 3/4 and adapted to -16


    Didn't Rob run dual wastegates? I wonder if anyone can help me pull some info on that to see how he ran his plumbing for them.
    Last edited by RastAudiA4; 11-12-2019 at 02:57 PM.

  27. #27
    Veteran Member Three Rings ktsimp721's Avatar
    Join Date
    Feb 22 2018
    AZ Member #
    414497
    Location
    San Jose California

    That Other Guy With A Brilliant Yellow B5: The Banana - BT Build & Story

    Quote Originally Posted by RastAudiA4 View Post
    Yeah i got rods for it, still makes me cringe the way it has to be setup though, and by charge control im assuming you mean the choice of plumbing for the WG? I figured the route im going is the safest bet, going SS hoses, and gonna wrap them in something to prevent more heat exposure....Any other ideas on how to make the WG plumbing safer and still keeping the setup for dual WG


    I hope it will too, there's a company here i found in Orlando that goes by Improved racing and makes their own inhouse fittings under the brand RaceFlux, I want to check them out to see if they can come up with a better solution. I bought a -16 drain for the oil pan, but the 034 bung was easier; figured ll source a pan and weld it on later. On the turbo side used a drain fitting from a t4 borg warner, i think its 3/4 and adapted to -16


    Didn't Rob run dual wastegates? I wonder if anyone can help me pull some info on that to see how he ran his plumbing for them.
    From what I’ve researched I think (well idk if your using n75 still or not) but I think it’s supposed to be set up backwards than what it would be normally or something to that effect. Like the action is opposite.... and that’s for one wastegate I never even seen a dual setup especially on our cars.... I’m going the easier route and use internal gate to drop the plumbing, then just tighten it that to the higher psi and lower the duty cycle on the n75 it’s like same effect from what I’ve read it’s gonna get confusing I’m already done with it..


    Sent from my iPhone using Audizine

  28. #28
    Established Member Two Rings RastAudiA4's Avatar
    Join Date
    Aug 26 2014
    AZ Member #
    277952
    Location
    United States

    UPDATE

    Long time guys, sorry for the late update, got busy and then fought with the car some and left it alone for a while...well got some more content to add...So basically where we left off....I got the Large -16an drain to fit over the compressor housing, got the wastegate bracket sorted....

    Few weekends passed since, here's what i've gotten to so far,

    Got the EGT sensors in, and they look pretty damn good, these are going to tie into the an EGT amplifier from and controller board from Reveltronics so i can monitor per cylinder


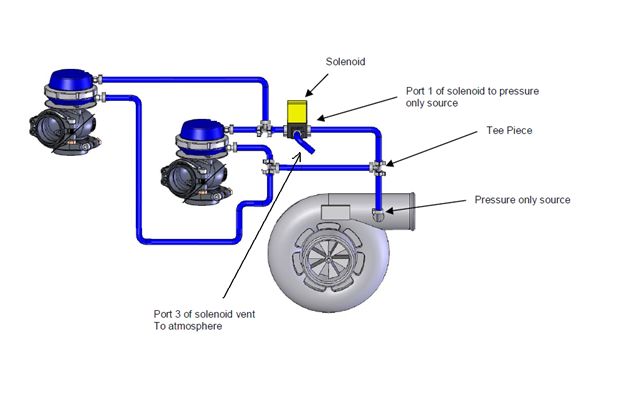
    After playing around with the sensors I started to attack the waste gate line plubming. Didn't get more research from searching b5 forums on running dual WGs and the plumbing but found tons elsewhere...also called the company that manufactures my WGs to get more info, consensus is that the diagram below is indeed the correct route...


    SOOO now issue is that I am realizing a challenge with the room left and the air lines for the WG plumbing will be very close to heat...so I went back to the guys at Improved Racing here in Orlando to get SS an lines, some sort of fire resistant sleeving and more fancy stuff....


    Had the Hallman MBC sitting around....also got a steal on some Gold fittings too, not a fan of colored bling, but i do like that it will blend in with the Brilliant Yellow, picked up -4an fitting ends for the MBC from Hallman


    Not too happy on the location of the plumbing but it seemed like the best place to put it, later i'll work on making that MBC run into the cabin as Hallman sells the extension...but over all i dig the gold fittings with the yellow, and the purple hallman kind of looks cool lol...


    This will be the bottom wastegate that will be subject to the most heat, for the best protection the SS lines are sleeved in the raceflux sleeve and then wrapped in some nice think heat shielding, so it think they will be fine...


    Moved on to the 2nd waste gate and broke a fitting, so stopping here and going to see if i can back it out, not a fan of the routing so far so going to try a little harder and spend some more time brain storming...


    Threw my tools in the car and walked in after that lol....Will go back out tomorrow and look for a better place to route these lines....thanks for following guys after these lines will be very close to testing things out


    EDIT
    Found a clean way to route the lines, thought i'd post some pics, later today I need to get that broken fitting out and finish this plumbing


    Last edited by RastAudiA4; 12-12-2019 at 09:43 AM.

  29. #29
    Established Member Two Rings RastAudiA4's Avatar
    Join Date
    Aug 26 2014
    AZ Member #
    277952
    Location
    United States

    UPDATE Finished Waste gate plumbing

    Alright got the wastegate plumbing for my dual setup done, turned out ok i guess, looks a little busy I wish I hid the lines better but tbh i just want this thing running, I can make it more show quality later.

    What do you guys think? For some reason it doesn't seem as clean as i pictured in my head....but not much to get rid of lol...

    Engine will be pulled once more once i'm happy with the way the bay looks...so I'll prob power wash the bay and clean up all the dirt.

    Here's pics of the routing i decided to go with:

    The lines under the front wastegate dump are SS braided hose with the raceflux fire resistant sleeve and then wrapped in some good quality heat blanket material, so I think they shouldn't melt lol?


    Fixed the broken fitting


    And here it is completed, hope i did everything right and have 0 boost creep for the $ i dropped making these lines


    And with that minus a few little things here and there the turbo/cold side setup is finally completed, just need to get the downpipe created do something about the surface rust on the exhaust housing (prob just clean it ceramic coat and get turbo blanket...idk you guys think the wastegate lines got a little out of hand? I feel like it does sometimes and other times i think i want to rip it out...


    OK so next steps, go through and make sure things are nice and tight and just not hand turned on the cold side + turbo, want to use allen head bolts for turbo mating to manifold... figure out hotside piping + BOV placement, plus re tuck the intake side of the engine since i pulled most out...oil pressure gauge for turbo wiring, boost signal from wastegate wiring, egt sensor wiring, Wideband wiring all goes to the Reveltronics board + display....gotta stop adding things to do lol just want to drive it now


    Almost forgot tomorrow I can run the coolant feed from oem back into the block, already have -6an coming off the hard pipe so I have a -6an to 3/8 barb and from that barb to rubber hose and then I have 3/8 to 1/2 inch barb to just use the factory hose and cut off the banjo fitting


  30. #30
    Veteran Member Four Rings A1 A2 German's Avatar
    Join Date
    Feb 28 2005
    AZ Member #
    5519
    My Garage
    Audi A4 B5, Audi Fox, Audi AMLS TT, GS450, CB175, CL175
    Location
    Tempe

    Kol setup.

    If your mbc line set up drives you up a wall here's a trick to simplify it to the max...you get a double male AN (maybe double 10mx1mm in your case), remove the ~3AN male from both the turbo and mbc, now directly mount the mbc to the snail with the double 10mx1.00 union. Congrats, you rid yourself of not only ~12"+ of hose but many AN fittings too.

    Viewing your lines again, throw away the line with the name on it....attach the 3AN TEE directly to the turbo with center TEE pointing up, throw away the line going to the bottom of the mbc to the TEE, now mount the mbc standing straight up directly into the pointed up part of the TEE...now you have not only a hard mounted spot but ditched lines and connectors. Granted you'll have finish things up over to your wg's. And on the other mbc port (side port to wg's) nothing says you need to run a line to a TEE which is crap...just to sprout off...physically attach the TEE to the mbc...my point is hard mounting everything. However it maybe best to keep a one line system and go to a tee at the point of wg's...opposed to running over 2 separate lines from the turbo mounted mbc.

    Also can ditch even more fittings if you can find a tee that threads into the turbo and mbc...opposed to swiveling on the tee(s) onto your existing 3AN males yet not too of a biggee there.

    My mbc is mounted directly to my WG (you really can't do that as have two, yet off the turbo is same idea), as also my WG is up front, top mounted and center so ideal spot too. My entire system is two 4" lines....period.... no tees...nothing (yet you'll need tees, one at turbo, one off mbc/for wgs)

    It's like when people make these giant messes contecting a remote FPR to a rail...no, get a double 6AN female and hard mount it directly to the rail...block opposite end so no return line which is yet more line, more fittings, more chance of failure.

    They are now making WG blankets too.

    However looks kinda neat, just saying if it bugs ya.
    Last edited by A1 A2 German; 12-14-2019 at 11:49 PM.

  31. #31
    Established Member Two Rings RastAudiA4's Avatar
    Join Date
    Aug 26 2014
    AZ Member #
    277952
    Location
    United States

    Quote Originally Posted by A1 A2 German View Post
    Kol setup.

    If your mbc line set up drives you up a wall here's a trick to simplify it to the max...you get a double male AN (maybe double 10mx1mm in your case), remove the ~3AN male from both the turbo and mbc, now directly mount the mbc to the snail with the double 10mx1.00 union. Congrats, you rid yourself of not only ~12"+ of hose but many AN fittings too.

    Viewing your lines again, throw away the line with the name on it....attach the 3AN TEE directly to the turbo with center TEE pointing up, throw away the line going to the bottom of the mbc to the TEE, now mount the mbc standing straight up directly into the pointed up part of the TEE...now you have not only a hard mounted spot but ditched lines and connectors. Granted you'll have finish things up over to your wg's. And on the other mbc port (side port to wg's) nothing says you need to run a line to a TEE which is crap...just to sprout off...physically attach the TEE to the mbc...my point is hard mounting everything. However it maybe best to keep a one line system and go to a tee at the point of wg's...opposed to running over 2 separate lines from the tu, would trbo mounted mbc.

    Also can ditch even more fittings if you can find a tee that threads into the turbo and mbc...opposed to swiveling on the tee(s) onto your existing 3AN males yet not too of a biggee there.

    My mbc is mounted directly to my WG (you really can't do that as have two, yet off the turbo is same idea), as also my WG is up front, top mounted and center so ideal spot too. My entire system is two 4" lines....period.... no tees...nothing (yet you'll need tees, one at turbo, one off mbc/for wgs)

    It's like when people make these giant messes contecting a remote FPR to a rail...no, get a double 6AN female and hard mount it directly to the rail...block opposite end so no return line which is yet more line, more fittings, more chance of failure.

    They are now making WG blankets too.

    However looks kinda neat, just saying if it bugs ya.
    Thanks for that, after sketching out a diagram i get what you mean, would for sure get rid of a bunch lol, great idea!. That at the batter relocation info in the previous posts are gonna come in handy. The lines are definitely growing on me now things are more together in the bay, but that confidence was much appreciated :)


    Got some more to add, tighted everything down on the turbo side and plumbed to intercooler.


    Found a place for the BOV, wish this 50mm would in the bay closer to the TB, but this will have to do. I couldn't find any info on whether a BOV should be placed before or after the MAP sensor on our cars...so I took the normal route as any boosted car, cuz PSI is PSI, no need to overthink it


    Bolted back up the hard pipe, on the spout I already had a -6an ss line coming off to feed the K04, since the Holset is oil cool only, i bought a -6an to 3/4' barb and a 3/4barb to 1/2"barb to connect back to the stock banjo return hose, just cut the banjo fitting off.


    Next I am going to wire the Unitronic wideband cable to the ECU, just 3 pins to plug into blank spots on the ECU harness it self, and wire up all gauges and sensors that i've added.
    Last edited by RastAudiA4; 12-29-2019 at 03:49 PM.

  32. #32
    Veteran Member Four Rings Blazius's Avatar
    Join Date
    Mar 15 2018
    AZ Member #
    415568
    Location
    Europe

    Sigh...


    That intercooler is way toooo low trust me, do not put it under the radiator lower line, even the RS4 bumper does not have much space below that.

    Second you CANNOT use BOV on a MAF based car such as Motronic. A stock pneumatic valve absolutely supports whatever you throw at it.If you want to have a proper setup get rid of that crap.

    Also no AC is going to be awful in summer but hey its your choice.

  33. #33
    Established Member Two Rings RastAudiA4's Avatar
    Join Date
    Aug 26 2014
    AZ Member #
    277952
    Location
    United States

    Quote Originally Posted by Blazius View Post
    Sigh...


    That intercooler is way toooo low trust me, do not put it under the radiator lower line, even the RS4 bumper does not have much space below that.

    Second you CANNOT use BOV on a MAF based car such as Motronic. A stock pneumatic valve absolutely supports whatever you throw at it.If you want to have a proper setup get rid of that crap.

    Also no AC is going to be awful in summer but hey its your choice.
    Thanks for the heads up on the radiator line and in the intercooler, good catch, However this how i ran it with the K04 and an S4 bumper so i'll double check... I bought the inter cooler with that dent lol, this thing hadn't had AC since the first setup either, i'll be fine :) i'd rather the clean bay, I can jump in my e60 m5 if i want AC

    And also it's a mafless file :) I have no n75, no evap, no solenoids under the mani, no SAIP, only thing plugged in the ECU, oil level sensor, MAP sensor, injectors, Coil wires, O2 sensors, Crank position, ABS, you know just the essentials, and they are coded out properly. basically everything Walky_Talky said we can remove is gone and coded

    You may have been confused when I said MAP not MAF, the manifold Absolute pressure sensor on the intake TB side, measures the pressure, was wondering if we do place a BOV there, then would it go before the MAP, manifold absolute pressure sensor, or after, hmm

  34. #34
    Veteran Member Four Rings Blazius's Avatar
    Join Date
    Mar 15 2018
    AZ Member #
    415568
    Location
    Europe

    I didnt get confused. If you have unitronics , maestro maffless whatever does not matter on stock ECU it means you are running in limp mode alpha N. Motronic is a Load/torque based ecu and load comes from MAF ONLY, MAP is only used for boost control it does not do anything else, this is why Bosch doesnt even say its a MAP sensor but a Thrust sensor.

    What they do is that they remove the DTC classes for the MAF so it doesnt put you in limp, if they do half assed job you also loose ABS and ESP, which means you lose EDL too which means your quattro is useless if you have one ( because this Torsen gen is an open torque bias diff , it never ever locks contrary to what some people believe)


    So in the end it doesnt matter where you put ur BOV, MAFless without SD and bov is the ultimate crap combo, because alpha N expects a certain airflow for a certain RPM, which the BOV is going to be dumping, not to mention all the bs that mafless comes with, but who cares as long as it runs WOT right :) ?


    There is absolutely no reason to delete MAF, no excuse, it can always be placed somewhere, if everything fails as blowthrough even..

  35. #35
    Veteran Member Four Rings Seerlah's Avatar
    Join Date
    Dec 05 2007
    AZ Member #
    23104
    Location
    A place between here and there

    I've ran MAFless with a BOV for a few years now, different setups, different turbos. I don't know tuning, but mine was done by a professional. Never had an issue running MAFless, neither has many other's. It really boiled down to a preference thing with driveability when it came to running a MAF or no MAF. With me, less parts meant less parts to fail. The more I could junk, the better. Worked for me fine, thus far.
    I hate it when my car acts like a little bitch, treating me like a bitch

  36. #36
    Veteran Member Three Rings ktsimp721's Avatar
    Join Date
    Feb 22 2018
    AZ Member #
    414497
    Location
    San Jose California

    That Other Guy With A Brilliant Yellow B5: The Banana - BT Build & Story

    Quote Originally Posted by Seerlah View Post
    I've ran MAFless with a BOV for a few years now, different setups, different turbos. I don't know tuning, but mine was done by a professional. Never had an issue running MAFless, neither has many other's. It really boiled down to a preference thing with driveability when it came to running a MAF or no MAF. With me, less parts meant less parts to fail. The more I could junk, the better. Worked for me fine, thus far.
    Lol you know I gotta chime in now >:D first off Blazius hates mafless I’m just gonna have to say it’s a fact hahah.Anyways I’m putting another plus one for mafless set ups.... I’ve put 600 miles with new turbo set up thus far my maf set up could be a little iffy(as I’m running it with a 90degress turn straight off the turbo no filter just guard for compressor wheel >:D. I tried with filter I didn’t like it....but when I used maf the car would choke have little hiccups in neutral rolling to a red light it would want to stall in city driving situations like someone was putting there hand over it. bought new maf and same problems persists. Wasted 170$ real quick. my maf has been unplugged for the past 400 miles and runs badass in the city or mostly highway it’s big turbo and no choking.I’m sorry but if I can do 120 mph throwing me in the seat and bully Porsche’s on the highway in LIMP smh then so be it... just call me ktlimp instead haha it’s more so the n75 you gotta figure out. it wants to do these boost fluctuations at part throttle it does this with or without the maf... this problem will become more important later..im in the process of writing the perfect requests.. but your not using n75 either so ima have to say run it your def not gonna regret it unless your in 30 mph limp aka real limp mode that’s different tho... I would say as long as your wastegate setup is good and kinda controllable I think you’ll be happy running mafless you’ll drive the rest. gives the car a little attitude/personality beefy turbo sounds on the side and shit
    Last edited by ktsimp721; 12-29-2019 at 10:50 AM.

  37. #37
    Veteran Member Four Rings Blazius's Avatar
    Join Date
    Mar 15 2018
    AZ Member #
    415568
    Location
    Europe

    Lol - I am not hating MAFless, however it is not the way its supposed to be on this car, simple turbocharging EFI injections basics, specially in this case. I know this is mostly above average joes who just wants power out from their car, but its good to know how it should be done properly and what it means in this car.
    mafless makes sense on SD ( speed density) because you dont care about flow there only manifold pressure with an actual MAP sensor, so you can run bovs and all that crap.

    Second thing is that a MAF is very fast and accurate and nothing will beat it in what it was designed to do, certainly not alpha n.


    If you only want sound, add a CAI and you will have intake sound a maf doesnt restrict intake compressor sound very much, run opendownpipe and you will have turbo sounds for days.

  38. #38
    Veteran Member Four Rings Seerlah's Avatar
    Join Date
    Dec 05 2007
    AZ Member #
    23104
    Location
    A place between here and there

    Don't get me wrong, running a MAF is ideally better (mainly for driveability and better gas mileage). But is it an absolute must? Not in the least. It really boils down to preference and my tuner did a good enough job with the tune that the on/off/part throttle is very reasonable (car has not been stock for a while so I can not really recall how it drove prior, but it is a night and day difference from the OTS tune I had with a GT2871R). He tuned it so well that I find myself driving in vacuum most of my driving (there is a lot of untapped power to be made on the 1.8L NA aspect of the vehicle). Used to have an OTS MAFless tune what had crap driveability (Eurodyne 630cc MAFless), so I know the difference between what a good custom tune versus an off the shelf one can do (still with Eurodyne, but remote tuned via the Suite).

    But just like Blazius, there are those who would want to replicate OEM hardware to maintain the most stock functions. But my B5 is a highly modified street toy...and I keep my daily driver stock. Mine is simplified for simplicity sake, to keep it simple.
    I hate it when my car acts like a little bitch, treating me like a bitch

  39. #39
    Established Member Two Rings RastAudiA4's Avatar
    Join Date
    Aug 26 2014
    AZ Member #
    277952
    Location
    United States

    Quote Originally Posted by Blazius View Post
    Lol - I am not hating MAFless, however it is not the way its supposed to be on this car, simple turbocharging EFI injections basics, specially in this case. I know this is mostly above average joes who just wants power out from their car, but its good to know how it should be done properly and wt it means in this car.
    mafless makes sense on SD ( speed density) because you dont care about flow there only manifold pressure with an actual MAP sensor, so you can run bovs and all that crap.

    Second thing is that a MAF is very fast and accurate and nothing will beat it in what it was designed to do, certainly not alpha n.


    If you only want sound, add a CAI and you will have intake sound a maf doesnt restrict intake compressor sound very much, run opendownpipe and you will have turbo sounds for days.


    Quote Originally Posted by Blazius View Post
    Lol - I am not hating MAFless, however it is not the way its supposed to be on this car, simple turbocharging EFI injections basics, specially in this case. I know this is mostly above average joes who just wants power out from their car, but its good to know how it should be done properly and what it means in this car.
    mafless makes sense on SD ( speed density) because you dont care about flow there only manifold pressure with an actual MAP sensor, so you can run bovs and all that crap.

    Second thing is that a MAF is very fast and accurate and nothing will beat it in what it was designed to do, certainly not alpha n.


    If you only want sound, add a CAI and you will have intake sound a maf doesnt restrict intake compressor sound very much, run opendownpipe and you will have turbo sounds for days.

    Ok I understand and I hope you took no offense to that, and yes i agree with you on the idea of a MAF. On our cars it is designed to be used as the way you described. And to be honest this is my first time running a MAFless setup and have no idea what to expect of the "base mafless" file i purchased. Also i do believe there is a reason to delete the MAF, technically with proper tuning it is NOT needed....maybe better to drive but not needed.


    Quote Originally Posted by Seerlah View Post
    I've ran MAFless with a BOV for a few years now, different setups, different turbos. I don't know tuning, but mine was done by a professional. Never had an issue running MAFless, neither has many other's. It really boiled down to a preference thing with driveability when it came to running a MAF or no MAF. With me, less parts meant less parts to fail. The more I could junk, the better. Worked for me fine, thus far.


    Quote Originally Posted by ktsimp721 View Post
    Lol you know I gotta chime in now >:D first off Blazius hates mafless I’m just gonna have to say it’s a fact hahah.Anyways I’m putting another plus one for mafless set ups.... I’ve put 600 miles with new turbo set up thus far my maf set up could be a little iffy(as I’m running it with a 90degress turn straight off the turbo no filter just guard for compressor wheel >:D. I tried with filter I didn’t like it....but when I used maf the car would choke have little hiccups in neutral rolling to a red light it would want to stall in city driving situations like someone was putting there hand over it. bought new maf and same problems persists. Wasted 170$ real quick. my maf has been unplugged for the past 400 miles and runs badass in the city or mostly highway it’s big turbo and no choking.I’m sorry but if I can do 120 mph throwing me in the seat and bully Porsche’s on the highway in LIMP smh then so be it... just call me ktlimp instead haha it’s more so the n75 you gotta figure out. it wants to do these boost fluctuations at part throttle it does this with or without the maf... this problem will become more important later..im in the process of writing the perfect requests.. but your not using n75 either so ima have to say run it your def not gonna regret it unless your in 30 mph limp aka real limp mode that’s different tho... I would say as long as your wastegate setup is good and kinda controllable I think you’ll be happy running mafless you’ll drive the rest. gives the car a little attitude/personality beefy turbo sounds on the side and shit


    As ktsimp721, and Seerlah mentioned, a mafless file with proper tuning can be just as good, and I don't want to deal with excess sensors in the car anyway if i can delete them without major harm. I agree with you 100% with someone running a closer to "stock" build meaning all sensors are still in play. My build is completely one off and custom so to speak, and tbh i felt as if the MAF might have caused more headache in the long run..... From Seerlah "Mine is simplified for simplicity sake, to keep it simple."


    Also thank you all for the info on MAF vs MAFless, I am aware of the decision i made and understand the consequences, but honestly have no idea what's gonna happen when it cranks up. AND i do love running no filter on the compressor housing :) much cleaner look. To me that is was the best part of this build. SO much was just a theory of physics, research and logic. Worst and best thing i've ever done was to do something no one else really doesn't do, it was a reward to overcome such obstacles.


    With that being said, this was a hell of a build for me as I am not a mechanic or own a shop. Im sure you can notice but this was all done in my APT complex in a parking space in FL heat. I learned a lot and will NEVER plan a build like this again as i was not prepared enough. I had everything planned out in my head and took it too the car, however DID overcome all issues with a little "Fuck it" and maybe whiskey or two. Now i get to see what doesn't work and what does. Creating this thread was the best thing for my motivation and hope you guys are actually enjoying it as much as me.

    This is my first BT build, and it feels good to gawk over my car as i did many of the others on this forum for a LONG time. Not sure if any of you actually ready the story of this car lol, but it is very special and fells good to accomplish a goal set years ago. But never forgotten.

    Alas the last thing for me to physically do before seeing how much i fucked up is just to add oil and coolant, and find someone to make or sell me a vband downpipe for the turbo.

    There is still more to come so stay tuned but I believe I have finally completed phase 1 of this build: Playing legos...Much more still to come but check it out, and if anyone can give me some REAL feedback, I have major OCD and i want this thing to be soooo much cleaner, I know i have much more time, but what you guys think? how did i do? You Jelly lol? Couldn't have done it without Audizine. Don't be afraid to tear me a new one, i dont care what you think but i do humble the opinions and visions of others and would love to hear some feedback on this as it kicked my ass so hard and killed my motivation, when it was done I couldn't really enjoy it lol....

    For a reminder phase one of my build was just making sure my vision on paper and thought can be applied. Next things to do is to get it running enough to daily it for a few weeks. Then we pull the engine and put in rods and clean up even more.

    MY FIRST BT BUILD, CAN I PLEASE COME IN NOW? lol....


  40. #40
    Veteran Member Four Rings Seerlah's Avatar
    Join Date
    Dec 05 2007
    AZ Member #
    23104
    Location
    A place between here and there

    Do what works for you. I think the engine bay looks clean. But I do suggest you run a filter on your compressor housing. As for a downpipe, find a reputable shop and have them fab one for you. That is really the only way to go about it, unless you know someone who can weld (I drove to a forum member's house, spent the night and he fabbed mine in his shop). Most find a shop, have it towed there, downpipe made and installed, then drive back.

    Also, I suggest a turbo blanket for the turbo. It will most likely cook your ignition coil harness overtime, plus the benefits of having one far outweighs not having one (ie lower IATs, quicker spool, cooler engine bay, hood paint protection from turbine housing heat, fuel lines not absorbing so much extra heat, etc).
    I hate it when my car acts like a little bitch, treating me like a bitch

Tags for this Thread

Bookmarks

Posting Permissions

  • You may not post new threads
  • You may not post replies
  • You may not post attachments
  • You may not edit your posts
  •  


    © 2001-2025 Audizine, Audizine.com, and Driverzines.com
    Audizine is an independently owned and operated automotive enthusiast community and news website.
    Audi and the Audi logo(s) are copyright/trademark Audi AG. Audizine is not endorsed by or affiliated with Audi AG.