Audizine - An Automotive Enthusiast Community

Page 7 of 21 FirstFirst ... 5678917 ... LastLast
Results 241 to 280 of 814
  1. #241
    Veteran Member Four Rings bhusted's Avatar
    Join Date
    Sep 11 2011
    AZ Member #
    81119
    My Garage
    B5 A4 4.2L V8
    Location
    Kirkland, WA

    Guest-only advertisement. Register or Log In now!
    Quote Originally Posted by lm0812 View Post
    Seriously, the new cover was worth it for that list alone. What's annoying about the steering rack is that the PO had it replaced, whoever replaced it though put the wrong size boot on each side. They put the short boot on the long side and the long boot on the short side, so one side is ripped to shit and the other is way too compressed. Nice work. It won't be nearly as bad this time since I know the technique and have the tools, still not fun though.

    Nope, haven't had to replace a clutch master cylinder, where is it located?
    Did not know that there were two different length boots, though it does not surprise me. Master cylinder is located on the pedal cluster inside the cabin under the dash. Mine hasn't totally failed yet, but it is making this incessant squeaking noise and has sort of a stiff spot in the middle that makes the stiff clutch a little more difficult to modulate. The best part is that it is plastic and I'm a little worried about breaking it on removal/installation.

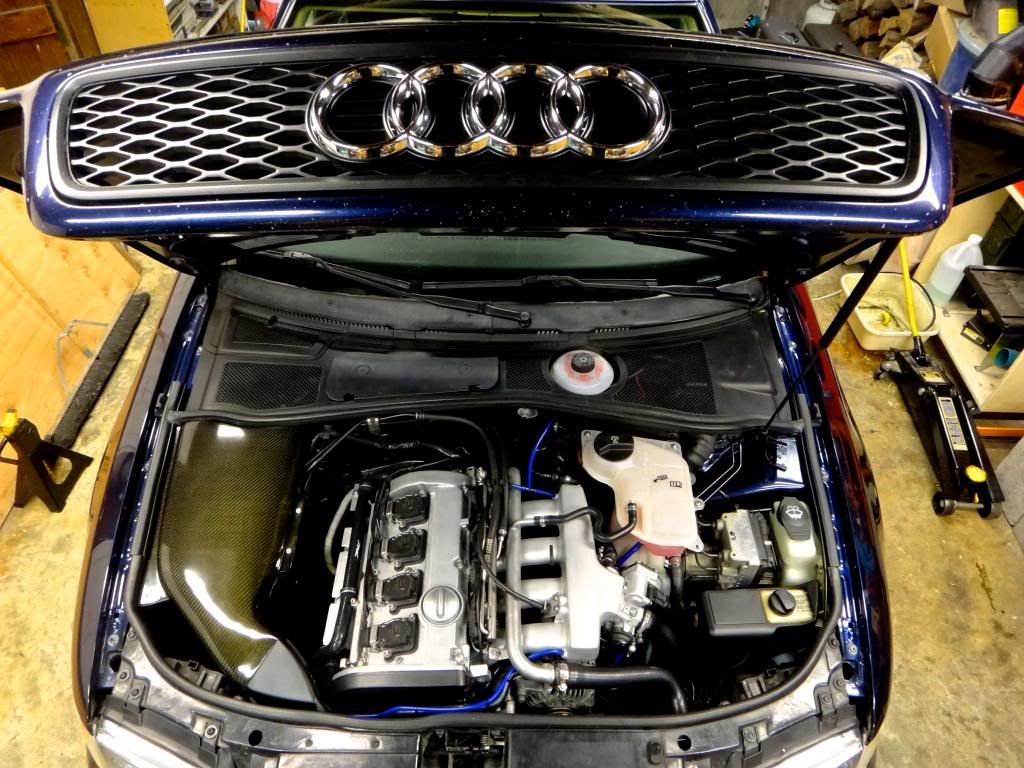
    Your engine bay is looking clean as ever.
    | B5 4.2L V8 Quattro | Tein S-Tech | O.Z. Ultraleggera 18x8 | Stabila Course 22mm rear swaybar | Agency Power WRX swaybar links | S4 front brakes | A8 rear brakes | FX-R HID projector retrofit | Fog projector retrofit | RS4 Grill |Aero wipers |

  2. #242
    Veteran Member Four Rings BaseDrifter's Avatar
    Join Date
    May 18 2010
    AZ Member #
    59183
    Location
    Bay Area, CA

    Yep, check it out, passenger side has a longer boot.


    Thanks, can't wait to get the HFC back in. I re-tucked the EVAP line last night. I'm waiting to reinstall the HFC until I can resolve these misfires though.

    Master cylinder sounds like fun, good luck with that. Still waiting on videos of your car!
    | Update thread / Youtube Channel |

    97 A4 1.8TQM: Frankenturbo|TyrolSport SMIC|034 HFC|Borla catback|Carbonio/007 DV|Vogtland GT3|034 RSB|Apikol Bushings|034 SD motor/tranny/strut mounts|A8 brakes/SS lines|JHM trio|Meyle HD CA/TREs|
    01 S4 2.7T: Stock

  3. #243
    Veteran Member Four Rings RENOxDECEPTION's Avatar
    Join Date
    Nov 04 2012
    AZ Member #
    103464
    My Garage
    2000 B5 A4 1.8TQM, 2000 B5 A4 1.8TQM
    Location
    Reno

    Quote Originally Posted by lm0812 View Post
    I'm waiting to reinstall the HFC until I can resolve these misfires though.
    Good idea! Lol

    2000 Audi A4 B5 1.8TQM AEB/06A
    1998 Audi A4 B5 4.2QM (Thread)
    2000 Audi A4 B5 1.8TQM K24 Turbo, AEB Wideband

  4. #244
    Veteran Member Four Rings BaseDrifter's Avatar
    Join Date
    May 18 2010
    AZ Member #
    59183
    Location
    Bay Area, CA

    Quote Originally Posted by RENOxDECEPTION View Post
    Good idea! Lol
    Some guy mentioned I should wait.
    | Update thread / Youtube Channel |

    97 A4 1.8TQM: Frankenturbo|TyrolSport SMIC|034 HFC|Borla catback|Carbonio/007 DV|Vogtland GT3|034 RSB|Apikol Bushings|034 SD motor/tranny/strut mounts|A8 brakes/SS lines|JHM trio|Meyle HD CA/TREs|
    01 S4 2.7T: Stock

  5. #245
    Veteran Member Four Rings BaseDrifter's Avatar
    Join Date
    May 18 2010
    AZ Member #
    59183
    Location
    Bay Area, CA

    PnP was a bust for injectors again. One car had the motor pulled and the other had the injectors taken already. As I was looking around I found one injector laying on the ground, figured what the hell and got it. If it works great, if not, oh well. I also got a transmission mount heat shield and "retro" oil cap that I'll polish up.

    | Update thread / Youtube Channel |

    97 A4 1.8TQM: Frankenturbo|TyrolSport SMIC|034 HFC|Borla catback|Carbonio/007 DV|Vogtland GT3|034 RSB|Apikol Bushings|034 SD motor/tranny/strut mounts|A8 brakes/SS lines|JHM trio|Meyle HD CA/TREs|
    01 S4 2.7T: Stock

  6. #246
    Veteran Member Four Rings pbcrazy's Avatar
    Join Date
    Feb 06 2013
    AZ Member #
    109017
    Location
    VA

    If you can't find any injectors I have my stock ones lying around somewhere, I can send them if I can find them.

    EDIT: Just remembered I have a set of new injector orings/pintle caps/filters that I actually know where they are, I can send you those to swap them in your injectors, the little filters do just get clogged after awhile.
    98.5 Audi A4 1.8T Quattro | 5 Speed | AEB | Laser Red
    | FrankenTurbo F21L | United Motorsports Stage 3 | 630cc Injectors | 3" MAF | ICM Delete w/FSI Coils | Scorpion 2.5" Catback/RAI 3" Test Pipe | Forge 007 | 034 Silicone PCV | Alzor 349 | FMIC | ECS RA4 LWFW/S4 Clutch/S4 P.Plate | AEM | Krauto | etc.

  7. #247
    Veteran Member Four Rings BaseDrifter's Avatar
    Join Date
    May 18 2010
    AZ Member #
    59183
    Location
    Bay Area, CA

    Thanks for the offer, I appreciate it. I'll most likely be getting a set of injectors from Reno at the meet next weekend though.
    | Update thread / Youtube Channel |

    97 A4 1.8TQM: Frankenturbo|TyrolSport SMIC|034 HFC|Borla catback|Carbonio/007 DV|Vogtland GT3|034 RSB|Apikol Bushings|034 SD motor/tranny/strut mounts|A8 brakes/SS lines|JHM trio|Meyle HD CA/TREs|
    01 S4 2.7T: Stock

  8. #248
    Veteran Member Four Rings BaseDrifter's Avatar
    Join Date
    May 18 2010
    AZ Member #
    59183
    Location
    Bay Area, CA

    Quote Originally Posted by pbcrazy View Post
    EDIT: Just remembered I have a set of new injector orings/pintle caps/filters that I actually know where they are, I can send you those to swap them in your injectors, the little filters do just get clogged after awhile.
    That'd be cool man, thanks a lot.

    Did a little work on the new oil cap tonight. Shaved it and sanded it out to 600 grit.

    Before:


    After:


    | Update thread / Youtube Channel |

    97 A4 1.8TQM: Frankenturbo|TyrolSport SMIC|034 HFC|Borla catback|Carbonio/007 DV|Vogtland GT3|034 RSB|Apikol Bushings|034 SD motor/tranny/strut mounts|A8 brakes/SS lines|JHM trio|Meyle HD CA/TREs|
    01 S4 2.7T: Stock

  9. #249
    Senior Member Two Rings kraylon's Avatar
    Join Date
    Apr 11 2007
    AZ Member #
    17194
    Location
    Denver

    What car did you get the oil cap off of?
    01 Audi A4 Quattro, Franken Turbo, Motoza Tuned, Abd intake, Bilsten sports, H&R springs, Neuspeed front, rear sway bars and exhaust, Atp test pipe, JHM linkage, complete rs4 body kit, 18" Falkens, Nitto invo tires, Forge 007 DV and Unos Mbc, 034 street motor & trans mounts.

  10. #250
    Veteran Member Four Rings BaseDrifter's Avatar
    Join Date
    May 18 2010
    AZ Member #
    59183
    Location
    Bay Area, CA

    It was on one of the Passats I was checking out.
    | Update thread / Youtube Channel |

    97 A4 1.8TQM: Frankenturbo|TyrolSport SMIC|034 HFC|Borla catback|Carbonio/007 DV|Vogtland GT3|034 RSB|Apikol Bushings|034 SD motor/tranny/strut mounts|A8 brakes/SS lines|JHM trio|Meyle HD CA/TREs|
    01 S4 2.7T: Stock

  11. #251
    Veteran Member Four Rings Tanzimur's Avatar
    Join Date
    Feb 21 2013
    AZ Member #
    110005
    My Garage
    97 Brilliant Black A4 B5 1.8T
    Location
    Warren, MI

    Lol you can grab one by motormite from oreily or auto zone for 5 bucks but it has writing on it. Looks good btw!

  12. #252
    Established Member Two Rings delldroid's Avatar
    Join Date
    Oct 18 2012
    AZ Member #
    102525
    Location
    Minneapolis

    This engine bay is awesome. Everything looks clean

  13. #253
    Veteran Member Four Rings BaseDrifter's Avatar
    Join Date
    May 18 2010
    AZ Member #
    59183
    Location
    Bay Area, CA

    Thanks guys, I finished the oil cap the other night and ended up bead blasting it.


    I've never liked all the grommets on the firewall and would love to shave it at some point, but that won't be happening until I pull the motor. For now I found a quick solution to clean up the ugliest grommet next to the air box.


    What I ended up doing was cutting off the front of the grommet and using a 1" piece of delrin to plug the hole. It fits perfect, couldn't have asked for anything better.


    New injectors should be here in a couple days, then the HFC goes back in and I can get it ready for the meet this weekend.
    | Update thread / Youtube Channel |

    97 A4 1.8TQM: Frankenturbo|TyrolSport SMIC|034 HFC|Borla catback|Carbonio/007 DV|Vogtland GT3|034 RSB|Apikol Bushings|034 SD motor/tranny/strut mounts|A8 brakes/SS lines|JHM trio|Meyle HD CA/TREs|
    01 S4 2.7T: Stock

  14. #254
    Senior Member Three Rings JJ.'s Avatar
    Join Date
    May 22 2012
    AZ Member #
    93920
    Location
    Netherlands

    Love the amount of detail you put into it! I really need to paint my valve cover and inlet, yours looks so clean :)

  15. #255
    Veteran Member Four Rings RENOxDECEPTION's Avatar
    Join Date
    Nov 04 2012
    AZ Member #
    103464
    My Garage
    2000 B5 A4 1.8TQM, 2000 B5 A4 1.8TQM
    Location
    Reno

    *Waits for the inevitable*

    2000 Audi A4 B5 1.8TQM AEB/06A
    1998 Audi A4 B5 4.2QM (Thread)
    2000 Audi A4 B5 1.8TQM K24 Turbo, AEB Wideband

  16. #256
    Veteran Member Four Rings BaseDrifter's Avatar
    Join Date
    May 18 2010
    AZ Member #
    59183
    Location
    Bay Area, CA

    I finally have most of my boost back and I'm a very happy camper. This if the first time I've seen more than 14psi in about two years. I switched tunes and I'm now spiking to 17psi and holding 15. G/s went from 150 to 164 (was getting 114 on a stock tune.) Of course with all good things must come some bad, flooring it on the freeway in 4th or 5th gear makes the clutch slip. I've been due for a replacement for awhile now.

    Last week I went through the 2 year CA smog shuffle and passed. Good timing since I'm really hoping I'll be able to get a FT installed by the end of the year. I also got four used AEB injectors from RenoDeception last week to address my misfires, they're not gone completely but have subsided.

    How they arrived.


    After a good scrubbing.


    Fuel rail removed. Don't think I have to worry about any dirt falling into the cylinders.


    New o-rings installed.


    Injectors reinstalled in the fuel rail.


    This past Saturday JHM had an Audi meet and BBQ. Had a great time out with the local (and somewhat local) guys, here are the B5 A4s lined up.


    And some new pictures of my bay.


    Quote Originally Posted by JJ. View Post
    Love the amount of detail you put into it! I really need to paint my valve cover and inlet, yours looks so clean :)
    Thanks a lot, my car would look a lot better with your wheels on it. Love those flat/fat fives (can never remember which it is.)
    | Update thread / Youtube Channel |

    97 A4 1.8TQM: Frankenturbo|TyrolSport SMIC|034 HFC|Borla catback|Carbonio/007 DV|Vogtland GT3|034 RSB|Apikol Bushings|034 SD motor/tranny/strut mounts|A8 brakes/SS lines|JHM trio|Meyle HD CA/TREs|
    01 S4 2.7T: Stock

  17. #257
    Senior Member Two Rings kraylon's Avatar
    Join Date
    Apr 11 2007
    AZ Member #
    17194
    Location
    Denver

    Good news and looking great!!!
    01 Audi A4 Quattro, Franken Turbo, Motoza Tuned, Abd intake, Bilsten sports, H&R springs, Neuspeed front, rear sway bars and exhaust, Atp test pipe, JHM linkage, complete rs4 body kit, 18" Falkens, Nitto invo tires, Forge 007 DV and Unos Mbc, 034 street motor & trans mounts.

  18. #258
    Established Member Two Rings SanFrancesc0's Avatar
    Join Date
    May 05 2013
    AZ Member #
    114590
    Location
    United States

    Sorry to hear about your clutch my man. Im glad the tune worked for you though! It really spikes at 17 for you? Maybe I just need to fix all my little leaks or something, or maybe get my boost gauge lit up haha.

    This picture is gorgeous. I think we need a b5 porn section this would be the icon for it for sure

  19. #259
    Veteran Member Four Rings RENOxDECEPTION's Avatar
    Join Date
    Nov 04 2012
    AZ Member #
    103464
    My Garage
    2000 B5 A4 1.8TQM, 2000 B5 A4 1.8TQM
    Location
    Reno

    I just thought of a free mod for you, polish that abs module.

    2000 Audi A4 B5 1.8TQM AEB/06A
    1998 Audi A4 B5 4.2QM (Thread)
    2000 Audi A4 B5 1.8TQM K24 Turbo, AEB Wideband

  20. #260
    Veteran Member Four Rings BaseDrifter's Avatar
    Join Date
    May 18 2010
    AZ Member #
    59183
    Location
    Bay Area, CA

    Quote Originally Posted by RENOxDECEPTION View Post
    I just thought of a free mod for you, polish that abs module.
    Ask and ye shall receive.

    Here's what I started with.


    A couple hours later…


    I probably need to take it back down to 600 grit to flatten it out before I call it done. It's close, but not quite right yet. You can also see where I nicked the shock tower paint with my tool. :(( Foolish mistake not to tape that up. I shouldn't be too concerned about it though since it will be covered up when I get a Euro Passat driver side cover. It might buff out.

    Yesterday I restored the headlights on the silver A4. Worked my way up from 150 to 1000 grit, wiped with mineral spirits, then finished with a light coat of Minwax clear gloss polyurethane sealant.

    The headlights were pretty nasty to start with. Really dragged down the appearance of the car.


    This is the "oh s*** what have I gotten myself into moment."


    A quick wipe with mineral spirits and huzzah.


    Before.


    And after. The turn signals got the same treatment.


    After painting the grilles and lower valence, restoring the headlights, and swapping the old grill from my car on the front restore is almost done. Paint needs to be gone over…and I'm not sure why one headlight is a bit darker than the other.

    Last edited by BaseDrifter; 05-15-2014 at 01:26 AM.
    | Update thread / Youtube Channel |

    97 A4 1.8TQM: Frankenturbo|TyrolSport SMIC|034 HFC|Borla catback|Carbonio/007 DV|Vogtland GT3|034 RSB|Apikol Bushings|034 SD motor/tranny/strut mounts|A8 brakes/SS lines|JHM trio|Meyle HD CA/TREs|
    01 S4 2.7T: Stock

  21. #261
    Veteran Member Four Rings A1 A2 German's Avatar
    Join Date
    Feb 28 2005
    AZ Member #
    5519
    My Garage
    Audi A4 B5, Audi Fox, Audi AMLS TT, GS450, CB175, CL175
    Location
    Tempe

    You can easly remove 100% of all that garbage in and around the passenger side strut tower/fire wall. All the cables, hoses and wires. I can help with anything, you won't see any of it. Unless you're shooting to keep the cluttered oem look.

  22. #262
    Veteran Member Four Rings bhusted's Avatar
    Join Date
    Sep 11 2011
    AZ Member #
    81119
    My Garage
    B5 A4 4.2L V8
    Location
    Kirkland, WA

    ABS module looks good. It's amazing how well the polyurethane and mineral spirits works for clearing the headlights.
    | B5 4.2L V8 Quattro | Tein S-Tech | O.Z. Ultraleggera 18x8 | Stabila Course 22mm rear swaybar | Agency Power WRX swaybar links | S4 front brakes | A8 rear brakes | FX-R HID projector retrofit | Fog projector retrofit | RS4 Grill |Aero wipers |

  23. #263
    Veteran Member Four Rings BaseDrifter's Avatar
    Join Date
    May 18 2010
    AZ Member #
    59183
    Location
    Bay Area, CA

    Quote Originally Posted by A1 A2 German View Post
    You can easly remove 100% of all that garbage in and around the passenger side strut tower/fire wall. All the cables, hoses and wires. I can help with anything, you won't see any of it. Unless you're shooting to keep the cluttered oem look.
    Doing that kind of tuck work is something I'd like to do when the motor is out, seems like it would make the work a lot easier. I also view taking those steps as part of a "future stage" of the car. Right now the plan is to get the Euro Passat cover for the driver's side to cover all that junk up. It's one of the last pieces of the puzzle to completing this stage of my engine bay project. One of the other things on the list is getting a silicone TIP.

    Passat cover for reference.


    Quote Originally Posted by bhusted View Post
    ABS module looks good. It's amazing how well the polyurethane and mineral spirits works for clearing the headlights.
    Thanks, and yeah they really do the trick. Debating about whether I should do my headlights, they aren't nearly as bad as my dad's were. I might just redo the fogs.
    | Update thread / Youtube Channel |

    97 A4 1.8TQM: Frankenturbo|TyrolSport SMIC|034 HFC|Borla catback|Carbonio/007 DV|Vogtland GT3|034 RSB|Apikol Bushings|034 SD motor/tranny/strut mounts|A8 brakes/SS lines|JHM trio|Meyle HD CA/TREs|
    01 S4 2.7T: Stock

  24. #264
    Veteran Member Four Rings A1 A2 German's Avatar
    Join Date
    Feb 28 2005
    AZ Member #
    5519
    My Garage
    Audi A4 B5, Audi Fox, Audi AMLS TT, GS450, CB175, CL175
    Location
    Tempe

    It's actually much easier with the motor in and the motor needs to be in, so you know proper lengths and how to route it. I could of never ever of done the changes with the motor out, not even close as you don't know what stops and what ends with nothing there. Good luck with the build .

  25. #265
    Veteran Member Four Rings BaseDrifter's Avatar
    Join Date
    May 18 2010
    AZ Member #
    59183
    Location
    Bay Area, CA

    Thanks. How did you go about doing the tuck? From what I've read, most people relocate the battery to the trunk and put the ABS module where the battery was and run new brake lines. Power steering reservoir can be tucked into the fender? And the engine harness gets routed beneath the secondary firewall? What needs to be extended to make that work?
    | Update thread / Youtube Channel |

    97 A4 1.8TQM: Frankenturbo|TyrolSport SMIC|034 HFC|Borla catback|Carbonio/007 DV|Vogtland GT3|034 RSB|Apikol Bushings|034 SD motor/tranny/strut mounts|A8 brakes/SS lines|JHM trio|Meyle HD CA/TREs|
    01 S4 2.7T: Stock

  26. #266
    Veteran Member Four Rings A1 A2 German's Avatar
    Join Date
    Feb 28 2005
    AZ Member #
    5519
    My Garage
    Audi A4 B5, Audi Fox, Audi AMLS TT, GS450, CB175, CL175
    Location
    Tempe

    I was talking about that Matrix of a mess on the passenger side fender well and false fire wall, we'll call it the intake area.

    But can help you with the other stuff too.

    For the intake area you have:

    -Fuel lines
    -ECM wiring harness
    -Evap and evap N82/N34/N64 (lol, what ever it is called valve)
    -Battery cable coming out of fire wall


    For this you actually leave the front of the car and engine alone, and jack it up, remove both front tires and fender liners.

    -Fuel lines, it ALWAYS bugs me people keep all that zig zag of a mess along the back of the false fire wall and clean everything up. When the car it jacked up, you can see the fuel lines on the undercarriage right behind the pass tire. I cut off both the hardlines right at that point, now remove all that mess all the way to the fuel rail and toss. I got double walled professional fuel line (any hot rod shop), and it now runs from that point up through the fender well (almost like stock), yet jumps over to the transmission and runs up the spine of the transmission directly to you guess it...the fuel rail. It comes from the dead center of the car now below and behind the block. Now, you have no fuel line in the engine bay.

    -ECM delete, appears you have the ecm still (as I see that wiring harness headed towards your airbox)? I would recommend doing the 2.0FSI swap and get ride of not only that unit but ~4' of wiring. I can do another write up if needed. Not to mention smoother and better performance, better spark, and rids yourself of the ecm unit itself which can be a problem.

    -Evap line, so you have a evap lines that run across the top of your motor, you're simply going to bring them below the motor along the subframe as seen below, and place that N86 valve inside the wheel well (reason you drop the fender liners):


    Very basic, ~10' of line (BAP has German made woven line) and a T-fitting, extend the N86 Valve harness ~12" to fit inside the fender and that's it. The line on the right goes to the drivers side fender well and plugs into the oem hard line. The line of the left goes to the hardline of on the passenger side. The line going up plugs into the the stock intake manifold location.


    It's pretty simple, in oem form you see the blue, green and yellow. Now, with the fender liners removed you cut off the hard line in blue (cut marks on pic), extend the N82 wiring harness to fit right in line seen in green), line just run the yellow line bought at BAP down the fender wheels along the subframe (note I used the wiring harness fasteners to hold the line it place every ~8" or so). Have both yellow lines come together, place a T fitting and run ~2' of line up to the oem intake manifold location. Re-install fender liners and done. Cost is $15, maybe not even that.


    Battery cable running out of false fire wall - You can cut the amount of battery cable in half needed too.

    The blue is the oem location. Pull out the whole thing all the way to the battery and toss it. If you have an audio system or just want even better wiring (larger) here's a chance to do what they call the big three (alt, starter, ground upgrade). Run your new cable down the heater core oem grommet or, anywhere along there put in a grommet and now you cable will now pop down back behind the head out of sight. You run it to a T fitting, ~1.5' of the cable goes to the left to the starter, ~2' of cable goes to the alternator. Boom, that super easy.

    - 5-8' of cable
    - 1 t-fitting
    - 3 eyelets (one for starter, one for alt, one for battery)

    Cost less then $30, I used 0 gauge, but you can use 4'. Very easy, very quick to do.


    All the other stuff, yeah, battery is in my trunk with the hump removed, abs relocate is next:


    You can remove and detach every sensor from the engine, take out that nasty of a grub looking creation coming out by the coolant tank, and run it down towards the heater hoses area, and drop it straight down to have it pop out it by the back of the head. Keep it mind! When touching the oem wiring harness, abs, and p/s bracket, etc you may see the "wear" marks from those pieces being there (metal lines touching this and that, the hole in the false fire wall now as the engine harness been removing and possible paint "wear" marks from where the oem harness lays on the drivers side strut tower. You could luck out, but sometimes it looks worse when you see that something "used" to be there and looks like it was removed as that obvious.

    Also, you can remove that entire mess under the p/s reservoir cover to under the drivers headlight with no extension of wires needed:


    All the intake area stuff is pretty easy and all 4 things can be down easily with in a day of sunlight.

  27. #267
    Veteran Member Four Rings BaseDrifter's Avatar
    Join Date
    May 18 2010
    AZ Member #
    59183
    Location
    Bay Area, CA

    Wow, thanks a bunch for all the info. Honestly I'm not so concerned with the intake side of things right now though since all of that mess is covered by the Carbonio. I do plan on deleting the ICM and running the updated coil packs within the year. The only reason I could see myself ditching the Carbonio would be if I was running a turbo that wouldn't allow it to fit. The plan is to go with a Frankenturbo to start, step up to an eliminator, and then maybe a full frame set up with a built motor. Unfortunately I also have to keep smog in mind. The two year shuffle is doable, but the more that is modified the longer it takes to get it passable (there's always the more expensive and less legal option as well.)

    I've partially tucked the EVAP line by removing the hard pipe off the firewall and running black vac line out of the Carbonio box, down along the TIP, under the turbo coolant return hose, and under the intake manifold.

    I agree about the fuel lines, the stock lines always look out of place with a BT installed. Replacing the stock fuel lines is something I would consider. With the way my bay is set up right now though, there isn't a whole lot more that could be tucked away. With the Passat cover on the driver's side the bay should be looking pretty sparse. One of the beauties of having a 97 1.8T is that everything is so simple. Vac and emissions system is much more stripped down than even a 98 or 99 1.8T, not to mention the horrible rats nest that is the AWM.

    | Update thread / Youtube Channel |

    97 A4 1.8TQM: Frankenturbo|TyrolSport SMIC|034 HFC|Borla catback|Carbonio/007 DV|Vogtland GT3|034 RSB|Apikol Bushings|034 SD motor/tranny/strut mounts|A8 brakes/SS lines|JHM trio|Meyle HD CA/TREs|
    01 S4 2.7T: Stock

  28. #268
    Veteran Member Four Rings RENOxDECEPTION's Avatar
    Join Date
    Nov 04 2012
    AZ Member #
    103464
    My Garage
    2000 B5 A4 1.8TQM, 2000 B5 A4 1.8TQM
    Location
    Reno

    Undiagnosed OCD :P

    2000 Audi A4 B5 1.8TQM AEB/06A
    1998 Audi A4 B5 4.2QM (Thread)
    2000 Audi A4 B5 1.8TQM K24 Turbo, AEB Wideband

  29. #269
    Established Member Two Rings
    Join Date
    Jan 15 2012
    AZ Member #
    86708
    Location
    NEPA

    Just a quick question, what'd you use to polish that ABS module so quickly? What's the process you're using for that? It's such a simple detail, but it looks great. I also need to get at my headlights like you did with the silver car. Mine look worse than yours did in the original picture...

    Btw, your bay looks awesome! It's really coming together. Wish I didn't have the boring 12v.

  30. #270
    Veteran Member Four Rings BaseDrifter's Avatar
    Join Date
    May 18 2010
    AZ Member #
    59183
    Location
    Bay Area, CA

    Quote Originally Posted by RENOxDECEPTION View Post
    Undiagnosed OCD :P
    Something like that.

    "Strive for perfection."

    Quote Originally Posted by Knikkz31 View Post
    Just a quick question, what'd you use to polish that ABS module so quickly? What's the process you're using for that? It's such a simple detail, but it looks great. I also need to get at my headlights like you did with the silver car. Mine look worse than yours did in the original picture...

    Btw, your bay looks awesome! It's really coming together. Wish I didn't have the boring 12v.
    Haha thanks. It's the details that count. Anyone can clean an engine bay and polish a manifold, it's the details that make each project unique. This is a vision I've had for the bay since I bought the car 4 years ago and it's pretty awesome to finally see it all come together.

    Since I didn't need to take off bulk material from the ABS pump I started out at 120 grit. I took it up to 600 by hand and realized it was going to take more smoothing than I wanted to do without power tools. At that point I swapped to my air powered angle grinder with sanding pad attachment and went from 120 back to 600. Unfortunately I didn't have any grits higher than 600 in pad attachments so from there on I was back to working by hand. From 600 I went to 1000 then 1500 grit. It still wasn't looking how I wanted at that point so I went back to the grinder with 300 grit paper and worked my way back up to where I am. I'm still not satisfied so I'll take it back down to 300 again to try and level it out.

    Basically, 150-280-320-600-1000-1500. If time is of the essence you could skip the 320 grit. If I had more material to remove I would've started with 60 or 80 grit. Of course the lower grit you start at the longer it's going to take to get those scratches out.

    Here's a bonus picture.

    | Update thread / Youtube Channel |

    97 A4 1.8TQM: Frankenturbo|TyrolSport SMIC|034 HFC|Borla catback|Carbonio/007 DV|Vogtland GT3|034 RSB|Apikol Bushings|034 SD motor/tranny/strut mounts|A8 brakes/SS lines|JHM trio|Meyle HD CA/TREs|
    01 S4 2.7T: Stock

  31. #271
    Veteran Member Four Rings melomandn's Avatar
    Join Date
    Nov 08 2010
    AZ Member #
    66735
    My Garage
    958 CTT, 996 C4S, old motorcycles
    Location
    Upstate New York

    Quote Originally Posted by lm0812 View Post
    Really like how your grill turned out, I'm sure you talked about it at some point but what kind of paint did you use?

    Past:

    - B7 avant, 3.0t swapped
    - B8 S4, Stage 2+
    - B6 S4, not stock
    - B5 S4 Clone, built motor, 2871r

  32. #272
    Veteran Member Four Rings BaseDrifter's Avatar
    Join Date
    May 18 2010
    AZ Member #
    59183
    Location
    Bay Area, CA

    Quote Originally Posted by melomandn View Post
    Really like how your grill turned out, I'm sure you talked about it at some point but what kind of paint did you use?
    Thanks, it's just an OEM RS4 grille with the edge plastidipped. The dip job I did on it turned out pretty shitty, lots of peeling edges but I haven't got around to redoing it since it isn't too noticeable. Been like that for a couple years now.
    | Update thread / Youtube Channel |

    97 A4 1.8TQM: Frankenturbo|TyrolSport SMIC|034 HFC|Borla catback|Carbonio/007 DV|Vogtland GT3|034 RSB|Apikol Bushings|034 SD motor/tranny/strut mounts|A8 brakes/SS lines|JHM trio|Meyle HD CA/TREs|
    01 S4 2.7T: Stock

  33. #273
    Veteran Member Four Rings BaseDrifter's Avatar
    Join Date
    May 18 2010
    AZ Member #
    59183
    Location
    Bay Area, CA

    Don't have much to update. The car has been running really well, save for the slipping clutch. No flooring it anything higher than 2nd gear right now, it will slip 3rd-5th gear. Babying it until I can replace it.

    I fixed a little issue that has been annoying me for awhile. Last year I stripped one of the tiny set screws that holds my shift knob to the shifter. Since it was only held with two screws it would spin around and that's no good. I took this opportunity to take the shift knob down to its separate components and clean everything. I also repaired the broken power wire for the LED.

    Power wire.


    It got damaged where the wire exits the knob due to the sharp angle there.


    A quick cut, strip, solder, and shrink fixed it up.


    After 4 years of driving the shift knob has been well worn in! Not so black anymore..


    I cut up the control arms from my dad's A4 for scrap recycling. A cut on either side of the bushing and a smack on the ground got all the bushings out. It was a good first test for my Portaband.


    Bucket-o-bushings.


    Stripped the plastic end tanks off my old cracked intercooler for recycling as well.


    Nasty.

    | Update thread / Youtube Channel |

    97 A4 1.8TQM: Frankenturbo|TyrolSport SMIC|034 HFC|Borla catback|Carbonio/007 DV|Vogtland GT3|034 RSB|Apikol Bushings|034 SD motor/tranny/strut mounts|A8 brakes/SS lines|JHM trio|Meyle HD CA/TREs|
    01 S4 2.7T: Stock

  34. #274
    Veteran Member Four Rings BaseDrifter's Avatar
    Join Date
    May 18 2010
    AZ Member #
    59183
    Location
    Bay Area, CA

    A few weeks ago I noticed some surface rust forming on my upper coolant pipe. I knew it would just be a matter of time before it started rusting…the bare steel held up longer than expected though. It's a little hard to see, but the bracket for the throttle cable was also rusting on the edge.


    …And my oil cap wasn't looking too great either.


    I put some clear coat on the oil cap, but it doesn't seem to have held up too well. It was old stuff, probably over a decade old. I picked up a fresh can of Krylon Flat Acrylic Clear Coat, we'll see how well it holds up to the heat.


    Pipe removed and taped up for blasting. I stuff a rag into each opening and then put a few layers of tape over to keep the vast majority of the beads out, I make sure to give it a good blast of air before reassembling to clear out anything that might've slipped by.


    Finished product after blasting and 3 coats of clear.


    While I had the coolant system drained I decided to lop off the tank attachment point at the very front since it's not used on my 97.


    With the coolant tank removed I had more room to work on the ABS pump, so I gave that another once over starting at 120 grit. I removed the last of "HZ1" and "HZ2" and took it back out to 1500 grit. Still needs work, could use a fine polish to bring out the real shine. You can also see the coolant tank after removing that attachment point here. I need to sand it a little more to round the edges over though.


    Refinished and clear coated oil cap.


    All done for now!


    And on a totally different note, one of my other hobbies is growing and collecting carnivorous plants. I took this photo the other day of my Darlingtonia californica, also called the California Cobra Lily due to its shape resembling a cobra. These plants are native to the west coast and are found in wet areas with nutrient deficient soil (hence the carnivory). In the bottom right corner you can see a seedling sprouting up from the sphagnum moss. Despite its small size, this plant is over 4 years old. They're very slow growers.

    There's a link to my carnivorous plant youtube channel in my signature if you're interested in seeing more.

    Last edited by BaseDrifter; 07-04-2014 at 01:52 AM.
    | Update thread / Youtube Channel |

    97 A4 1.8TQM: Frankenturbo|TyrolSport SMIC|034 HFC|Borla catback|Carbonio/007 DV|Vogtland GT3|034 RSB|Apikol Bushings|034 SD motor/tranny/strut mounts|A8 brakes/SS lines|JHM trio|Meyle HD CA/TREs|
    01 S4 2.7T: Stock

  35. #275
    Veteran Member Four Rings melomandn's Avatar
    Join Date
    Nov 08 2010
    AZ Member #
    66735
    My Garage
    958 CTT, 996 C4S, old motorcycles
    Location
    Upstate New York

    You did your steering rack at one point didnt you? You have any tips or suggestions where to pick one up?

    Past:

    - B7 avant, 3.0t swapped
    - B8 S4, Stage 2+
    - B6 S4, not stock
    - B5 S4 Clone, built motor, 2871r

  36. #276
    Veteran Member Four Rings BaseDrifter's Avatar
    Join Date
    May 18 2010
    AZ Member #
    59183
    Location
    Bay Area, CA

    I replaced the steering rack on my dad's B5, mine is in desperate need of doing as well though. Page 3 in this thread is where I did the swap, there's also a picture of the new rack at the top of this page. I picked up a rebuilt rack from rack doctor and would do so again. Price was right (~$240), it was packaged very well which made shipping the old rack back for the core refund an easy deal, and it bolted right up. It's one of the more frustrating jobs I've done, I don't recommend it, but it's doable. Lots of extensions and swivels are necessary to get the large banjo bolts off, I believe one is 18mm. When trying to get the lower rack bolt back in, use a piece of paper towel in between the socket (10mm 12 point IIRC) and bolt to hold it in place while you locate it.

    ---

    In other news, my current project is to rewire my dash camera. Right now I have it hooked up so that it goes on and off with the ignition and it has been working flawlessly for months now. The problem is that the car must be on for the camera to receive power and I'd like to be able to power the camera without the keys in the ignition when desired, say during a traffic stop or if I park in a bad area for a short amount of time. I was initially going to just wire in a second 12v power source on a switch under the dash, but I didn't want to send power back through my accessory panel and power things like my fog lights and under dash lights (which are all powered on a separate relay activated by the ignition circuit.)

    I think what I'm going to do is isolate the dash camera and put it on its own relay. By hooking the camera to pin 30 (usually the input) and using the 87/87a pins for power, I can have two separate sources of power for the camera.

    Pin 30: Dash camera
    Pin 85: Ground
    Pin 86: Ignition power (75x)
    Pin 87: Ignition power (75x)
    Pin 87a: 12v from my switch under the dash (for good measure I could even receive power for 87a from the 87a terminal on the accessory relay.)

    With that arrangement, the dash camera will receive power with the ignition on and power off when the ignition is turned off. With the ignition turned off, pin 87a and 30 are connected, so long as my switch under the dash is activated the camera should also receive power while not sending it BACK through pin 87 and the ignition circuit. Any thoughts or suggestions on this arrangement are welcome.


    | Update thread / Youtube Channel |

    97 A4 1.8TQM: Frankenturbo|TyrolSport SMIC|034 HFC|Borla catback|Carbonio/007 DV|Vogtland GT3|034 RSB|Apikol Bushings|034 SD motor/tranny/strut mounts|A8 brakes/SS lines|JHM trio|Meyle HD CA/TREs|
    01 S4 2.7T: Stock

  37. #277
    Veteran Member Four Rings bhusted's Avatar
    Join Date
    Sep 11 2011
    AZ Member #
    81119
    My Garage
    B5 A4 4.2L V8
    Location
    Kirkland, WA

    Sounds like your logic is sound for wiring the camera. The only thought I had was using a non load-reduced source instead of 75x. This thing can't use much current, so it's not going to prevent you from starting. Every time you go to start the car having used your switch to run the camera with ignition off, it will turn off and then back on again as power is cut to 75x during starting.
    | B5 4.2L V8 Quattro | Tein S-Tech | O.Z. Ultraleggera 18x8 | Stabila Course 22mm rear swaybar | Agency Power WRX swaybar links | S4 front brakes | A8 rear brakes | FX-R HID projector retrofit | Fog projector retrofit | RS4 Grill |Aero wipers |

  38. #278
    Veteran Member Four Rings BaseDrifter's Avatar
    Join Date
    May 18 2010
    AZ Member #
    59183
    Location
    Bay Area, CA

    Thanks, and that's true, I could run the new relay off terminal 15 instead.
    | Update thread / Youtube Channel |

    97 A4 1.8TQM: Frankenturbo|TyrolSport SMIC|034 HFC|Borla catback|Carbonio/007 DV|Vogtland GT3|034 RSB|Apikol Bushings|034 SD motor/tranny/strut mounts|A8 brakes/SS lines|JHM trio|Meyle HD CA/TREs|
    01 S4 2.7T: Stock

  39. #279
    Veteran Member Four Rings RENOxDECEPTION's Avatar
    Join Date
    Nov 04 2012
    AZ Member #
    103464
    My Garage
    2000 B5 A4 1.8TQM, 2000 B5 A4 1.8TQM
    Location
    Reno

    Or you could use a transistor to isolate circuits instead of a relay, it's not like it's going to have a large load.

    2000 Audi A4 B5 1.8TQM AEB/06A
    1998 Audi A4 B5 4.2QM (Thread)
    2000 Audi A4 B5 1.8TQM K24 Turbo, AEB Wideband

  40. #280
    Veteran Member Four Rings BaseDrifter's Avatar
    Join Date
    May 18 2010
    AZ Member #
    59183
    Location
    Bay Area, CA

    How would I go about doing that? I defaulted to relays because that's what I know haha.
    | Update thread / Youtube Channel |

    97 A4 1.8TQM: Frankenturbo|TyrolSport SMIC|034 HFC|Borla catback|Carbonio/007 DV|Vogtland GT3|034 RSB|Apikol Bushings|034 SD motor/tranny/strut mounts|A8 brakes/SS lines|JHM trio|Meyle HD CA/TREs|
    01 S4 2.7T: Stock

Page 7 of 21 FirstFirst ... 5678917 ... LastLast


Bookmarks

Posting Permissions

  • You may not post new threads
  • You may not post replies
  • You may not post attachments
  • You may not edit your posts
  •  


    © 2001-2025 Audizine, Audizine.com, and Driverzines.com
    Audizine is an independently owned and operated automotive enthusiast community and news website.
    Audi and the Audi logo(s) are copyright/trademark Audi AG. Audizine is not endorsed by or affiliated with Audi AG.