Audizine - An Automotive Enthusiast Community

Page 1 of 2 12 LastLast
Results 1 to 40 of 45
  1. #1
    Veteran Member Four Rings IceFour's Avatar
    Join Date
    Jul 20 2013
    AZ Member #
    119300
    Location
    Union City, California

    DIY: B8.5 ecode headlight install

    Guest-only advertisement. Register or Log In now!
    I know there's a thread floating around showing how B8 ecodes are installed and it's very useful, very similar. There are only slight differences between the two but I figured i'd make one anyway because I have too much time on my hands right now. This is also my first DIY write-up so if it's crap let me know.

    **All of the screws you need to remove have a torx head**

    Step 1 - Removing headlight housing from car

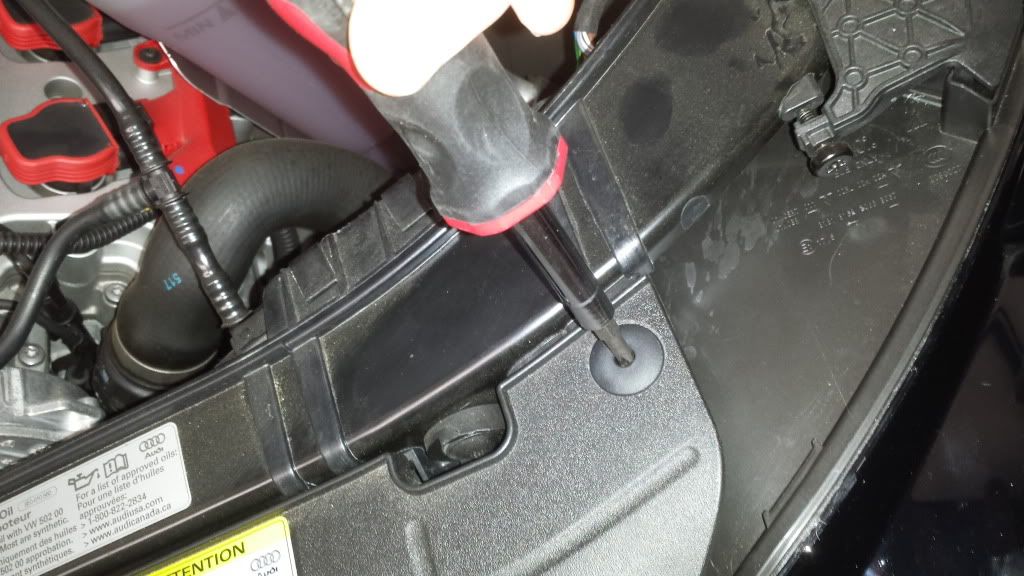
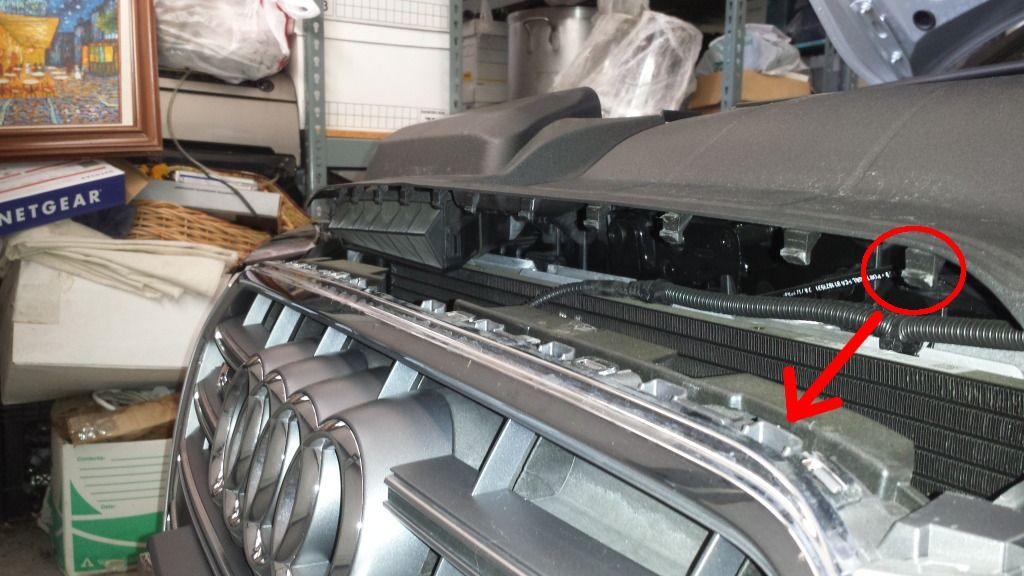
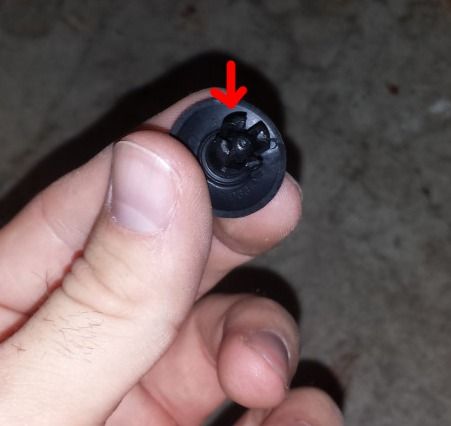
    First off you need to remove the plastic shroud connected to the grill that's covering access to the headlight housings. Remove four plastic tabs via using a small tool able to punch the center in a little to allow you to pop the tabs out. Be careful not to push too hard or they will fall through the bottom and be lost. Also when pulling the tabs they tend to fly once they release so keep a hold on them.

    These are the tabs you need to remove


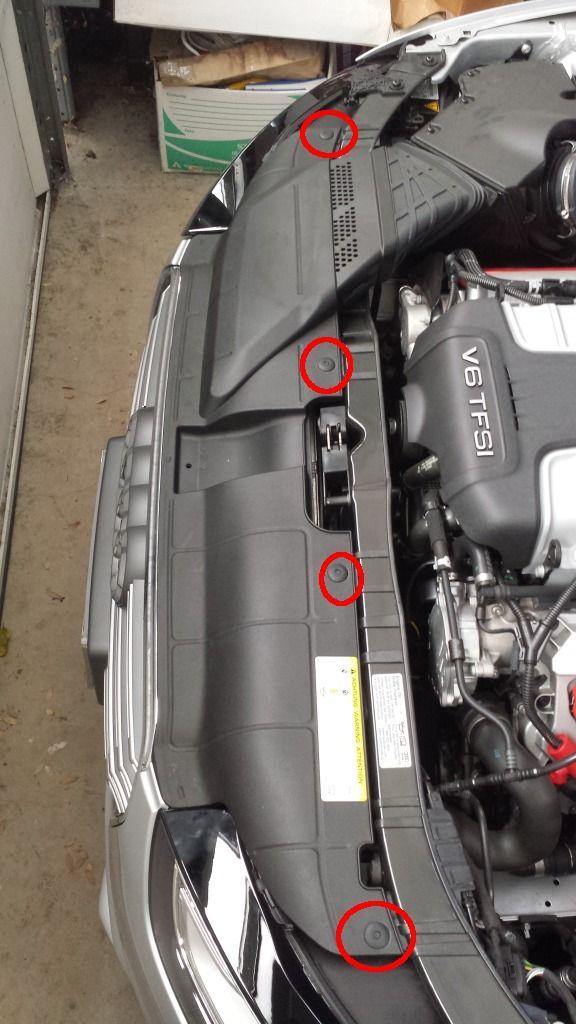
    Illustration of pushing the inside of the tab down


    Once those are removed you need to pull up on the front of the shroud to release the several tabs connected to the grill, pulling straight up worked for me but some say to pull up and away (toward the windshield). The shroud should be fully removed now, set it aside. Now you have access to the screws required to be removed in order to remove the housing.

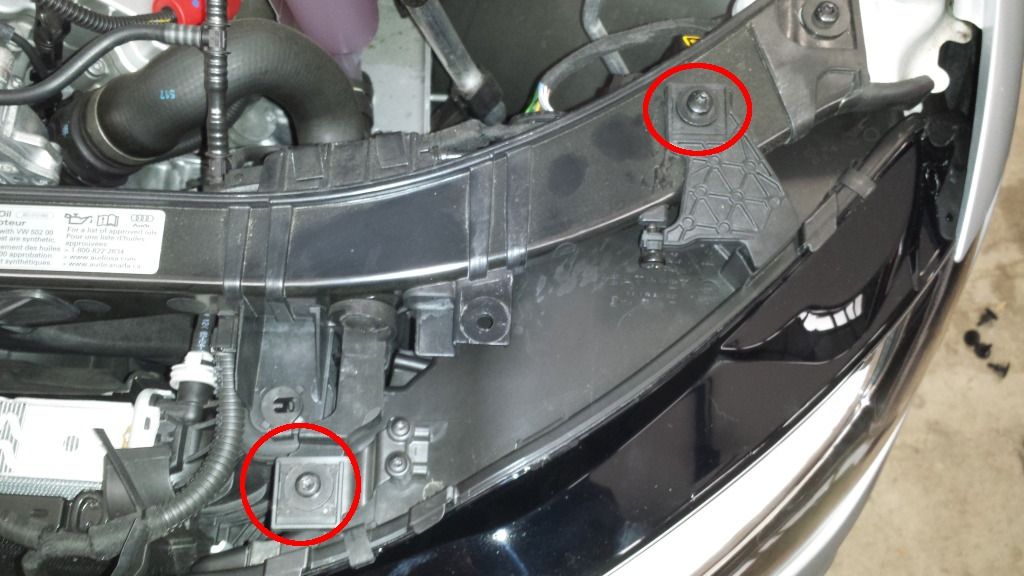
    There are 5 screws holding the housing in place: two up top, one in the middle rear (held by a uclip), then two at the bottom of the housing.

    The two up top:


    The two at the bottom and at the middle rear:


    Another of the middle rear:


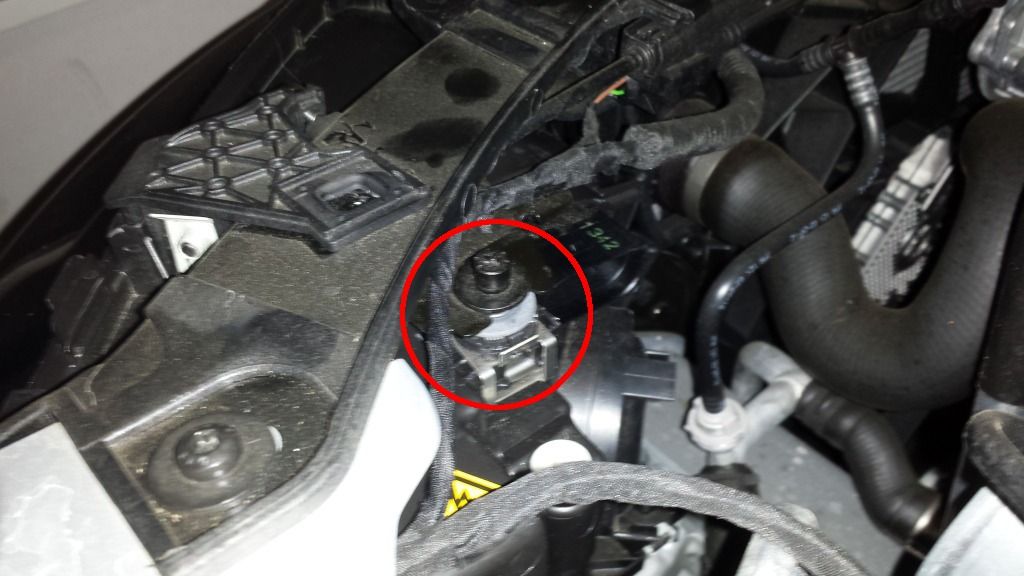
    The two at the top need to be removed completely, the one at the middle rear needs to be loosened alot. It does not come out all the way. Once it's loosened you need to remove the entire clip assembly the screw is attached to. The two at the bottom only need to be loosened slightly in order to release the housing. Once all these bolts are removed you only need to remove the electrical connector. There's a tab that you need to pull in order to release the connector. You can use your nail or in my case I used a flathead to wedge it carefully. Once that's removed the housing is ready to be removed from the car.

    An easier way to remove both headlight housings -
    Quote Originally Posted by Nastybutler View Post
    Two things to add: When removing and putting them back in, it makes it pretty simple if you pull the inside corner out first when removing and, conversely, the outer part should go in first when putting back in. Secondly, to aid in removal, take that top bracket thingy off that you have to transfer to the new light once you get it wiggled out a bit. That way when you're pulling up and out on the inner part, it doesn't get in the way of that. That's how I did it anyway, and once I figured that out, the second one was a snap.
    Now we can move on to Step 2...

    Step 2 - Transferring ballasts and bulbs from OEM lights to ecodes
    You can do this anywhere you feel comfortable, I did this on the floor on carpet.

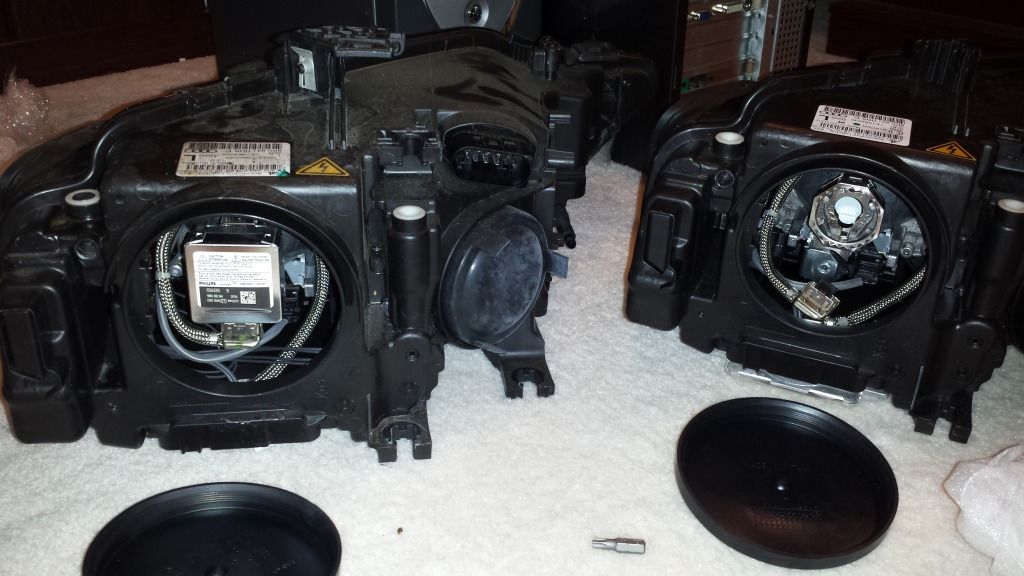
    Here's a picture of the underside of both the OEM and ecodes side by side:


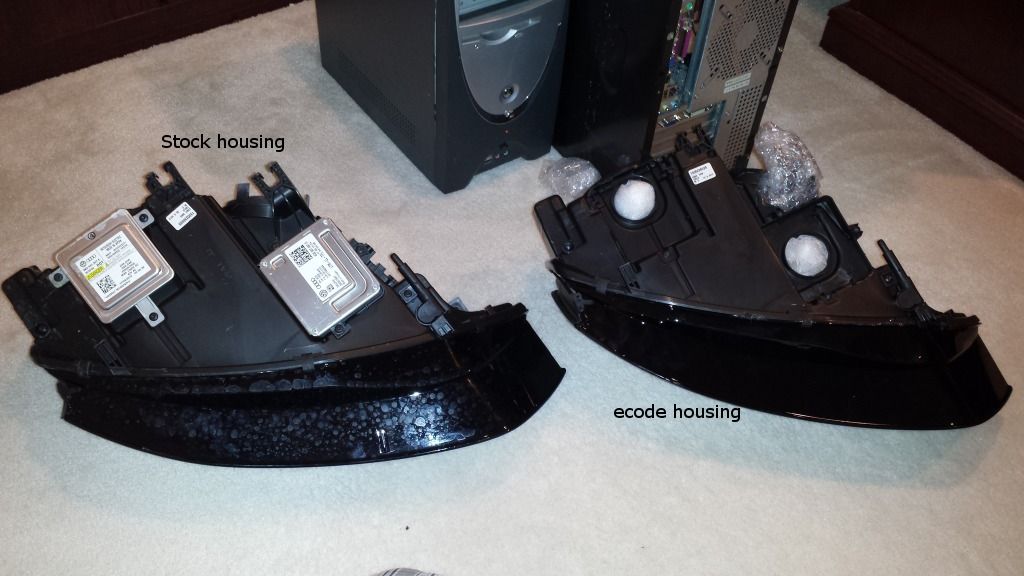
    Same, but the topside:


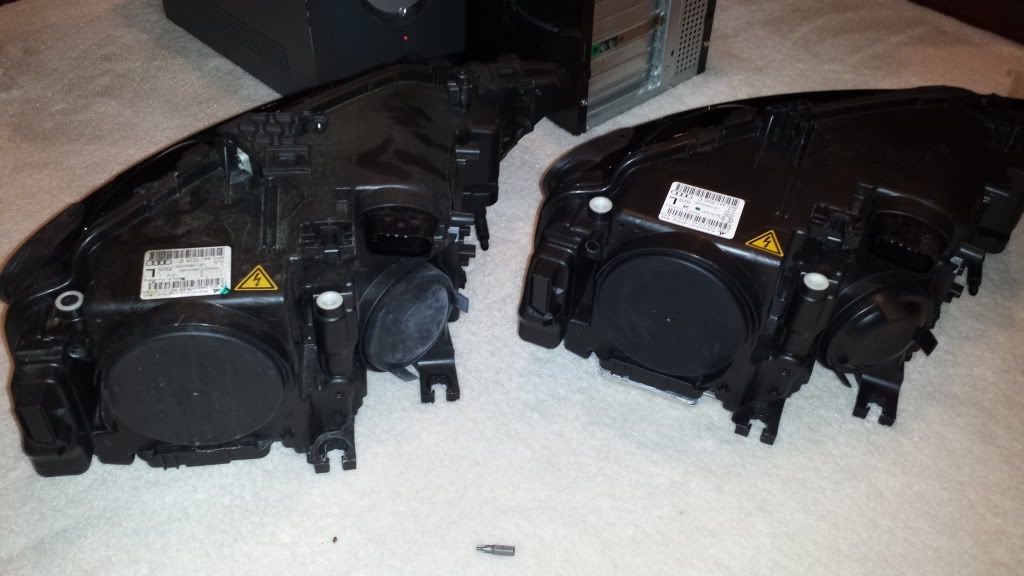
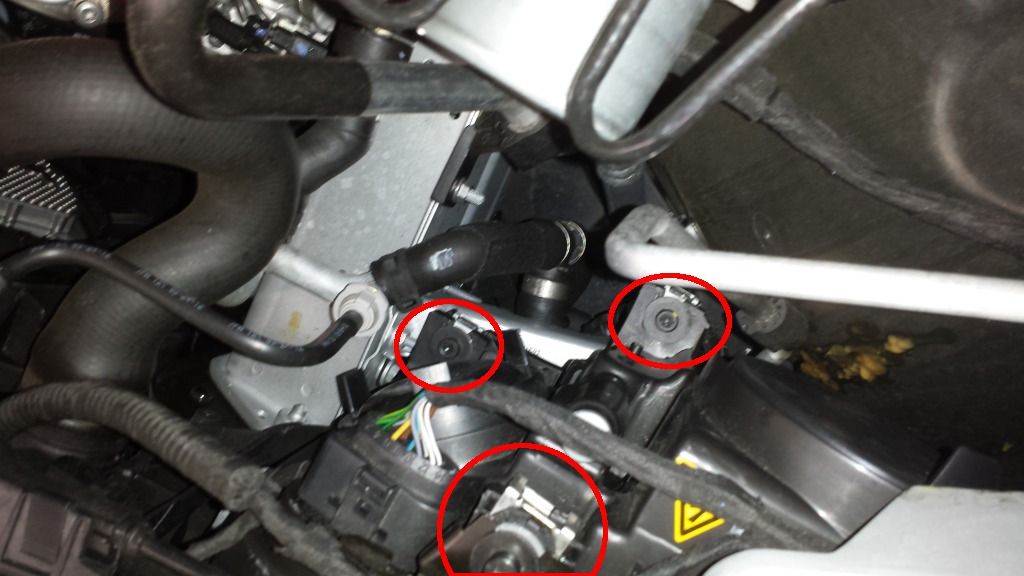
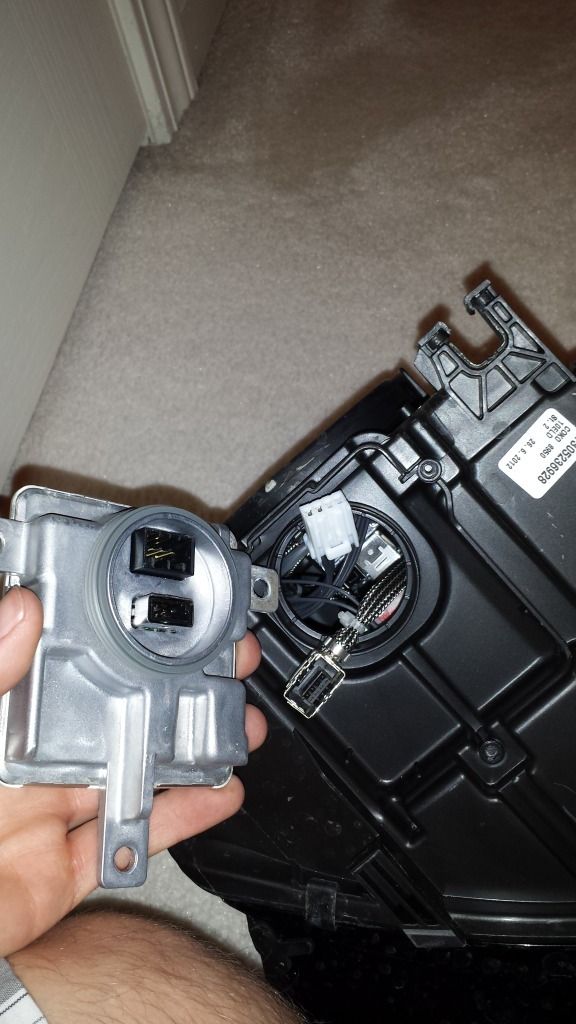
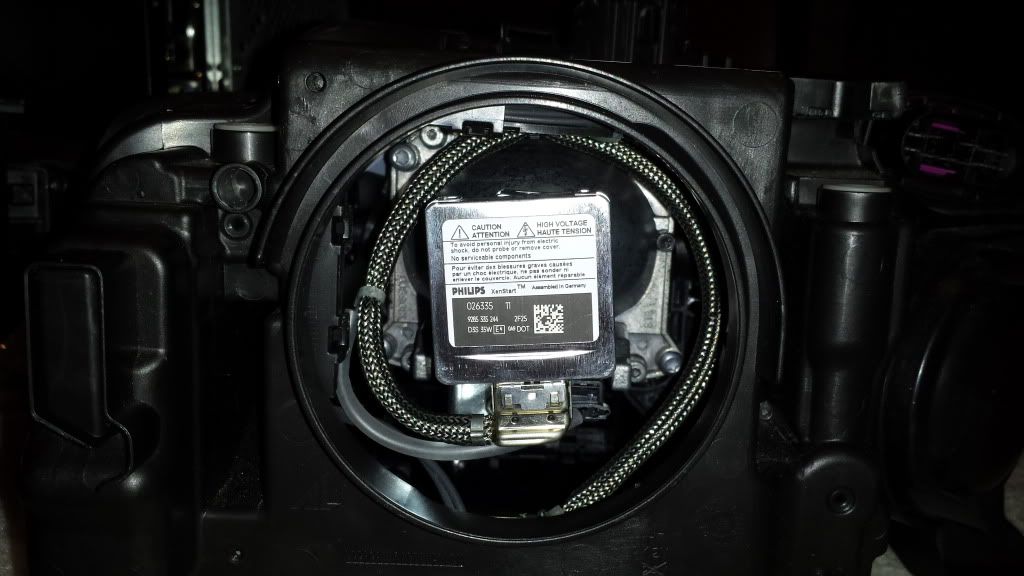
    This is a pretty straightforward procedure, as you see in the first picture of the two housings you see the ballasts. We simply need to transfer them over.

    Each ballast is held in by 3 torx screws. Once unscrewed don't be alarmed it will take a little pulling to remove because there's a rubber gasket sealing it. The ballast for the HID is connected by two electrical connectors:

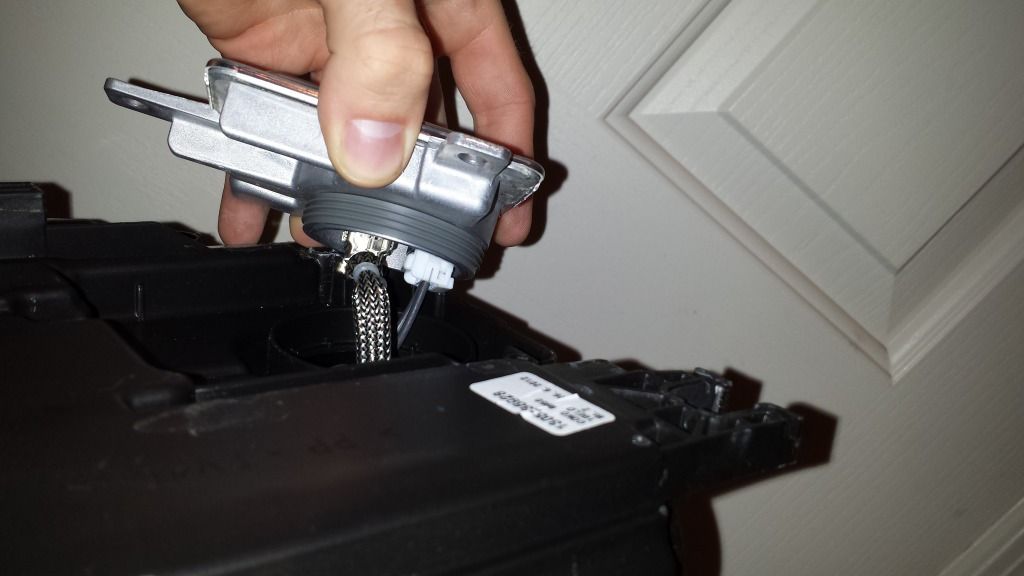
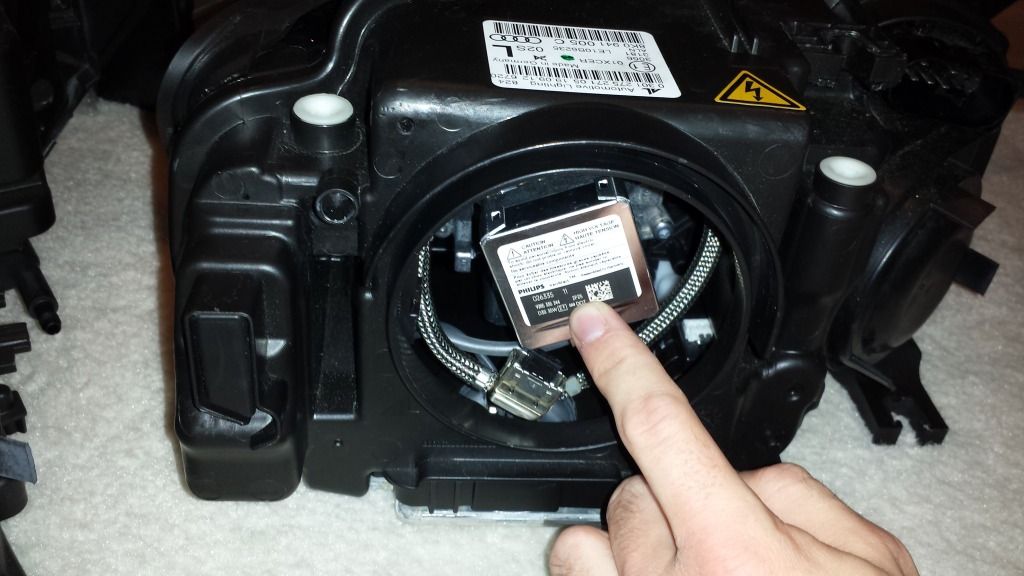
    ^as you can see there's not much room to work with, you'll have to get your hands in there to disconnect the wires.

    The metal connector you just need to pull out, it will take some force. The white plastic connector has a tab you push in to release it.


    Transfer to the ecode housing, reconnect the connectors(they're exactly the same) and screw the ballast back in using the screws you removed from the other housing.

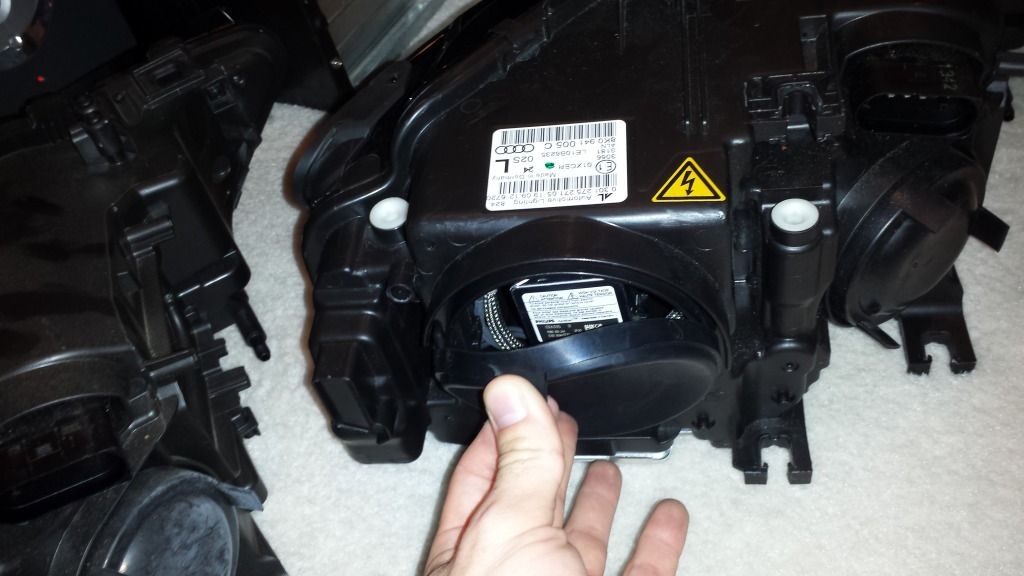
    Now for the ballast for the LED strip, same thing: 3 torx screws, there will also be a rubber gasket. There's one large plastic connector connected to this ballast, remove it.


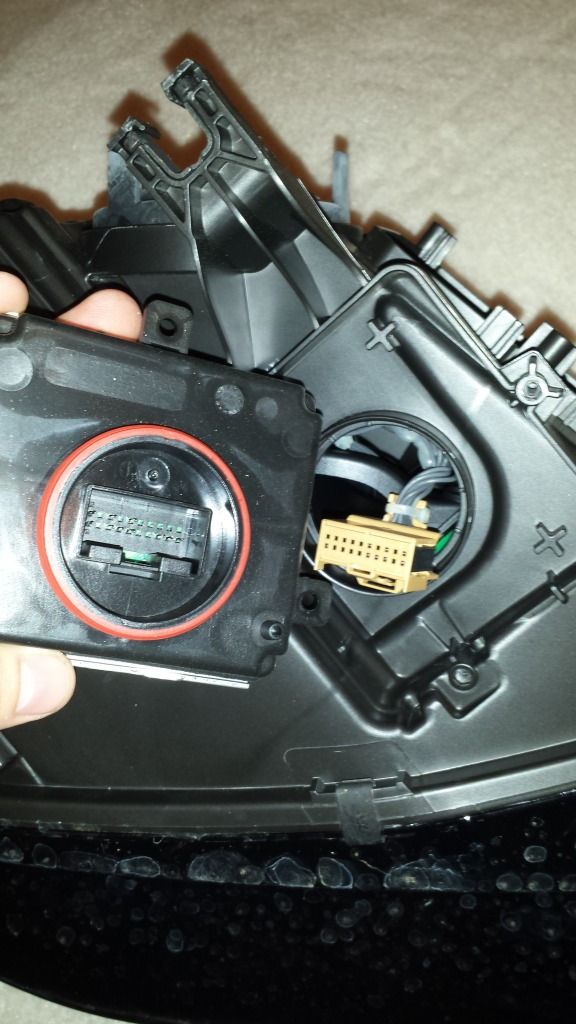
    Transfer again to the ecode housing and do the reverse procedure.

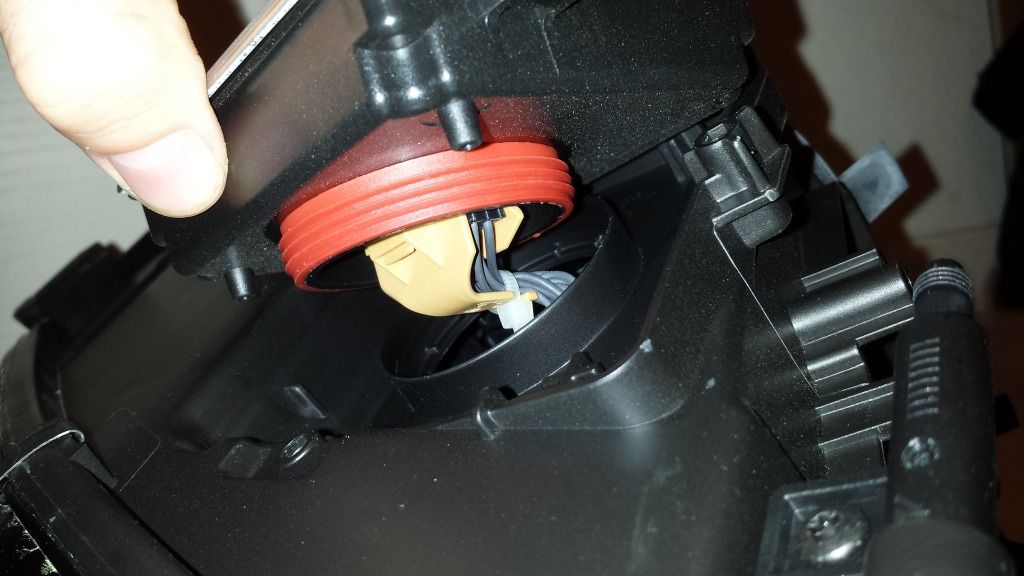
    Now it's time to transfer the HID bulb from the OEM housing to the ecode housing. Here's what they look like with the rubber grommets removed.
    OEM on the left, ecode on the right.


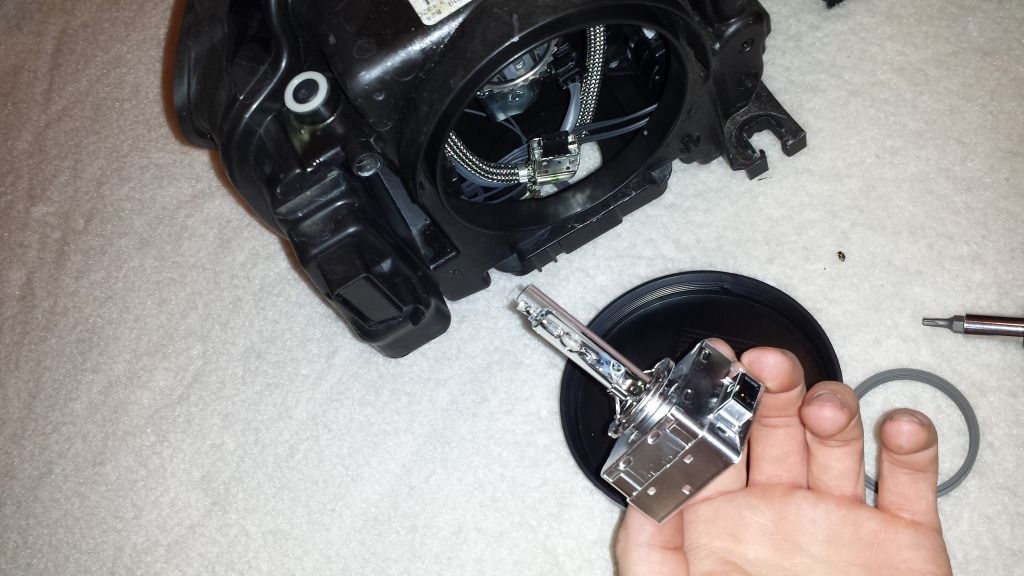
    You need to remove the metal electrical connector to the HID bulb, I did this after removing the bulb. Up to you if you want to remove it while the bulb is still in. To remove the bulb turn the square housing counterclockwise, it can only turn a little bit. It will look like this when it's at the right angle to be removed:


    Pull the bulb straight back be careful not to bang the bulb against anything and do not touch the bulb itself.
    Removed from OEM housing:


    Transfer to the ecode housing, put bulb in same way it went out at an angle like this picture:


    Turn it clockwise until it can't go any farther, the bulb is in. Connect the metal electrical connector. Put the rubber grommet back on.


    The last thing to do is to transfer the two brackets up top from the housing you removed to your new ecode housing. (I bought mine second hand and did not have the brackets, some may already have the brackets and this step will not be necessary.) These are the two brackets to transfer:


    The one on the left is held by one torx screw horizontally. Pull straight up the bracket will come off easily. Transfer to ecode, line it up and push down. This suprised me but for me you have to press it down with some force until the holes line up to re install the screw.
    The one on the right has two smaller torx screws, vertical, that you need to remove. Same thing, pull up and and transfer. This did not require any force, reinstall the two torx screws.

    Now you're ready to install the ecode housing into your car.


    Again, easier method to reinstall the housings -
    Quote Originally Posted by Nastybutler View Post
    Two things to add: When removing and putting them back in, it makes it pretty simple if you pull the inside corner out first when removing and, conversely, the outer part should go in first when putting back in. Secondly, to aid in removal, take that top bracket thingy off that you have to transfer to the new light once you get it wiggled out a bit. That way when you're pulling up and out on the inner part, it doesn't get in the way of that. That's how I did it anyway, and once I figured that out, the second one was a snap.
    At this point it's just reverse order of step one. Put the uclip back on, screw in the top 2 screws, tighten down the middle rear(uclip), then finally the bottom two. Reconnect the electrical connector. Now you can move on to the second housing or...

    If you're finished put the shroud back on first line up the clips for the shroud and the grill:


    and press down, re install the four tabs to complete installing the shroud. Be careful when re installing these. The first one I tried to put back in I nearly broke off one of the flanges.


    When you press the inside through it spreads out the flanges. So, what I did was press the flanges inward to help it slide back into the hole.

    At this point you're done, test them out to see if they're working correctly. You'll have to VAGCOM the side marker out error codes if you haven't already done so. I hope this helped!

    VAGCOM code to remove side marker out error message/code -
    Quote Originally Posted by pwdrskr View Post
    I believe it was this:

    [09 – Cent. Elect.]
    [Coding - 07] -> [Long Coding Helper] -> Byte 10 Bit 3 - Change 1 to 0
    Additional Credit to @Nastybutler for providing a better method to remove and reinstall the headlight housings
    and @pwdrskr for providing the vagcom code
    Last edited by IceFour; 09-09-2016 at 10:27 AM.

  2. #2
    Veteran Member Four Rings xuandatou's Avatar
    Join Date
    Oct 17 2012
    AZ Member #
    102405
    Location
    NoCal

    Great write up !

    Gonna save you at least $75~
    2013 S5 Build Thread
    2001 S4 Avant
    2017 Ducati Monster 821
    Instagram

    Gone but not forgotten:
    2011 Q5 2.0T
    2011 A5 2.0T
    2013 S5
    2007 A6 3.2

  3. #3
    Veteran Member Three Rings 04TurboB6's Avatar
    Join Date
    Feb 17 2008
    AZ Member #
    25365
    Location
    Leesburg, Va

    nice!! looks pretty straight forward! So no bumper removal for headlight changes etc? easier than I thought, on my B7, I had to remove the bumper lol...

    now...where's the final product???!! pic of the e-codes installed

    I'm looking at getting e-codes as well! awesome info!
    2014 Monsoon Gray S4, 6 speed MT
    2007 Ibis White A4 2.0T Quattro, 6 Speed MT SOLD
    2004 Dolphin Grey A4 1.8T, SOLD

  4. #4
    Veteran Member Three Rings bkkchris's Avatar
    Join Date
    Dec 05 2006
    AZ Member #
    13959
    Location
    Los Angeles & Bangkok

    Great writeup. Glad it worked out for you. Ecodes, such a good mod.
    2018 RS5 COUPE // SONOMA GREEN
    - Gone -
    2017 TT Mythos
    2017 Macan GTS Rhodium
    2014 S5 Monsoon
    2013 S4 Phantom
    2012 S4 Monsoon
    2008 S4 Dolphin
    2006 S4 Moonlight
    2004 A4 Dolphin

  5. #5
    Veteran Member Four Rings coolwater's Avatar
    Join Date
    Nov 06 2009
    AZ Member #
    50333
    My Garage
    2023 X3 M40
    Location
    NYC / DC/MD/VA

    Nice write up.
    I hate the new plastic fasteners.
    Much prefer the old screws.
    Lost one of those plastic things already....

    -cW
    2024 RS3 Turbo Blue with Carbon Pack
    2023 X3 M40i Alpine White
    Gone - 2023 RS3 Mythos Black - 2019 SQ5 - 2019 RS5 Coupe - 2015 S3 - 2014 Audi A5 2.0T - 2013 S4 3.0 -2010 A4 2.0T
    Youtube Channel: https://www.youtube.com/channel/UC4z...OgbcLzxwZEOt1A

  6. #6
    Veteran Member Three Rings
    Join Date
    Feb 08 2013
    AZ Member #
    109142
    My Garage
    2017 Corvette Z06; 2007 Ford F-150; 2004 Honda RC51
    Location
    Sammamish, WA

    When you get a chance, I'd love to hear your first impressions of the e-codes vs. the stock lens. I think the stock lenses are pretty good so I'd be interested in hearing your take on the change the first few times you drive them.

    Thanks,
    Mike
    2013 Premium +, Monsoon Gray, S tronic, sport diff, B&O, 19" RS4 reps, black on black interior, carbon inlays

    Mods planned: seeing doctor tomorrow about a lead foot prosthetic

  7. #7
    Veteran Member Four Rings IceFour's Avatar
    Join Date
    Jul 20 2013
    AZ Member #
    119300
    Location
    Union City, California

    Thank you everyone for the comments!

    Quote Originally Posted by 04TurboB6 View Post
    nice!! looks pretty straight forward! So no bumper removal for headlight changes etc? easier than I thought, on my B7, I had to remove the bumper lol...

    now...where's the final product???!! pic of the e-codes installed

    I'm looking at getting e-codes as well! awesome info!
    Nope bumper removal is not necessary at all.

    Only picture I have right now:


    Quote Originally Posted by coolwater View Post
    Nice write up.
    I hate the new plastic fasteners.
    Much prefer the old screws.
    Lost one of those plastic things already....

    -cW
    Thats the reason I felt it worth mentioning... fun fact: I lost the inner part of one of the tabs by pressing down too hard too quickly while trying to get pictures for this write-up. Now it joined by my torx socket. >_>

    Quote Originally Posted by mcoomer View Post
    When you get a chance, I'd love to hear your first impressions of the e-codes vs. the stock lens. I think the stock lenses are pretty good so I'd be interested in hearing your take on the change the first few times you drive them.

    Thanks,
    Mike
    As far as I know the only difference is a wider beam pattern, correct me if im wrong. I do notice it and I like it. I see more of the road around me and whats ahead in different lanes. Its more of a bonus for me though. Aesthetics are a big thing for me. I wouldnt pay full $1600 though. I was already looking for alternatives because the main thing is getting rid of amber side markers. But the new beam pattern I very much like, haven't been flashed yet so I assume theyre not blinding anyone either.

    With that being said 86ing the side marker s gives a nice clean look at night but now the fog lights bother me. Maybe I just wont touch them. I hardly use them anyway.
    Last edited by IceFour; 10-08-2013 at 12:51 AM.

  8. #8
    Veteran Member Four Rings FaceSmA5h's Avatar
    Join Date
    Jun 16 2010
    AZ Member #
    60350
    My Garage
    964
    Location
    └A / California

    Thank you for the DIY.

    I would like to add that when installing mine, there were plastic pieces attached the bottom of the headlights. I wasted 30-40 mins trying to use "finesse" and get it in. After unscrewing two bolts and removing the plastic piece, I had no trouble getting it in.
    Rest in Peace Part #2: Daytona Gray SLine+ |A5HLEY

    Rest in Peace:
    '10 Audi S5 | Quartz Gray

  9. #9
    Veteran Member Four Rings b8audis4's Avatar
    Join Date
    Nov 06 2013
    AZ Member #
    128760
    Location
    Ohio

    Thanks for the DIY!
    2011 Audi S4 - Ibis - Magma - Premium Plus - XPEL - STIR PLUS - Anti Laser Priority - AWE Resonated Exhaust - Ecodes - Alu Kruez - BBS CH-R (Mops)

  10. #10
    Veteran Member Four Rings IceFour's Avatar
    Join Date
    Jul 20 2013
    AZ Member #
    119300
    Location
    Union City, California

    Quote Originally Posted by FaceSmA5h View Post
    Thank you for the DIY.

    I would like to add that when installing mine, there were plastic pieces attached the bottom of the headlights. I wasted 30-40 mins trying to use "finesse" and get it in. After unscrewing two bolts and removing the plastic piece, I had no trouble getting it in.
    Do you have a picture? I can add it into the first post and credit you for the tip. :)

    Sent from my SGH-M919 using Tapatalk

  11. #11
    Veteran Member Four Rings Bomiz's Avatar
    Join Date
    May 01 2012
    AZ Member #
    92869
    Location
    Los Angeles

    What's an IceFour?
    2013 S4 | Monsoon Gray | Premium+ | Nav | B&O | Advanced Key | 19" | Carbon Atlas | Sports Diff | Build Thread!!
    Mods:Air 80 Tint all Around | Roc-Euro Intake | APR RSC Full Exhaust | Alu Kreuz | RS4 Grill from AMI | Miro 111 19x9.5 | Solo-Werks Coilovers | Deval Rear Carbon Fiber Diffuser | Vagcom |

  12. #12
    Veteran Member Four Rings IceFour's Avatar
    Join Date
    Jul 20 2013
    AZ Member #
    119300
    Location
    Union City, California

    Quote Originally Posted by Bomiz View Post
    What's an IceFour?
    Lol Ice Silver combined with S4 :P I wasn't in a very imaginative mood when I made the account.

  13. #13
    Established Member Three Rings LakeShow's Avatar
    Join Date
    Apr 26 2013
    AZ Member #
    114135
    Location
    Long Island, NY

    It looks great especially on the silver. It's just such an expensive investment.
    2013|S4|Carbon Atlas|MMI 3G+NAV|Supercharged Badges|3M 35% Tint|Gloss Powdercoated Peelers|AWE Tuning 102MM|Roc-Euro|Vag-Com'd|
    2014|C63 AMG 507|

    IG: _LakeShow_

  14. #14
    Veteran Member Three Rings Nastybutler's Avatar
    Join Date
    Apr 07 2014
    AZ Member #
    177944
    My Garage
    2010 C6 A6 (Wife's); 2012 Triumph Street Triple R (Phantom Black)
    Location
    United States

    Anybody care to share the coding to remove the error message?

    Sent from my Nexus 5 using Tapatalk
    For Sale: 2014 A5 2.0T (Scuba Blue) | APR Stage 2 v2.0 | 8spd Tiptronic | MMI 3G+ w/Nav | Advanced Key | B&O (w/ upgraded sub) | park assist | heated memory seats & mirrors |

    1/4 Mile: 13.39 @ 100.74 mph on fake 93 octane (90 + Lucas booster)

    Mods can be found in my Build Thread

  15. #15
    Veteran Member Four Rings pwdrskr's Avatar
    Join Date
    Aug 21 2010
    AZ Member #
    63028
    Location
    Carlsbad, CA

    I believe it was this:

    [09 – Cent. Elect.]
    [Coding - 07] -> [Long Coding Helper] -> Byte 10 Bit 3 - Change 1 to 0
    '19RS5 Coupe: Prestige, Daytona Grey, Blk Interior, Carbon Pkg, Driver Pkgs, APR+/TCU/Intake, CETE AVC, ABT Coils, Vossen EVO-1R 20x10et20

    '22RS6: Glacier White, Blk/Gray Interior, Blk Optics, Exec, Driver Pkgs, Sport Exhaust, APR+, Akrapovič Exhaust, CETE AVC/ASC, Vossen GNS-1 22x10.5 et7, Stealth wrapped Piano Black Interior

  16. #16
    Veteran Member Three Rings Nastybutler's Avatar
    Join Date
    Apr 07 2014
    AZ Member #
    177944
    My Garage
    2010 C6 A6 (Wife's); 2012 Triumph Street Triple R (Phantom Black)
    Location
    United States

    Quote Originally Posted by pwdrskr View Post
    I believe it was this:

    [09 – Cent. Elect.]
    [Coding - 07] -> [Long Coding Helper] -> Byte 10 Bit 3 - Change 1 to 0
    :thumbsup: Thanks pwdrskr.

    Sent from my Nexus 5 using Tapatalk
    For Sale: 2014 A5 2.0T (Scuba Blue) | APR Stage 2 v2.0 | 8spd Tiptronic | MMI 3G+ w/Nav | Advanced Key | B&O (w/ upgraded sub) | park assist | heated memory seats & mirrors |

    1/4 Mile: 13.39 @ 100.74 mph on fake 93 octane (90 + Lucas booster)

    Mods can be found in my Build Thread

  17. #17
    Veteran Member Three Rings Nastybutler's Avatar
    Join Date
    Apr 07 2014
    AZ Member #
    177944
    My Garage
    2010 C6 A6 (Wife's); 2012 Triumph Street Triple R (Phantom Black)
    Location
    United States

    Just got the ecodes I got from scottykenny installed. This How-To was the tits! Made it super simple. Two things to add: When removing and putting them back in, it makes it pretty simple if you pull the inside corner out first when removing and, conversely, the outer part should go in first when putting back in. Secondly, to aid in removal, take that top bracket thingy off that you have to transfer to the new light once you get it wiggled out a bit. That way when you're pulling up and out on the inner part, it doesn't get in the way of that. That's how I did it anyway, and once I figured that out, the second one was a snap.

    Now to attempt the coding. Here's hoping pwdrskr knows of what he speaks.

    Happy Independence Day, US Audizine.comites!


    Yes, I may have been drinking while doing this. So what? Wanna fight about it?
    For Sale: 2014 A5 2.0T (Scuba Blue) | APR Stage 2 v2.0 | 8spd Tiptronic | MMI 3G+ w/Nav | Advanced Key | B&O (w/ upgraded sub) | park assist | heated memory seats & mirrors |

    1/4 Mile: 13.39 @ 100.74 mph on fake 93 octane (90 + Lucas booster)

    Mods can be found in my Build Thread

  18. #18
    Veteran Member Three Rings DATZ's Avatar
    Join Date
    Oct 17 2010
    AZ Member #
    65831
    Location
    Northern NJ

    Details about Ecodes from ScottyKenny? Is he a regular seller or one-off?


    Quote Originally Posted by Nastybutler View Post
    Just got the ecodes I got from scottykenny installed. This How-To was the tits! Made it super simple. Two things to add: When removing and putting them back in, it makes it pretty simple if you pull the inside corner out first when removing and, conversely, the outer part should go in first when putting back in. Secondly, to aid in removal, take that top bracket thingy off that you have to transfer to the new light once you get it wiggled out a bit. That way when you're pulling up and out on the inner part, it doesn't get in the way of that. That's how I did it anyway, and once I figured that out, the second one was a snap.

    Now to attempt the coding. Here's hoping pwdrskr knows of what he speaks.

    Happy Independence Day, US Audizine.comites!


    Yes, I may have been drinking while doing this. So what? Wanna fight about it?
    2015 S4 - Sepang Blue - 6mt - Black/Silver Nappa - Sports Diff - Black Optics - B&O - Tech Package - Carbon Atlas

    Bilstein PSS10 - Milltek non res - Eurocode sways/links/AluKreuz/STS - StopTech Trophy 380mm BBK - APR intake

  19. #19
    Veteran Member Three Rings Nastybutler's Avatar
    Join Date
    Apr 07 2014
    AZ Member #
    177944
    My Garage
    2010 C6 A6 (Wife's); 2012 Triumph Street Triple R (Phantom Black)
    Location
    United States

    Quote Originally Posted by DATZ View Post
    Details about Ecodes from ScottyKenny? Is he a regular seller or one-off?
    He's a forum member who is selling his S5.

    Sent from my Nexus 5 using Tapatalk
    For Sale: 2014 A5 2.0T (Scuba Blue) | APR Stage 2 v2.0 | 8spd Tiptronic | MMI 3G+ w/Nav | Advanced Key | B&O (w/ upgraded sub) | park assist | heated memory seats & mirrors |

    1/4 Mile: 13.39 @ 100.74 mph on fake 93 octane (90 + Lucas booster)

    Mods can be found in my Build Thread

  20. #20
    Veteran Member Three Rings Nastybutler's Avatar
    Join Date
    Apr 07 2014
    AZ Member #
    177944
    My Garage
    2010 C6 A6 (Wife's); 2012 Triumph Street Triple R (Phantom Black)
    Location
    United States

    Quote Originally Posted by pwdrskr View Post
    I believe it was this:

    [09 – Cent. Elect.]
    [Coding - 07] -> [Long Coding Helper] -> Byte 10 Bit 3 - Change 1 to 0
    That did the trick! Thanks again.

    Sent from my Nexus 5 using Tapatalk
    For Sale: 2014 A5 2.0T (Scuba Blue) | APR Stage 2 v2.0 | 8spd Tiptronic | MMI 3G+ w/Nav | Advanced Key | B&O (w/ upgraded sub) | park assist | heated memory seats & mirrors |

    1/4 Mile: 13.39 @ 100.74 mph on fake 93 octane (90 + Lucas booster)

    Mods can be found in my Build Thread

  21. #21
    Veteran Member Four Rings IceFour's Avatar
    Join Date
    Jul 20 2013
    AZ Member #
    119300
    Location
    Union City, California

    Quote Originally Posted by Nastybutler View Post
    Just got the ecodes I got from scottykenny installed. This How-To was the tits! Made it super simple. Two things to add: When removing and putting them back in, it makes it pretty simple if you pull the inside corner out first when removing and, conversely, the outer part should go in first when putting back in. Secondly, to aid in removal, take that top bracket thingy off that you have to transfer to the new light once you get it wiggled out a bit. That way when you're pulling up and out on the inner part, it doesn't get in the way of that. That's how I did it anyway, and once I figured that out, the second one was a snap.

    Now to attempt the coding. Here's hoping pwdrskr knows of what he speaks.

    Happy Independence Day, US Audizine.comites!


    Yes, I may have been drinking while doing this. So what? Wanna fight about it?
    Added to the OP, thanks.

  22. #22
    Senior Member Three Rings
    Join Date
    Oct 19 2014
    AZ Member #
    289543
    Location
    PA

    Is any adjustment/alignment typically needed after installing these? I understand the white screws are for this purpose.

  23. #23
    Veteran Member Three Rings Nastybutler's Avatar
    Join Date
    Apr 07 2014
    AZ Member #
    177944
    My Garage
    2010 C6 A6 (Wife's); 2012 Triumph Street Triple R (Phantom Black)
    Location
    United States

    Quote Originally Posted by AZT View Post
    Is any adjustment/alignment typically needed after installing these? I understand the white screws are for this purpose.
    I had to adjust mine down a bit to keep from blinding other drivers.
    For Sale: 2014 A5 2.0T (Scuba Blue) | APR Stage 2 v2.0 | 8spd Tiptronic | MMI 3G+ w/Nav | Advanced Key | B&O (w/ upgraded sub) | park assist | heated memory seats & mirrors |

    1/4 Mile: 13.39 @ 100.74 mph on fake 93 octane (90 + Lucas booster)

    Mods can be found in my Build Thread

  24. #24
    Veteran Member Four Rings
    Join Date
    Oct 14 2012
    AZ Member #
    102231
    My Garage
    Empty...for now...
    Location
    SE PA

    Quote Originally Posted by AZT View Post
    Is any adjustment/alignment typically needed after installing these? I understand the white screws are for this purpose.
    Quote Originally Posted by Nastybutler View Post
    I had to adjust mine down a bit to keep from blinding other drivers.
    And I had to adjust mine up a bit to provide adequate visibility. My car is lowered which may contribute to the issue, i.e. at stock ride height the factory-set angle of the projectors may provide adequate light beam range, but when lowered the beam may hit the ground too close in front of the car. I also bought mine used, so I don't know if the previous owner had already changed the projector setting from the factory.

    In the past I've adjusted them up incrementally (like 1/2 turn at a time) and went for test drives to see if the light output was acceptable to me. I would go through a couple of iterations of adjusting them up until I got to the point where people were flashing their lights at me - then, I would go back down by quarter turns until I got no feedback from the other drivers. It's a roundabout way of doing it (and annoying to other drivers for a night or two) but it was easier than taking it to the dealer and having them charge $50 or whatever it is for them to do a factory calibration.
    SOLD 2015 Daytona Gray S4
    6MT / Sport Diff / B&O / Tech Pkg / Carbon Atlas / Black Alcantara
    Mods: Xpel Ultimate, 3M Color Stable Tint 35%, Bilstein PSS10, Euro Code Alu Kreuz, Eurocode Sway Bars, Moog Endlinks, CR-15, Eurocode Meisterwerk ASTS, AWE Resonated Touring Exhaust, 034 Transmission Mount, HCX LED 3000k Fog Lights, Apikol Rear Diff Mount

  25. #25
    Veteran Member Four Rings IceFour's Avatar
    Join Date
    Jul 20 2013
    AZ Member #
    119300
    Location
    Union City, California

    Quote Originally Posted by AZT View Post
    Is any adjustment/alignment typically needed after installing these? I understand the white screws are for this purpose.
    Myself I never adjusted it. I haven't had high beams ever flashed at me so it seems it's not blinding anyone.

  26. #26
    Senior Member Three Rings
    Join Date
    Oct 19 2014
    AZ Member #
    289543
    Location
    PA

    Finally did the Ecode swap tonight on my '15 B8.5 S4 and the write-up was a big help, thanks OP! Only a couple addl notes:

    1. I didn't see it mentioned but on mine there was also a rubber (drain or vent?) hose that is connected to each housing near the inside/bottom area that must be removed and reconnected. On my first headlight it pulled off by itself and I didn't even notice it and reinstalled the Ecode without connecting it. When I saw it tugging on the 2nd headlight I went back and was able to reconnect it the first without removing again.

    2. My new Ecodes came with preinstalled brackets so wasn't necessary to move over. Also I didn't see how removing would help at all in getting the housing out (maybe for the A5/S5 it is different). As mentioned though it did work well to pull the inside of the light out first. I found that then tilting/twisting the inside upward a little allowed the outside to more easily clear that sharp point of the fender.

  27. #27
    Active Member Two Rings nok's Avatar
    Join Date
    Dec 04 2006
    AZ Member #
    13924
    Location
    Maspeth, NY

    Quote Originally Posted by AZT View Post
    Finally did the Ecode swap tonight on my '15 B8.5 S4 and the write-up was a big help, thanks OP! Only a couple addl notes:

    1. I didn't see it mentioned but on mine there was also a rubber (drain or vent?) hose that is connected to each housing near the inside/bottom area that must be removed and reconnected. On my first headlight it pulled off by itself and I didn't even notice it and reinstalled the Ecode without connecting it. When I saw it tugging on the 2nd headlight I went back and was able to reconnect it the first without removing again.
    Was just about to comment this... would have saved me a bit of frustration to know about the breather hose attached to the inside corner of the housing. Followed these removal instructions to get at my cornering bulbs and couldn't figure out why it wouldn't come out until I noticed the hose. Pulls off easily and goes back on easily as well.
    -nok
    2013 (B8.5) S4 Prestige, Stock
    Past: 2002 (B6) A4 Sport Pkg

  28. #28
    Senior Member Two Rings
    Join Date
    Mar 01 2016
    AZ Member #
    369598
    My Garage
    Gone: 2007 Acura TL Type S, 2004 Acura TL, 2005 VW Passat 1.8T
    Location
    NH

    Thanks for the guide OP, I found it very useful. I was able to install new 5000k Xenarc CBI bulbs and swap the turn signals for LED bulbs in about an hour. The bulbs I used for the turn signals were the ones here: http://www.amazon.com/LEDIN-PWY24W-P...ilpage_o05_s00

    On a side note, does anyone know what this hose is for? It was connected to the bottom of the drivers side headlight housing, but was not connected in the same place on the passenger side (it was connected to something that was not attached to the headlight housing on the passenger side).
    [url=http://postimage.org/]

    I also took a video to show the difference between LED and non LED turn signal bulbs. Personally I don't think this is a must do mod, but since I was in there for the headlight bulbs anyway I chose to do it. The LED definitely match the rest of the turn signals (in the side mirrors and the rears) better. You can see how the driver side incandescent bulb gets out of sync with the LED on the passenger side. This would be the same effect of getting out of sync with the LED turns in the mirrors.

    The first video below is slowmo and the second is norma speed. (sorry for the watermark for the free software).


    2013 S4 DSG | VX3 LED Fogs | LED interior conversion | LED reverse lights and plate lights | CR-15 Strut Tower Brace | 35% Window Tint |

  29. #29
    Established Member Two Rings rallm7's Avatar
    Join Date
    Feb 24 2016
    AZ Member #
    369294
    Location
    CT

    Quote Originally Posted by bberg22 View Post
    On a side note, does anyone know what this hose is for? It was connected to the bottom of the drivers side headlight housing, but was not connected in the same place on the passenger side (it was connected to something that was not attached to the headlight housing on the passenger side).
    I think its just a drain for any condensate. Mine was located in the same spot for both driver and passenger side headlights (from what I remember...).
    Current: 2020 S6 | Daytona Gray Pearl | Black Optics
    Past: 2016 S4 | Ibis White | Black Nappa | Black Optics | Ecodes | RS4 Grille | ECS Carbon Mirrors | APR Stage 2 + DSG | AWE Touring Resonated | ECS Kohlefaser Luft-Technik Intake
    Summer: V-FF 101 19x9.5 Carbon Graphite w/ PSS 255/35 | Winter: Alzor Rotor Reps Matte Black 18x8 w/ TBD tires

  30. #30
    Senior Member Two Rings
    Join Date
    Mar 01 2016
    AZ Member #
    369598
    My Garage
    Gone: 2007 Acura TL Type S, 2004 Acura TL, 2005 VW Passat 1.8T
    Location
    NH

    You are correct about the hose. I just didn't notice it in the passenger side at first. I'll have to get back in there and reconnect it.

  31. #31
    Veteran Member Three Rings Pared's Avatar
    Join Date
    Oct 28 2010
    AZ Member #
    66308
    Location
    NYC

    Just wanted to thank IceFour for putting this together. Process is extremely simple but having a reference makes things even easier.

  32. #32
    Established Member Two Rings Chris4Reef's Avatar
    Join Date
    Feb 06 2013
    AZ Member #
    109041
    My Garage
    13 S4 15 A3
    Location
    Orlando, FL

    My car has the AFS and I'm switch to non-AFS Ecode lights. Is there going to be another error besides the amber light? Does anyone have that VAGCOM code?
    2013 Prestige S4 | Roc Euro Intake | AWE 102mm black tip catback exhaust W/ Resonated DPs | HRE FF01 Tarmac 20 X 9 | Michelin PSS 255/30/20 | ECS CF Spoiler | ECS CF Rear Diffuser | ECS CF Side blades | ECS CF Mirror Caps | ECS CF Fog Grille Accents | ECS 2 Piece Rotors | Deval Front Lip | H&R Street Performance Coilovers | Eurocode AK | Eurocode F&R Sways + Endlinks | MRC Racing Titanium Stud Kit | CR-15 Upper Brace | 034 Trans mount | RS Grill | Blackout badges | 3M Gloss Black wrapped roof

  33. #33
    Senior Member Two Rings JTFisch90's Avatar
    Join Date
    Mar 24 2017
    AZ Member #
    396227
    My Garage
    2003 Infiniti QX4
    Location
    WA

    I have an amber light question too -

    On ecodes, does the amber parking light (now white) still work? Do they shine white, or not at all? Can these LEDs/bulbs be replaced when installing the ecodes?
    AUDI S5 B8.5 - Prestige - Monsoon Grey - Sports Differential

    Mods:
    APR ECU - Stage 2 | APR TCU | APR Dual Pulley | APR Ultracharger | APR CPS | APR Intake |
    VMR V710 - 19x8.5 | Michelin PS4S | ECS Spacers | ECS Drivetrain Mounts | Eurocode Sway Bars | Eurocode Alu Kreuz | CR-15 |
    Ecodes | RS5 Grille | 5500K HIDs | LED Fogs | Red LED Footwells | ECS Aluminum Skid |

  34. #34
    Veteran Member Three Rings silverf0x's Avatar
    Join Date
    Dec 14 2015
    AZ Member #
    365809
    Location
    Montreal, QC

    Quote Originally Posted by JTFisch90 View Post
    I have an amber light question too -

    On ecodes, does the amber parking light (now white) still work? Do they shine white, or not at all? Can these LEDs/bulbs be replaced when installing the ecodes?
    There are simply no lights being the clear reflectors.
    Murdered B8.5 S4
    Build Thread

  35. #35
    Senior Member Two Rings JTFisch90's Avatar
    Join Date
    Mar 24 2017
    AZ Member #
    396227
    My Garage
    2003 Infiniti QX4
    Location
    WA

    Oh ok. Thank you. I was always curious about that.
    AUDI S5 B8.5 - Prestige - Monsoon Grey - Sports Differential

    Mods:
    APR ECU - Stage 2 | APR TCU | APR Dual Pulley | APR Ultracharger | APR CPS | APR Intake |
    VMR V710 - 19x8.5 | Michelin PS4S | ECS Spacers | ECS Drivetrain Mounts | Eurocode Sway Bars | Eurocode Alu Kreuz | CR-15 |
    Ecodes | RS5 Grille | 5500K HIDs | LED Fogs | Red LED Footwells | ECS Aluminum Skid |

  36. #36
    Veteran Member Three Rings SeattleiteA6's Avatar
    Join Date
    May 08 2015
    AZ Member #
    331800
    Location
    Seattle, WA

    Reviving this post, hoping that someone downloaded/saved it somewhere and could repost the pictures....ya know, because Photobucket blows.

    This is the best tutorial I've seen (and I've searched a lot) and I finally got a set of ecodes so I need it more than ever!

    I PM'd the OP and he is gonna see what he can dig up, but I figured I may as well see if any other AZers happened to save it somewhere where PB couldn't sabotage it.

    Thanks gents


    Sent from my iPhone using Tapatalk
    2014 S6 Phantom w Black Int & Carbon Atlas//B&O//Innovation//Black Optics//RS front clip//E-code Dynamic Tails//Carbon Diffuser w carbon tips//VCDS -15mm//Straight Pipes//JB4
    2018 Q7 Night Black w Black Int//Technik Trim (CAN origin)//Luxury Pkg//Black Optics//Adaptive Air//euro tails and other mods forthcoming...
    ====
    2013 Q7 3.0T Prestige S-Line Plus
    2013 RS5 Ibis w Black Int//e-code tails//20" HRE FF01
    2012 A6 3.0T Prestige//Sport Pkg

  37. #37
    Senior Member Two Rings JTFisch90's Avatar
    Join Date
    Mar 24 2017
    AZ Member #
    396227
    My Garage
    2003 Infiniti QX4
    Location
    WA

    +1.
    I have ecodes on the way too.
    This would be really helpful.
    AUDI S5 B8.5 - Prestige - Monsoon Grey - Sports Differential

    Mods:
    APR ECU - Stage 2 | APR TCU | APR Dual Pulley | APR Ultracharger | APR CPS | APR Intake |
    VMR V710 - 19x8.5 | Michelin PS4S | ECS Spacers | ECS Drivetrain Mounts | Eurocode Sway Bars | Eurocode Alu Kreuz | CR-15 |
    Ecodes | RS5 Grille | 5500K HIDs | LED Fogs | Red LED Footwells | ECS Aluminum Skid |

  38. #38
    Established Member Two Rings mikron2's Avatar
    Join Date
    Feb 27 2016
    AZ Member #
    369451
    Location
    Nevada

    Does anybody happen to have the pictures backed up anywhere? They are no longer visible for me on photobucket.
    2013 RS5 - Vorsteiner VFF - 104 Graphite 20x10, E-Codes, ECS Aggressive Spacer Kit

  39. #39
    Veteran Member Three Rings silverf0x's Avatar
    Join Date
    Dec 14 2015
    AZ Member #
    365809
    Location
    Montreal, QC

    Haven't saved them but to be honest it's pretty straight forward..
    Murdered B8.5 S4
    Build Thread

  40. #40
    Senior Member Two Rings JTFisch90's Avatar
    Join Date
    Mar 24 2017
    AZ Member #
    396227
    My Garage
    2003 Infiniti QX4
    Location
    WA

    IceFour,
    Do you still have these pictures?

    I'm installing these this weekend. I'm not too worried but I'm sure this guide would save me some time.
    AUDI S5 B8.5 - Prestige - Monsoon Grey - Sports Differential

    Mods:
    APR ECU - Stage 2 | APR TCU | APR Dual Pulley | APR Ultracharger | APR CPS | APR Intake |
    VMR V710 - 19x8.5 | Michelin PS4S | ECS Spacers | ECS Drivetrain Mounts | Eurocode Sway Bars | Eurocode Alu Kreuz | CR-15 |
    Ecodes | RS5 Grille | 5500K HIDs | LED Fogs | Red LED Footwells | ECS Aluminum Skid |

Bookmarks

Posting Permissions

  • You may not post new threads
  • You may not post replies
  • You may not post attachments
  • You may not edit your posts
  •  


    © 2001-2025 Audizine, Audizine.com, and Driverzines.com
    Audizine is an independently owned and operated automotive enthusiast community and news website.
    Audi and the Audi logo(s) are copyright/trademark Audi AG. Audizine is not endorsed by or affiliated with Audi AG.