Audizine - An Automotive Enthusiast Community

Results 1 to 16 of 16
  1. #1
    Established Member Two Rings
    Join Date
    Mar 26 2009
    AZ Member #
    40368
    Location
    Dub Central (WA)

    timing chain marks? or how to set cam chain timing? any PDF?

    Guest-only advertisement. Register or Log In now!
    Do either of the cam chains use visual marks to set the timing correctly? I have the motor out of my 2007 S4 and was going to replace the cam adjusters, however I thought it might be a good time to to replace the upper guides for extra piece of mind. Is there a PDF or a good source someone could direct me to about setting the cam chain timing during reassembly. I reeeeeally dont want to get everything back in the car to find I am off a link or tooth. Thank you!

  2. #2
    Veteran Member Four Rings gcoy's Avatar
    Join Date
    Apr 06 2009
    AZ Member #
    40835
    My Garage
    2005 B6 S4 6mt Avant & 2001 B5 S4 6mt Avant (Sold) & 2007 VW Passat 3.6 4Mo wagon
    Location
    Boise Id

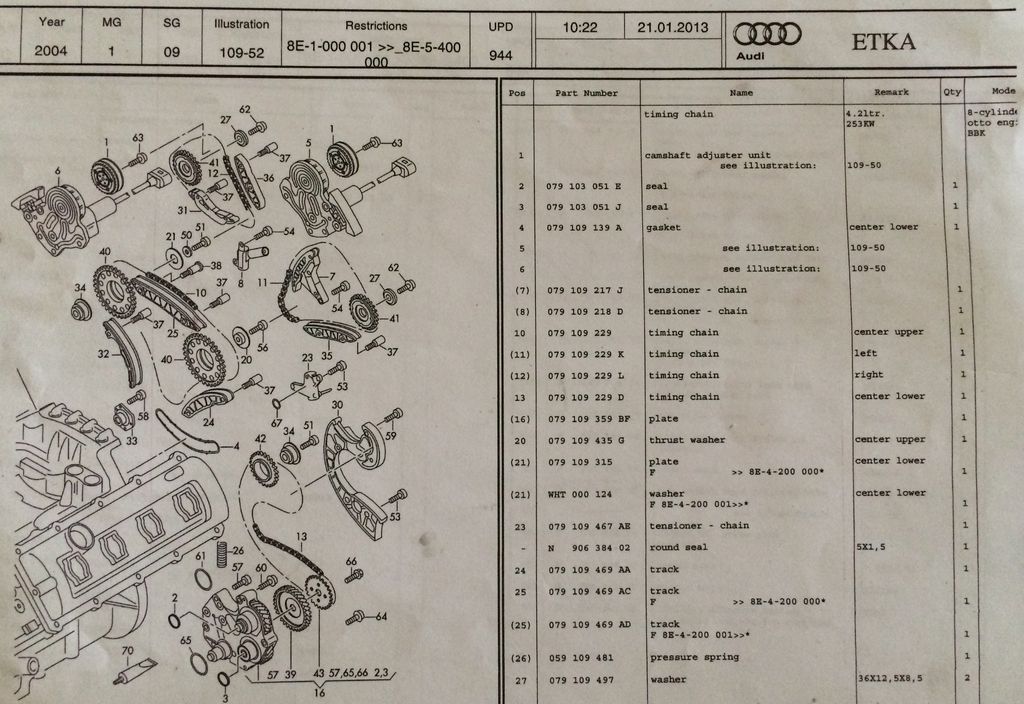
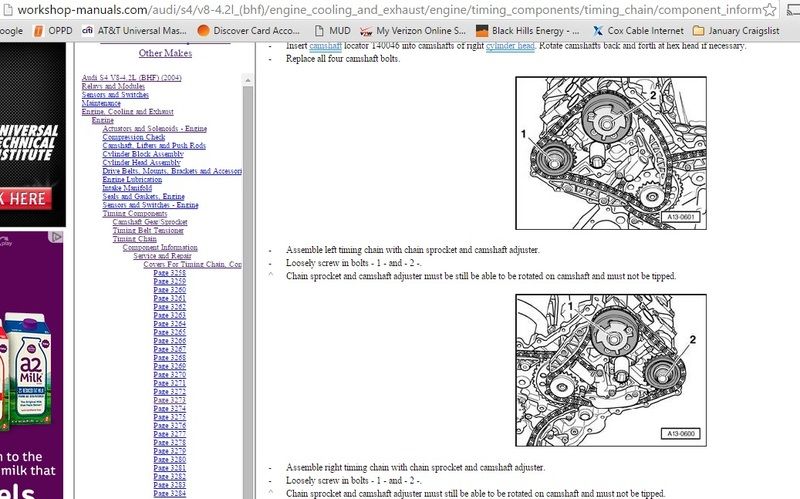
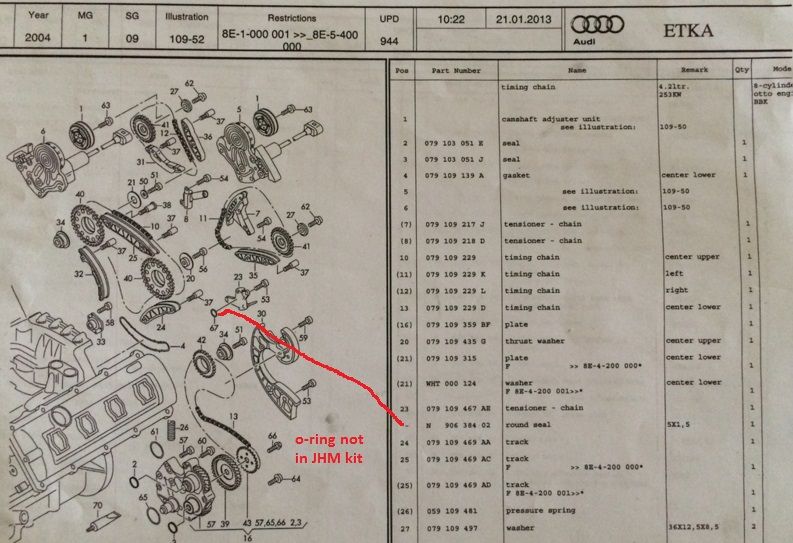
    No they do not. Attached is a pic of the program that I used, ETKA.
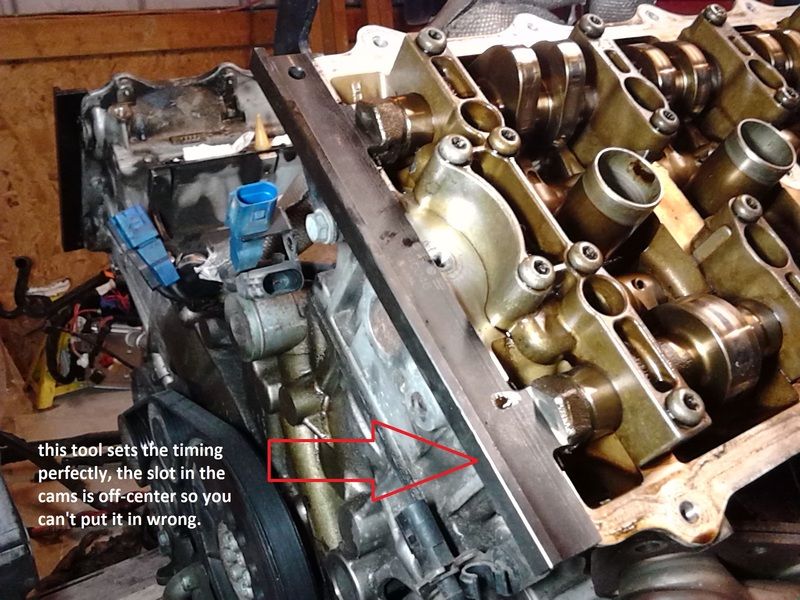
    You will also need the tools to set the timing

    [IMG][/IMG]

  3. #3
    Veteran Member Three Rings VroomTT's Avatar
    Join Date
    Nov 21 2013
    AZ Member #
    131209
    Location
    SE FL

    Crazy question... how many of the guides can be replaced without doing the full timing overhaul?

    For example; if I'm doing the clutch and while the trans is out, pop off the rear covers(engine still in car), which of the guides could theoretically just be swapped out for the upgraded versions? Ideally the big ones that commonly break could just be swapped out and covers thrown back on.

    Can it be done?

  4. #4
    Veteran Member Four Rings JimmyBones's Avatar
    Join Date
    Apr 03 2010
    AZ Member #
    57098
    Location
    Northern Virginia

    Quote Originally Posted by VroomTT View Post
    Crazy question... how many of the guides can be replaced without doing the full timing overhaul?

    For example; if I'm doing the clutch and while the trans is out, pop off the rear covers(engine still in car), which of the guides could theoretically just be swapped out for the upgraded versions? Ideally the big ones that commonly break could just be swapped out and covers thrown back on.

    Can it be done?
    I have done timing chain services with the engine still in the car but it is much more involved then just taking the transmission/clutch/flywheel off. I say that because there is a certain order to how the covers for the timing components come off and there is a lot of other stuff that has to come off before you can even get the timing covers off. The lower left guide that always breaks requires the really big lower timing chain cover to be taken off. Which means that everything else is opened up. The camshaft adjusters however can be replaced without taking the transmission off but the whole top of the engine has to come apart.

  5. #5
    Veteran Member Three Rings VroomTT's Avatar
    Join Date
    Nov 21 2013
    AZ Member #
    131209
    Location
    SE FL

    Quote Originally Posted by JimmyBones View Post
    I have done timing chain services with the engine still in the car but it is much more involved then just taking the transmission/clutch/flywheel off. I say that because there is a certain order to how the covers for the timing components come off and there is a lot of other stuff that has to come off before you can even get the timing covers off. The lower left guide that always breaks requires the really big lower timing chain cover to be taken off. Which means that everything else is opened up. The camshaft adjusters however can be replaced without taking the transmission off but the whole top of the engine has to come apart.
    Apologies for the thread jack, but this is great info. Right, so assuming trans/clutch/flywheel already off, what's involved to get to that lower left guide? Oil/Coolant drain, Coolant hard-pipe in the back, some wiring and misc connections, valve covers off up top, upper covers off from each bank, then the lower back cover? I know I'm over simplifying it.

    Does removing that lower rear cover mean the full timing service is required? Or can it be removed to replace the bad guides without the motor needing to be re-timed?

  6. #6
    Veteran Member Four Rings badger.'s Avatar
    Join Date
    Mar 31 2014
    AZ Member #
    168335
    My Garage
    '18 RS3 | '05 S4 Avant
    Location
    KY

    Quote Originally Posted by VroomTT View Post
    Or can it be removed to replace the bad guides without the motor needing to be re-timed?
    I had all my covers off when I did my timing (engine out) and didn't actually "reset" or "re-time" anything, left it all locked (crank pin/cam bars) and changed one guide/tensioner at a time. SO basically if you are still "in time" then you don't need to go through the entire re-timing process.
    YMMV
    ninja edit: i installed the whole JHM intermediate timing kit this way, mech adjusters included.
    '18 RS3 Glacier White: DS1 Stg 2 | Wagner EVO1 IC | 034 4" Turbo Inlet | 034 4" Intake
    '05 S4 Avant Brilliant Red: JHM Tune | JHMv1 Headers | Fast Intentions Catback | Ported IM & Spacers | JHM LWCP | JHM ATF Cooler | Thor Skid Plate | Koni Yellows | Apikol Rear Diff | JHM LW Rotors | AudioQ 1200D w/Dual 10" CVRs

  7. #7
    Senior Member Two Rings icanfly's Avatar
    Join Date
    Jan 12 2012
    AZ Member #
    86544
    My Garage
    06 B7 S4 | 92 Corrado SLC VR6 | STI Powered HandBuilt TarmacRallyCar | Skydiving Rig
    Location
    Looking for a canyon to carve.

    As was pointed out, you'll need the tools to do this. You can rent them from JHM.

    I am currently doing my timing system refresh right now (self-pulled motor) and am at the critical stage of timing. There are documents that can be provided (I got them from another member and as such will spread the love, just PM me with your email).

    Soon, I'll be doing a write up of what it actually takes to do this yourself and what I learned in the process as a shade tree mechanic to help others who choose to tackle this project.
    slow is fast...

  8. #8
    Active Member Two Rings Foot's Avatar
    Join Date
    Oct 13 2010
    AZ Member #
    65616
    My Garage
    1991 Audi V8 quattro 5 speed
    Location
    Bellevue, NE

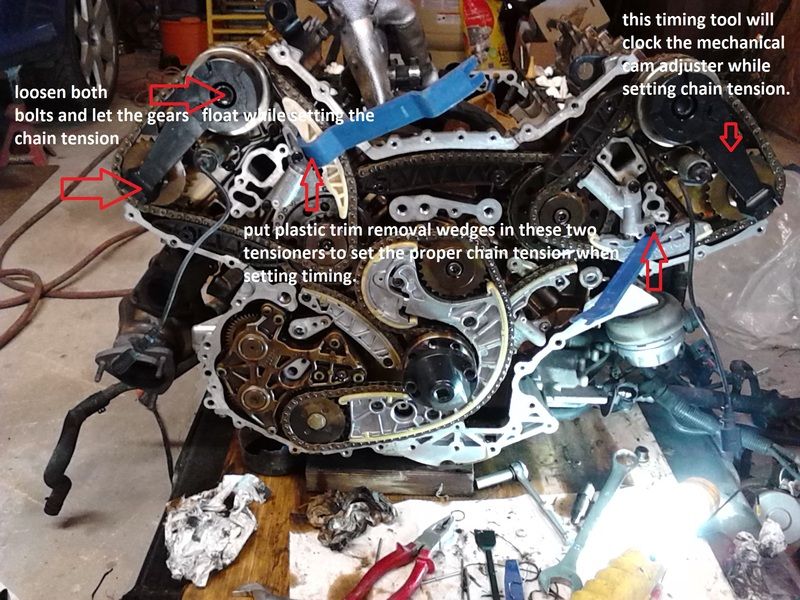
    The timing tools will set the timing for you, but the trick is to loosen the bolts on the cam gears and let them float while setting the timing. The exhaust cam gear and the intake cam mechanical adjuster gear move around, but the cams stay put, while you take up the slack in the chains. Then once the tensioners have the slack taken out with wedges, you tighten the bolts in the cam gears to lock in the timing.


    2004 Audi S4 6 speed Nogaro Blue
    1991 Audi V8 quattro 5 speed Pearl White

  9. #9
    Active Member Two Rings Foot's Avatar
    Join Date
    Oct 13 2010
    AZ Member #
    65616
    My Garage
    1991 Audi V8 quattro 5 speed
    Location
    Bellevue, NE

    Last edited by Foot; 02-01-2016 at 08:23 PM. Reason: better link to chain tentioners
    2004 Audi S4 6 speed Nogaro Blue
    1991 Audi V8 quattro 5 speed Pearl White

  10. #10
    Active Member Two Rings Foot's Avatar
    Join Date
    Oct 13 2010
    AZ Member #
    65616
    My Garage
    1991 Audi V8 quattro 5 speed
    Location
    Bellevue, NE

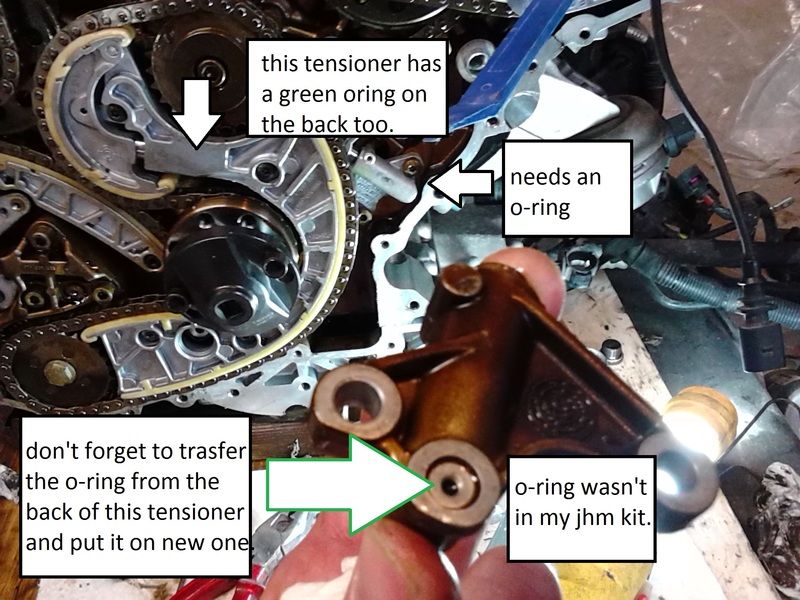
    FYI: The JHM kit is missing the 2 exhuast cam bolts and an O-ring #N 906 384 02 for a small tensioner (#67 under #23 on the ETKA).

    The manual clearly states that the cam gears need to be loose when setting chain tension and to do that you need to replace all 4 "stretch bolts" on the cams, but JHM only gives you two. The slack in the chain is what Audi wants you to get out, so thats why they want the gears to float around on the cams until the proper tension is in the chains.

    The Audi V8 from 1991 has dual overhead cams and the gears on the cams need to float and stay loose when you set the timing on that engine too in order to take out the slack. Audi has always done it that way. Lock the cams, leave the cam gears loose.

    2004 Audi S4 6 speed Nogaro Blue
    1991 Audi V8 quattro 5 speed Pearl White

  11. #11
    Veteran Member Four Rings gcoy's Avatar
    Join Date
    Apr 06 2009
    AZ Member #
    40835
    My Garage
    2005 B6 S4 6mt Avant & 2001 B5 S4 6mt Avant (Sold) & 2007 VW Passat 3.6 4Mo wagon
    Location
    Boise Id

    ^^^ Great advise

  12. #12
    Senior Member Two Rings icanfly's Avatar
    Join Date
    Jan 12 2012
    AZ Member #
    86544
    My Garage
    06 B7 S4 | 92 Corrado SLC VR6 | STI Powered HandBuilt TarmacRallyCar | Skydiving Rig
    Location
    Looking for a canyon to carve.

    Foot,
    it looks like your S4 is a 2004 - when pulling my timing system apart, I didn't find the O-Ring #67 as called out in the diagram either in the adjuster or on the motor. I did pick one up before I started the project because I remember someone calling this out sometime back in an old thread I could no longer find. As such, does anyone have enough technical knowledge (JHM Team?) can you speak to the need for this O-Ring (specifically in my case - an 06') and call out the difference between the different year engines?

    want to make sure that we are getting and sharing the right information.
    thanks!
    slow is fast...

  13. #13
    Veteran Member Three Rings VroomTT's Avatar
    Join Date
    Nov 21 2013
    AZ Member #
    131209
    Location
    SE FL

    Quote Originally Posted by badger. View Post
    I had all my covers off when I did my timing (engine out) and didn't actually "reset" or "re-time" anything, left it all locked (crank pin/cam bars) and changed one guide/tensioner at a time. SO basically if you are still "in time" then you don't need to go through the entire re-timing process.
    YMMV
    ninja edit: i installed the whole JHM intermediate timing kit this way, mech adjusters included.
    This is exactly what I wanted to know! No timing concerns for me yet(knock on wood) but I figure if I tackle the clutch, wouldn't be a bad idea to try to check guides for cracks and swap them out for the metal/updated ones.

  14. #14
    Active Member Two Rings Foot's Avatar
    Join Date
    Oct 13 2010
    AZ Member #
    65616
    My Garage
    1991 Audi V8 quattro 5 speed
    Location
    Bellevue, NE

    Quote Originally Posted by icanfly View Post
    Foot,
    it looks like your S4 is a 2004 - when pulling my timing system apart, I didn't find the O-Ring #67 as called out in the diagram either in the adjuster or on the motor. I did pick one up before I started the project because I remember someone calling this out sometime back in an old thread I could no longer find. As such, does anyone have enough technical knowledge (JHM Team?) can you speak to the need for this O-Ring (specifically in my case - an 06') and call out the difference between the different year engines?

    want to make sure that we are getting and sharing the right information.
    thanks!
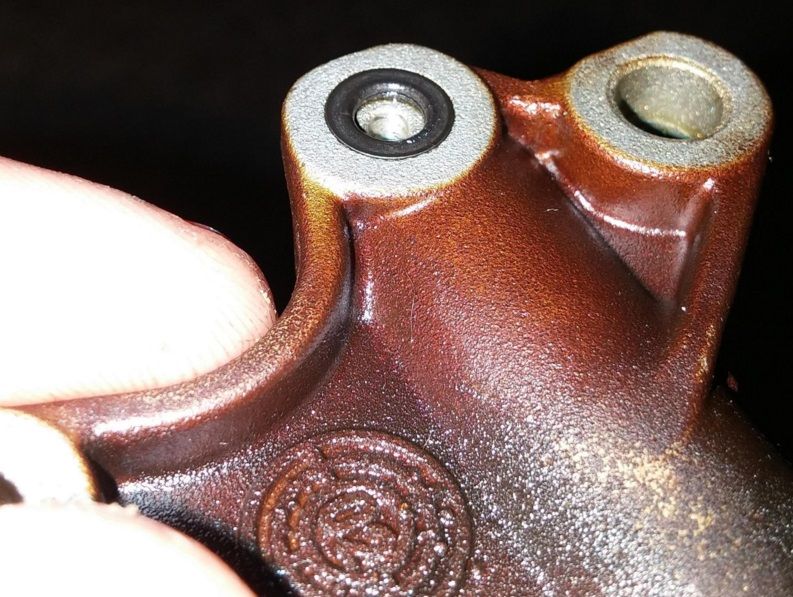
    If you look closely at this pic of the tensioner in question, you'll see the rough casting, it mates to a machined surface on the block, and so it makes an o-ring necessary to seal it. If your 2006 tensioner is machined vs. cast at this o-ring location, then no o-ring needed. I think the one you get from JHM is cast in the kit and so I'd put in the o-ring.

    pic borrowed from badger, thanks badger for this detailed pic.
    2004 Audi S4 6 speed Nogaro Blue
    1991 Audi V8 quattro 5 speed Pearl White

  15. #15
    Veteran Member Four Rings badger.'s Avatar
    Join Date
    Mar 31 2014
    AZ Member #
    168335
    My Garage
    '18 RS3 | '05 S4 Avant
    Location
    KY

    Quote Originally Posted by VroomTT View Post
    This is exactly what I wanted to know! No timing concerns for me yet(knock on wood) but I figure if I tackle the clutch, wouldn't be a bad idea to try to check guides for cracks and swap them out for the metal/updated ones.
    and to clarify, i did replace the top two cam bolts (those came off due to the mechanical adjusters) but I did not loosen the others ones as Foot specified.
    '18 RS3 Glacier White: DS1 Stg 2 | Wagner EVO1 IC | 034 4" Turbo Inlet | 034 4" Intake
    '05 S4 Avant Brilliant Red: JHM Tune | JHMv1 Headers | Fast Intentions Catback | Ported IM & Spacers | JHM LWCP | JHM ATF Cooler | Thor Skid Plate | Koni Yellows | Apikol Rear Diff | JHM LW Rotors | AudioQ 1200D w/Dual 10" CVRs

  16. #16
    Veteran Member Four Rings badger.'s Avatar
    Join Date
    Mar 31 2014
    AZ Member #
    168335
    My Garage
    '18 RS3 | '05 S4 Avant
    Location
    KY

    Quote Originally Posted by Foot View Post
    If you look closely at this pic of the tensioner in question, you'll see the rough casting, it mates to a machined surface on the block, and so it makes an o-ring necessary to seal it. If your 2006 tensioner is machined vs. cast at this o-ring location, then no o-ring needed. I think the one you get from JHM is cast in the kit and so I'd put in the o-ring.

    pic borrowed from badger, thanks badger for this detailed pic.
    No problem :)

    BTW I never did install this o-ring... no issues yet (knock on wood). It's been 17k miles now. I asked around here and other forums, and got mixed answers on whether it is needed or not. Although overall most claimed it wasn't really that important. If I was doing timing work at <100k I probably would've gone back and got it in there, but since I did it at 164k, even if it does cause accelerated wear from momentary slack or something I doubt I will see it before something else blows lol
    Some further discussion buried here:
    http://www.audizine.com/forum/showth...k-on-the-Clock!
    '18 RS3 Glacier White: DS1 Stg 2 | Wagner EVO1 IC | 034 4" Turbo Inlet | 034 4" Intake
    '05 S4 Avant Brilliant Red: JHM Tune | JHMv1 Headers | Fast Intentions Catback | Ported IM & Spacers | JHM LWCP | JHM ATF Cooler | Thor Skid Plate | Koni Yellows | Apikol Rear Diff | JHM LW Rotors | AudioQ 1200D w/Dual 10" CVRs

Bookmarks

Posting Permissions

  • You may not post new threads
  • You may not post replies
  • You may not post attachments
  • You may not edit your posts
  •  


    © 2001-2024 Audizine, Audizine.com, and Driverzines.com
    Audizine is an independently owned and operated automotive enthusiast community and news website.
    Audi and the Audi logo(s) are copyright/trademark Audi AG. Audizine is not endorsed by or affiliated with Audi AG.