Audizine - An Automotive Enthusiast Community

Page 1 of 4 123 ... LastLast
Results 1 to 40 of 127
  1. #1
    Veteran Member Four Rings badger.'s Avatar
    Join Date
    Mar 31 2014
    AZ Member #
    168335
    My Garage
    '18 RS3 | '05 S4 Avant
    Location
    KY

    Finally Doing Timing with 164k on the Clock!

    Guest-only advertisement. Register or Log In now!
    The time has come, I'm finally am doing the timing on my car, a 2005 S4 TIP. Taking the opportunity to do:

    1) Intermediate JHM Timing Kit
    2) Motor Mounts
    3) Trans Cooler Kit (JHM)
    4) Piggie Pipes
    5) Oil Check Valves

    This is being done in my 14x20' garage, no air compressor or air tools. My timeline is 9 days, starting last Saturday and I hope to be back driving it to work Monday. It's been quite the adventure so far. Knock on wood, everything to this point has gone fairly smoothly. Broke the rear coolant hose pulling the motor, and my DP flex joints are pretty trashed, but everything else seems OK so far!

    Getting Ready:


    Front End Off:


    Pulling it Out:


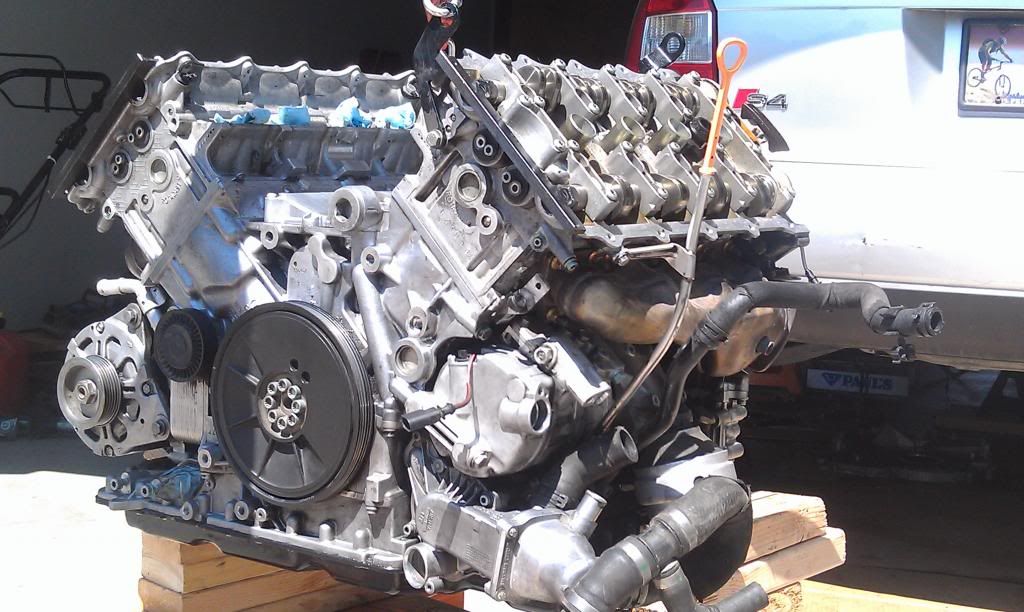
    Engine Out! Had to build some stands:


    Tried to mimic the Audi specialty engine table:


    Downpipes with flex joints in rough shape:


    Electrical Harness Off. That's gonna be fun to get back on...


    Trans Off:


    Rebuilt the engine & trans supports in prep for motor teardown:


    Ready to take Timing covers off:


    Bank 2 and Bank 1 top end:


    Crankshaft lock pin Installed - hopefully this is all the way in! I put some paint on the tip, it doesn't seem to bottom out in the hole in the motor but it definitely centered:


    Covers off!


    Justification and gratification for doing it all! Two cracks on the guide!


    More to come later, this is as far as I am right now. Some interesting notes:

    1) One bolt on the Bank 1 valve cover, top back corner, sheared in half. Might have to drill it out (if I can), or just put on extra RTV, not sure yet haha.

    2) Bank 1 was a fraction of a mm off from being able to slide in the camshaft locking bar easily. Bank 2 went in fine. Had to manipulate the camshafts at the hex bolt with a wrench on Bank 1 just a smidge to get the bar to slide in.

    3) Finally found a local shop weld in new flex joints and relocate my rear sensor bungs. So hopefully the piggies will still come to fruition.

    This has been interesting. I just hope it goes back in as easily as it all comes out and I can get all the electrical and whatnot routed correctly again. I took lots of pics but it is a serious rats nest when it is all on there!!
    '18 RS3 Glacier White: DS1 Stg 2 | Wagner EVO1 IC | 034 4" Turbo Inlet | 034 4" Intake
    '05 S4 Avant Brilliant Red: JHM Tune | JHMv1 Headers | Fast Intentions Catback | Ported IM & Spacers | JHM LWCP | JHM ATF Cooler | Thor Skid Plate | Koni Yellows | Apikol Rear Diff | JHM LW Rotors | AudioQ 1200D w/Dual 10" CVRs

  2. #2
    Veteran Member Four Rings Mr. Corey's Avatar
    Join Date
    Jan 14 2009
    AZ Member #
    37449
    My Garage
    Audi's
    Location
    NYC

    Nice work!!! How many hours did it take you to pull the engine out and remove the trans...?
    Suzuka Gray Gated V10 B6 Nogaro with lots of mods BUILD THREAD B7 Sprint B8 Nogaro Avant
    Photography Website www.coreymaywalt.com

  3. #3
    Veteran Member Four Rings Slow4's Avatar
    Join Date
    Dec 02 2007
    AZ Member #
    23048
    My Garage
    2020 Ford PIU, 2017 D675R
    Location
    DC/MD/(VA)

    Awesome !!!!!

    Bravo-kudos to you Sir on the excellent woodwork and taking on this task.
    2015 B8 SQ5
    Click Here
    ---
    Past
    2001 B5 S4 | 2005 B6 S4 AVANT | 2013 Allroad P+ | 2013 B8.5 A4 P+


  4. #4
    Veteran Member Three Rings
    Join Date
    Oct 04 2013
    AZ Member #
    124353
    Location
    203 Connecticut

    I envy you guys with a garage and space to DIY. Good ish!

  5. #5
    Senior Member Three Rings blocke's Avatar
    Join Date
    Jul 26 2013
    AZ Member #
    119685
    My Garage
    1990 BMW 325i (sold), 2006 VW GTI (sold), 2006 A4 S-line (sold), 2014 Jetta SportWagen TDI
    Location
    Temecula, CA

    You sir, are my hero. Excellent job thus far.
    You might take the opportunity to drain the TQ and flush/fill the trans fluid while it's all apart.
    Performance: Fast Intentions 12" resonated cat back, ECS Snub Mount, JHM LTW Crank Pulley, JHM IM spacers, Optima Red Top, Dimple Oil drain magnet, 034 engine mounts,
    Suspension/Brakes: JHM LTW rotors front & Rear, Hawk HPS Pads, VMR V708's, H&R Sport springs, 034 strut mounts.
    Visual: Lamin-X on headlights, 20% tint , ZIZA city LEDs, Ziza License place LEDS, Interior LED conversion, R8 oil cap, 996 coolant cap
    Instagram: lockebrian

  6. #6
    Veteran Member Four Rings SlickFix's Avatar
    Join Date
    Nov 11 2010
    AZ Member #
    66868
    Location
    Rochester, MN

    Subscribed! Excellent work, badger. How difficult was it to separate the transmission from the engine? I don't think there are any DIY's for a tip transmission, so what did you use as a guide?

    Did you buy all the special tools needed for the timing? If so, I will gladly rent or purchase them from you when you're done.
    His: 2012 Moonlight Blue Metallic S5 Prestige
    Hers: 2014 Lava Gray Metallic Q5 2.0T
    Son's: 2005.5 Imola Yellow B7 S4 4.2 Sedan
    19" B8 S5 Peelers

  7. #7
    Active Member Two Rings
    Join Date
    Dec 29 2014
    AZ Member #
    306461
    Location
    Fairborn, OH

    Sub'd! Great work!
    '04 S4 Avant, 6-speed, stock.

  8. #8
    Veteran Member Three Rings SprintBlueWorld's Avatar
    Join Date
    Sep 16 2013
    AZ Member #
    123267
    My Garage
    08 Hemi Big Horn, 08 Honda civic, 08 Audi S4 Cab MT6
    Location
    Pa

    Good luck going forward!
    Oem RS4 Reps, RS4 Pedals, KN Air Filter, JHM 93 tune, JHM Intake Spacers, Rear Stoptech Slots & SS Brake lines, JHM 6-Rib Pullys, 034 Snubby Bracket, Dimple/ECS Oil & Diff Magnetic Drain plugs, Apikol Diff Mount, 034 Carrier Mount Inserts, Corsa RSC Cat-Back, 034 Sway Bar & End Links, Piggies in a Blanket, Front JHM LW Rotors, Hawk HPS pads, 13mm Spacers

  9. #9
    Established Member Two Rings rixonichard's Avatar
    Join Date
    Mar 15 2013
    AZ Member #
    111401
    Location
    Orem, Utah

    Will be in your shoes some day. Love the homemade motor stand. What was the motivation to do the service now? Did your startup rattle all of a sudden get much worse? Had you already done the check valves? If not are you going to do them now?

  10. #10
    Veteran Member Four Rings TarlCabot's Avatar
    Join Date
    Feb 18 2013
    AZ Member #
    109786
    My Garage
    Can of Whoop @ss!!!
    Location
    Upstate, SC

    looking good, great job
    PAST 2004 Audi S4 4.2L 2006 Audi S4 4.2L 25th #167
    2015 Audi B8.5 A4 2.0T P+ S-line JHM K04-R Turbo 3" HFC/Downpipe FMIC Stage 3 K04 ECU and Stage 2 ZF8 TCU tunes ECS-Luft-Technik CIA/Air Scoop/Silicone Intake Tract GFB DV Bilstein Sport Struts/Shocks H&R Sport Springs 034motorsport Catch Can Kit D/L Control Arms/Bushing Rear Sway Bar with Front/Rear End Links 15mm-F/20mm-R Spacers Bullet Nose Studs/Nuts RS4 Honeycomb Mesh Front/Fog Light Grilles

  11. #11
    Veteran Member Four Rings BCsniper's Avatar
    Join Date
    Jan 29 2010
    AZ Member #
    54160
    My Garage
    B6 S4 6MT Avant, B6 3.0 Avant 6MT (for sale), C5 A6 2.8
    Location
    north ga

    Great Job Man! And While that stand looks sketchy I bet it's nice to have everything up higher to work on.


    I'm still in the middle of working on my car as well. Mine's going pretty slow since I've been spending more time in bed with the GF watching tv/movies instead of late nights in the garage like I had thought initially.


    No broken guides here. Everything on mine looked in great shape. Cam Adj. Sprockets even looked nearly new:


  12. #12
    Senior Member Three Rings FormulaElement's Avatar
    Join Date
    Jul 02 2013
    AZ Member #
    118216
    Location
    406, MT

    Quote Originally Posted by SlickFix View Post
    Subscribed! Excellent work, badger. How difficult was it to separate the transmission from the engine? I don't think there are any DIY's for a tip transmission, so what did you use as a guide?

    Did you buy all the special tools needed for the timing? If so, I will gladly rent or purchase them from you when you're done.
    It's really easy, just unbolt the transmission and pull. The Bentley manual says to unbolt the torque converter as well but I don't think it's necessary. I unbolted it from the drive plate and the torque converter fell on the floor when I pulled them apart...

    Getting them back together correctly is a whole other story though...

    Tarl has tools to rent for a really reasonable price. I just sent them back to him.

    OP - my bank 1 was off a litte bit as well. I just attributed it to the electrical adjusters being different heights. I didn't measure this though.

  13. #13
    Veteran Member Four Rings SlickFix's Avatar
    Join Date
    Nov 11 2010
    AZ Member #
    66868
    Location
    Rochester, MN

    Quote Originally Posted by BCsniper View Post
    Mine's going pretty slow since I've been spending more time in bed with the GF watching tv/movies instead of late nights in the garage like I had thought initially.
    Rule #22!


    No broken guides here. Everything on mine looked in great shape. Cam Adj. Sprockets even looked nearly new:
    So according to my calculations, you are the first person to ever do this job and not find a cracked or broken chain guide. Did you have bad rattle?
    His: 2012 Moonlight Blue Metallic S5 Prestige
    Hers: 2014 Lava Gray Metallic Q5 2.0T
    Son's: 2005.5 Imola Yellow B7 S4 4.2 Sedan
    19" B8 S5 Peelers

  14. #14
    Veteran Member Four Rings badger.'s Avatar
    Join Date
    Mar 31 2014
    AZ Member #
    168335
    My Garage
    '18 RS3 | '05 S4 Avant
    Location
    KY

    Quote Originally Posted by blocke View Post
    You sir, are my hero. Excellent job thus far.
    You might take the opportunity to drain the TQ and flush/fill the trans fluid while it's all apart.
    I did a trans filter change and refill just last year so I am hoping to get by with just a top up after this job.


    Quote Originally Posted by rixonichard View Post
    Will be in your shoes some day. Love the homemade motor stand. What was the motivation to do the service now? Did your startup rattle all of a sudden get much worse? Had you already done the check valves? If not are you going to do them now?
    Motivation was mainly 164,00 miles and increased rattle frequency starting last fall. Also finally saved some money for it, and was sick of wondering and stressing about if/when it was all gonna go. I have not done check valves, plan to do them now though.


    Quote Originally Posted by SlickFix View Post
    Subscribed! Excellent work, badger. How difficult was it to separate the transmission from the engine? I don't think there are any DIY's for a tip transmission, so what did you use as a guide?

    Did you buy all the special tools needed for the timing? If so, I will gladly rent or purchase them from you when you're done.
    I rented them from JHM. I used the bentley, I will try to write up in more detail later exactly what I did. It wasn't too bad really.


    Quote Originally Posted by FormulaElement View Post
    It's really easy, just unbolt the transmission and pull. The Bentley manual says to unbolt the torque converter as well but I don't think it's necessary. I unbolted it from the drive plate and the torque converter fell on the floor when I pulled them apart...

    Getting them back together correctly is a whole other story though...

    Tarl has tools to rent for a really reasonable price. I just sent them back to him.

    OP - my bank 1 was off a litte bit as well. I just attributed it to the electrical adjusters being different heights. I didn't measure this though.

    I followed bentley too and unbolted the TC , and it nearly fell to the floor when we pulled the trans off too. Thankfully it didn't.


    I'll post some pics later of the mechanical adjusters. Mine looked VERY good IMO. Very slight wallowing of the hole but nothing severe. The new spring spacers that came with the JHM ones were too big.
    '18 RS3 Glacier White: DS1 Stg 2 | Wagner EVO1 IC | 034 4" Turbo Inlet | 034 4" Intake
    '05 S4 Avant Brilliant Red: JHM Tune | JHMv1 Headers | Fast Intentions Catback | Ported IM & Spacers | JHM LWCP | JHM ATF Cooler | Thor Skid Plate | Koni Yellows | Apikol Rear Diff | JHM LW Rotors | AudioQ 1200D w/Dual 10" CVRs

  15. #15
    Veteran Member Three Rings
    Join Date
    Feb 18 2014
    AZ Member #
    146977
    Location
    Arizona

    nice, thanks for the pics. I may be diy'ing the job soon as well. gotta get my a/c done and maybe the timing before the summer heat sets in. the nice spring weather is going away way too soon and it's already starting to get kinda warm here, it's been in the 90s for the past week. I gotta hurry and get my car ready so it can get me through the summer when the real heat comes! I'll be interested in hearing updates on how everything goes

  16. #16
    Veteran Member Four Rings BCsniper's Avatar
    Join Date
    Jan 29 2010
    AZ Member #
    54160
    My Garage
    B6 S4 6MT Avant, B6 3.0 Avant 6MT (for sale), C5 A6 2.8
    Location
    north ga

    Quote Originally Posted by SlickFix View Post
    So according to my calculations, you are the first person to ever do this job and not find a cracked or broken chain guide. Did you have bad rattle?

    My car has ~185k miles but got a new motor at 97k.

    When I first got it around 115k it had no rattle. Now I have I'd say a pretty standard rattle on cold-starts. This is not my first B6 S4 so I wasn't real paranoid about it like most. Lately I've been getting a lot more rattles on warm starts as well.

    I highly doubt I'm the first not to find a broken guide. Also I'd bet my lower guide was the updated B7 version that has just a tad bit more reinforcement. I assume this since my car got a newer motor a few years back....plus the alternator is a hitachi which used B7 years.

  17. #17
    Veteran Member Four Rings ieatfishburitos's Avatar
    Join Date
    Jan 10 2007
    AZ Member #
    14775
    Location
    Earth

    thanks for posting, will be following..

  18. #18
    Registered Member One Ring jrbryson89's Avatar
    Join Date
    Apr 01 2015
    AZ Member #
    324322
    Location
    high point nc

    My new hero lol... im dreading the day i have to do this process

  19. #19
    Veteran Member Four Rings gcoy's Avatar
    Join Date
    Apr 06 2009
    AZ Member #
    40835
    My Garage
    2005 B6 S4 6mt Avant & 2001 B5 S4 6mt Avant (Sold) & 2007 VW Passat 3.6 4Mo wagon
    Location
    Boise Id

    Great Job!! Wow this brings back memories. I like the stand(s) you built.
    I did the ghetto 2x4 method. lol

    [IMG][/IMG]

  20. #20
    Veteran Member Four Rings badger.'s Avatar
    Join Date
    Mar 31 2014
    AZ Member #
    168335
    My Garage
    '18 RS3 | '05 S4 Avant
    Location
    KY

    Ok, I need help Stat.

    How do I get the freaking rear main seal on??? Measuring the stiff part of the new seal against the diameter of the crank end there is no way it will go on. Already snapped one trying to tap it around.

    HELP!
    '18 RS3 Glacier White: DS1 Stg 2 | Wagner EVO1 IC | 034 4" Turbo Inlet | 034 4" Intake
    '05 S4 Avant Brilliant Red: JHM Tune | JHMv1 Headers | Fast Intentions Catback | Ported IM & Spacers | JHM LWCP | JHM ATF Cooler | Thor Skid Plate | Koni Yellows | Apikol Rear Diff | JHM LW Rotors | AudioQ 1200D w/Dual 10" CVRs

  21. #21
    Veteran Member Four Rings BCsniper's Avatar
    Join Date
    Jan 29 2010
    AZ Member #
    54160
    My Garage
    B6 S4 6MT Avant, B6 3.0 Avant 6MT (for sale), C5 A6 2.8
    Location
    north ga

    I just did mine about an hour ago. I put it in the freezer for awhile then tap tap tapped it in place


    Now getting that front main seal off/on is seeming to be a bitch

  22. #22
    Veteran Member Four Rings badger.'s Avatar
    Join Date
    Mar 31 2014
    AZ Member #
    168335
    My Garage
    '18 RS3 | '05 S4 Avant
    Location
    KY

    Yeah I figured it out, had to get that spacer that I didn't know was a spacer off.

    Unfortunately after I had all covers and trans back on I found a small green gasket that appears to go behind that larger center lower tensioner. I am assuming the new one didn't come installed and I never really looked at the back side.

    So today was pretty much a waste of time. Get to take everything off again tomorrow. F***.
    '18 RS3 Glacier White: DS1 Stg 2 | Wagner EVO1 IC | 034 4" Turbo Inlet | 034 4" Intake
    '05 S4 Avant Brilliant Red: JHM Tune | JHMv1 Headers | Fast Intentions Catback | Ported IM & Spacers | JHM LWCP | JHM ATF Cooler | Thor Skid Plate | Koni Yellows | Apikol Rear Diff | JHM LW Rotors | AudioQ 1200D w/Dual 10" CVRs

  23. #23
    Veteran Member Three Rings
    Join Date
    Feb 18 2014
    AZ Member #
    146977
    Location
    Arizona

    sorry but LOL. I really am sorry to hear that man that sucks big time, but I still couldn't help but laugh. and here I was all pissed that I have to put my car back into service position again after getting it halfway re-assembled

  24. #24
    Veteran Member Four Rings badger.'s Avatar
    Join Date
    Mar 31 2014
    AZ Member #
    168335
    My Garage
    '18 RS3 | '05 S4 Avant
    Location
    KY

    Yeah not much else to do but swear then laugh it off.

    I think I can get to it without messing with the two cam bank timing so that would save a lot of time.

    Here we go!
    '18 RS3 Glacier White: DS1 Stg 2 | Wagner EVO1 IC | 034 4" Turbo Inlet | 034 4" Intake
    '05 S4 Avant Brilliant Red: JHM Tune | JHMv1 Headers | Fast Intentions Catback | Ported IM & Spacers | JHM LWCP | JHM ATF Cooler | Thor Skid Plate | Koni Yellows | Apikol Rear Diff | JHM LW Rotors | AudioQ 1200D w/Dual 10" CVRs

  25. #25
    Veteran Member Four Rings gcoy's Avatar
    Join Date
    Apr 06 2009
    AZ Member #
    40835
    My Garage
    2005 B6 S4 6mt Avant & 2001 B5 S4 6mt Avant (Sold) & 2007 VW Passat 3.6 4Mo wagon
    Location
    Boise Id

    Oh,, That sucks big time!!
    I seriously remember almost doing the Exact same thing. For some reason I did a triple check before putting the rear covers back on and I found that same green gasket. I though, now wear the hell does this go?
    This is such a meticulous job.

  26. #26
    Veteran Member Four Rings SlickFix's Avatar
    Join Date
    Nov 11 2010
    AZ Member #
    66868
    Location
    Rochester, MN

    Quote Originally Posted by badger. View Post
    Yeah not much else to do but swear then laugh it off.
    You can perhaps take some solace in the fact that every mistake you make is going to prevent many others from doing the same. I can tell you that near the top of my reminder list is going to be "don't forget that effing green gasket before putting the covers on!"
    His: 2012 Moonlight Blue Metallic S5 Prestige
    Hers: 2014 Lava Gray Metallic Q5 2.0T
    Son's: 2005.5 Imola Yellow B7 S4 4.2 Sedan
    19" B8 S5 Peelers

  27. #27
    Veteran Member Four Rings badger.'s Avatar
    Join Date
    Mar 31 2014
    AZ Member #
    168335
    My Garage
    '18 RS3 | '05 S4 Avant
    Location
    KY

    Quote Originally Posted by SlickFix View Post
    You can perhaps take some solace in the fact that every mistake you make is going to prevent many others from doing the same. I can tell you that near the top of my reminder list is going to be "don't forget that effing green gasket before putting the covers on!"
    Yes, effing green gasket indeed!! Took about 4 hours this morning to get everything back to where I was last night at 11. Taking a breather now.


    New question - between 8-12 seconds watch the top left tensioner/adjuster. I am hoping this is normal? (please say yes). Video starring my dad and his mad engine-turning skills.

    '18 RS3 Glacier White: DS1 Stg 2 | Wagner EVO1 IC | 034 4" Turbo Inlet | 034 4" Intake
    '05 S4 Avant Brilliant Red: JHM Tune | JHMv1 Headers | Fast Intentions Catback | Ported IM & Spacers | JHM LWCP | JHM ATF Cooler | Thor Skid Plate | Koni Yellows | Apikol Rear Diff | JHM LW Rotors | AudioQ 1200D w/Dual 10" CVRs

  28. #28
    Veteran Member Four Rings TarlCabot's Avatar
    Join Date
    Feb 18 2013
    AZ Member #
    109786
    My Garage
    Can of Whoop @ss!!!
    Location
    Upstate, SC

    you have no built up oil pressure to hold those out... mine did the same thing
    another note... make sure your turning the engine the correct direction and not backwards, idk if it would actually hurt anything but never hurts to be safe
    PAST 2004 Audi S4 4.2L 2006 Audi S4 4.2L 25th #167
    2015 Audi B8.5 A4 2.0T P+ S-line JHM K04-R Turbo 3" HFC/Downpipe FMIC Stage 3 K04 ECU and Stage 2 ZF8 TCU tunes ECS-Luft-Technik CIA/Air Scoop/Silicone Intake Tract GFB DV Bilstein Sport Struts/Shocks H&R Sport Springs 034motorsport Catch Can Kit D/L Control Arms/Bushing Rear Sway Bar with Front/Rear End Links 15mm-F/20mm-R Spacers Bullet Nose Studs/Nuts RS4 Honeycomb Mesh Front/Fog Light Grilles

  29. #29
    Stage 2 Banner Advertiser Four Rings Jake@JHM's Avatar
    Join Date
    Aug 31 2011
    AZ Member #
    80618
    My Garage
    C7 A6 3.0T - D4 A8L 4.0T
    Location
    Lathrop

    Quote Originally Posted by TarlCabot View Post
    you have no built up oil pressure to hold those out... mine did the same thing
    another note... make sure your turning the engine the correct direction and not backwards, idk if it would actually hurt anything but never hurts to be safe
    Yup. Need that oil pressure up in therrr.

    JHMotorsports.com - (209) 968-0077 - JHM Dealers
    Discover Your Vehicle's True Potential with JHMotorsports | Visit Us at JHMotorsports.com 🚀🏁
    Pioneering Performance Software with Home Flashing Technology Since 2013 - SHOP JHM ECU/TCU SOFTWARE!
    JHM B8-RS5 Runs 10s w/ JHM SC Kit


  30. #30
    Veteran Member Four Rings badger.'s Avatar
    Join Date
    Mar 31 2014
    AZ Member #
    168335
    My Garage
    '18 RS3 | '05 S4 Avant
    Location
    KY

    Quote Originally Posted by TarlCabot View Post
    you have no built up oil pressure to hold those out... mine did the same thing
    another note... make sure your turning the engine the correct direction and not backwards, idk if it would actually hurt anything but never hurts to be safe
    Ok, that's what I was thinking, doesn't hurt to double check! Thanks
    '18 RS3 Glacier White: DS1 Stg 2 | Wagner EVO1 IC | 034 4" Turbo Inlet | 034 4" Intake
    '05 S4 Avant Brilliant Red: JHM Tune | JHMv1 Headers | Fast Intentions Catback | Ported IM & Spacers | JHM LWCP | JHM ATF Cooler | Thor Skid Plate | Koni Yellows | Apikol Rear Diff | JHM LW Rotors | AudioQ 1200D w/Dual 10" CVRs

  31. #31
    Veteran Member Four Rings demonmk2's Avatar
    Join Date
    Apr 01 2011
    AZ Member #
    73301
    My Garage
    B5 on jack stands
    Location
    charlotte

    I did one of these a month ago..other than being expensive its not really that bad of a job.

  32. #32
    Veteran Member Three Rings
    Join Date
    Feb 18 2014
    AZ Member #
    146977
    Location
    Arizona

    lol I like the title of your video, I always thought these timing chain systems look like the inside of a watch

  33. #33
    Veteran Member Four Rings Slow4's Avatar
    Join Date
    Dec 02 2007
    AZ Member #
    23048
    My Garage
    2020 Ford PIU, 2017 D675R
    Location
    DC/MD/(VA)

    Quote Originally Posted by badger. View Post
    sooooo according to your B6 S4 Rolex, it's beer o'clock?
    2015 B8 SQ5
    Click Here
    ---
    Past
    2001 B5 S4 | 2005 B6 S4 AVANT | 2013 Allroad P+ | 2013 B8.5 A4 P+


  34. #34
    Active Member Two Rings Foot's Avatar
    Join Date
    Oct 13 2010
    AZ Member #
    65616
    My Garage
    1991 Audi V8 quattro 5 speed
    Location
    Bellevue, NE

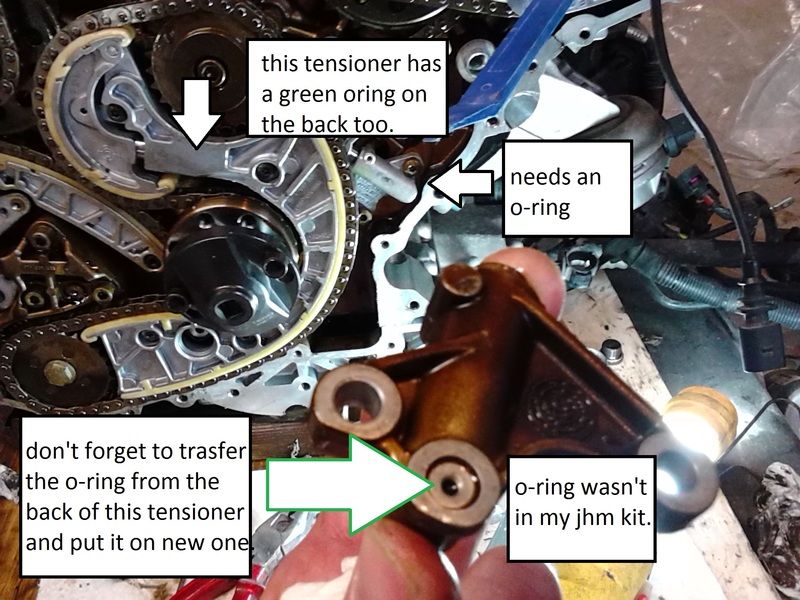
    Did you remember to put the o-ring on the back of the little tensioner? you have to transfer it from the old one, because it's not in the JHM kit. At least it wasn't in mine. Hope you don't have to take it apart again.


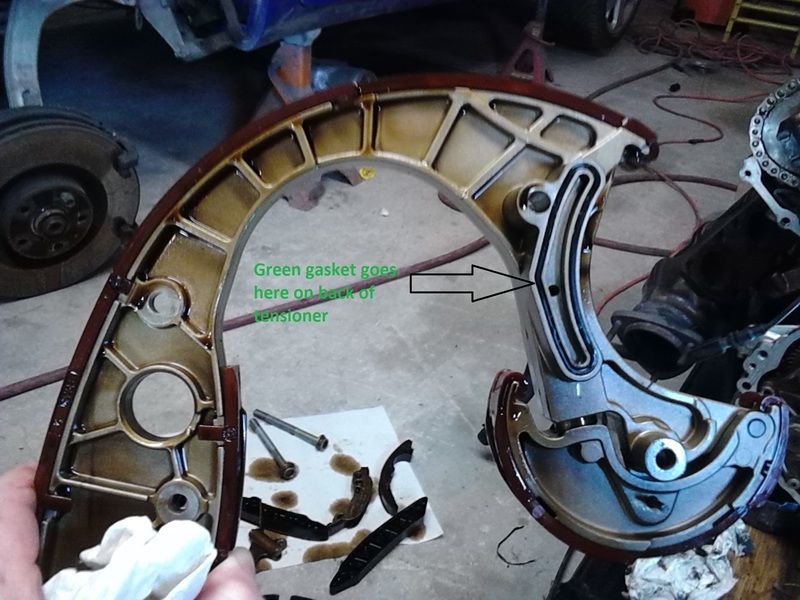
    Also here's a pic of where the green o-ring in the JHM kit goes:


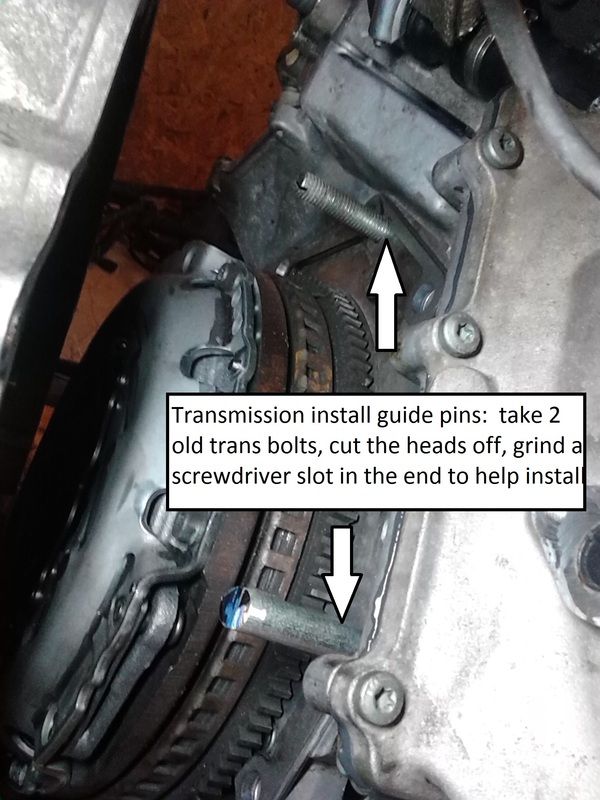
    And here's a tip for getting your transmission back on: Use old trans bolts as guide pins. It make it much easier:
    2004 Audi S4 6 speed Nogaro Blue
    1991 Audi V8 quattro 5 speed Pearl White

  35. #35
    Active Member Two Rings Foot's Avatar
    Join Date
    Oct 13 2010
    AZ Member #
    65616
    My Garage
    1991 Audi V8 quattro 5 speed
    Location
    Bellevue, NE

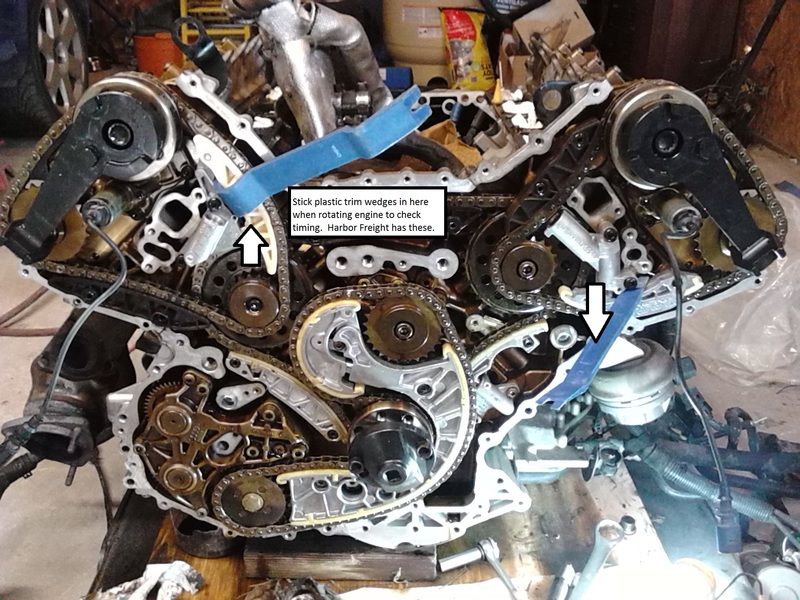
    I used some cheap Harbor Freight trim removal wedges to keep my tensioners wedged while rotating engine:
    2004 Audi S4 6 speed Nogaro Blue
    1991 Audi V8 quattro 5 speed Pearl White

  36. #36
    Active Member One Ring
    Join Date
    Dec 05 2013
    AZ Member #
    133882
    My Garage
    2004 S4,1992 Lexus SC400, 1997 Ford Escort (the beater), 2010 Toyota Camry SE
    Location
    Middlesex, NJ, USA

    Subscribed!!!! Great work!!!

  37. #37
    Veteran Member Three Rings
    Join Date
    Aug 09 2012
    AZ Member #
    98417
    Location
    Bay Area

    Does your alternator get stuck on the frame while removing the motor? I had to remove the thing before removing the motor and im thinking ill have to put it back in after i reinstall also. Problem is those pesky bolts on the back of it.

  38. #38
    Veteran Member Four Rings badger.'s Avatar
    Join Date
    Mar 31 2014
    AZ Member #
    168335
    My Garage
    '18 RS3 | '05 S4 Avant
    Location
    KY

    Quote Originally Posted by Foot View Post
    Did you remember to put the o-ring on the back of the little tensioner? you have to transfer it from the old one, because it's not in the JHM kit. At least it wasn't in mine. Hope you don't have to take it apart again.


    I did not transfer this other circular o-ring. Nothing has mentioned it! This is the first I've heard. What are the consequences? I am ready to put the engine back in tomorrow morning and really not going to pull it all apart again.
    '18 RS3 Glacier White: DS1 Stg 2 | Wagner EVO1 IC | 034 4" Turbo Inlet | 034 4" Intake
    '05 S4 Avant Brilliant Red: JHM Tune | JHMv1 Headers | Fast Intentions Catback | Ported IM & Spacers | JHM LWCP | JHM ATF Cooler | Thor Skid Plate | Koni Yellows | Apikol Rear Diff | JHM LW Rotors | AudioQ 1200D w/Dual 10" CVRs

  39. #39
    Veteran Member Four Rings badger.'s Avatar
    Join Date
    Mar 31 2014
    AZ Member #
    168335
    My Garage
    '18 RS3 | '05 S4 Avant
    Location
    KY

    The old one is very flat, I am having a hard time thinking it is doing much to begin with. Why isn't this in the JHM kit? How old was your kit... maybe they include it now? The frustrating part is I don't even really need to change that, I just change it because it its in the kit. Same with that lower center tensioner. These extra parts are causing more trouble than they ever were to begin with.

    Either way we are going to find out how it runs without it.
    '18 RS3 Glacier White: DS1 Stg 2 | Wagner EVO1 IC | 034 4" Turbo Inlet | 034 4" Intake
    '05 S4 Avant Brilliant Red: JHM Tune | JHMv1 Headers | Fast Intentions Catback | Ported IM & Spacers | JHM LWCP | JHM ATF Cooler | Thor Skid Plate | Koni Yellows | Apikol Rear Diff | JHM LW Rotors | AudioQ 1200D w/Dual 10" CVRs

  40. #40
    Active Member Two Rings
    Join Date
    Mar 01 2015
    AZ Member #
    317882
    Location
    Norwalk ct

    Quote Originally Posted by badger. View Post
    The old one is very flat, I am having a hard time thinking it is doing much to begin with. Why isn't this in the JHM kit? How old was your kit... maybe they include it now? The frustrating part is I don't even really need to change that, I just change it because it its in the kit. Same with that lower center tensioner. These extra parts are causing more trouble than they ever were to begin with.

    Either way we are going to find out how it runs without it.
    lol.. I know the feeling of having being close to done and don't want to go back
    "They say follow your dreams.....So I went back to bed."

Tags for this Thread

Bookmarks

Posting Permissions

  • You may not post new threads
  • You may not post replies
  • You may not post attachments
  • You may not edit your posts
  •  


    © 2001-2025 Audizine, Audizine.com, and Driverzines.com
    Audizine is an independently owned and operated automotive enthusiast community and news website.
    Audi and the Audi logo(s) are copyright/trademark Audi AG. Audizine is not endorsed by or affiliated with Audi AG.