


EDIT: WILL ADD MORE PICS/INFO SOON
Ok so after some work I made myself a nice faceplate for my RNS-E for my B5 S4.
It isn't too hard, but it is very tedious.
Things you will need:
Dremil
Sandpaper
Glazing Spot Puddy
Symphony 1 for parts (You will be removing facplate parts from this)
Plastidip
Something to plastic weld (soldering gun)
Epoxy/Superglue (optional)
First start my removing and dismatleing your Symphony 1 to get down to the bare faceplate.
Once you get down to the bare faceplate you have to dremil off the side fins. (You can probably do this without dismatleing the radio, but I just took mine apart to be precise)
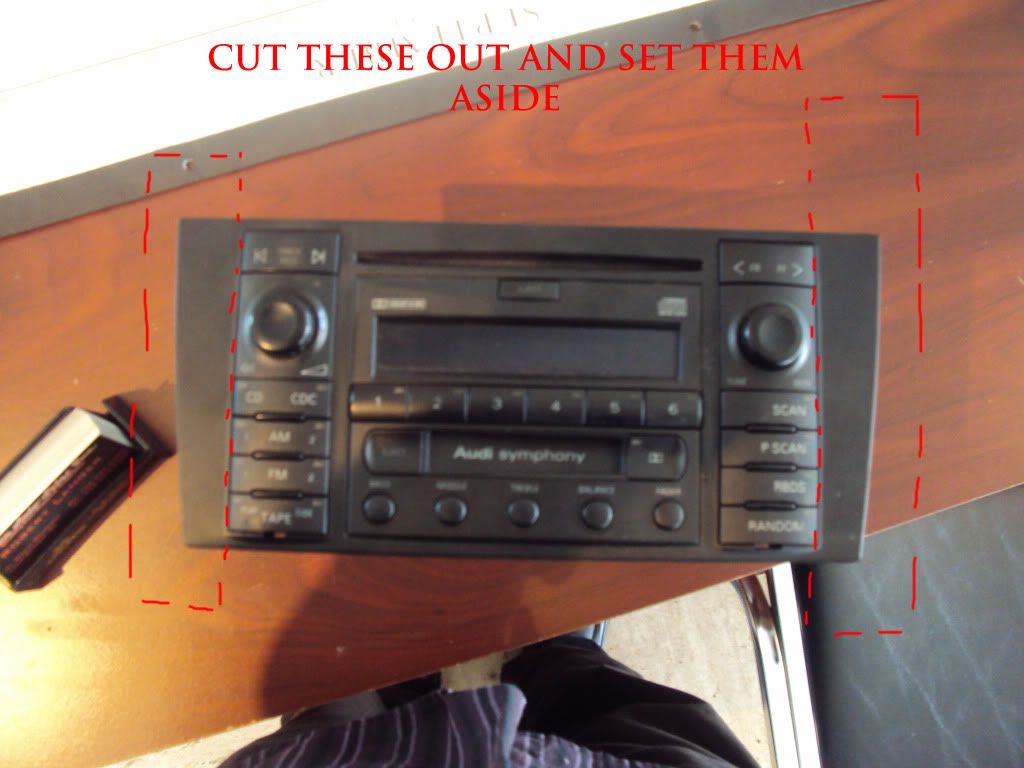
Put the side fins to the side, you will need them later.
You're going to want to shave the top and/or bottom portions of the RNS-E to it will fit in your car. There will be gaps on the side.. This is where those side fins come into play. Shave the side fins you just removed from the symphony 1 to fill in those side gaps flush. Once you are satisfied with the fit remove the RNS-E nav and move to the next step.
The next step is to dimantle your RNS-E down to get to the bare faceplate. A BIG tip I could reccomend is when you remove the full faceplate note the orientation of all the buttons etc so later when you put the full faceplate back together all goes smoothly. **Also note how the RETURN button attaches to the circut board before you take it off.**
Be VERY careful taking the RNS-E apart it is a very intricate and delicate Nav.
Once you get down to the bare faceplate, line up and plastic weld the side fins you have shaved up. Plastic weld where the fins meet the RNS-E faceplate on the top, bottom and back (where the fin and RNS-E meet). If you are not very good at plastic welding, try and tack weld the top and bottom and superglue/epoxy the rear.
Once you have the fins attached start applying the glazing spot puddy to fill and smoothen out the surface of the faceplate. Make sure to fill in any inperfections and gaps as well. Once everything is filled in, start sanding all of the puddy down to smoothen and even out the surface.

DSC02389 by DiscoPotato., on Flickr

DSC02388 by DiscoPotato., on Flickr
Once that is completed, and you are satisfied with the finsih, prepare the faceplate for paint. Make sure to tape of the indent where the screen sits in because you do not want to fill in the rails that the screen rolls on. This will also preserve the DVD and SD card signifiers.
Apply MULTIPLE light even coats. This may take a while but it will be well worth it. For me painting with the plastidip took a few hours.
I used plastidip for two main reasons:
-The finsh is a great match to the interior and lookk OEM if done right.
-If you need to strip it at any time, it just peels off.

DSC02393 by DiscoPotato., on Flickr
Once the paint is done, put the facplate back together and the RNS-E as a whole. If you are not satisfied with th result, peel off the Plastidip and repeat the sading, puddy etc.
GOOD LUCK!!
Finished product (sorry for all the fingerprints)

DSC02399 by DiscoPotato., on Flickr


Bookmarks