


 , it’s not difficult or complicated IF you have the right tools and the right technique, I’m writing this up as to save someone 3 trips to the hardware store.
What you need:
Time:
~30-45 minutes per downpipe.
Tools:
Drill (corded and variable speed preferred)


Long thick flat head screw driver OR flat punch
Any type of deburring bit will work, I recommend one that’s designed for wood rather than metal/concrete this will insure the exhaust pipes don’t get too roughed up. Most are expensive, so a spade bit will do the trick and is usually only a couple bucks
The distance between the beginning of the exhaust pipe and the far end of the cat is 10” you will need a combination of bit and extension that can reach that far.


You will need an extra long spade bit or a min 6" drill bit extension. Keep the drill bit under 1”, it won’t kick as hard, I would recommend 1/2” or 3/4”

Optional:
1 liter of solvent: paint thinner/any type of alcohol/acetone
Plastic sheeting for easier cleanup
Difficulty:
1 out of 5, easy with the right tools
Procedure:
To make this as easy, fast and painless as possible you first need to understand how the catalyst sits inside the pipe. That will make breaking up the honeycomb much easier.
Here is the cutout and side view: (done in MS paint don’t hate)


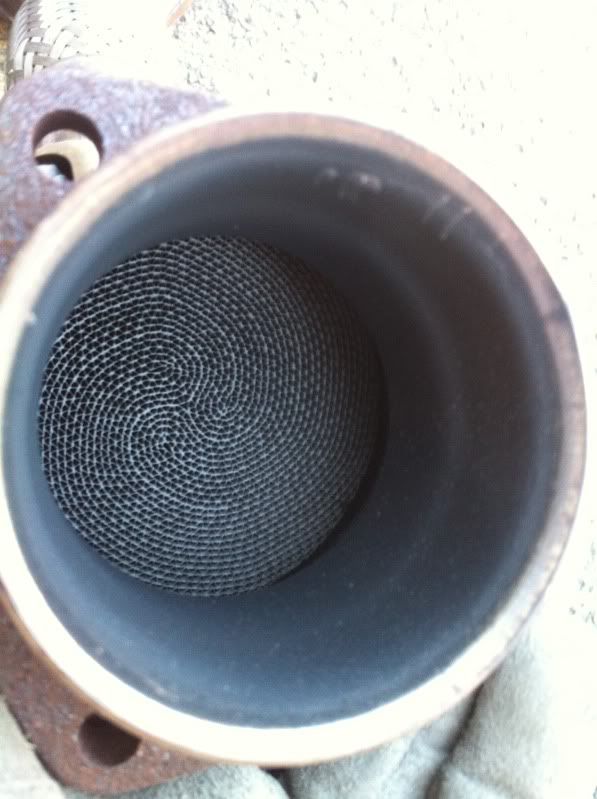
The honeycomb material has the density of hard drywall and is surrounded by a soft lining, similar to dense cotton or soft fiberglass. At the beginning of the cat there is a wire mesh ring that’s holding everything together.
This is what you are starting with:


First measure the maximum depth the bit should go into the pipe, mark it with bright tape, this will insure you won’t scuff up the pipe too badly while drilling straight thru.

If you are only gutting the pre-cats and leaving the main cats intact work on the downpipe on a flat surface or with the precat angled down, this will help keep material out of the main cats, it is very bad if chunks get trapped by the main cat, I can’t stress this enough, clogged cats can melt metal and start a fire, do not take this warning lightly.
You first need to hollow-out the center of the honeycomb, using the drills full speed, work your way so there is about 1” of honeycomb left on the edges, occasionally shaking material out. Wearing gloves and holding a shop towel you can hold the drill bit extension with one hand and the drill in the other guiding it around the honeycomb, use low speed at this stage.

With the help of a hammer insert a screw driver or flat punch into the white material, then twist, chucks will start breaking off (if they don’t, the remaining honeycomb material is too thick, keep working at it), work your way around. Again invert the pipe and shake material out, you can use the drill to break apart large chunks that won't fall through. Another way is to shake the chunks close to the opening then using a screw driver through the O2 sensor bung to break them into smaller pieces. Do not insert a drill thru the O2 bung, you risk damaging the threads.
Metal ring removal after I was done with the first pipe the metal ring was half loose, I grabbed it with pliers and kept twisting them around dislodging the ring from the pipe, one the second pipe the wire mesh got tangled in the drill bit and came loose, whichever works for you make sure to remove it.
Notice the white material at the top that is your cat lining and the wire mesh is on the right, grey dust and chunks is the honeycomb itself

With the pipe inverted shake loose any remaining material, while shaking listen to any chunk by the main cat, using a flashlight look through the O2 sensor bung to verify there is no material by the main cat. do not skip this step
While the pipe is inverted using a garden hose back flush the exhaust (from the main cat) pipe to remove any remaining material, then flush the pipe with 500ml of solvent, it will mix with any left over water and evaporate faster, if you are planning to install the pipes the same day, do so, then run the car to evaporate any leftover water, if you are not planning to install the pipes that day, leave them inverted in the sun to dry, any pooling water inside the pipe will create corrosion its best to avoid that as much as possible.
Repeat procedure for the other pipe.
When done this should look like so:


Catalytic converters contain precious metals (platinum, palladium) if you have a local recycler that will take honey comb material they usually pay 5-8 bucks per pounds, there is about 1lb per cat, If it’s worth your time and trouble go for it. There are even places that will let you ship your material to them, they might pay as high as 10 bucks per pounds, but unless you are shipping 20lb it’s not really worth the effort.
FAQ:
Q: Will this cause a CEL?
A: yes, you will need either O2 sensor extensions, or get a JHM tune, the programming ignores the O2 sensor and won’t throw a code.
Q: Will I pass smog check?
A: most likely, the main cat still scrubs the air well enough for you to pass smog, even in cali.
Q: I don’t want to get the O2 sensor extension and I won’t get a tune for some time, can I drive with a CEL?
A: Yes, this is only an emission code and won’t affect anything else, if however you are getting smoged the CEL is an automatic fail.
Q: Will removing the pre-cats make my car louder?
A: yes, with stock catback the gain is noticeable, with aftermarket catback without resonators the gain in sound is minimal but drone is usually minimized.
Q: There is no smog in my state, should I gut the main cats as well?
A: The general consensus is that unless you have Force Induction (nitrous/boost), the gains are not as big as gutting the pre-cat, going completely cat-less your car will stink and produce soot that will gather on the rear bumper and trunk, if you are serious about performance you are most likely not running oem downpipes.
Q: what is the performance difference between piggies and aftermarket downpipes?
A: Justin has a good thread talking about exhaust and downpipes. http://www.audizine.com/forum/showth...ONG?highlight=
This is my educated guess based on what I’ve read and seen: Cat-less aftermarket downpipes will produce more power then cat-less oem downpipes. Aftermarket downpipes with high-flow cats will produce similar results as piggies.

 Reply With Quote


Bookmarks