Audizine - An Automotive Enthusiast Community

Results 1 to 40 of 40
  1. #1
    Veteran Member Four Rings fly300kts's Avatar
    Join Date
    Oct 16 2008
    AZ Member #
    34255
    My Garage
    03 Golf GTI - 03 Golf 2.0l - 04 Golf 2.0L
    Location
    South Florida - Ft Lauderdale

    Lower Control Arm Replacement

    Guest-only advertisement. Register or Log In now!
    I need to thank the Crew at 034 Motorsport since they were able to split a kit and sell me only the lower control arms (I have the Sterns on top).
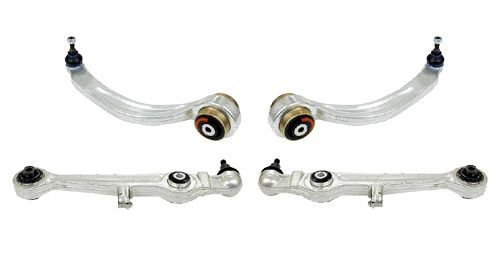
    These have stiffer bushing and going to install them in few days. I'll post a shot DIY


    The DIY

    The process is pretty straight forward
    1 hour per side

    Tools

    2 x 18mm wrenches
    10mm wrench
    Hydraulic floor jack
    Ball joint separator
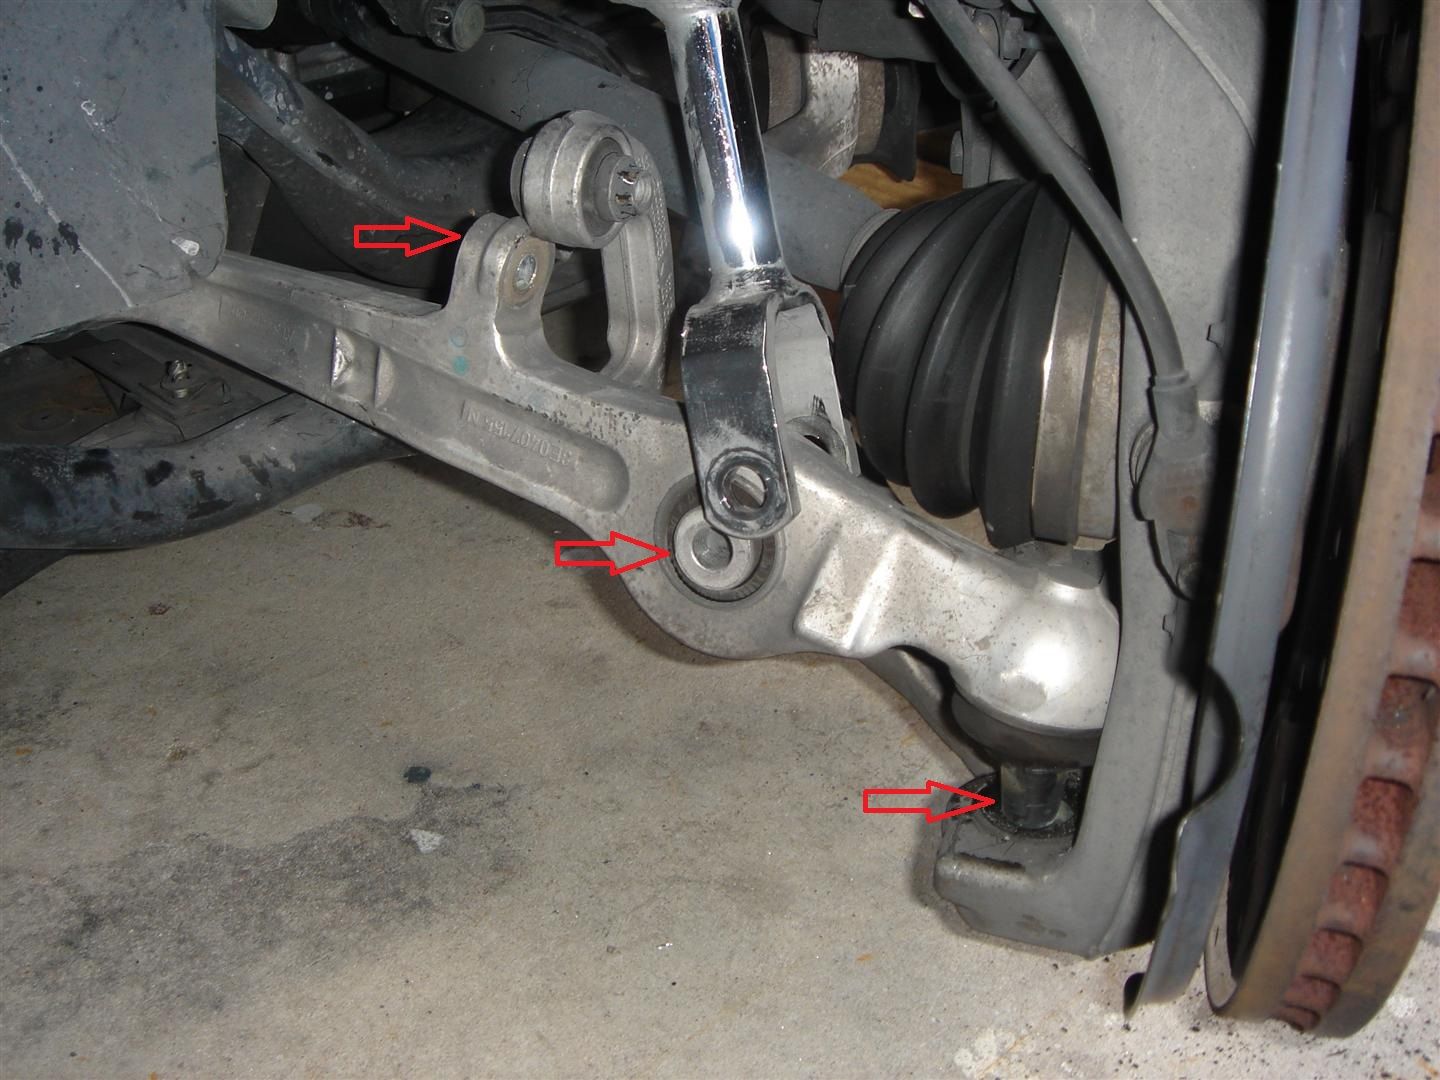
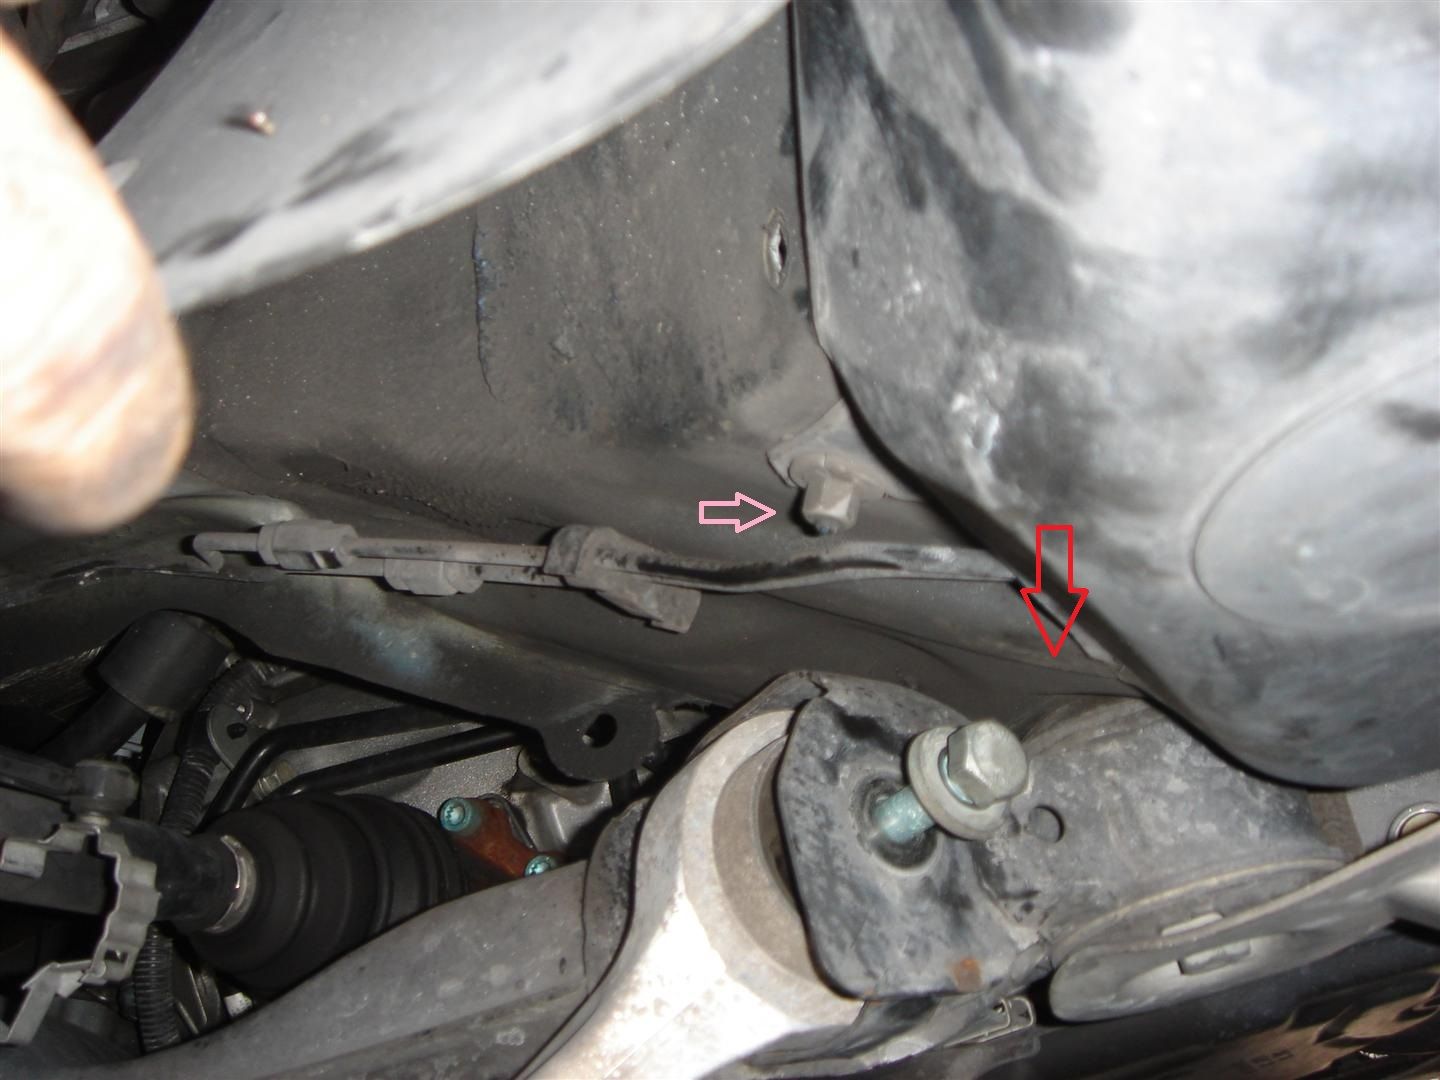
    FRONT ARM

    1/ Disconnect auto-leveling clamp if installed
    2/ Lift the forward arm with the floor jack few inches to release the sway link pressure. Remove the upper bolt of the linkage
    3/ Remove the shock bottom bolt
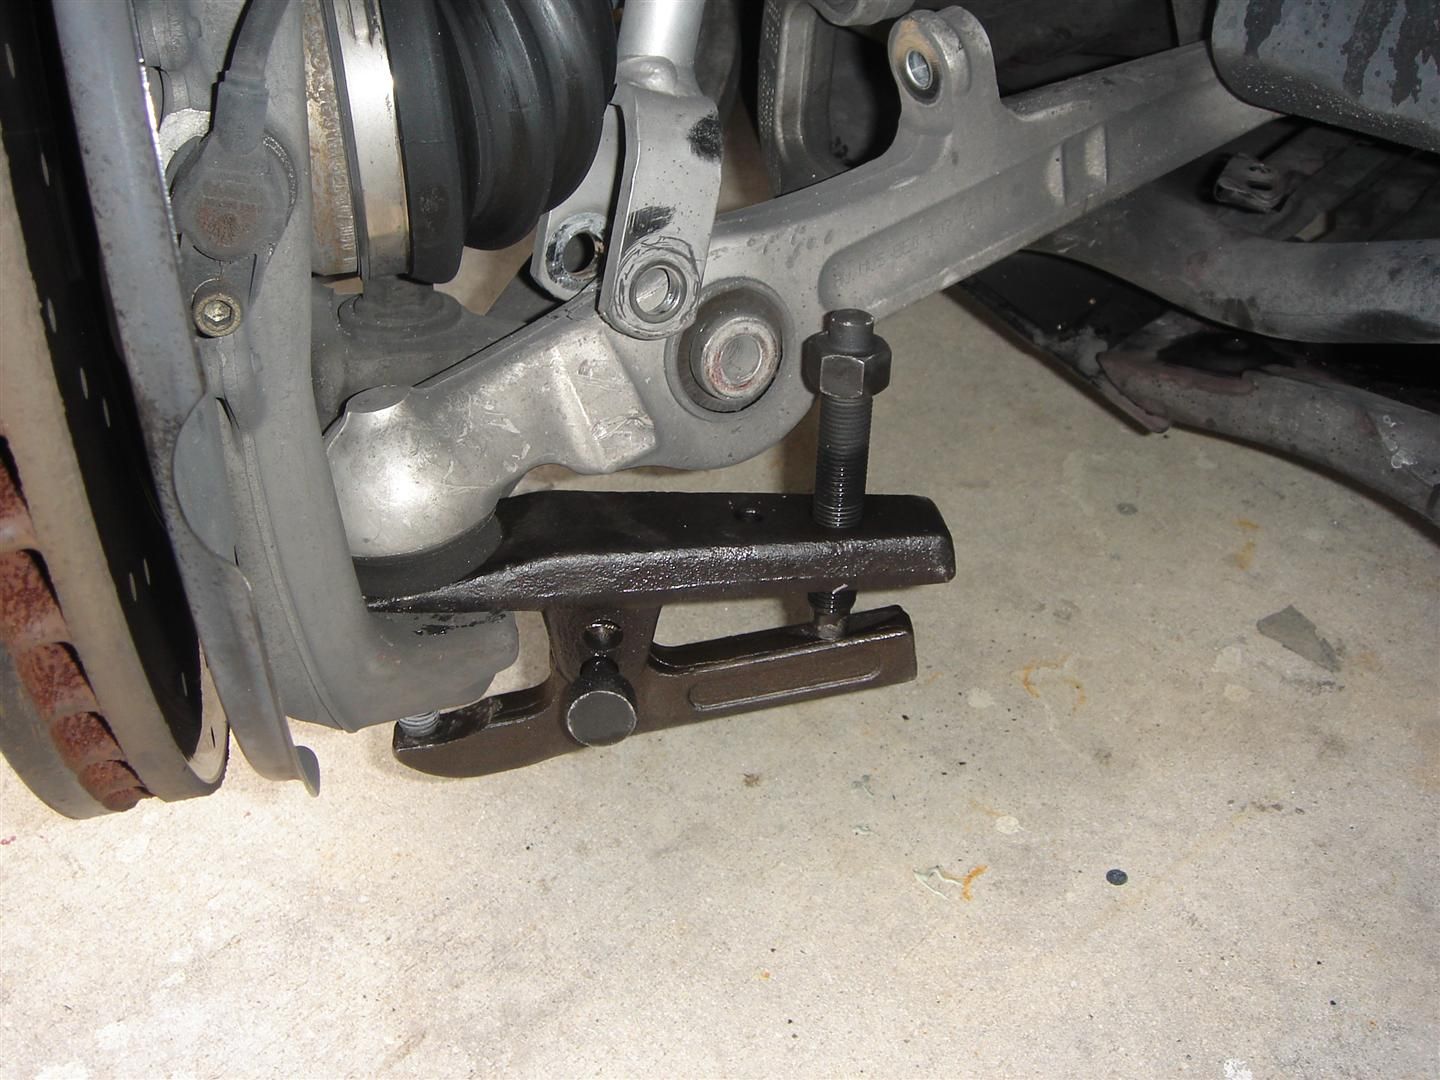
    4/ With the ball joint separator, free the arm from the hub.


    DON’T EVEN THINK STARTING THIS JOB WITHOUT THE SEPARATOR!!!

    Got mine from Harbor Freight ($10) but I had to enlarge the fork because the cutout was too small for the pivot cone widht. When it releases, it sounds like a shot gun!


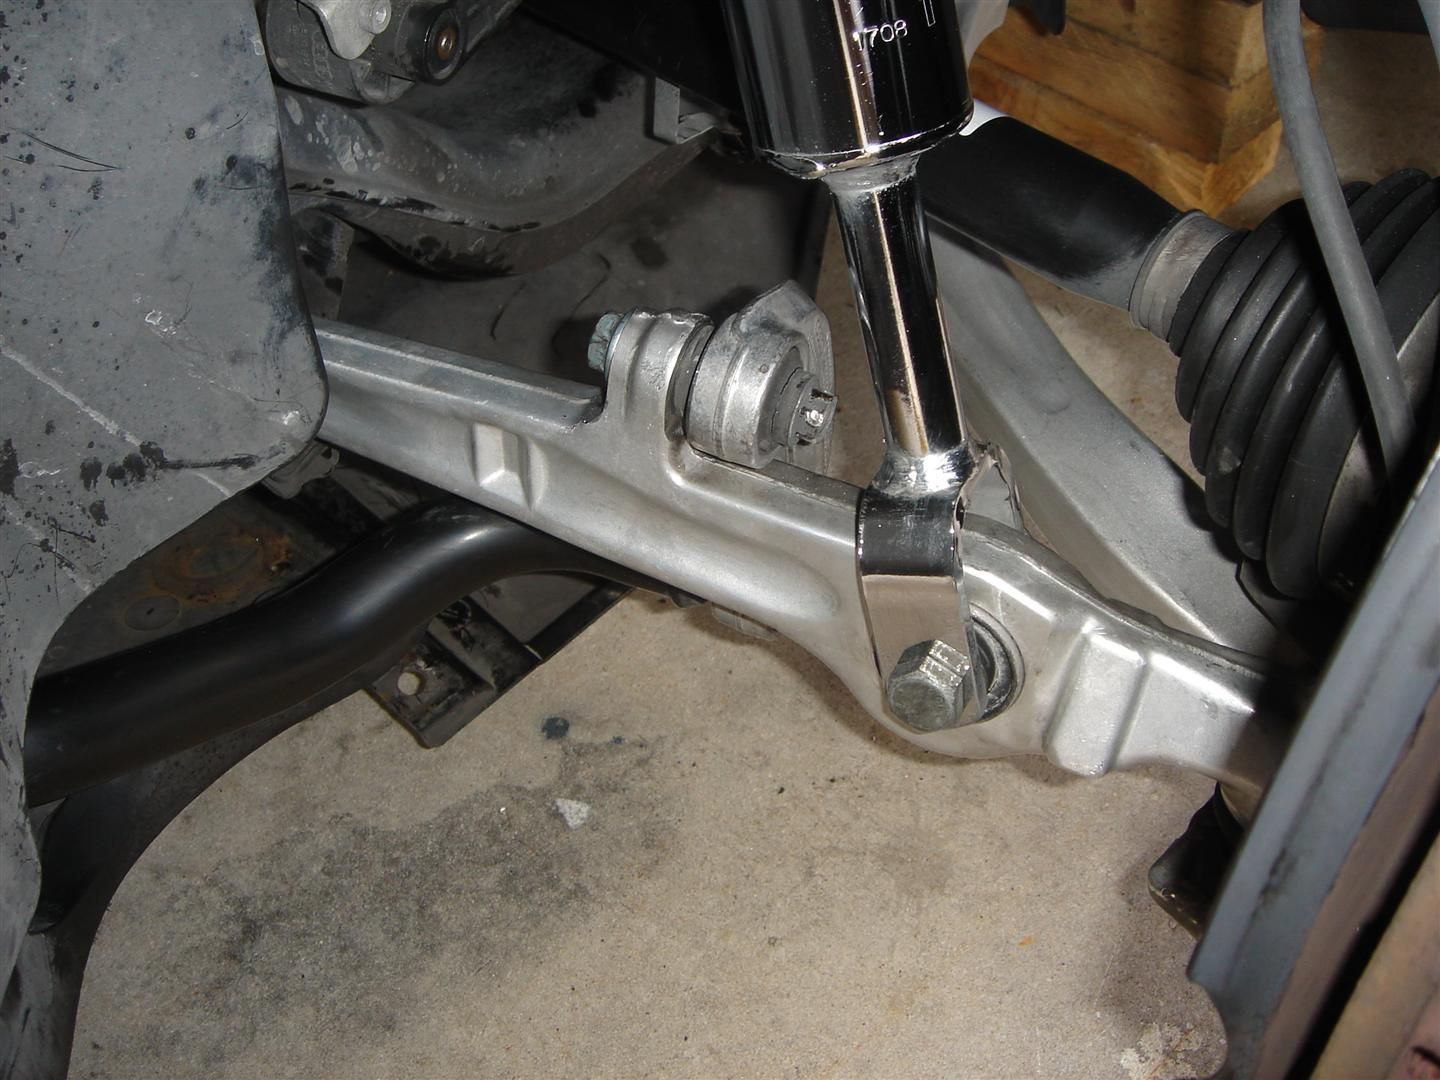
    5/ Using the 18mm wrenches, remove the inner bolt. Replace the arm

    REAR ARM

    1/ with the ball joint separator, free the arm from the hub.
    2/ Using the 18mm wrenches, remove the inner bolt


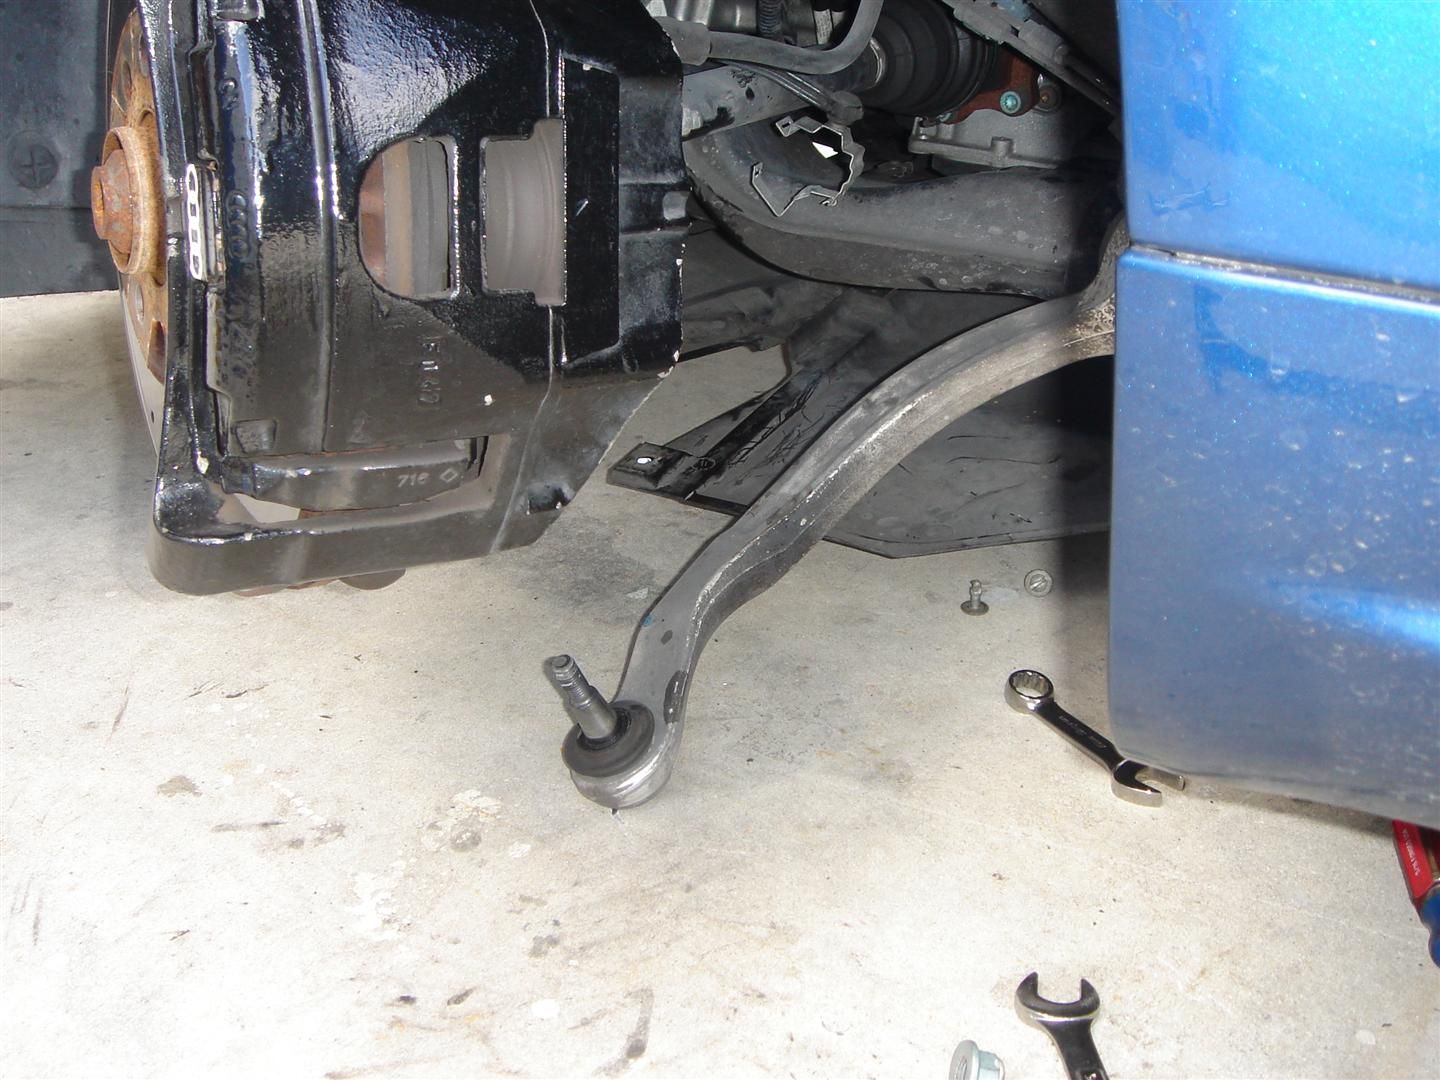
    You will not be able to slide out completely the inner bolt with removing the 10mm plastic nut holding the cover. Remove the nut and bent down enough the plastic cover to make room and slide out the bolt.


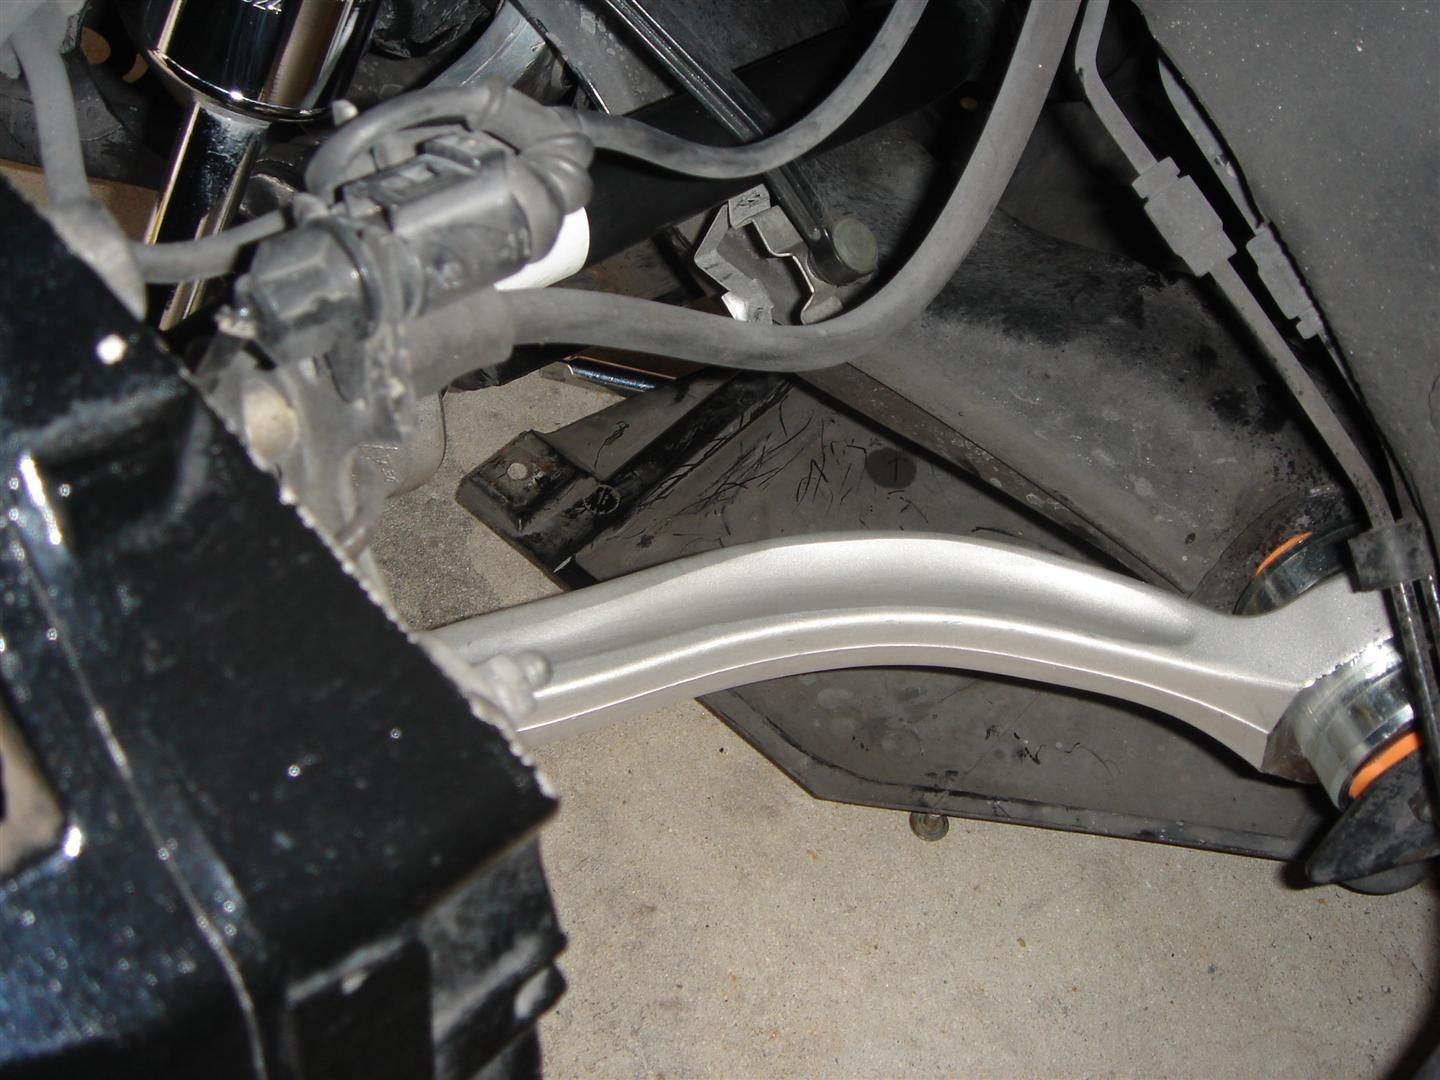
    Clean and you are done


    Let me know if any question

    Phil
    Last edited by kristokes; 04-01-2011 at 02:30 PM.

  2. #2
    Veteran Member Four Rings Leo14's Avatar
    Join Date
    Mar 09 2010
    AZ Member #
    55790
    Location
    North E. Jerz

    Nice! Can't wait for the DIY
    RIP QG TI B7 A4

  3. #3
    Veteran Member Four Rings beantown's Avatar
    Join Date
    Jul 27 2009
    AZ Member #
    45573
    My Garage
    '15 S3
    Location
    Boston

    Nice addition Phil...subscribed.

  4. #4
    Veteran Member Three Rings euroazfck's Avatar
    Join Date
    Jul 18 2010
    AZ Member #
    61591
    My Garage
    98 audi a4_ 88 civc hatch "jdm"
    Location
    colorado

    I'll subScribe!

  5. #5
    Veteran Member Four Rings fly300kts's Avatar
    Join Date
    Oct 16 2008
    AZ Member #
    34255
    My Garage
    03 Golf GTI - 03 Golf 2.0l - 04 Golf 2.0L
    Location
    South Florida - Ft Lauderdale

    DIY Posted

    Phil

  6. #6
    Veteran Member Four Rings elwigglero's Avatar
    Join Date
    Sep 04 2008
    AZ Member #
    32699
    My Garage
    B7 S4 DTM, B7 A4 2.0T Ti
    Location
    Lansdale, PA

    You had adjustable uppers before right? Did you feel a big difference when upgrading the lower arms w/ stiffer bushings?
    Justin
    DTM S4 Sprint Blue

  7. #7
    Veteran Member Four Rings fly300kts's Avatar
    Join Date
    Oct 16 2008
    AZ Member #
    34255
    My Garage
    03 Golf GTI - 03 Golf 2.0l - 04 Golf 2.0L
    Location
    South Florida - Ft Lauderdale

    Quote Originally Posted by elwigglero View Post
    You had adjustable uppers before right? Did you feel a big difference when upgrading the lower arms w/ stiffer bushings?
    Definitively and even if still good at 95000 miles, the larger bushings were totally distorded

    Phil

  8. #8
    Established Member Two Rings Philthy's Avatar
    Join Date
    Nov 10 2010
    AZ Member #
    66810
    Location
    Wildwood Mo

    Replacing all my arms tomorrow. Anyone happen to have the torque specs and do these need to be loaded like the uppers?

  9. #9
    Established Member Two Rings mr larry's Avatar
    Join Date
    Feb 14 2011
    AZ Member #
    70938
    My Garage
    B7 A4 2.0T 6MT Quattro, BMW E82 128i Coupe
    Location
    South FL

    Quote Originally Posted by Philthy View Post
    Replacing all my arms tomorrow. Anyone happen to have the torque specs and do these need to be loaded like the uppers?
    Bump for loading question x2

  10. #10
    Established Member Two Rings bombermon's Avatar
    Join Date
    Oct 15 2008
    AZ Member #
    34225
    My Garage
    Audi S4 B5
    Location
    FL

    Mine seized and I had to take off the spindle and get the arms pressed out

  11. #11
    Senior Member Three Rings Kodymfk's Avatar
    Join Date
    Jun 07 2012
    AZ Member #
    94819
    My Garage
    Black B6 A4 416whp e85 5 spd, Black AllRoad Static (tip)
    Location
    Lansing Michigan

    Going to do this tomorrow, how much surface did you have to remove from the tool to make it work?
    Quote Originally Posted by fly300kts View Post
    Definitively and even if still good at 95000 miles, the larger bushings were totally distorded

    Phil
    e85, meth, 30psi, 1.8T All the Way Check my build out! http://www.audizine.com/forum/showth...-build-on-methI'm also on the FB Kody K

  12. #12
    Senior Member Two Rings rs6's Avatar
    Join Date
    Mar 23 2005
    AZ Member #
    5814
    My Garage
    2014 Cayenne S, 2013 F-150, 2006 A4, Focus Electric
    Location
    San Francisco

    Quote Originally Posted by Kodymfk View Post
    Going to do this tomorrow, how much surface did you have to remove from the tool to make it work?
    Not much, maybe only 1 mm on the insides of the "fork."

  13. #13
    Established Member Two Rings squeegy200's Avatar
    Join Date
    Jun 05 2013
    AZ Member #
    116623
    My Garage
    1990 VW Corrado G60, 1992 VW Golf 16V, 2011 VW Jetta 2.5SE
    Location
    United States

    I'll be doing this very soon as well.
    Just ordered the entire upper and lower control arm kit with tie rod ends this week. Also ordered the ball joint separator tool from harbor freight. Thank you for the detailed information and illustrations. They will be very useful when I tackle this job

    Sent from my Nexus 7 using Tapatalk

  14. #14
    Senior Member Two Rings
    Join Date
    Jul 16 2012
    AZ Member #
    96976
    Location
    PA

    I just did mine yesterday and I just want to say thanks to the OP for this guide. I also want to add some tips in case anyone's interested:

    - removing the sway bar from the mounting bracket helped a lot in getting the front arm in and out
    - I removed front arm first, ball joint side then the inner side. I then removed the rear arm, also ball joint then inner side
    - When installing, it was way easier to do the front arm first while the rear arm was still detached. it was a PITA to align the inner bolts for the front arm, it made it way easier when I had the rear arm off since I can move the knuckle/hub around without the rear arm countering the movement
    - when installing, I did front ball joint, front inner bolts, rear inner bolts, rear ball joint
    - as per ELSA, they have to be torque at curb weight (loaded suspension)

  15. #15
    Established Member Two Rings squeegy200's Avatar
    Join Date
    Jun 05 2013
    AZ Member #
    116623
    My Garage
    1990 VW Corrado G60, 1992 VW Golf 16V, 2011 VW Jetta 2.5SE
    Location
    United States

    This thread was extremely helpful. Much appreciation and thanks! You guys must be super fast, it took me about five hours. I did also replace a drive shaft while replacing the lower control arms. But I must work significantly slower than most.

    I did use the harbor freight ball joint separator. It is a must for this task. And it does sound like a shotgun when the ball joints let loose! Thanks again! Great write up!

    Sent from my Nexus 7 using Tapatalk

  16. #16
    Veteran Member Four Rings fly300kts's Avatar
    Join Date
    Oct 16 2008
    AZ Member #
    34255
    My Garage
    03 Golf GTI - 03 Golf 2.0l - 04 Golf 2.0L
    Location
    South Florida - Ft Lauderdale

    Quote Originally Posted by squeegy200 View Post
    This thread was extremely helpful. Much appreciation and thanks! You guys must be super fast, it took me about five hours. I did also replace a drive shaft while replacing the lower control arms. But I must work significantly slower than most.

    I did use the harbor freight ball joint separator. It is a must for this task. And it does sound like a shotgun when the ball joints let loose! Thanks again! Great write up!

    Sent from my Nexus 7 using Tapatalk
    Your welcome

    Phil

  17. #17
    Veteran Member Four Rings papadelogan's Avatar
    Join Date
    Jul 31 2011
    AZ Member #
    79072
    My Garage
    1999 F250 7.3 Powerstroke
    Location
    Gulf Coast of Florida

    Is there a reference available for the torque values for each bolt/nut/fastener?
    2013 Phantom Black A5 P+ Cabriolet (2.0T quattro) mods4cars, mesh grill, gunmetal VMR 701, HFC "Boudica"

    2007 Ibis White B7 A4 Ti Avant 6MT quattro JHM Stage 2, HFC, Milltek CatBack, GFB DV+ "the YETI" sold

    2005.5 Black B7 A4 6MT quattro sold

  18. #18
    Veteran Member Four Rings Avant4me's Avatar
    Join Date
    Aug 09 2011
    AZ Member #
    79487
    Location
    NOVA

    Found the values

    Quote Originally Posted by B6JoeS4 View Post
    From Bentley manual:


    1- 75nm
    5- 7nm
    7- 45nm
    8- 40nm
    12- 70nm +180
    14- 110nm
    17- 10nm
    20- 90nm
    22- 55nm
    23- 110nm +90
    24- 40nm +90
    26- 40nm +90
    28- 70nm +180
    29- 75nm
    37- 50nm +90
    38- 50nm
    ~2007 DTM A4 S-Line Avant, 6MT, Stasis cat back, RAI downpipe, JHM Stage2 93, JHM HPFP, HFC, APR snub mount, 034M SD Motor mounts, RS4 RSB, VMR 708 19x8.5 ET35 245/35/19, B5 perches, NEUSPEED sport springs ~

  19. #19
    Active Member Two Rings AndyCastellini's Avatar
    Join Date
    Jul 16 2014
    AZ Member #
    264541
    Location
    South Jersey

    How do you get the inner bolt for the rear arm out on the passenger side

  20. #20
    Veteran Member Four Rings Avant4me's Avatar
    Join Date
    Aug 09 2011
    AZ Member #
    79487
    Location
    NOVA

    Take the plastic cover off the bottom of the car and it will slide out. You only need to undo the front of the cover in order to pop it down enough
    ~2007 DTM A4 S-Line Avant, 6MT, Stasis cat back, RAI downpipe, JHM Stage2 93, JHM HPFP, HFC, APR snub mount, 034M SD Motor mounts, RS4 RSB, VMR 708 19x8.5 ET35 245/35/19, B5 perches, NEUSPEED sport springs ~

  21. #21
    Active Member One Ring feeley80's Avatar
    Join Date
    May 02 2010
    AZ Member #
    58451
    My Garage
    Tools.
    Location
    Washington, DC

    I had a real battle with this one. I didn't realize there was a sleeve in the spindle for the rear lower control arm, so when i took the old one out the sleeve went with it. I was dumbfounded and about to scrap the whole project because the old part and the new part didn't look the same at the ball joint side. Thankfully a buddy of mine came to the rescue. We popped the sleeve off of the old ball joint, pounded it back into the spindle and the new arm went on without and issue. I became best friends with my breaker bar on this one.
    Side note: get a ratcheting 18mm wrench for this one if you don't already have on. http://shop.advanceautoparts.com/p/g...rm=18mm+wrench
    '07 A4 2.0T Quattro. Black on Black. Diverter Valves, Cam followers, oil leaks, carbon buildup... my girlfriend thinks it's hot that I can work on my own car. Thankfully Audi gives me plenty of opportunities to impress.

  22. #22
    Veteran Member Four Rings FraggyA4's Avatar
    Join Date
    Mar 03 2012
    AZ Member #
    89246
    My Garage
    Jeep Comanche
    Location
    Thief River Falls, MN

    Quote Originally Posted by feeley80 View Post
    I had a real battle with this one. I didn't realize there was a sleeve in the spindle for the rear lower control arm, so when i took the old one out the sleeve went with it. I was dumbfounded and about to scrap the whole project because the old part and the new part didn't look the same at the ball joint side. Thankfully a buddy of mine came to the rescue. We popped the sleeve off of the old ball joint, pounded it back into the spindle and the new arm went on without and issue. I became best friends with my breaker bar on this one.
    Side note: get a ratcheting 18mm wrench for this one if you don't already have on. http://shop.advanceautoparts.com/p/g...rm=18mm+wrench
    Yeah to prevent this you could of used the ball joint tool that Fly has post on the first page. It holds the bushing in while you press out the ball joint.
    -Chadwick

    FULLY BUILT ENGINE!

  23. #23
    Active Member One Ring feeley80's Avatar
    Join Date
    May 02 2010
    AZ Member #
    58451
    My Garage
    Tools.
    Location
    Washington, DC

    haha, I bought it the day of my last post. Good advice: "Do not start this project without the ball joint remover."
    '07 A4 2.0T Quattro. Black on Black. Diverter Valves, Cam followers, oil leaks, carbon buildup... my girlfriend thinks it's hot that I can work on my own car. Thankfully Audi gives me plenty of opportunities to impress.

  24. #24
    Veteran Member Four Rings FraggyA4's Avatar
    Join Date
    Mar 03 2012
    AZ Member #
    89246
    My Garage
    Jeep Comanche
    Location
    Thief River Falls, MN

    Quote Originally Posted by feeley80 View Post
    haha, I bought it the day of my last post. Good advice: "Do not start this project without the ball joint remover."
    Yeah mine never would of came out with the forks. They came off with explosive force. I had to modify mine though to make it work. I ended up grinding flat the part that presses on the bolt part.
    -Chadwick

    FULLY BUILT ENGINE!

  25. #25
    Active Member One Ring kendo36's Avatar
    Join Date
    Oct 10 2014
    AZ Member #
    288067
    Location
    Clintonville WI

    Yes I got that far. Issue is I think there's a sleeve that also site in the hole where the ball joint goes up through.

  26. #26
    Veteran Member Three Rings caliizaktiv's Avatar
    Join Date
    Dec 20 2010
    AZ Member #
    68491
    My Garage
    Used Oil
    Location
    East Coast

    I'm going to add to this with regards to the Passenger Curved Lower Control Arm and my experience with my B6 S4

    Full Write-up here http://www.audizine.com/forum/showth...5#post10671735


    07 RS4 | 03 M5 | 24 RS6p

  27. #27
    Veteran Member Three Rings mosnet99's Avatar
    Join Date
    Oct 10 2015
    AZ Member #
    361130
    My Garage
    2004 USP 1.8T, 1993 Jeep Cherokee Country
    Location
    Detroit, MI

    Sorry to revive this thread, but what would happen if the suspension is not loaded when you torque the bolts down?

  28. #28
    Veteran Member Four Rings Avant4me's Avatar
    Join Date
    Aug 09 2011
    AZ Member #
    79487
    Location
    NOVA

    Quote Originally Posted by mosnet99 View Post
    Sorry to revive this thread, but what would happen if the suspension is not loaded when you torque the bolts down?
    You'll wear out your control arm bushings much quicker
    ~2007 DTM A4 S-Line Avant, 6MT, Stasis cat back, RAI downpipe, JHM Stage2 93, JHM HPFP, HFC, APR snub mount, 034M SD Motor mounts, RS4 RSB, VMR 708 19x8.5 ET35 245/35/19, B5 perches, NEUSPEED sport springs ~

  29. #29
    Veteran Member Three Rings mosnet99's Avatar
    Join Date
    Oct 10 2015
    AZ Member #
    361130
    My Garage
    2004 USP 1.8T, 1993 Jeep Cherokee Country
    Location
    Detroit, MI

    Quote Originally Posted by Avant4me View Post
    You'll wear out your control arm bushings much quicker
    We're not talking 100 miles quicker, right?

    Sent from my LG-H811 using Tapatalk
    Misfiring 2004 1.8TQ USP, CX Racing FMIC, Hybrid K04, Milltek HFC

  30. #30
    Veteran Member Four Rings Avant4me's Avatar
    Join Date
    Aug 09 2011
    AZ Member #
    79487
    Location
    NOVA

    Many variables and depends on what angle you tightened the arms down at relative to where they should be.

    If they are pretty close to where they need to be then probably not much faster all else equal.

    If they are reasonably off then all else being equal it could be months or years earlier.
    ~2007 DTM A4 S-Line Avant, 6MT, Stasis cat back, RAI downpipe, JHM Stage2 93, JHM HPFP, HFC, APR snub mount, 034M SD Motor mounts, RS4 RSB, VMR 708 19x8.5 ET35 245/35/19, B5 perches, NEUSPEED sport springs ~

  31. #31
    Veteran Member Four Rings i3oricua's Avatar
    Join Date
    Sep 17 2006
    AZ Member #
    11575
    My Garage
    2022 Kia Sorento; 2015 Ducati Monster 821 Dark
    Location
    Aurora, Colorado

    Quote Originally Posted by mosnet99 View Post
    Sorry to revive this thread, but what would happen if the suspension is not loaded when you torque the bolts down?
    I'll tell you what will happen from experience. They'll be noisy and you'll drive yourself crazy trying to figure it out. There is the potential to prematurely wear out the bushings but its slim. After a few thousand miles I finally torqued them down under load and made all my creaking and squeaking go away.

  32. #32
    Established Member Two Rings redbat's Avatar
    Join Date
    May 23 2015
    AZ Member #
    333873
    Location
    Santa Cruz, CA

    Quick question - I ordered replacement lower control arms from FCP Euro. The part number was DEL-TC1179 (Delphi part). The box I received had ONE of those and one that is almost exactly the same but with the part number TJ43K. They look the same EXCEPT that the hole for the swaybar link bolt in the DEL-TC1179 part is OFF-CENTER, while the other part has that hole centered.

    So the question: are these parts supposed to be identical, or did I get a dud? It's off-center by a millimeter or 2 - enough that I don't want to put it on my car without confirmation that it's supposed to be off-center.

    ------
    The Garage:
    2005.5 Brilliant Black A4 Quattro 6spd manual / JHM Stage 1 / 034 snub / NewSouth Vent Boost Gauge / GFB DV+ / JHM Lightweight Flywheel Clutch Kit / Koni FSD / Eibach springs
    2008 Dolphin Grey S-Line Avant

  33. #33
    Veteran Member Four Rings fly300kts's Avatar
    Join Date
    Oct 16 2008
    AZ Member #
    34255
    My Garage
    03 Golf GTI - 03 Golf 2.0l - 04 Golf 2.0L
    Location
    South Florida - Ft Lauderdale

    Should be centered

    Phil

  34. #34
    Established Member Two Rings redbat's Avatar
    Join Date
    May 23 2015
    AZ Member #
    333873
    Location
    Santa Cruz, CA

    Thanks, Phil!
    ------
    The Garage:
    2005.5 Brilliant Black A4 Quattro 6spd manual / JHM Stage 1 / 034 snub / NewSouth Vent Boost Gauge / GFB DV+ / JHM Lightweight Flywheel Clutch Kit / Koni FSD / Eibach springs
    2008 Dolphin Grey S-Line Avant

  35. #35
    Senior Member Two Rings
    Join Date
    Mar 01 2013
    AZ Member #
    110480
    Location
    USA/VA

    How did you enlarge the fork on the separator? I plan on buying the one from HF also.
    • 06 Audi 
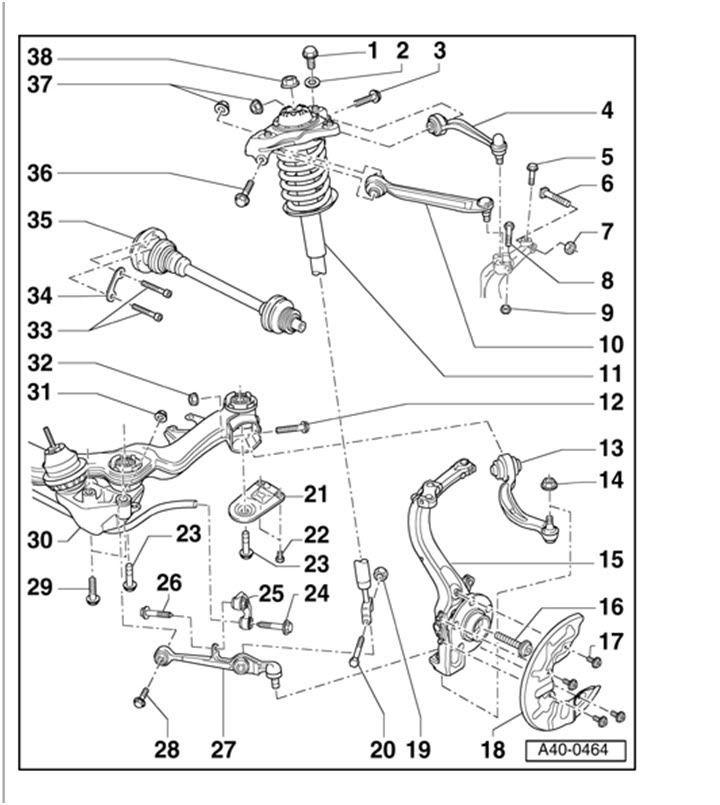
2.0t Quattro Avant - Drop in K&N, Sony App Radio, 034 Snub Mount & Bracket, Carbon Fiber Interior Wrap - Sold
    • 01 Audi A4 1.8t AWM Quattro - AWE Boost Gauge, 18" Avus S4 Rims, 8000k HIDs, 3000K HID fog light mod, Pioneer Double DIN, Krauto Interior LED Kit - Sold

  36. #36
    Established Member Two Rings mr larry's Avatar
    Join Date
    Feb 14 2011
    AZ Member #
    70938
    My Garage
    B7 A4 2.0T 6MT Quattro, BMW E82 128i Coupe
    Location
    South FL

    Quote Originally Posted by phatjames167 View Post
    How did you enlarge the fork on the separator? I plan on buying the one from HF also.
    I ground mine a bit with a dremel

  37. #37
    Veteran Member Four Rings MattboyR32's Avatar
    Join Date
    Nov 28 2006
    AZ Member #
    13736
    Location
    Orange County, CA, USA

    Since i'm a complete donkey I want to prevent others out there that attempt this to avoid the dumbass fooked up way I went about it...

    Ok so I bought this.
    https://www.amazon.com/gp/product/B0...?ie=UTF8&psc=1

    Which is all well and good, but as mentioned above, some modifications are needed. Get out a metal file and shave the inner parts of the fork. It doesn't need to be widened much, but do it before attempting and re-attempting and re-attempting expecting it to work.

    So as you probably gathered, the separator I bought kept slipping off, more like firing off. I'm looking at this thing and it goes in far enough. Unfortunately in my fooked up head I thought it was simply that it wasn't in far enough. Well what was happening is that the piece that is pushing up on the joint itself was slipping off because of the angle. After getting 3 out of 4 off with much swearing and scratching of head. I finally broke out the fookin drill and drilled a wide shallow hole in the flat piece that way it has something to grip onto and you are not going to fuck up your threads like I have done. All 4 threads are fooked.

    Take a note lads.


    B7 RS4 6MT Daytona Grey
    JHM 2.75" catback non-res, piggie pipes, 034 transmission, engine mounts, strut mounts & end links, Apikol diff mount, Hotchkis adjustable rsb, Escort 9500i (HW), JHM lightweight rotors, JHM intake manifold spacers, BC Racing coilovers,
    RIP: B7 S4 DTM 6MT Dolphin Grey
    JHM Tune, Corsa Catback, Piggie Pipes, Bilstein PSS9, RS4 Reps, Blackvue Car Blackbox (HW), Escort 9500i (HW)

  38. #38
    Veteran Member Four Rings aluthman's Avatar
    Join Date
    Mar 24 2013
    AZ Member #
    111961
    Location
    Oakdale, CT

    The Harbor Freight tool has an indentation there out of the box. You just got one that has less features than a Harbor Freight tool lol.
    -Adam

    '07 DTM A4 2.0T|6MT|EFR 7163 Twin Scroll|DoTuning|Built Motor|Meth and other go fast stuff…
    '06 A4 2.0T Quattro - RIP (Best ¼ mile pass 13.634 @ 103.30)

  39. #39
    Veteran Member Four Rings MattboyR32's Avatar
    Join Date
    Nov 28 2006
    AZ Member #
    13736
    Location
    Orange County, CA, USA

    yup and cost more! lol


    B7 RS4 6MT Daytona Grey
    JHM 2.75" catback non-res, piggie pipes, 034 transmission, engine mounts, strut mounts & end links, Apikol diff mount, Hotchkis adjustable rsb, Escort 9500i (HW), JHM lightweight rotors, JHM intake manifold spacers, BC Racing coilovers,
    RIP: B7 S4 DTM 6MT Dolphin Grey
    JHM Tune, Corsa Catback, Piggie Pipes, Bilstein PSS9, RS4 Reps, Blackvue Car Blackbox (HW), Escort 9500i (HW)

  40. #40
    Veteran Member Four Rings Dondbg's Avatar
    Join Date
    Mar 12 2016
    AZ Member #
    370140
    My Garage
    B6 S4 2005 manual swap
    Location
    The land of Kiwis

    Guys.

    My B7 tie road end / front ball arm joint are: 16MM or 20MM ? I've been googling and am I right to say they are 16mm....

    Anyone here used kraft automotive parts ? The price fits budget and purpose.

    http://www.kraft-automotive.com/#home-27

    Want to make sure below fits before I hit buy now.

    https://www.ebay.com/itm/182107623285

    Thanks.


    -------------------------------------
    Audi A4 B7 avant 2.0T Tip Quattro 2008

Bookmarks

Posting Permissions

  • You may not post new threads
  • You may not post replies
  • You may not post attachments
  • You may not edit your posts
  •  


    © 2001-2025 Audizine, Audizine.com, and Driverzines.com
    Audizine is an independently owned and operated automotive enthusiast community and news website.
    Audi and the Audi logo(s) are copyright/trademark Audi AG. Audizine is not endorsed by or affiliated with Audi AG.