So it was too cold for me to take pics, so I'm going to be stealing pics from audi[]viruz's PCV Valve walkthrough. Thanks in advance man!
I just wanted to get it done (I even bagged out on changing the oil, I was being super lazy!) but it was INCREDIBLY simple. Seriously a walk in the park if you've ever worked on a 1.8t engine.
Tools:
Torx drivers of various sizes. The engine has 3 different sizes of torx bolts that they use so make sure you have the right sizes.
A good ratchet
3" wobble extension
4-6" extension
Phillips head screwdriver (if you choose to remove the air snorkel)
2 Hose clamps (roughly 1-1.25" diameter)
Valve Cover Gasket P/N: 06F103483D
Ultra-Black gasket sealer (optional) I used Permatex brand from my local Auto parts store, no need to buy the ultra expensive Audi stuff
1) Unscrew the Oil Cap to release the pressure in the crankcase. Pop off PCV hoses:
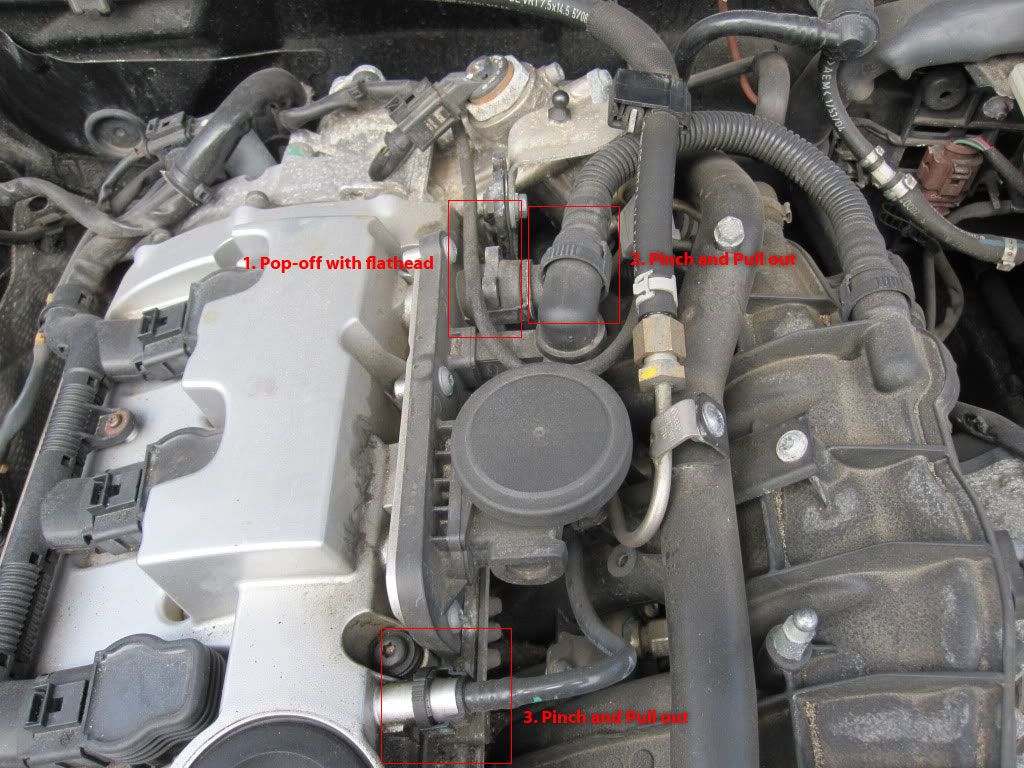
Hoses 2 and 3 are simple: just pinch the sides of the connector and pull off. For 1 you just pop the retaining clip up and over the valve nipple thing with a flathead. It shouldn't take much force so be careful not to break it. After you pop that over it should just slide right of. Just move the hoses out of the way.
2) Unhook the HPFP connector.
Unbolt the PCV valve:
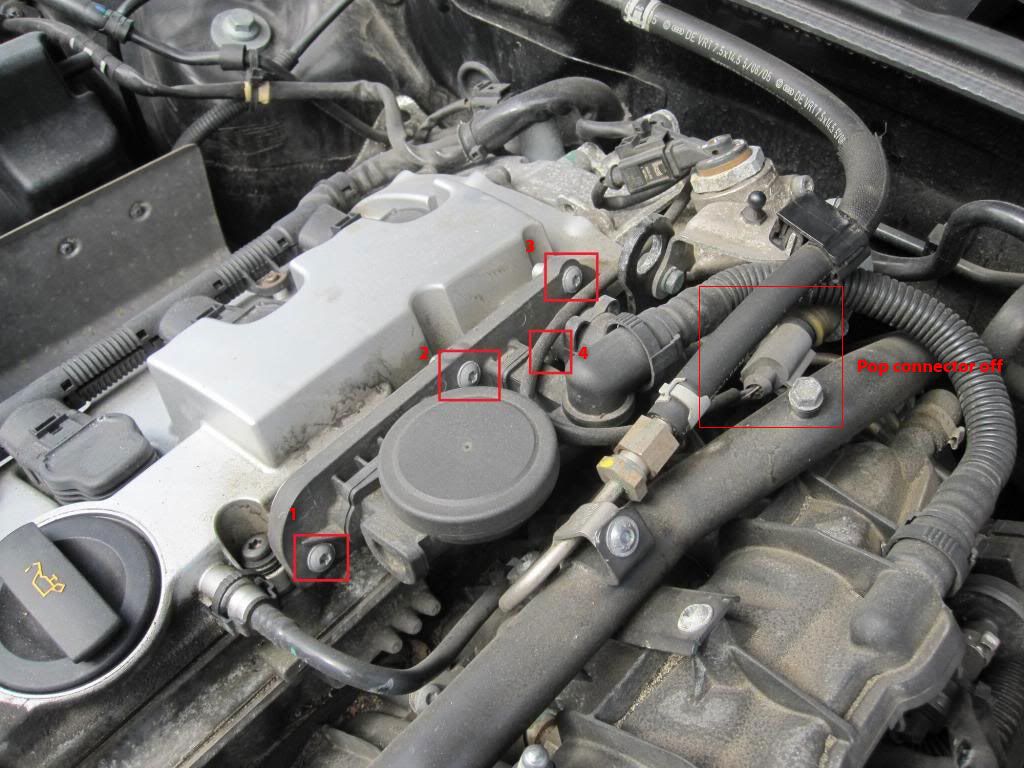
Bolts 1, 2, & 3 are easy to get to, just unbolt them and make sure NOT TO DROP THEM! For the 4th I found it easiest to get at it with a wobble extension. Be extremely careful with this bolt that it doesn't fall into the Intake Manifold area as its tough to get down there and there are lots of grooves for it to get lodged in.
Pull the PCV valve off. Its probably a good idea to blow into the hose that connects to the pancake valve to check for leaks. If you can blow through it then its time for a new PCV valve! Lucky you!
3) Time to remove the air snorkel. This step is optional, but it gives you more room to wrestle with the hoses in the next step. Unscrew the two phillips head screws at the front of the bay, directly to the left of the radiator fans. Pull up on the back of the snorkel and pull out.
4) Now you have to wrestle with these two hoses:
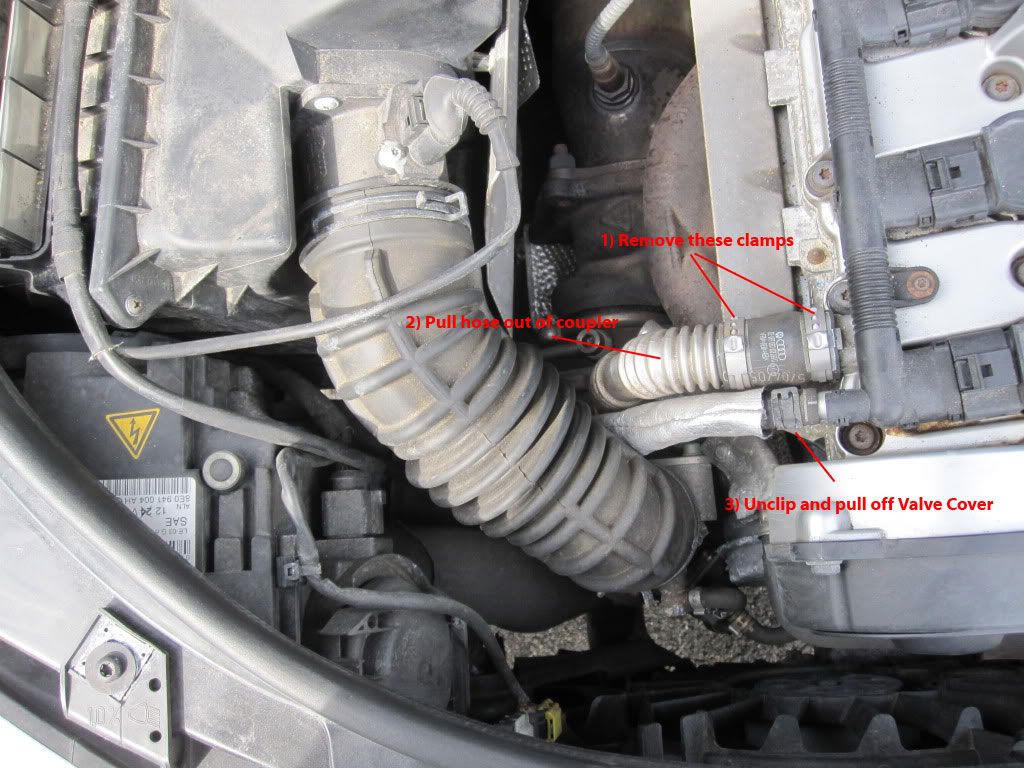
I pulled both one-time use clamps off because I hate them and I wanted to replace them with screw clamps, but you only need to remove the bottom one. Once they are off, pull the metal hose out. Its a bit tough but just be careful an move slowly, brute force is not your friend.
For 3, I actually couldn't get the hose off to save my life. It was pretty well adhered on to the valve cover, so I just left it on and folded the valve cover back on it. Worked fine for me, but YMMV.
5) Unscrew Coil Pack Harness holddowns. They are two small torx bolts. You can't miss them. Then pull the coil packs. I bought a Coil Pack puller and I would seriously recommend anyone to get one. It makes life much easier!
6) Unscrew 2 bolts from front of Timing belt cover. You can see one here:
The other is right next to that.
6) Time to unscrew the Valve Cover. Now I can't find a good pic so I may update with a pic of my own. There are like 16 or 17 bolts holding it down. They are Torx head screws that are semi captive so you should be able to back them all the way out without fear of them falling out. What I did was back them out all the way and just pull them out. There were a few stubborn ones but I just left them in as I moved on to the next step...
7) Now you need to break the valve cover free from the head. The gasket had adhered to the had somewhat to I just rocked the valve cover back and forth with some force to pop it loose. It took some force but I got it loose after 2 minutes of tugging. Once its free pull it making sure the bolts are either all out or at least still held into the valve cover. for any stubborn bolts, just push it out of the VC from underneath.
8) Pull the gasket off the VC or the head. My gasket was in one piece, but you may not be so lucky.
9) Clean up the Valve cover well underneath.
10) Clean the mating surfaces well on the head where the gasket sits. Mine has some weird rubbery gunk all around the spark plug shafts. Be careful and just clean it up as best you can. The cleaner the surface is the better the new gasket will seal.
11) Place gasket in grooves in Valve Cover. I applied some Ultra-Black Gasket Sealer to the corners on the groove that slots into the VC just to hold it in place.
12) (optional) I also smeared a bit of the Gasket sealer on the lower edge of the gasket mating surface of the head. Since that edge is lower, it sees more pressure and (at least on my engine) was leaking worse than the top edge.
13) Place VC, with gasket, back on top of head. Be careful so that the gasket doesn't dislodge or move around. If it falls out or seats wrong you will to do this all again soon!
14) Put bolts back in. Start off tightening by hand so you don't crossthread them. Tighten them in a pattern from the inner bolts outward. I just barely snugged them, then just went around in a semi star pattern and gave them slight turns until the rubber grommets on the bolts bulged ever so slightly. I believe the torque specs are 10nm or ~7ft/lbs for people who want to be exact.
15) Replace parts you removed in reverse order.
16) Have a beer

and enjoy the satisfaction of DIY'ing and saving some money!


 Reply With Quote


Bookmarks