Audizine - An Automotive Enthusiast Community

Results 1 to 18 of 18
  1. #1
    Veteran Member Three Rings Brettannica's Avatar
    Join Date
    Oct 14 2012
    AZ Member #
    102234
    My Garage
    2010 Audi A4 Avant
    Location
    Perth, Western Australia

    Tiptronic +/- Reversal - Tutorial

    Guest-only advertisement. Register or Log In now!
    Hi all,

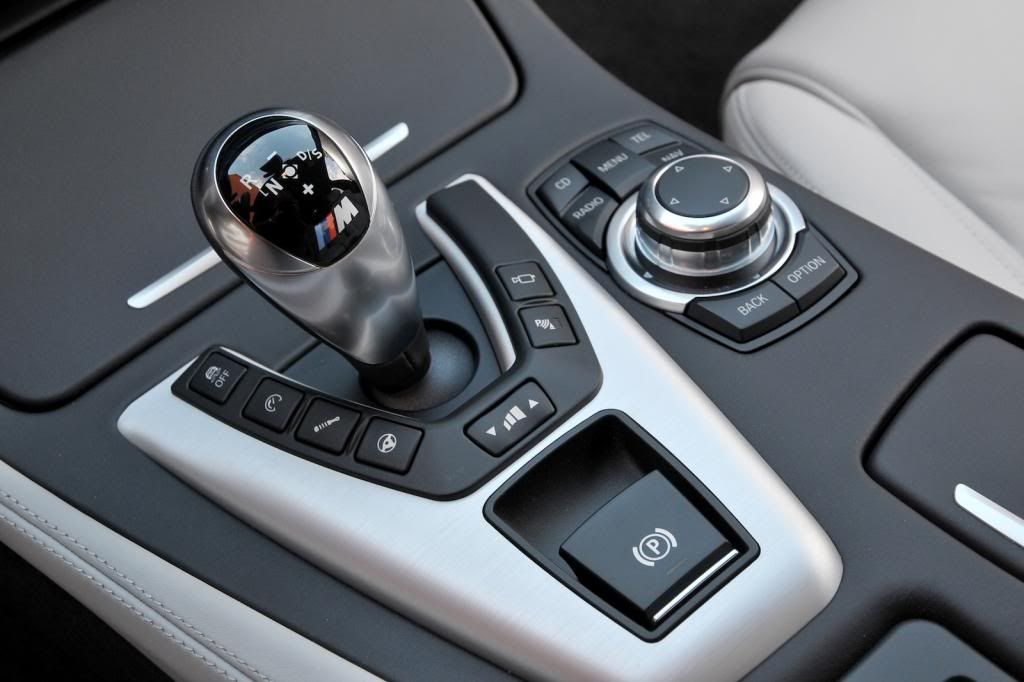
    Well, I thought I would have a crack at reversing the +/- changing sequence on the Tiptronic shifter as per the previously posted Video in French.
    I was amazed at how simple the job was - literally 45 mins from start to finish and it works like a charm.

    Whilst I was doing the change, I figured I would take some photos and post a step by step tutorial for anyone interested.

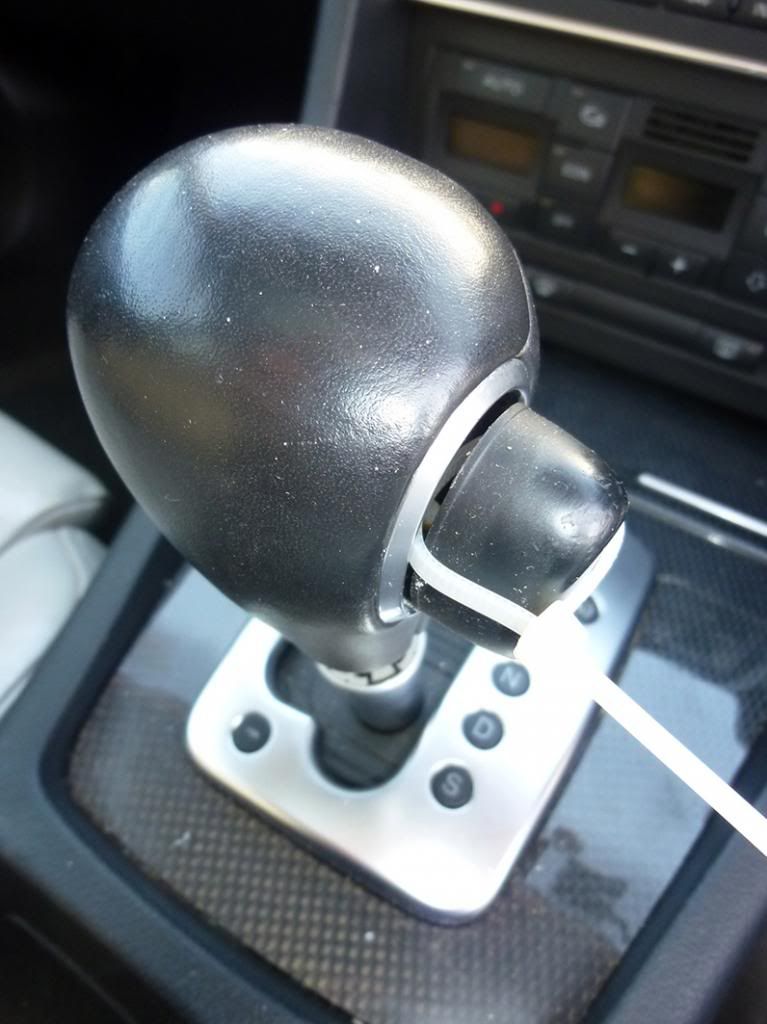
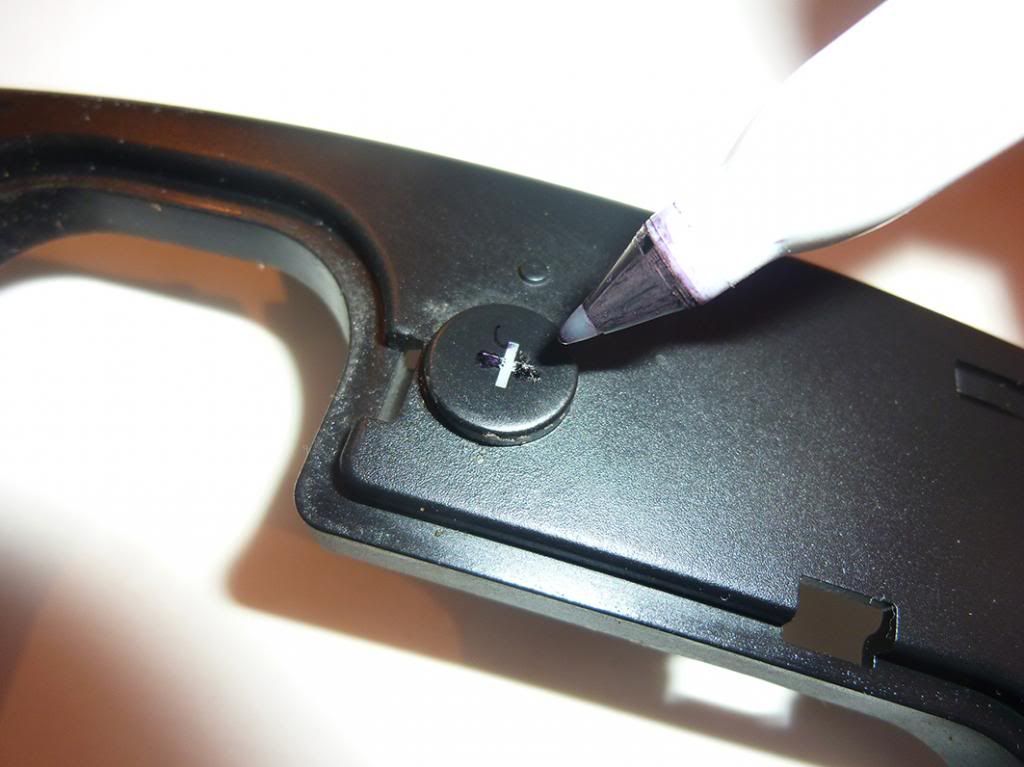
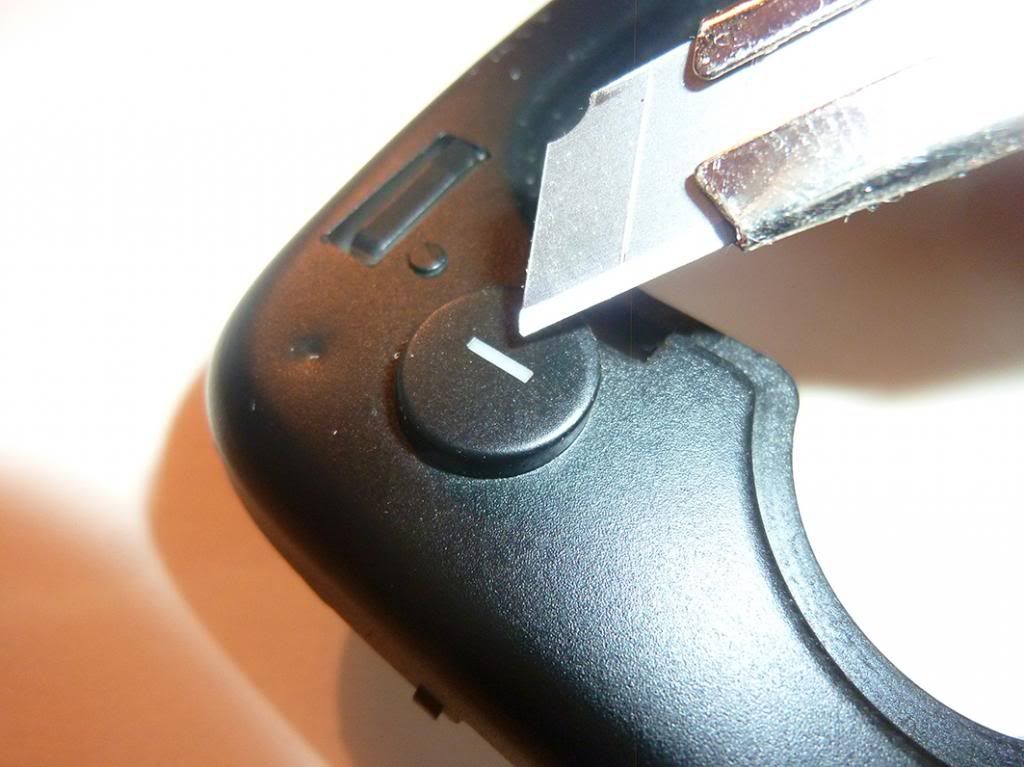
    STEP 1: Place shifter into DRIVE. Pull button outwards, but only enough to slip a small zip tie in between the housing and the button. Secure.


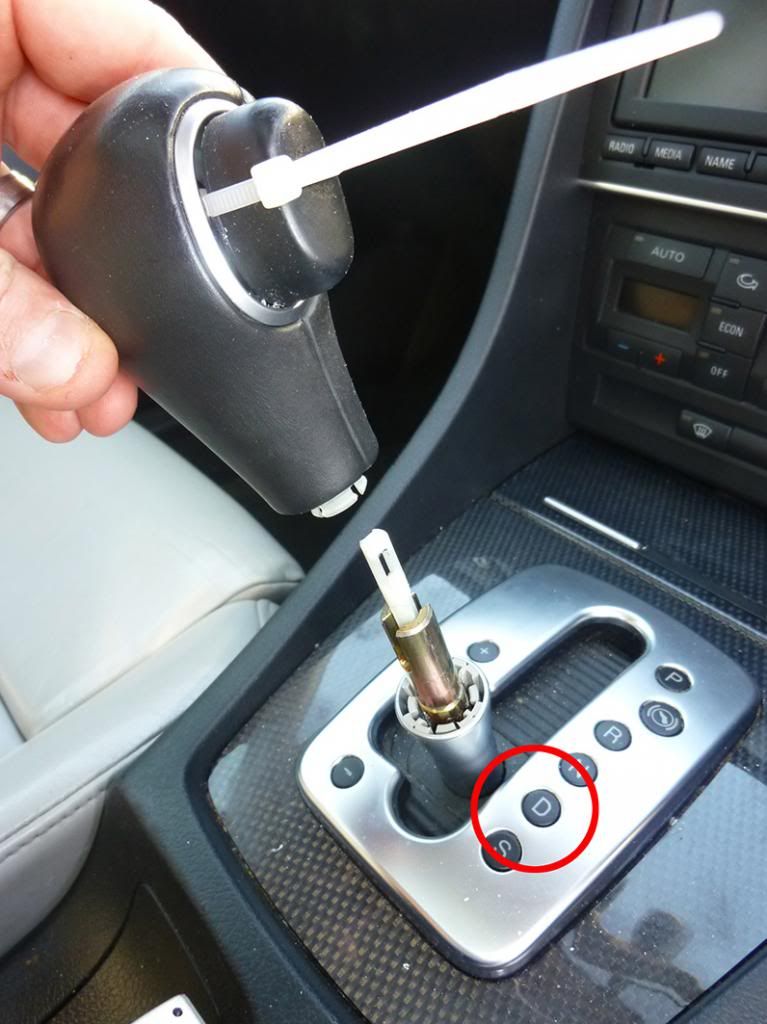
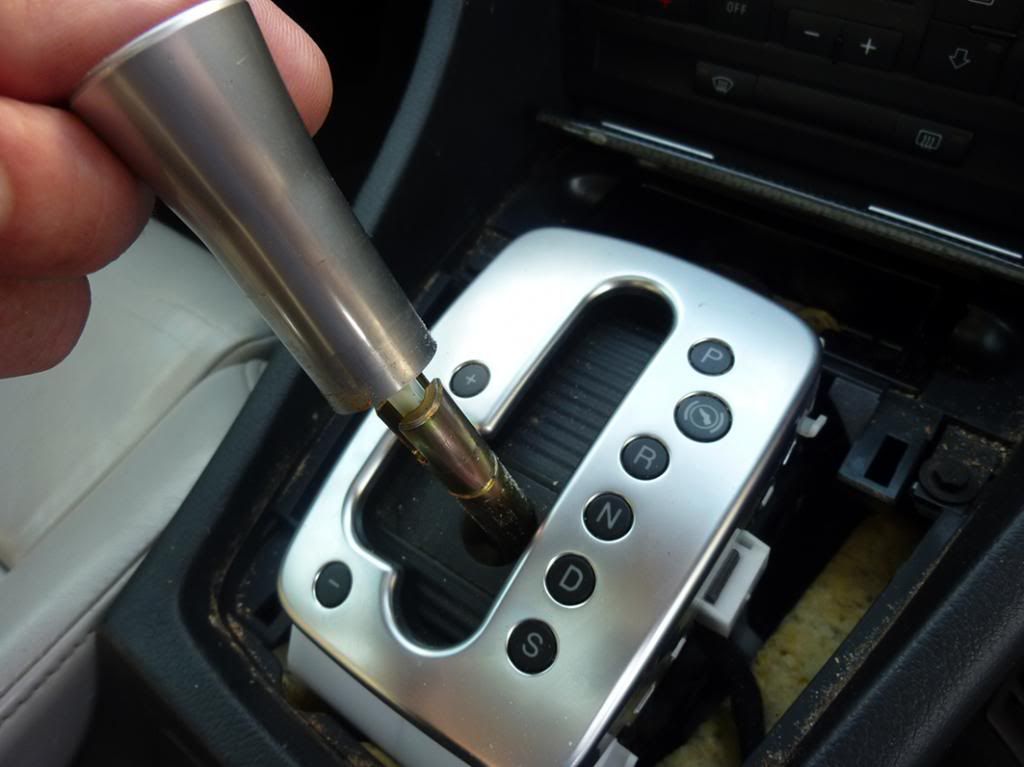
    STEP 2: Rotate silver sleeve below the knob clockwise. Pull up using CONTROLLED force. Mine popped off quite easily. *Note, the shifter position in DRIVE. This may make a difference to the ease of removal as per the YouTube Video.


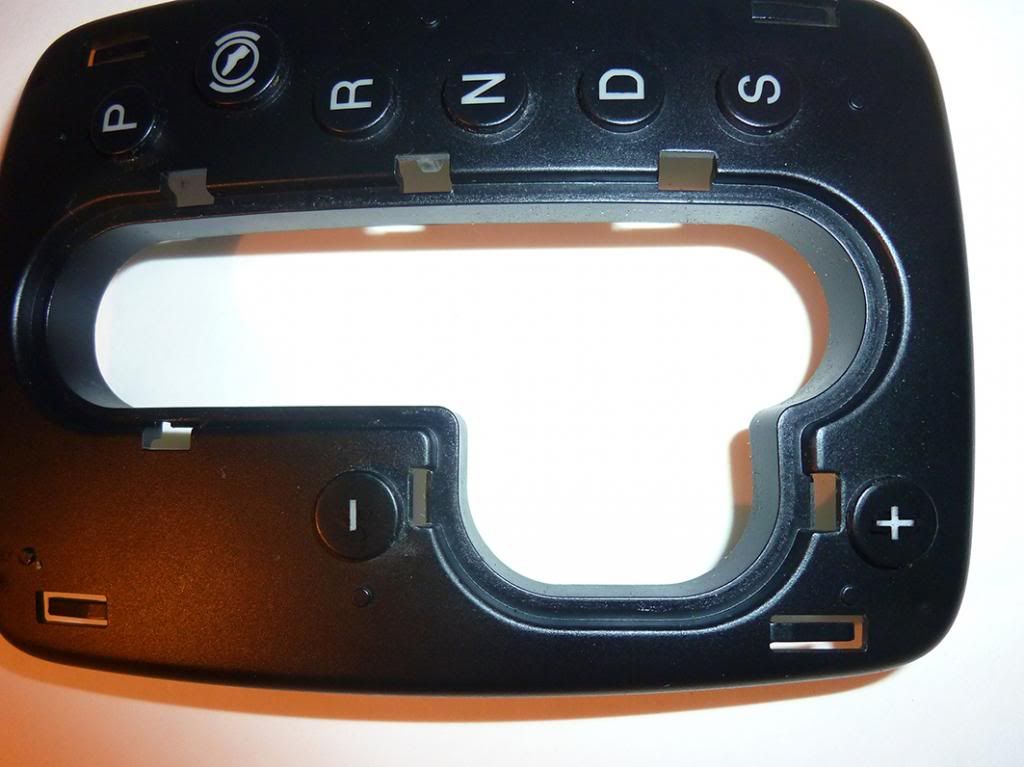
    STEP 3: Open the ashtray and using two hands lift the shifter display surround upwards. Once the forward lugs are free, gently use a screwdriver to pry the rear ones up.


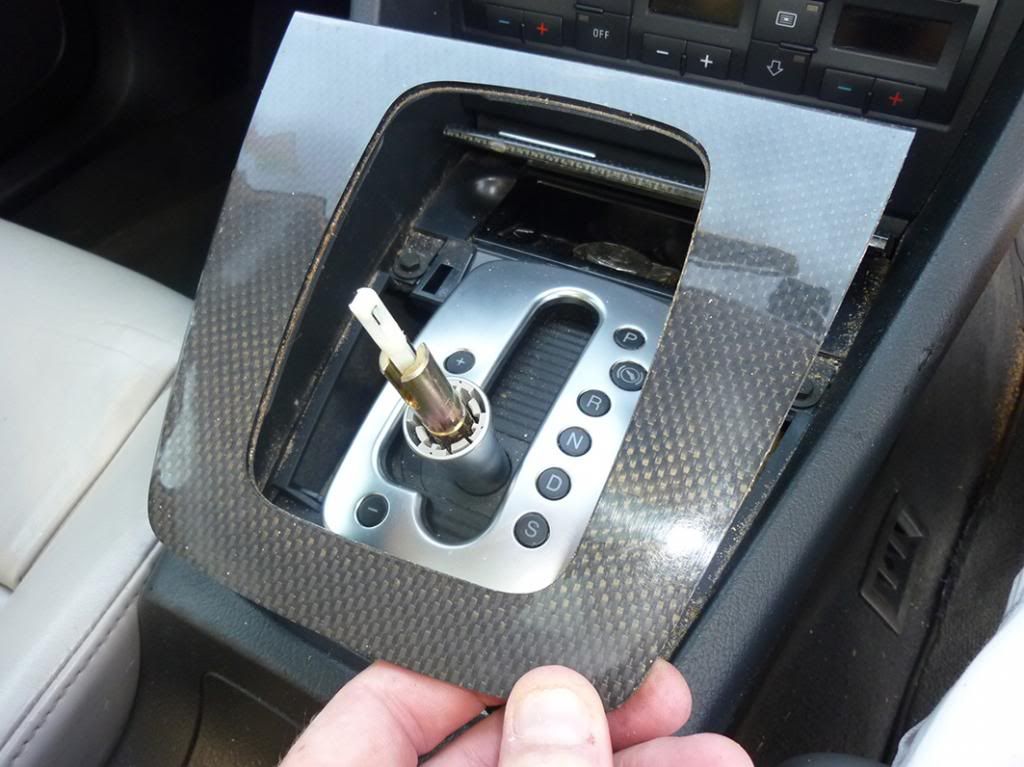
    These are the four lugs and their relative positions.


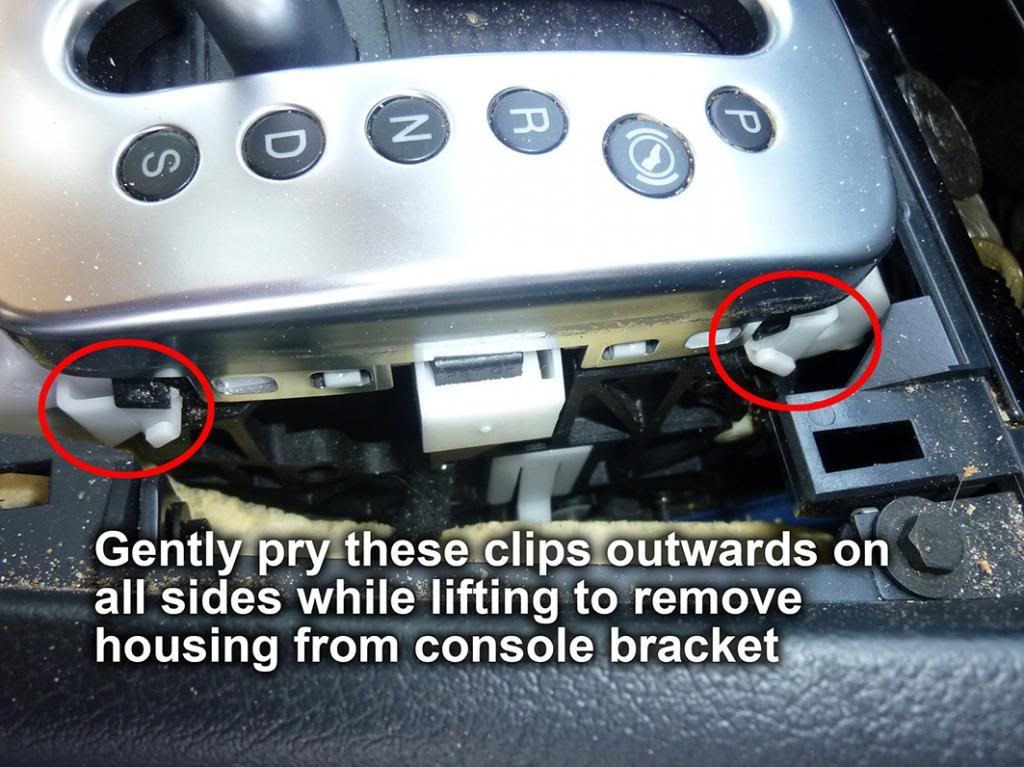
    STEP 4: Gently pry the four tabs securing the shifter housing to the console bracket whilst using a slight upwards force (otherwise they just clip back into position).


    STEP 5: Remove the shaft sleeving from the stick.


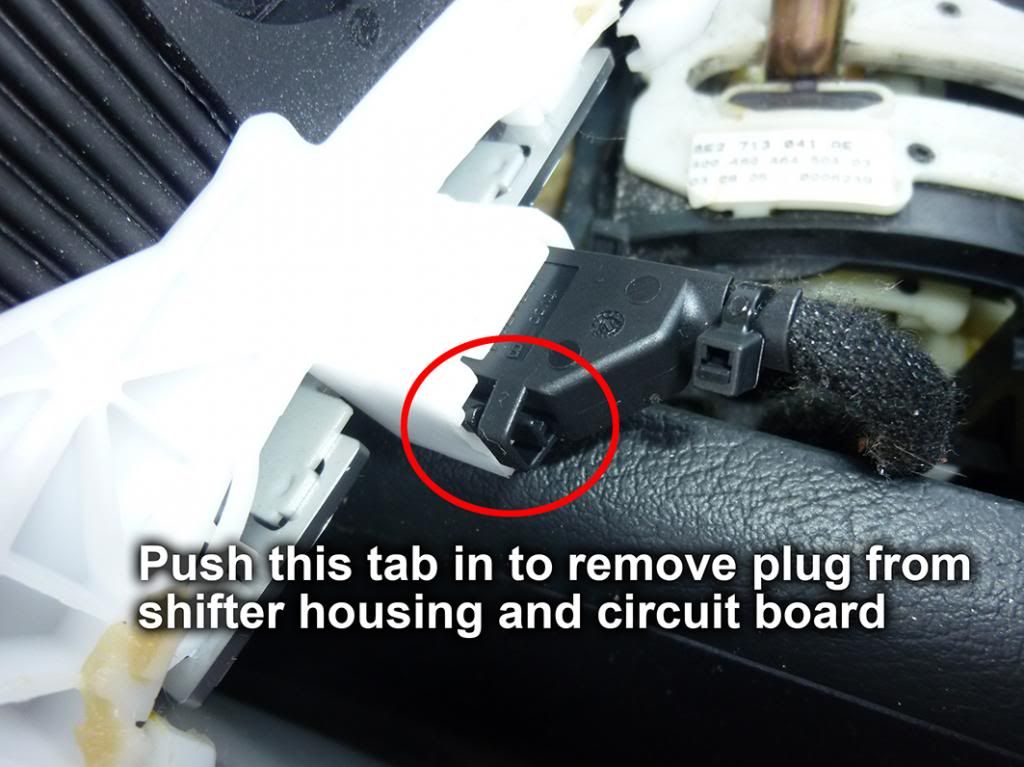
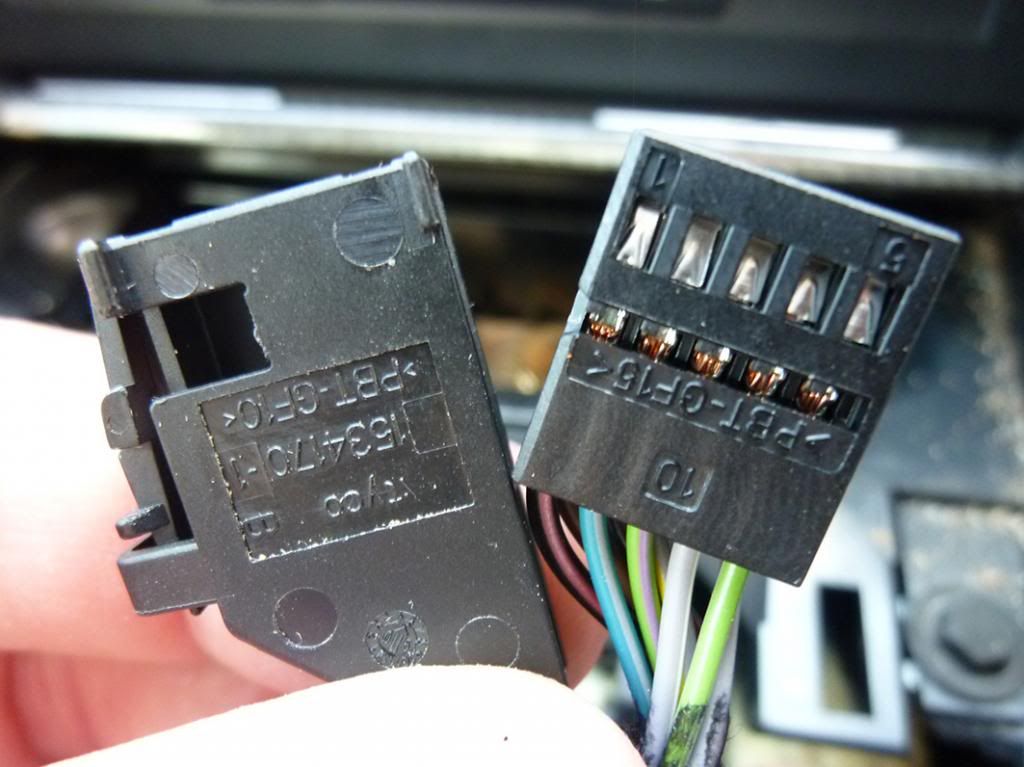
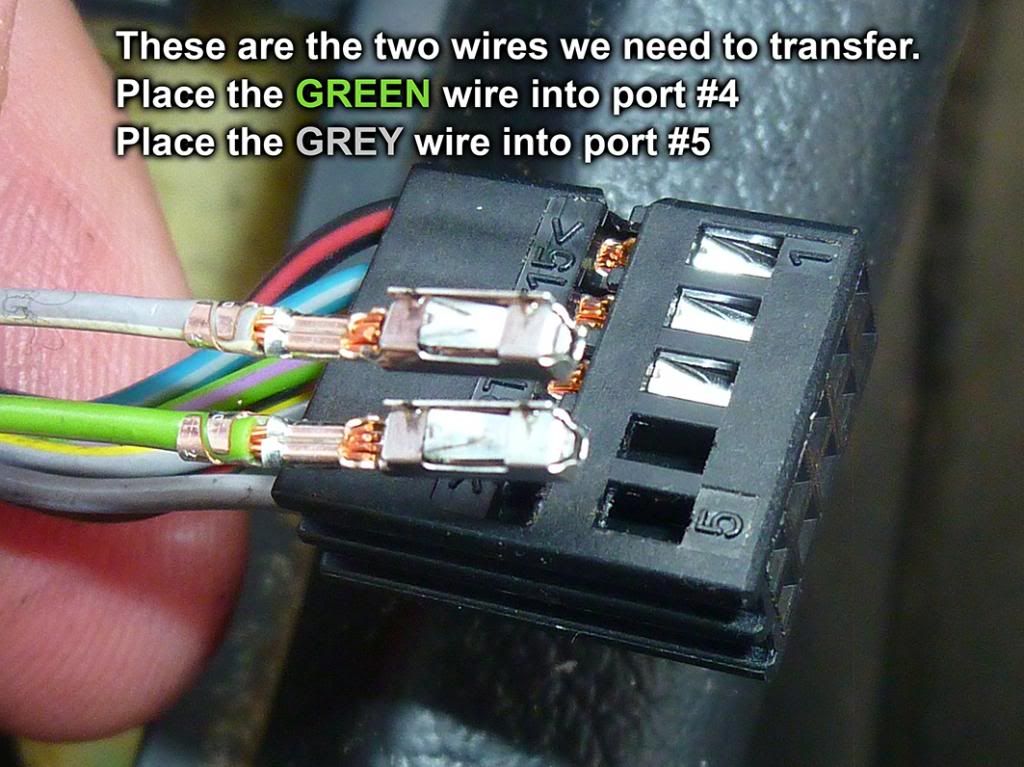
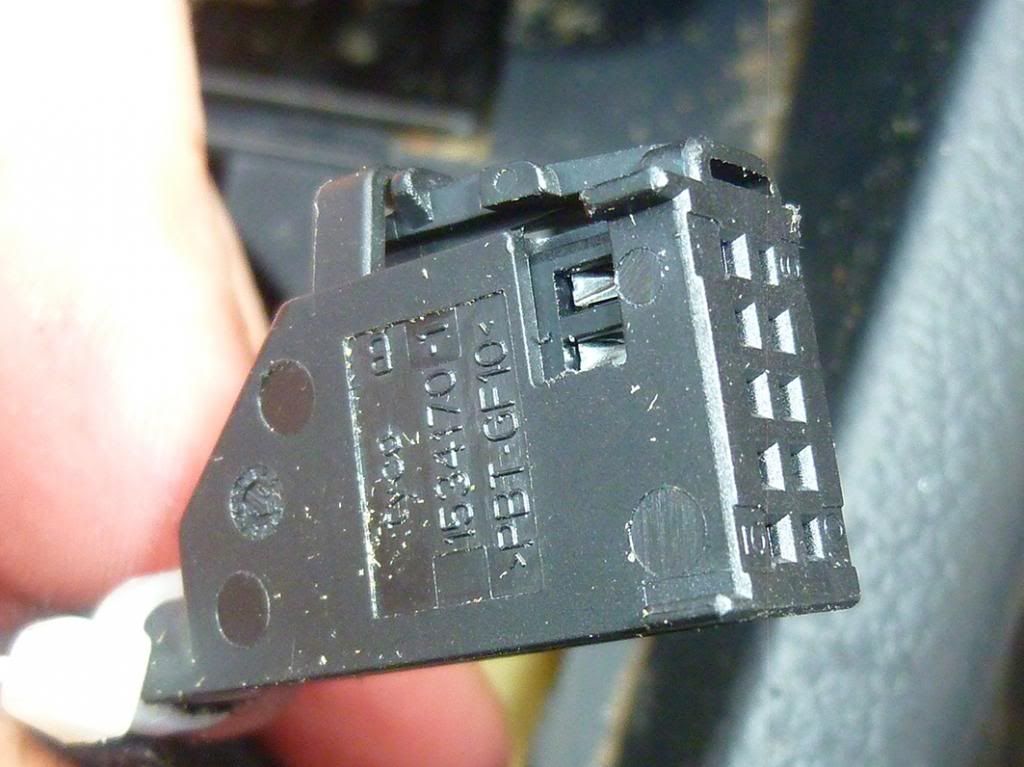
    STEP 6: Remove the plug from the underside of the shifter housing by depressing the tab and pulling.


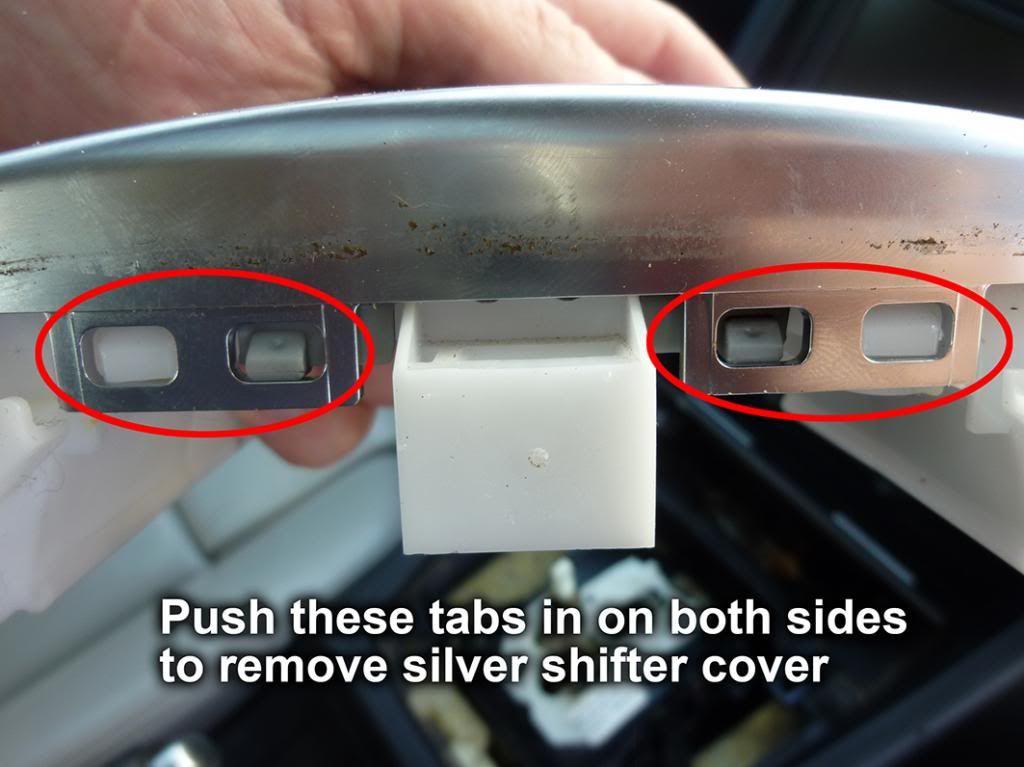
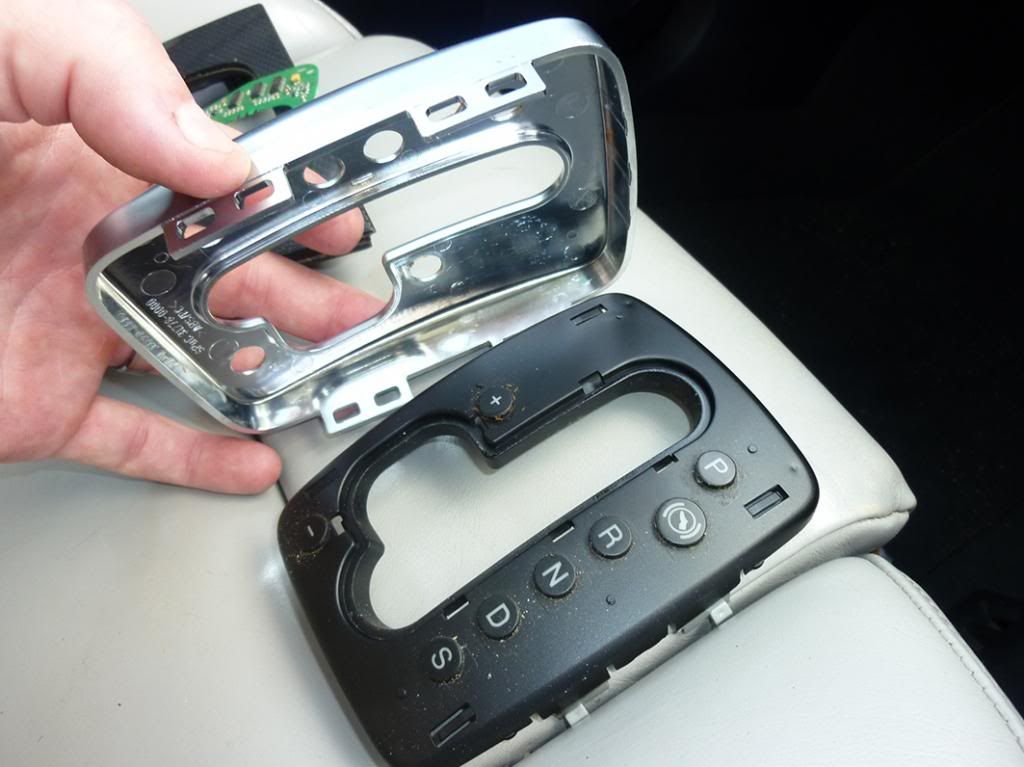
    STEP 7: Once the plug is removed, push the tabs in that are located on the side of the housing lid to remove the silver cover.


    STEP 8: Remove silver cover from housing.


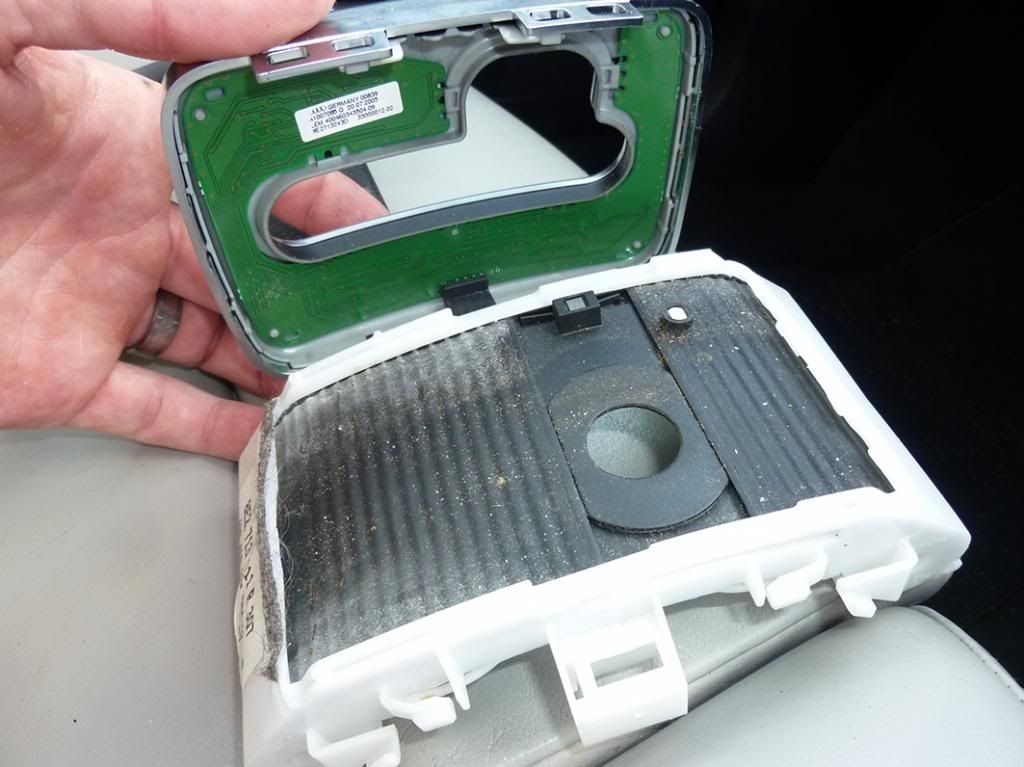
    Now we work on the Silver Cover

    STEP 9: Gently pry the circuit board from the cover, releasing the small retaining tabs.


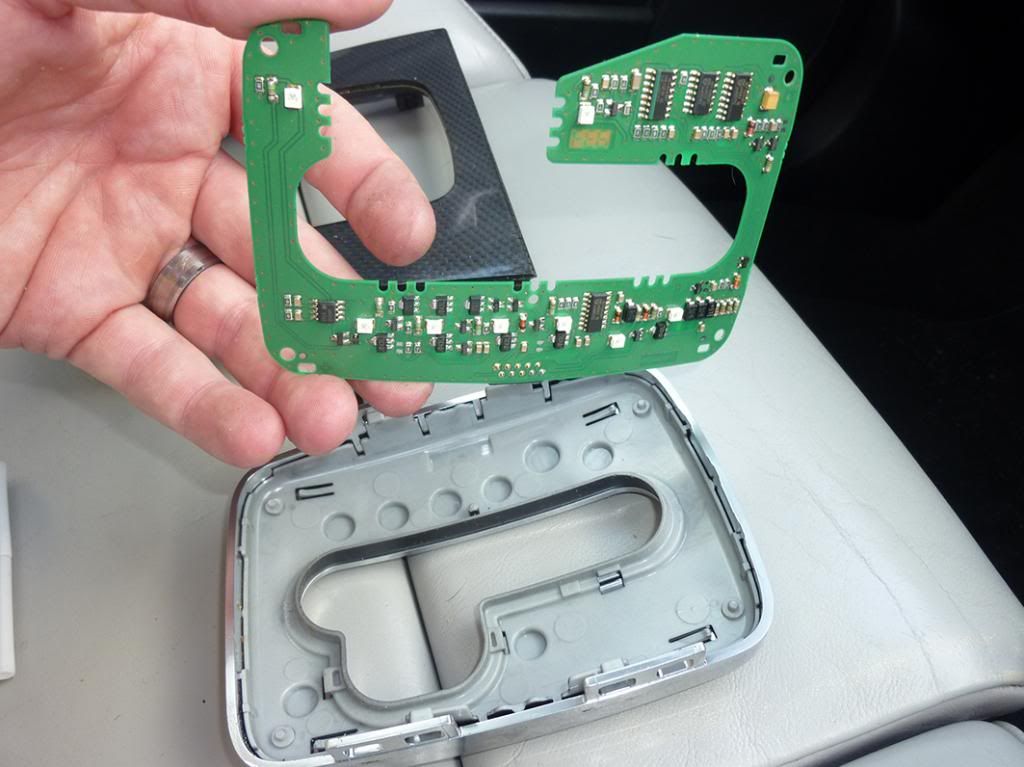
    STEP 10: Separate the black information board from the silver cover. You can gently pry using a small screwdriver or use the friction from your grip.

    Last edited by Brettannica; 09-18-2013 at 08:58 PM.
    In The Garage: B7 S4: JHM Tune Carbon Fibre: Vis Racing Hood, Relak Skirts & Paddle Extensions, Blades, DTM Deck Lip : 034 Snub & Bracket : JR Air Filter : H&R Springs : F.I. Catback : Gunmetal 19” 6RS V10’s • B8 A4 Avant: BSR Bling : 19” 4RS V10’s : V-Tech Chip
    Previous Rides: • E32 BMW 740i • E36 BMW 325i • B5 A3S • B6 A4 • Ford Falcon 351 • Triumph TR8 • Vauxall Super Tourer • Saab 9-3 • Saab 9-5 • Toyota Prado 4x4

  2. #2
    Veteran Member Three Rings Brettannica's Avatar
    Join Date
    Oct 14 2012
    AZ Member #
    102234
    My Garage
    2010 Audi A4 Avant
    Location
    Perth, Western Australia

    Now we work on the plug

    STEP 11: Remove or loosen the tab which retains the wiring harness inside the plastic housing. Cut the small zip tie securing the plastic housing to the wiring loom.


    STEP 12: Remove wiring loom from protective sleeve.


    STEP 13: In order for the exchange to be successful you need to swap wires 4 (GREY with small white stripe) and 5 (GREEN with small white stripe). These are the only wires you are interested in.


    STEP 14: Using a small screwdriver, insert into the small window, press down and pull on the wires to release them from their respective housing. Once this is completed. Swap the two wires over and re-insert. It’s that simple.


    STEP 15: Re-insert wiring loom back into it’s housing and attach a new zip tie to the wiring loom to secure.


    STEP 16: Give the whole area a good clean.


    Time to get creative...

    Step 17: Using a Sharpie and a scalpel or craft knife, block out the vertical stroke on the (+) symbol and scrape a downward stroke onto the (-) symbol.


    STEP 18: Once the modifications are completed it should look like this...


    STEP 19: Once you are satisfied with the finish, reconstruction of all parts is a simple reversal of the step-by-step instructions above.


    STEP 20: Crack a beer and bask in your awesomeness…


    And the proof is in the pudding...

    [/B]
    Last edited by Brettannica; 09-19-2013 at 05:53 PM.
    In The Garage: B7 S4: JHM Tune Carbon Fibre: Vis Racing Hood, Relak Skirts & Paddle Extensions, Blades, DTM Deck Lip : 034 Snub & Bracket : JR Air Filter : H&R Springs : F.I. Catback : Gunmetal 19” 6RS V10’s • B8 A4 Avant: BSR Bling : 19” 4RS V10’s : V-Tech Chip
    Previous Rides: • E32 BMW 740i • E36 BMW 325i • B5 A3S • B6 A4 • Ford Falcon 351 • Triumph TR8 • Vauxall Super Tourer • Saab 9-3 • Saab 9-5 • Toyota Prado 4x4

  3. #3
    Senior Member Two Rings rockstar's Avatar
    Join Date
    May 04 2011
    AZ Member #
    75022
    Location
    Tampa, FL

    Sounds like something I'm doing this weekend! Great post!

  4. #4
    Senior Member Two Rings rockstar's Avatar
    Join Date
    May 04 2011
    AZ Member #
    75022
    Location
    Tampa, FL

    Sounds like something I'm doing this weekend! Great post!
    Btw, is there any way to pop the (-,+) buttons off and exchange positions rather than cut/sharpie the buttons?

  5. #5
    Veteran Member Three Rings Brettannica's Avatar
    Join Date
    Oct 14 2012
    AZ Member #
    102234
    My Garage
    2010 Audi A4 Avant
    Location
    Perth, Western Australia

    Quote Originally Posted by rockstar View Post
    Sounds like something I'm doing this weekend! Great post!
    Btw, is there any way to pop the (-,+) buttons off and exchange positions rather than cut/sharpie the buttons?
    Unfortunately not rockstar, they are moulded (or look to be).
    If you wanted to get intricate, you could always scrape away all of the black on both buttons then place vinyl cut graphics in place with the symbols cut out.
    Last edited by Brettannica; 09-18-2013 at 10:24 PM.
    In The Garage: B7 S4: JHM Tune Carbon Fibre: Vis Racing Hood, Relak Skirts & Paddle Extensions, Blades, DTM Deck Lip : 034 Snub & Bracket : JR Air Filter : H&R Springs : F.I. Catback : Gunmetal 19” 6RS V10’s • B8 A4 Avant: BSR Bling : 19” 4RS V10’s : V-Tech Chip
    Previous Rides: • E32 BMW 740i • E36 BMW 325i • B5 A3S • B6 A4 • Ford Falcon 351 • Triumph TR8 • Vauxall Super Tourer • Saab 9-3 • Saab 9-5 • Toyota Prado 4x4

  6. #6
    Senior Member Three Rings
    Join Date
    Jun 07 2013
    AZ Member #
    116758
    Location
    West

    Excellent and thorough. The only step I don't care for is the "-", "+" Sharpie/scratch operation. I may look into physically swapping the raised buttons. A cutting operation would need to be done vertically around the buttons, but that work would be hidden by the aluminum trim. I would probably look for an open hole drill that would allow the button to be cut around.

  7. #7
    Veteran Member Three Rings Brettannica's Avatar
    Join Date
    Oct 14 2012
    AZ Member #
    102234
    My Garage
    2010 Audi A4 Avant
    Location
    Perth, Western Australia

    Quote Originally Posted by Concavitor View Post
    Excellent and thorough. The only step I don't care for is the "-", "+" Sharpie/scratch operation. I may look into physically swapping the raised buttons. A cutting operation would need to be done vertically around the buttons, but that work would be hidden by the aluminum trim. I would probably look for an open hole drill that would allow the button to be cut around.
    Cheers Concavitor,

    Tell you what, let’s make a deal. You can try that and then, if successful, I’ll replicate it!!!
    In The Garage: B7 S4: JHM Tune Carbon Fibre: Vis Racing Hood, Relak Skirts & Paddle Extensions, Blades, DTM Deck Lip : 034 Snub & Bracket : JR Air Filter : H&R Springs : F.I. Catback : Gunmetal 19” 6RS V10’s • B8 A4 Avant: BSR Bling : 19” 4RS V10’s : V-Tech Chip
    Previous Rides: • E32 BMW 740i • E36 BMW 325i • B5 A3S • B6 A4 • Ford Falcon 351 • Triumph TR8 • Vauxall Super Tourer • Saab 9-3 • Saab 9-5 • Toyota Prado 4x4

  8. #8
    Veteran Member Four Rings SlickFix's Avatar
    Join Date
    Nov 11 2010
    AZ Member #
    66868
    Location
    Rochester, MN

    Pretty cool mod, but does it also affect the function of the paddle shifters? To be honest, on my S4 I always use the paddle shifters when I want to use the tip mode. But on Wifey's Avant this may come in handy.
    His: 2012 Moonlight Blue Metallic S5 Prestige
    Hers: 2014 Lava Gray Metallic Q5 2.0T
    Son's: 2005.5 Imola Yellow B7 S4 4.2 Sedan
    19" B8 S5 Peelers

  9. #9
    Veteran Member Four Rings SurferD's Avatar
    Join Date
    Apr 30 2007
    AZ Member #
    17686
    My Garage
    18Forester XT touring, 03-F150 XLT, 71-240Z
    Location
    Orange, CT

    Uh maybe I'm slow but what's the point?
    Is it so upshifts are towards the rear?
    Otherwise, excellent DIY.
    Currently: 2017 Q7 Prestige 3.0 with APR tune.
    Formerly: 2007 S4 Avant 6MT; 2002 S4

  10. #10
    Veteran Member Three Rings Brettannica's Avatar
    Join Date
    Oct 14 2012
    AZ Member #
    102234
    My Garage
    2010 Audi A4 Avant
    Location
    Perth, Western Australia

    Quote Originally Posted by SlickFix View Post
    Pretty cool mod, but does it also affect the function of the paddle shifters? To be honest, on my S4 I always use the paddle shifters when I want to use the tip mode. But on Wifey's Avant this may come in handy.
    Hi Slick. Thanks. No it doesn’t, you’re only changing the signal connectors to the stick. I too use my DSG shifters but when you are turning etc (ie. booting it left or right at lights/intersection) I find it easier to use the stick as it’s where you left it rather than rotated xº.

    Quote Originally Posted by SurferD View Post
    Uh maybe I'm slow but what's the point?
    Is it so upshifts are towards the rear?
    Otherwise, excellent DIY.
    Hi SurferD. Thanks again. I really just broke down what the French Vid did as I figured it might come in handy for a few users.

    The point would be that the car now shifts like a sequential gearbox or old school bang shifter which makes it loads more user friendly, especially when you are concentrating on driving at speed.
    If I’m not using the DSG paddles, rather than constantly reminding myself that forward is up etc. I find I can now change without thinking. Forearm on the armrest and a flick of the wrist to change up.
    In The Garage: B7 S4: JHM Tune Carbon Fibre: Vis Racing Hood, Relak Skirts & Paddle Extensions, Blades, DTM Deck Lip : 034 Snub & Bracket : JR Air Filter : H&R Springs : F.I. Catback : Gunmetal 19” 6RS V10’s • B8 A4 Avant: BSR Bling : 19” 4RS V10’s : V-Tech Chip
    Previous Rides: • E32 BMW 740i • E36 BMW 325i • B5 A3S • B6 A4 • Ford Falcon 351 • Triumph TR8 • Vauxall Super Tourer • Saab 9-3 • Saab 9-5 • Toyota Prado 4x4

  11. #11
    Veteran Member Three Rings
    Join Date
    Mar 05 2012
    AZ Member #
    89410
    My Garage
    Mazda RX8 GT
    Location
    south florida

    will need to try this soon great job....this needs to be stickied somewhere :-)
    B7 Sprint Blue Audi S4
    Few mods here and there

  12. #12
    Veteran Member Four Rings SurferD's Avatar
    Join Date
    Apr 30 2007
    AZ Member #
    17686
    My Garage
    18Forester XT touring, 03-F150 XLT, 71-240Z
    Location
    Orange, CT

    Quote Originally Posted by Brettannica View Post
    Hi Slick. Thanks. No it doesn’t, you’re only changing the signal connectors to the stick. I too use my DSG shifters but when you are turning etc (ie. booting it left or right at lights/intersection) I find it easier to use the stick as it’s where you left it rather than rotated xº.


    Hi SurferD. Thanks again. I really just broke down what the French Vid did as I figured it might come in handy for a few users.

    The point would be that the car now shifts like a sequential gearbox or old school bang shifter which makes it loads more user friendly, especially when you are concentrating on driving at speed.
    If I’m not using the DSG paddles, rather than constantly reminding myself that forward is up etc. I find I can now change without thinking. Forearm on the armrest and a flick of the wrist to change up.
    Got it mate.
    If only all the mods in the car were easy as swapping 2 wires.
    Currently: 2017 Q7 Prestige 3.0 with APR tune.
    Formerly: 2007 S4 Avant 6MT; 2002 S4

  13. #13
    Veteran Member Three Rings Brettannica's Avatar
    Join Date
    Oct 14 2012
    AZ Member #
    102234
    My Garage
    2010 Audi A4 Avant
    Location
    Perth, Western Australia

    Update…

    It’s been a week since I did this mod and I have to say it’s a no brainer. I've been using it a fair bit since I did the change and it's waaaaaaay better, you don’t have to think about changing it now feels very natural.
    And if it’s good enough for an M5, it’s good enough for me…


    On a side note. Nor surprisingly, after pulling it apart and giving the assembly a thorough cleaning the whole shifting mechanism is smoother and quieter.
    In The Garage: B7 S4: JHM Tune Carbon Fibre: Vis Racing Hood, Relak Skirts & Paddle Extensions, Blades, DTM Deck Lip : 034 Snub & Bracket : JR Air Filter : H&R Springs : F.I. Catback : Gunmetal 19” 6RS V10’s • B8 A4 Avant: BSR Bling : 19” 4RS V10’s : V-Tech Chip
    Previous Rides: • E32 BMW 740i • E36 BMW 325i • B5 A3S • B6 A4 • Ford Falcon 351 • Triumph TR8 • Vauxall Super Tourer • Saab 9-3 • Saab 9-5 • Toyota Prado 4x4

  14. #14
    Veteran Member Three Rings
    Join Date
    Nov 14 2010
    AZ Member #
    67019
    Location
    Seattle

    amazing write-up.
    2007 S4 6MT.

  15. #15
    Veteran Member Three Rings Brettannica's Avatar
    Join Date
    Oct 14 2012
    AZ Member #
    102234
    My Garage
    2010 Audi A4 Avant
    Location
    Perth, Western Australia

    Quote Originally Posted by powderrecon View Post
    amazing write-up.
    Cheers!
    In The Garage: B7 S4: JHM Tune Carbon Fibre: Vis Racing Hood, Relak Skirts & Paddle Extensions, Blades, DTM Deck Lip : 034 Snub & Bracket : JR Air Filter : H&R Springs : F.I. Catback : Gunmetal 19” 6RS V10’s • B8 A4 Avant: BSR Bling : 19” 4RS V10’s : V-Tech Chip
    Previous Rides: • E32 BMW 740i • E36 BMW 325i • B5 A3S • B6 A4 • Ford Falcon 351 • Triumph TR8 • Vauxall Super Tourer • Saab 9-3 • Saab 9-5 • Toyota Prado 4x4

  16. #16
    Active Member Two Rings
    Join Date
    Mar 02 2013
    AZ Member #
    110540
    Location
    uk

    Just done this myself - took about 15 mins in the drive. Very easy, but make sure you put the white main plastic the right way up. Took me a few mins to make sure that was correct. Took it for a spin, and will take a few go's before I get fully used to it, but does feel better. Plus I found that the ashtray light was disconnected, so fixed that too!

  17. #17
    Veteran Member Three Rings Brettannica's Avatar
    Join Date
    Oct 14 2012
    AZ Member #
    102234
    My Garage
    2010 Audi A4 Avant
    Location
    Perth, Western Australia

    Quote Originally Posted by ricostuart View Post
    Just done this myself - took about 15 mins in the drive. Very easy, but make sure you put the white main plastic the right way up. Took me a few mins to make sure that was correct. Took it for a spin, and will take a few go's before I get fully used to it, but does feel better. Plus I found that the ashtray light was disconnected, so fixed that too!
    Sweet. Glad you’re happy. I hope you cracked a warm pint at the when you finished...
    In The Garage: B7 S4: JHM Tune Carbon Fibre: Vis Racing Hood, Relak Skirts & Paddle Extensions, Blades, DTM Deck Lip : 034 Snub & Bracket : JR Air Filter : H&R Springs : F.I. Catback : Gunmetal 19” 6RS V10’s • B8 A4 Avant: BSR Bling : 19” 4RS V10’s : V-Tech Chip
    Previous Rides: • E32 BMW 740i • E36 BMW 325i • B5 A3S • B6 A4 • Ford Falcon 351 • Triumph TR8 • Vauxall Super Tourer • Saab 9-3 • Saab 9-5 • Toyota Prado 4x4

  18. #18
    Veteran Member Three Rings Brettannica's Avatar
    Join Date
    Oct 14 2012
    AZ Member #
    102234
    My Garage
    2010 Audi A4 Avant
    Location
    Perth, Western Australia

    Just Bumping this as I’ve had an enquiry.

    Moderator - Can you put this mod in a sticky????
    In The Garage: B7 S4: JHM Tune Carbon Fibre: Vis Racing Hood, Relak Skirts & Paddle Extensions, Blades, DTM Deck Lip : 034 Snub & Bracket : JR Air Filter : H&R Springs : F.I. Catback : Gunmetal 19” 6RS V10’s • B8 A4 Avant: BSR Bling : 19” 4RS V10’s : V-Tech Chip
    Previous Rides: • E32 BMW 740i • E36 BMW 325i • B5 A3S • B6 A4 • Ford Falcon 351 • Triumph TR8 • Vauxall Super Tourer • Saab 9-3 • Saab 9-5 • Toyota Prado 4x4

Bookmarks

Posting Permissions

  • You may not post new threads
  • You may not post replies
  • You may not post attachments
  • You may not edit your posts
  •  


    © 2001-2025 Audizine, Audizine.com, and Driverzines.com
    Audizine is an independently owned and operated automotive enthusiast community and news website.
    Audi and the Audi logo(s) are copyright/trademark Audi AG. Audizine is not endorsed by or affiliated with Audi AG.