


Here's links to the products I used. You can use any subwoofer you choose. However, I highly recommend the JL Audio Microsub I list here. It is a great match and very small. The amp is also more than ideal because it pretty much snaps in to the factory location. No additional items were used to secure it and I feel it is very well retained.
Subwoofer
Amplifier
Power Cable
Fuse Holder
Line Out Converter
RCA Cable
Ring Terminals
Spade Terminals
With regards to the terminals, power wire, and other miscellaneous items: Just go to those categories and pick whatever has free shipping and the best price at that time. Stay away from cheap wire, though. It is usually thick jacketing and does not have the high strand counts of something nicer. The Kicker stuff I used is extremely flexible and very easy to run along the factory wiring.
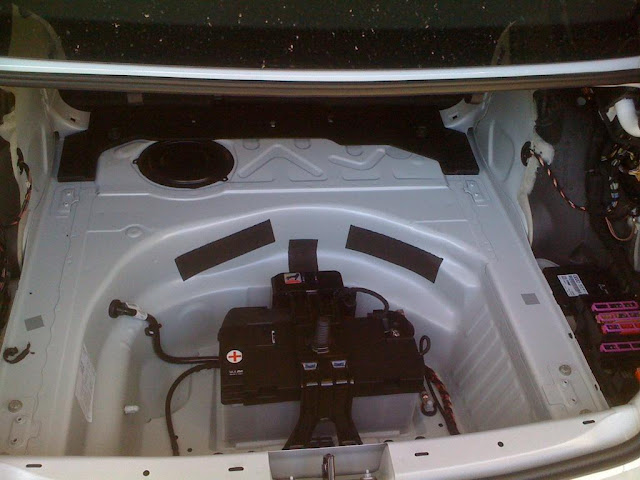
Start by removing everything in the trunk, trim wise and carpet wise. The trim is removed very easily compared to previous models. Start by flipping up the tie-down hooks. Underneath is two Torx 25 (T25) bolts for each of them. Remove the bolts and the entire hook assembly comes out. Now, remove the trunk mat by unclipping the floor mat style hooks at the front. Just grab them from underneath and lift straight up. Remove the spare tire, the tool cover, and the tools. These just pull out after removing the hand tightened retainer at the top of the assembly. You will need to remove the bracket above the battery. So, you might as well do it now. It's a few 13mm hex head bolts and it will remove when tilted to the rear.
The side trim is the toughest part to remove back here. Remember to pull the trim as close to the clips as possible. If you have a panel puller, it helps. Remove from the back first. Once the back is undone, fold the seats down to remove the front part from inside the car. Just look at everything before you start pulling and you shouldn't mess anything up.
Here is a pic of the clips:

If you break one, it won't be the clip that breaks. It will be the plastic used to hold the clip to the carpet. In a worse-case scenario, you can glue these back together with hot glue or an adhesive of your choice. Otherwise, it's a whole new carpet piece. ($$$) Like I said, go slowly and carefully.
Once you're done removing items. The first place we tackled is the remote turn on lead. We didn't find any in the audio harness. So, we went to the fuse box on the other side. The entire red row of fuses is switched +12V. So, it's the perfect place to tap. The guy that did this with me only solders and heat shrinks, no wire taps. Learn to solder on something else outside the car, first, though. It's cramped.

The wire you're after is black with a purple trace. Use a razor or sharp blade to cut the insulation and pull it back. Do not cut through the wire. Now, using a pick or sharp object, open a hole in the wiring to splice in your +12V wire. Add that in and solder it up. Now, wrap it up with quality electrical tape. Run that across to the other side of the trunk.
A note about running wires. Always run them along factory wires and zip tie them on, even if it seems out of the way. If you go in for service and they have to remove the wiring, they will be careful doing it as it may mess up other items. If it's just laying there, they'll rip it out and cause you a headache later.
Now, on to the amp itself.
Here is the left side of the trunk area with everything removed.

There are four fasteners to undo. All are 10mm hex head. Two are on the bottom of the bracket holding the top amp. The other two are in back of the top amp. Be careful not to drop these two in the back, it's a tight spot. Once removed, the amp assembly tilts out. Just leave it connected for now.
Let's wire in the LOC. The wires we're after are White and Yellow (positive) and Blue and Yellow (negative). These can be cut directly, no splicing. Once cut, solder in the leads to your LOC. If you have a two channel LOC like the one I picture, twist both positive leads together and both negative leads. This will make it a mono signal.

Now, place your amp in the space between the two factory amps. It almost snaps in there. It's PERFECT, isn't it? You're welcome. Use some double sided foam tape or strong velcro to secure the LOC to the top of the amp. You can now begin your power wiring.

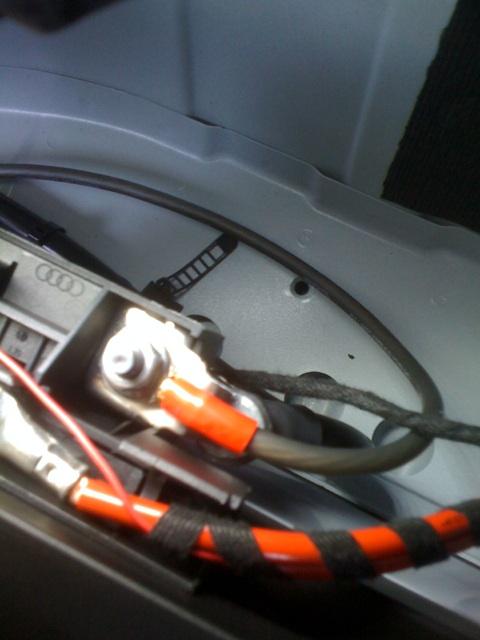
Before running your positive wire to the battery, tape up the other end of it. If it catches ground, that's a short around the battery, big no no. Use a ring terminal to attach to the factory battery post. There is a nut available to do this.
Again, run your wiring along factory paths. The fuse holder sits perfectly right here.

Above and to the right of the factory amp rack is a factory ground nut. Use this and a ring terminal for your ground. Cut your wires to length, attach spade terminals and plug them into your amp. Now you can put the fuse in the fuse holder and complete the circuit.
You're almost done. Run a short RCA cable (18" is perfect) from the LOC to the amp. Max the gains on the LOC and start low on the amp. You will need a short run of wire to get to the sub from your amp. Attach spade terminals and lock it into the amp. As you reassemble things, pull the speaker wire from under the left side carpet out into the tire area. Leave yourself enough to play with placement of the sub. Once you place the sub where you would like, you can set the gains and listen for clipping. Please note that the way this is wired, the sub only comes on with ignition on, not in accessory mode.
Here's the finished amp install:
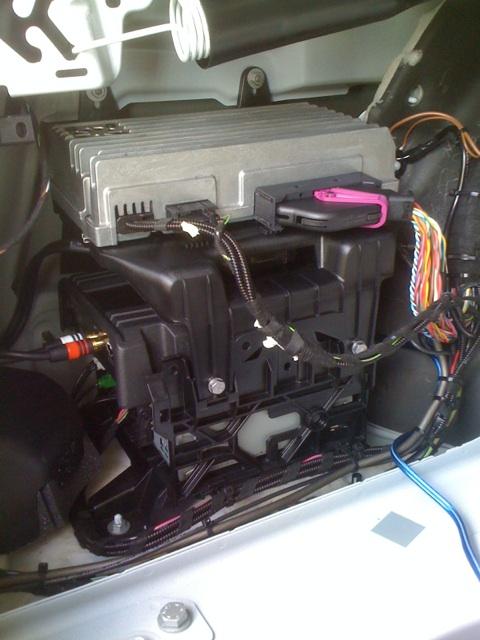
It looks very factory. I couldn't be happier.
Reassemble everything and place your sub in its final spot. It can be secured using the hook side of industrial velcro. If you have 1/2" staples and a gun, you can staple the velcro to the box. Don't use anything longer than 1/2", though, or you'll penetrate the sealed airspace. Place two 2" x 2" strips on the bottom and one long run across the top. It will grab the factory carpet very well.

In my opinion, this amp and sub combo is a perfect match. I will be looking for a way to add a sub volume control to the factory B&O menu on the MMI. I would love to be able to turn it down on the bass heavy songs. But, otherwise, I couldn't be happier.
PM me with any questions and I hope this helps.
Thanks!

 Reply With Quote
 I just installed my system off your DIY. Thanks for adding the remote tap line- would never have found that myself! How do you like that microsub box? What type of music does/doesn't sound good on it?
 but I think this why you see a "battery discharging" warning when you start the car to warm it up (center cluster when exiting the vehicle after cold start).
  Ibis P+ / DSG / Silk Napa / B&O / Sport Diff. / ADS lite / MMI & Nav / APR Stage 2+ & TCU Tuned / Ultra Charger / 184mm KI LIL BITCH / ECS Kohlefaser Luft-Technik Intake / AMS Alpha Cooler / ECS 2-Piece Rotors / Akebono Pads / VMR 803 19x9.5 ET45 265-35-19 PSS / ECS Drivetrain Bushing Inserts / CR-15
 THEN
THEN  THEN
THEN  THEN Rinse & Repeat!


Bookmarks