


The parts were:
- Image Dynamics ID10 V3 D4 subwoofer, $139
- Three Dayton Audio RS75-4 3-inch full range drivers, $22 each
- JL Audio C2-075CT tweeters, $68
- 25 square feet of Fatmat, $55
- Angled speaker ring for subwoofer, $32
I've heard the B&O stereo, which to me is good, but not amazing. Listening to the same CD I used when testing the B&O, which I'm familiar with on many different home and car audio systems (The Killers, Hot Fuss), I think the upgrades I made make for sound that's at least as good as (and probably better than) the B&O. I'm not suggesting that anyone intentionally forego the B&O, since, although this route was cheaper, it was a fair amount of work. On the other hand, if you find yourself with the base system and want to make improvements, this is a reasonable way to go.
In descending order of sound improvement:
1) Replacing the side dash tweeters with the Dayton Audio full range drivers.
The stock tweeter is on the left, and the Dayton Audio driver on the right. I made mounting brackets--not pretty, but they don't show:

Incidentally, I have a suspicion that the tweeters are the same ones as in the B&O system (but mounted on the dash instead of the sail panels). The part number of the B&O tweeter is 8T0353999B, and the base stereo tweeter is 8T0353999A (just the last letter is different). They're in different housings, but the drivers themselves look the same. Here is the B&O tweeter (from the AudiEnthusiasts writeup for installing the B&O tweeters in the base system):
Installing the Dayton Audio drivers wasn't too bad, and the improvement in sound for $44 was well worth it. Making the mounting brackets was probably the worst part.
2. FatMat in the doors.
I did it at the same time as installing tweeters in the sail panels, but this noticeably improved the tightness of the bass, which had a boomy/resonant sound before.
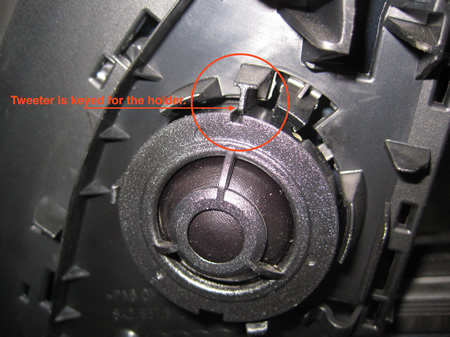
3. Putting the JL Audio tweeters in the sail panels.
I didn't take pictures, but it's pretty much the same as the Audi Enthusiasts writeup on installing the B&O tweeers. The JL housings fit perfectly into the stock (empty) space; I just glued them in place. By far the worst part was poking hundreds of holds in the speaker [non-]grills. The sound is crisper and clearer with the tweeters. I chose the JL Audio tweeters rather than the B&O because of my suspicion above--that I would be ending up with the same tweeters as the ones I just took out of the dash.
4. Replacing the subwoofer.
I chose the Image Dynamics model because it's said to be usable in an infinite baffle installation. The impedance of the stock subwoofer measured 2 ohms, so I wired the two voice coils on the new subwoofer in parallel, which also gave a measured impedance of 2 ohms. I used an angled speaker ring (made by eBay member avpriority), 1.75 inches in the back and 0.75 inches in the fron, 9.125 inches inside diameter and 10.125 inches outside diameter. That resulted in the subwoofer being level with the ground. I also put FatMat on the parcel shelf, but here's a picture before doing so:

5. Replacing the center channel speaker
I was surprised that this didn't make a huge difference. The stock speaker was really cheap looking. Here it is on the left, with my replacement Dayton Audio RS75-4 on the right:

And here are the backs of the stock center dash speaker on the left, and the stock tweeter on the right. If it helps anyone, the measured impedance of the center channel speaker was 3.6 ohms and of the tweeter, 6.2 ohms.


 Reply With Quote


 EPL Stage 2 | Strat Intake | AWE Exhaust | JHM Short Shifter | Alu Kreuz | Eurocode USS with end-links | Lamin-X E-codes | Hoen H11 Endurance Yellow Fogs | Tunerdomes LEDs | 35% Crystalline Tint | 3M Clearbra |VAG'd


Bookmarks