


(by 1/4 scale, 03.09.05)
Here are instructions for those interested in installing the Euro OEM dual (right side) intercooler. This system was installed as standard equipment on the 190hp version of the B6 A4 1.8T.
The parts can be sourced separately or from Greedspeed (currently a $850.00 kit as of the date of these instructions). I picked this kit up used from an AZ member at somewhat of a cost savings.
Here are the parts included in the kit:

There are pros and cons over aftermarket front mount coolers. I chose the dual system given it is OEM quality without fitment issues and also that it has been engineered to work without problems (intake pressure loss, etc.). I also feel that the DSMIC doesn't create any cooling problems that FMICs might cause by being mounted in front of the AC and radiator panels at the front of the car. Also, this kit doesn't require any modifications to the stock bumper.
Such a modification is subject to owner preference however, hence this system fits my current and future mod upgrades given my aim of retaining as much as possible a stock look to the car.
This system can be installed with simple hand tools by one person. You'll need jack stands, or better, a lift to access the underside of the engine compartment. You should give yourself a minimum of 6 hours of install time if you are attempting this for the first time.
Below are the parts and layout of the dual intercoolers:

Step 1:
Begin by jacking up the front end and supporting safely on jack stands (or lift). Remove front wheels and plastic belly pan.

Step 2:
Remove front wheel liners on both sides of the car using a standard torx bit.

Step 3:
After removing the wheel liners use a 10mm socket to remove three nuts (on each side of the car) that holds the bumper to the fenders.

Step 4:
Remove the foglight grilles. On the underside of the bumper inside each grille opening there is a bolt that must be loosen with a 6mm hex key socket. You do not need to back out these bolts all the way, but only enough to release the plate that holds the bumper to the struts that hold it to the car (difficult to understand while the bumper is on the car but will become evident as you gently pull it way from the car).

Step 5:
Pull the bumper slightly away from the car and support from beneath.

Step 6:
On the left side of the car, behind the bumper, clamp the rubber headlight washer hose and disconnect the hose. Also in this location you must disconnect both the foglight and horn connectors.

Step 7:
The bumper can now be removed from the car (marvel at how much surface area of the car is devoted to cooling!). You will also want to remove the righthand headlight and its base plate (torx screws) at this time as well).

A closer view of the right side of the car showing the stock location of the smog pump that will be located to make room for the new IC.

Step 8:
From beneath, locate the boost reservoir and remove.


Here's what the stock set up looks like out of the car (you will not be reinstalling this).

Install the new bracket and smog pump in the position of the former boost reservoir.

Step 9:
Install IC bracket and intercooler in the old smog pump location using the three bolts from old bracket. There is not much room here so install them separately.


Step 10:
Here's a view from beneath with the IC installed waiting for the turbo to IC hose and IC outlet to crossover hose to be installed.
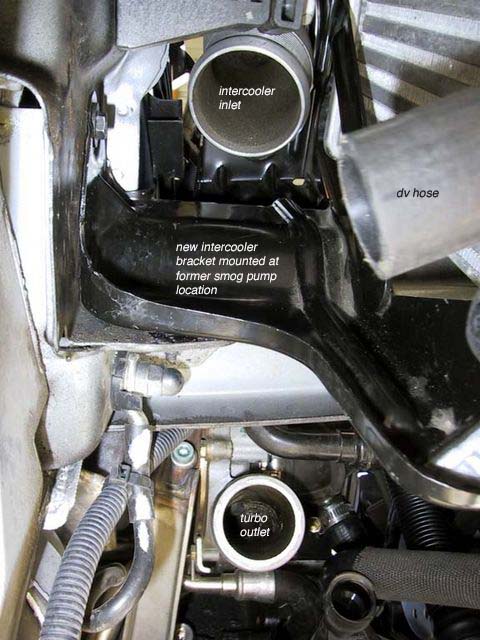
Step 11:
Install and hook up IC hoses and diverter valve. I installed a new Forge 007 dv as part of this upgrade.

Step 12:
Double check all hose and fastener connections. Reinstall bumper, washer connections and electrical harnesses. Reinstall foglight grilles, fender liners, and wheels. Install belly pan and lower car.
Step 13:
Road test.
Step 14:
Enjoy your drive given new lower intake temps. You're now ready for a Stage 3 upgrade!
(These instructions are for reference only. The author assumes no responsibilites for any ill-effects or negative results resulting from these procedures.)


Bookmarks