Audizine - An Automotive Enthusiast Community

Results 1 to 39 of 39
  1. #1
    Senior Member Three Rings crew's Avatar
    Join Date
    Oct 02 2009
    AZ Member #
    48679
    My Garage
    1966 Mustang, 1988 F150, 2006 A4 2.0t (SOLD), 2013 Focus ST
    Location
    19803

    B7 Window Regulator Tutorial

    Guest-only advertisement. Register or Log In now!
    Finally got up the balls/time to do this.

    It's fairly straightforward, and I got a lot of help from this B6 tutorial (I'll refer to it for pics I didn't remember to take, props to Stockton):
    http://www.audizine.com/forum/showth...or-Replacement
    I'd suggest reading all of mine and all of his before tackling this, to make sure you have everything you need and don't miss a step.
    ____________________________________________

    Difficulty: 5/10
    Time: 1-5 hours (depending on if you had to go buy a T45 bit, lost it, looked for an hour or more, found it, and then continued..)
    Beers: 2 tall ones
    Cost: ~$150 from EuropaParts
    ____________________________________________

    Tools:

    1) Phillips bit with ratchet and extension (regular screwdriver is fine, this is just quicker)
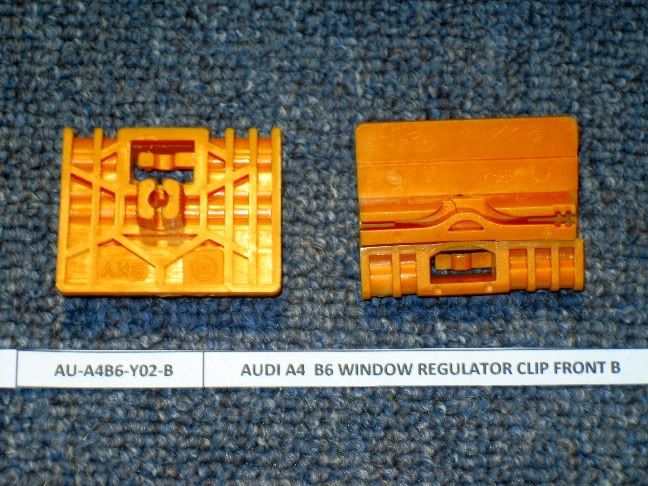
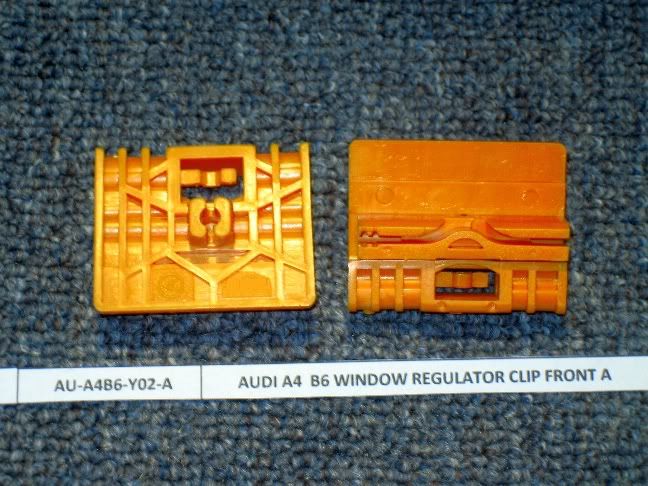
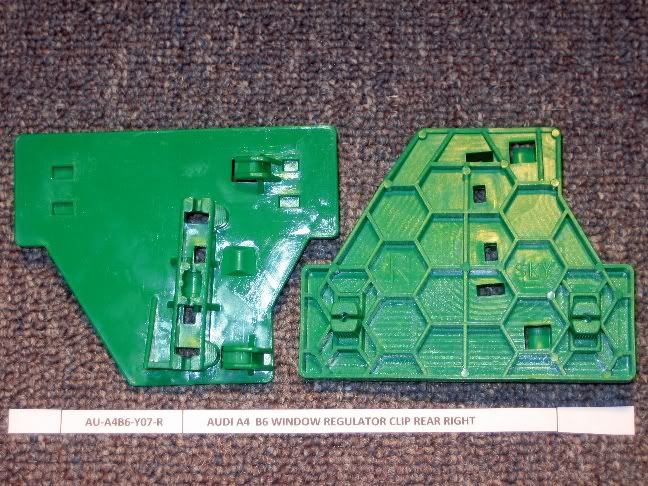
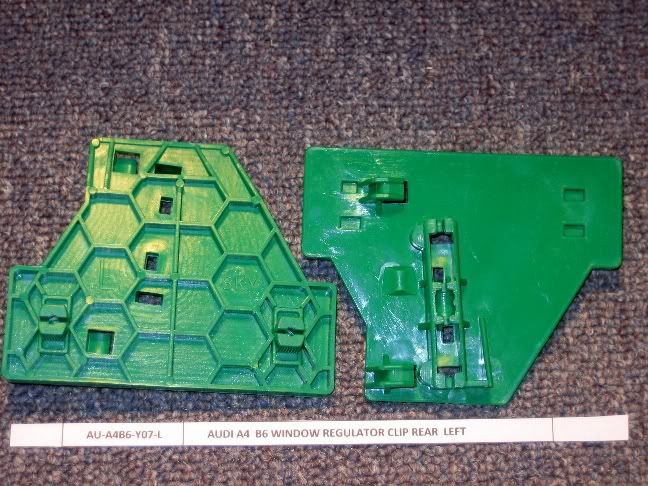
    2) T45 Torx bit, also need T25 and T30 (not pictured)
    3) Normal screwdriver (see 1)
    4) Pry bar of some sort (you can use a flat blade screwdriver)
    5) Pen (not essential, but I'll explain)
    6) Clothes pin edge (good for wedging without marking, but not strong..)
    7) Needlenose pliers


    ____________________________________________

    Step 1: Removing the door panel. First, put the window all the way down. Arrow at top edge of upper trim is where you will start to remove it (see 2nd photo) - it just clips in, but the last clip is L-shaped towards the outer edge, so slide it towards the interior after the other clips are disconnected and it will come right out. The two arrows below are locations for screws - you WILL need an extension for the handle one, since it's fairly recessed. The screw under the door panel is very long, so take your time and don't strip the head.


    Step 2: Once the upper trim is removed, there are 4 phillips screws to remove.


    See below the door handle for the approximate angle you need to remove that screw.


    Step 3: Once the 6 screws are removed, start at the bottom and pull towards you to disconnect the tabs. Once you reach the top, you'll be able to slide the door card up and off the door frame. Note that it will not just come off!! There are still connections - unhook the cable for the puller (right arrow), and unplug the right-most harness from the motor, you'll see which one is trailing to the door card.


    Here's the hook for the puller.


    Here's the interior of the door card, to give you a better idea of what needs to be disconnected.


    Step 4: Back to the door. This photo is kind of a clusterfvck, but you'll get the idea. Disconnect the harness at (1), it will require you to push the red slider towards the connection, afterwhich you can pull the whole thing towards you. There are three T25 screws holding the motor onto the door, the lone arrows to the top left - remove these. To remove the motor completely and set it aside, disconnect the three harnesses in the red circle.


    Step 5: Disconnect the speaker. There are two harnesses, one white plug (circled) and three T25 screws. The speaker will be held to the door with a plastic plug at the top center, so you don't need to be scared you'll drop the speaker after you remove the screws. Pull gently towards you and it'll pop right out. Behind the speaker, up and to the left, you'll see two plugs holding the power mirror harness to the door frame. You can either remove the tape, or unset the plugs, but both need to be disconnected (sorry, no pics - there are a few on the B6 page).


    Step 6: The last few connections. Two T25 screws hold the regulator in place, one in the speaker well and another at a similar height to the right. Remove these. There are also four T45 screws, the top silver ones circled, a small black one on the left, and one recessed on the doorjamb side.


    Step 7: PLEASE refer to the B6 tutorial for this step, since I forgot to take pics, and will have to pump a few steps into one. Disconnect the mirror and remove the upper weatherstripping. Basically, remove the two plastic pieces on the interior of the frame nearest the mirror. They clip in, and will pop off with a little force. Beneath the inner one, there is a T30 screw that must be removed so that the window frame can be extracted. To remove the upper weatherstripping, start from the inner side and CAREFULLY make your way up and around the window frame. Be sure to pull from the base of the stripping, and not the top. Since it's only a few years old, I wasn't too worried about it tearing, and it came out fairly easily. Once the TOP HALF ONLY of the stripping is removed and hanging, there are 4 plugs (two per side), that need to be popped out where the stripping meets the door. I believe there are pics on the B6 page, and I'm sorry I didn't snap a few, my bad.

    Step 8: Once you're certain all connections have been cleared, you will be able to remove the window frame (the frame, mirror, glass, and regulator will all come out). Again, no pics, but it will come out with steady force and is actually somewhat light. Make sure that the mirror harness (remember we disconnected those two plugs?) doesn't catch on anything, since it's coming with us. The frame and regulator are curved, so pulling the window frame up and towards you will allow it to come out easily. Once free, lay it down very carefully with the mirror side up. As you can see below, I just used the cardboard packing from the new regulator, but have a safe spot ready so you're not holding up the frame looking for somewhere to go.


    Step 9: Lay the new regulator next to the old one, ensuring that you didn't order the wrong part, and that it all faces the right way and lines up properly. Remove the two T25 screws at the base of the window glass. This will free the window itself, keeping those tabs connected. Slide the window down and towards you along the guides, and place it somewhere safe. You will then be able to remove the remaining two T25 screws holding the old regulator in place, at which point you can throw it off a bridge.

    Hmm, wonder what the problem was?


    Reconnect the new regulator as you disconnected the old one, slide the glass back into place carefully, and reconnect it to the slides. This all goes back in as it came out, carefully and making sure the harness doesn't catch. Take your time, and if you were smart about keeping track of the screws and bolts, reassembly will be a breeze.

    Here's my big tip for doing a job like this. I took two large pieces of cardboard (from the new regulator packaging), and used the pen (told ya we'd come back to this) to draw a crude scale rendering of the door card and interior frame. For every screw I removed, I punctured the cardboard with it in it's approximate location and labeled it. This means no lost screws, and zero confusion wondering what screw goes where. Here's two pics, with larger versions linked below.


    http://i55.tinypic.com/29ux3ip.jpg


    http://i54.tinypic.com/2w53868.jpg

    Well, this would have been a one hour / two beer job had I not needed to run out and buy a T45 bit. Also didn't help that I managed to lose the bit for an hour (since it got dark upon my return from the store), and finally found it inside the bag of candy I'd been snacking at on the way home from the store while checking out the bit. All in all, not hard if you're organized and methodical, and instantly makes me love my car again. Gas station stops were awkward for a while, but no more.

    I know this is a pretty bare-bones tutorial, but hopefully it helps someone out. I'm sure I missed steps and photos, but chances are if it's not here, it's covered in the B6 page. Stockton did and awesome job on that, and I attribute my success on this one to that tutorial.. figured we could use a B7-specific version, that's all.

    Cheers.
    Last edited by kristokes; 12-13-2011 at 07:17 AM.
    -Matt

    Quattrophenia (PSN)
    flickr
    MTN Custom Leather

  2. #2
    Veteran Member Three Rings makav3li's Avatar
    Join Date
    May 06 2010
    AZ Member #
    58638
    Location
    Ellsworth AFB, SD

    awesome write-up! im deff gunna use this once my window gets worse lol god knows audi's window regulators suuck! DIY section now :)
    Selling Nogoro blue Alcantara door panels. Will fit b6/b7 a4/s4/rs4. In great condition, originally wanted $600 shipped but dropped price to $500 shipped. Check my classifieds for pictures. I want these gone, will include extra door clips if requested. PM me if you want pictures of them installed or anything else I want these gone so make me an offer and we'll talk.

  3. #3
    Veteran Member Four Rings Dangler's Avatar
    Join Date
    Sep 15 2006
    AZ Member #
    11458
    Location
    PA

    great write up. I followed the DIY for the driver side to do my passenger side regulator a few months ago, clips and bolts to remove the frame and glass are in the general area, the door card is different. The template was a good idea, i should've did that..ha. Your regulator was far more chewed up then mine...damn!

    oh and for those that have small door dings, while you have the window frame out, you can rub them out with the end of screw driver to smooth them out or reduce them. I did it on my car, just go slow and be careful.
    F.T.W.L.T.B.D.W.I.C.T.W

  4. #4
    Senior Member Three Rings crew's Avatar
    Join Date
    Oct 02 2009
    AZ Member #
    48679
    My Garage
    1966 Mustang, 1988 F150, 2006 A4 2.0t (SOLD), 2013 Focus ST
    Location
    19803

    Thanks guys.

    I couldn't believe how bad it was chewed up haha.. someone needs to make a more sturdy replacement - metal ?
    -Matt

    Quattrophenia (PSN)
    flickr
    MTN Custom Leather

  5. #5
    Veteran Member Three Rings grizzles's Avatar
    Join Date
    Sep 15 2006
    AZ Member #
    11349
    Location
    OC, CA

    Great writeup, I am glad most of mine crapped out under warranty.

    Saw you link the in sig, can you make straps for any watch?

  6. #6
    Senior Member Three Rings crew's Avatar
    Join Date
    Oct 02 2009
    AZ Member #
    48679
    My Garage
    1966 Mustang, 1988 F150, 2006 A4 2.0t (SOLD), 2013 Focus ST
    Location
    19803

    ^^ I sure can, let me know what you're looking for.

    For people that need window regs, I just found this on Amazon - $45 shipped for a front reg ??

    "VDO WR40048 Audi Front Window Regulator"

    http://www.amazon.com/VDO-WR40048-Fr...2006&carId=001
    -Matt

    Quattrophenia (PSN)
    flickr
    MTN Custom Leather

  7. #7
    Veteran Member Four Rings Sharkfin's Avatar
    Join Date
    Nov 01 2007
    AZ Member #
    22242
    My Garage
    B7 A4 2.0TQT
    Location
    PA

    Great DIY, I think I've got a failing one. Did you have a weird noise and scraps on your window? I can't decide if it's the motor or the regulator

  8. #8
    Senior Member Three Rings crew's Avatar
    Join Date
    Oct 02 2009
    AZ Member #
    48679
    My Garage
    1966 Mustang, 1988 F150, 2006 A4 2.0t (SOLD), 2013 Focus ST
    Location
    19803

    Scraping noise, yep.. See the cable all chewed up? That's what my noise was coming from!

  9. #9
    Account Terminated Four Rings
    Join Date
    Jul 10 2008
    AZ Member #
    30734
    My Garage
    06 A4 / 09 IS-F / 10 Cayenne
    Location
    Austin, TX

    There's a gear on the motor that drives the window regulator. The more you roll your window up/down with a bad regulator (crunching noise) the better your chances are of needing to replace the motor as well as the teeth on the gear will strip.

  10. #10
    Veteran Member Three Rings illegitimus's Avatar
    Join Date
    Mar 17 2009
    AZ Member #
    40007
    My Garage
    2006 B7 A4 Quattro Tip S-line
    Location
    Boston, MA

    what a timely DIY! my driver's side from is going... nicely done! Thanks!

  11. #11
    Senior Member Three Rings crew's Avatar
    Join Date
    Oct 02 2009
    AZ Member #
    48679
    My Garage
    1966 Mustang, 1988 F150, 2006 A4 2.0t (SOLD), 2013 Focus ST
    Location
    19803

    Good luck! Any questions, let me know.
    -Matt

    Quattrophenia (PSN)
    flickr
    MTN Custom Leather

  12. #12
    Veteran Member Four Rings Sharkfin's Avatar
    Join Date
    Nov 01 2007
    AZ Member #
    22242
    My Garage
    B7 A4 2.0TQT
    Location
    PA

    I fear my window won't go back up someday, I need to do this asap.

  13. #13
    Active Member Two Rings
    Join Date
    Sep 11 2007
    AZ Member #
    21005
    Location
    Austria

    First sorry for may not so good English... not my native language...


    A huge thanks for writing this Window Regulator Tutorial for B6 and B7 platform!!!

    I replaced the front driverside regulator over the weekend and everything went smoothly except one thing. I have electrical power folding mirrors. Now my left (driverside) mirror can't fold. Right (passanger side) work normaly.
    I drow my car with disconnected window motor and mirror and maybe that's the reason, who knows.
    I double check all connections and couldn't figure out what's wrong.
    If someone know how to fix this power folding mirror problem it will be of great help. What I can say not 100% sure du not put your key or drive your car before connecting all harness together.

    Anyway you did great work! Thanks again for sharing!


    I think that I can hear cracking noise from passanger side window now... ;)

  14. #14
    Stage 2 Banner Advertiser Four Rings ECS Tuning-Audi's Avatar
    Join Date
    Oct 02 2006
    AZ Member #
    70746
    Location
    Wadsworth,OH

    Everything you need to replace front window regulators can be found in the link below!

    Click HERE to order or for more information.


    Let me know if you have any questions!

    Jason

  15. #15
    Established Member Two Rings Hungrypilot's Avatar
    Join Date
    Sep 27 2011
    AZ Member #
    81780
    My Garage
    '05 MINI Cooper S
    Location
    Towson, MD

    Ouch @ $142...

  16. #16
    Senior Member Three Rings A4-Wookie's Avatar
    Join Date
    Mar 27 2011
    AZ Member #
    73014
    My Garage
    2015 Audi Q7
    Location
    209, Ca

    Quote Originally Posted by Hungrypilot View Post
    Ouch @ $142...
    Get the part number and order it from Amazon. I payed 45 shipped for mine about 3-4 months ago. Been working perfectly since!
    2015 Audi Q7
    2013 Audi A6
    2006 Audi A4 Quattro - Stolen and totaled 7/9/2012

  17. #17
    Established Member Two Rings Hungrypilot's Avatar
    Join Date
    Sep 27 2011
    AZ Member #
    81780
    My Garage
    '05 MINI Cooper S
    Location
    Towson, MD

    Quote Originally Posted by A4-Wookie View Post
    Get the part number and order it from Amazon. I payed 45 shipped for mine about 3-4 months ago. Been working perfectly since!
    How long did it take to receive it, though? Amazon says it ships in 1-2 months? F that...

  18. #18
    Senior Member Three Rings A4-Wookie's Avatar
    Join Date
    Mar 27 2011
    AZ Member #
    73014
    My Garage
    2015 Audi Q7
    Location
    209, Ca

    I received it in about a week. Not sure why it would say that long. I'd make sure it's in stock, throw it in the cart and then go through and fill everything out until you get to shipping part and make sure there's an option for 3-5 days or whatever.
    2015 Audi Q7
    2013 Audi A6
    2006 Audi A4 Quattro - Stolen and totaled 7/9/2012

  19. #19
    Established Member Two Rings Hungrypilot's Avatar
    Join Date
    Sep 27 2011
    AZ Member #
    81780
    My Garage
    '05 MINI Cooper S
    Location
    Towson, MD

    In stock, ships for free with Prime, ordered... next step: Brave the below freezing temps we've had lately and get it done ASAP.

  20. #20
    Established Member Two Rings nojoda's Avatar
    Join Date
    Jul 17 2007
    AZ Member #
    19629
    My Garage
    07 B7 A4 2.0T / 02 BMW M3 RIP
    Location
    miami

    Quote Originally Posted by Stockton View Post
    I used another DIY from another board but found some errors in it.

    This was done on my 2004 A4 1.8t Quattro 6spd manual just to be precise.

    I replaced the Front Driver's Side(left) Window Regulator which I purchased from http://www.genuinevwaudiparts.com/pa...?siteid=214407
    Part number: 8E0837461C

    This is a DIY on how you to replace it with a new one, if you need to replace the window motor you can use this, it's actually a lot easier and less steps.

    Lets begin with the tools you will need.

    1 Philips head screwdriver
    1 Flat head screwdriver for prying, I put tape on mine to help prevent scratching.
    1 Ratchet wrench. I used a nice long extension piece too. You don't need the ratchet the whole time. You only need it to break the seal of the screws or the last half turn when tightening. The extension works nice to keep from banging into things with the handle your hand and is nice to use without the ratchet like a screwdriver.
    1 #25 Torx bit.
    1 #30 Torx bit.
    1 #45 Torx bit.
    A pair of needle nose pliers will come in handy as well.


    Having a stool or something will save your back and knees too.

    Now lets take this door apart.

    First, roll down the window all the way down.

    If you're window reg is really jammed up try to help it down with your hand. It doesn't have to go back up till you replace it with the new one, if you're doing the motor it doesn't matter if it's up or down.

    Now we're going to take the trim off the door and the small cap behind the handle.

    There is one Philips head screw at bottom center of the door as well.


    The screw at the bottom is pretty long and can be a pain, be patient with it and don't strip out the head.

    As far as removing the upper trim, I used my fingers, I started in the middle near the door handle and worked my way to the door hinge. All of the clips pull straight out, except the on at the end of the trim closest to the open part of the door, that clip should be done last and pull the trim towards the door hinge.

    Here is the back of the trim piece.


    Here is what 5 normal clips look like.


    Here is the one clip closest to the open part of th door, as you can see it can't be pulled straight out.


    The cap under the handle just use a flat head from the underside and it will pop right off.

    Now with the trim and cap off you have 4 Philips head brass colored screws exposed and 2 of the same screws behind where the cap was. Remove them. This is where a needle nose or magnetic screwdriver will help with the 2 behind the cap.


    Now with those 6 screws and the 1 at the bottom center removed the door interior is ready to pull off. Start at the bottom and gentle pull to get the clips behind to come loose. The door interior will stay attached by the top. You will have to lift it to get it completely separated from the door but it won't just drop off until you lift it off.

    The door is going to be attached from behind by the door handle mechanism and 2 wires at the bottom near the speaker so don't just yank it off expecting it to be free from the door completely yet.

    Once lifted away from the door detach the door mechanism and wire clips, one on the speaker, one on the window motor. The one on the window motor has a purple clip that you can just press down with a flat head, it will swing down and back releasing the connection.


    Now lay the door interior somewhere safe it won't get scratched.


    The inner door is now exposed somewhat.

    Now get our your #25 Torx.

    I like to take all the #25's off now you can so you're not switching back and forth with different bits.

    Now unclip the other other connection on the speaker and the other 3 connections on the Window Motor.

    There are 3 black #25 Torx screws around the speaker and 3 silver #25 Torx on the Window Motor. There is also a clip holding a wire on top of the speaker that needs to be removed. I found it easier to undo the tape holding the wire to the clip then pulling the clip itself.

    When you remove the screws from both parts, neither part will fall off. The Window Motor will need to be pulled off and if that is all you are replacing, do so, and reverse the steps from here and you are done.

    The speaker has a small platic hanger at the top center, after the screws are out it will need to be lifted and pulled off to come free.


    Now with window motor and speaker removed, time to remove the glued on sound deadening material. Just start at a corner and slowly, gently work it along the glue lines try not to rip and destroy it. It helps if it's warm when you're doing this, you can use a hair drier to help warm it up if needed. If you do it right all the glue will come off with the deadening material and not stay on the door.

    When it's off lay it somewhere safe glue side up.

    Check to make sure this clip is still intact and in the correct position.


    Now there are still 2 more #25 Torx screws to remove now.
    One is in the speaker well where you just removed the speaker. It's a black screw at the bottom of the old Window Regulator. The other is to the left of it about same height and is now uncovered with the sound deadening removed. Remove both screws.


    Now you are done with Torx #25 screws till the re-assemble.

    Now you have to remove the power mirror wire from the clips on the inside lower part of the door so it can come out freely when you pull the door apart.

    This is the Brown wiring harness that you disconnected from the Window Motor. Pull the big rubber plug out of the door that all the wires are coming through and disconnect the plastic wire tie holding them all togther. Needle nose will help.


    Now there are 3 clips holding this wire on the INSIDE of the door you have disconnect. One is black and you can release the clip easily. The other two are white and you can reach them from inside the speaker well.

    Here is the black one you can release easily.


    Here is a pic inside the speaker well, you can see the lower white clip, the second is higher and approximated.


    It's up to you to pull out those white clips or just undo the tape. I pulled the lower and undid the tape on the higher one.

    Now with that wire loose, pull it through and let it hang out of the speaker well.


    Now we're going to pull the remaining plastic pieces near the mirror. They're just clipped in, I started at the bottom with a flat head till I could get my fingers under it and just worked my way up for the big piece, it has 3 clips holding it. I started from the side with the small piece it has one clip and wedges into to the bottom.


    Now we're ready to take some more screws out.

    Now we're gunna take the one and only #30 Torx screw out that was behind that plastic you just removed by the side mirror. It is the lower black one. Do not remove the upper silver screw.


    Ok now on to the last 4 screws and they are all #45 Torx 2 silver 2 black. 3 of them are right there on the door easy to spot, one is on the open edge of the door hidden behind a rubber cap.

    Lets take the one out behind the cap first.

    Remove the rubber cap and remove the screw. Don't worry about dropping it inside the door. There is no where for it to drop to. It will just stay there. A magnetic bit or needle nose and a long extension will really help here.
    Cap


    Screw


    This is the angle you're gunna be at unscrewing it and replacing it, extension of some length is a must.


    Now with that out, lets take out the other #45 Torx screws that are easy to get to. 1 black screw and 2 silvers left.


    Now all the scewes are out. Time to remove the weather stripping around the top part of the door ONLY!

    Be careful with this. I ripped mine a little but some glue fixed it. Pull from behind the stripping, not underneath.

    I started from hinged part.


    Do not remove it past those lines.

    Get your fingers behind the rubber from the top of the door and work your way around slowly.

    When you're done it will look like this.


    Now on the open part of the door there is one rubber cap to remove.

    You want to get the 2 clips behind it to come out of the lower half of the door but stay attached to the upper half.


    Now the last step before separating the door. Just squeeze the blue plastic stems of the Window Regulator where the Window Motor was attached and push them into the door.


    Now you're ready to live the top half off the door off. The whole window assembly will life out. The top frame, Window Regulator and Glass. Have somewhere close by, clean and safe to lay this down.

    You're going to be laying it down mirror side up.

    When lifting remember the glass and Window Regulator are slightly curved so it won't lift straight up, just get a good grip and lift slowly and don't force it, let it come out how it wants to.

    REMEMBER THE POWER MIRROR WIRE. That has to come up with the mirror so make sure it's not caught anywhere.

    When you get it separated you have this.


    Remember when I said you were done with the #25 Torx bit? Well I lied, get it back out. 4 more to go.

    Ok now you're gunna take the 2 #25 Torx out of the bottom of the Window Regulator but leaving the plastic tabs on the actual glass.


    Pull the window out to get this.


    Now lay the new Window Regulator out next the old one that's still attached to make sure you have it all ready to go on the correct way.


    Now remove the 2 #25 Torx screws at the top of the old Window Regulator.


    Alright, now just put the new one into place and put the top 2 screws in.

    Then slide the window into the frame and line up the bottom tabs. This is the most annoying part, getting the window in. It's easy with someone to give a helping hand which I didn't have but with a little patients it'll go in and line up.

    Now screw the 2 lower #25 torx screws in to attach the window to the Regulator.

    From here just reverse the steps.

    I like to get the window in attach the 2 #25 torx screws at the bottom of the Window Regulator first and get the blue stems popped through that the Window Motor will screw into.

    REMEMBER WHAT SCREWS GO ON UNDER THE SOUND DEADENING. The Window Motor goes on after the deadening material.

    Hope all worked out for you.
    I really want to thank the OP for this DIY. It took me 3 HR's but only because I stubbornly didn't label the screw's and forgot their place. Also, acting like a noob I finally forgot to install the Handle cable and looked myself out of the car lol.

    awesome write up although I didn't know there was another part which is stated on the DIY here is the B6 version attached just in case someone didn't see the links.


  21. #21
    Veteran Member Three Rings clemsongt's Avatar
    Join Date
    Mar 09 2009
    AZ Member #
    39679
    My Garage
    05.5 A4 2.0TMT RIP: 88 MX6 GT
    Location
    Irmo, SC

    Only tip that I might add is to make sure all of the metal threaded inserts are still in their proper holes before you start putting things back. If one has fallen out, you aren't likely to take the whole thing apart for that one door panel screw but instead it just gets thrown in the glove box.

    Now that I have my regulator in and the window is back to working without problem, why does it not one touch auto up? I can one touch auto down, but I have to hold the switch until the window goes all the way up. Is there a way to sync the windows or something?
    Disclaimer: In no way shape or form is the comment above representative of an automotive expert. It is merely the understanding and/or opinion of an automotive enthusiast, and as such, the knowledge he/she possesses may or may not actually be the truth.

  22. #22
    Veteran Member Three Rings grizzles's Avatar
    Join Date
    Sep 15 2006
    AZ Member #
    11349
    Location
    OC, CA

    Quote Originally Posted by clemsongt View Post
    Only tip that I might add is to make sure all of the metal threaded inserts are still in their proper holes before you start putting things back. If one has fallen out, you aren't likely to take the whole thing apart for that one door panel screw but instead it just gets thrown in the glove box.

    Now that I have my regulator in and the window is back to working without problem, why does it not one touch auto up? I can one touch auto down, but I have to hold the switch until the window goes all the way up. Is there a way to sync the windows or something?
    Roll the window all the way up then hold the button in the up position for 5 seconds and it it will re-enable. Can't remember if you have to do it for all windows individually or not.

  23. #23
    Veteran Member Three Rings clemsongt's Avatar
    Join Date
    Mar 09 2009
    AZ Member #
    39679
    My Garage
    05.5 A4 2.0TMT RIP: 88 MX6 GT
    Location
    Irmo, SC

    Quote Originally Posted by grizzles View Post
    Roll the window all the way up then hold the button in the up position for 5 seconds and it it will re-enable. Can't remember if you have to do it for all windows individually or not.
    Thanks, that should def be added to the end of the OP. I think it is only messed up on the driver window, so it's most likely only necessary for the window(s) that is messed up.
    Disclaimer: In no way shape or form is the comment above representative of an automotive expert. It is merely the understanding and/or opinion of an automotive enthusiast, and as such, the knowledge he/she possesses may or may not actually be the truth.

  24. #24
    Veteran Member Three Rings clemsongt's Avatar
    Join Date
    Mar 09 2009
    AZ Member #
    39679
    My Garage
    05.5 A4 2.0TMT RIP: 88 MX6 GT
    Location
    Irmo, SC

    So any other suggestions?... I tried and it didn't work :(
    Disclaimer: In no way shape or form is the comment above representative of an automotive expert. It is merely the understanding and/or opinion of an automotive enthusiast, and as such, the knowledge he/she possesses may or may not actually be the truth.

  25. #25
    Veteran Member Three Rings grizzles's Avatar
    Join Date
    Sep 15 2006
    AZ Member #
    11349
    Location
    OC, CA

    Quote Originally Posted by clemsongt View Post
    So any other suggestions?... I tried and it didn't work :(
    I may have missed a step in there....try rolling it all the way down then all the way back up and hold the button for 5 seconds. It's something like that but it's also in the manual so you can check that as well.

  26. #26
    Veteran Member Four Rings
    Join Date
    Feb 20 2010
    AZ Member #
    54926
    My Garage
    TT225, Touareg, Tiguan, TDI, A3, RS6, Jetta
    Location
    Brighton, MI

    Can some snap photos of the plastic rail clips?
    I would like to add the B7 clips to my stock. They look similar to the B6 clips (photo below), but there can be minute differences (similar to difference between A6 C5 and A4 B6 clips).
    Also: how does the clip (assuming only 1 big one) for the rear windows look like?

    Email:

    [email protected]

    B6 clips font (A and B pair):


    B6 rear (L and R clip):

    01 Allroad Tiptronic, TCU tune, mild stg 3 (350 HP) tune (stock injectors) KraftwerkTurbo TM1. Lower, Wider. Custom tip vent pod with Podi
    02 Allroad 6 spd, Kraftwerk Turbo TM6, 750cc, 3" MAF, piggy, FMIC, CM stg 5 (hate). 30 psi at 3600 rpm. Needs stronger rods (coming).
    05 Golf TDI
    Looking for 2001 A4 1.8T quattro manual with blown motor
    www.regulatorfix.com
    www.kraftwerkturbo.com

  27. #27
    Senior Member Three Rings dc2002's Avatar
    Join Date
    Jan 29 2007
    AZ Member #
    15213
    Location
    Roswell GA

    Holy Cow!!!

    Ordered the $50 VDO regulator from Amazon and just completed the install.

    EXCELLENT TUTORIAL!!!

    Thank you very much!!!

  28. #28
    Registered Member Four Rings BoSNiaN's Avatar
    Join Date
    Jun 02 2011
    AZ Member #
    76367
    My Garage
    2012 Benz ML350, 2007 BMW 325xi, 2006 Audi A4 2.0T
    Location
    Canada

    1) This is more difficult than it seems for the drivers side. If you don't align glass back up right, it might not glide smoothly and the extra tension could blow your motor. That's what happened to me yesterday. Everything looks perfect and fit correctly during re-assembly, but when I tried it after everything was back together, the window rolls up and down too slowly. There is too much tension somewhere and I'm not gonna take everything apart again so I'm just gonna take it to a mechanic and pay to get it done right. My dad used to be an engineer for Mercedes and he couldn't even figuire out how to align it as neither instructions (this or the b6 guide) even mention how to do it.

    2) A BIG thumbs up for Amazon....Ordered the wrong regulator 3 months ago, and they exchanged it for me and even paid the return shipping! For those interested THIS is the correct front LEFT regulator and THIS is the correct front RIGHT regulator. The rear left regulator I also bought off ECS for a similar price.
    2006 A4 2.0T 6 SPD MT // Dolphin Grey on Black // Sport + Premium Package // Quattro

    ==> Complete Mod List <==

  29. #29
    Senior Member Two Rings
    Join Date
    Feb 29 2012
    AZ Member #
    89052
    Location
    Charlotte, NC

    Doing this one tomorrow (front passenger window). Got the part a couple of months ago (from Amazon) and have been too distracted by work.

    Thank you in advance to everyone who contributed to this thread. BTW, here's a video I found useful as it provides some continuity which may not exist in the step-by-step pictures above: http://www.youtube.com/watch?v=1YHB1y2lZrs

    I will post again tomorrow with the result. If I'm not flipping my biscuit because things don't turn out the way I expected them, I will try to take more pics and will post a link to the album.
    2019 Audi e-tron Prestige | Glacier White | 21” | Cold Weather | Audi Beam Rings

  30. #30
    Veteran Member Four Rings
    Join Date
    Feb 20 2010
    AZ Member #
    54926
    My Garage
    TT225, Touareg, Tiguan, TDI, A3, RS6, Jetta
    Location
    Brighton, MI

    Anything for the B7 rear? Video? Write up? Photos?
    01 Allroad Tiptronic, TCU tune, mild stg 3 (350 HP) tune (stock injectors) KraftwerkTurbo TM1. Lower, Wider. Custom tip vent pod with Podi
    02 Allroad 6 spd, Kraftwerk Turbo TM6, 750cc, 3" MAF, piggy, FMIC, CM stg 5 (hate). 30 psi at 3600 rpm. Needs stronger rods (coming).
    05 Golf TDI
    Looking for 2001 A4 1.8T quattro manual with blown motor
    www.regulatorfix.com
    www.kraftwerkturbo.com

  31. #31
    Senior Member Two Rings
    Join Date
    Feb 29 2012
    AZ Member #
    89052
    Location
    Charlotte, NC

    Good God ... That was a whipping (for me). I started at 9:30 and wrapped up at 3:30. I took a couple one hour breaks (one for lunch and one to go buy some adhesive) and I also took my sweet time because I was taking pictures (link to album later). Speaking of the pics, I don't know that I will be providing anything new and crucial that this DIY, the video, and some common sense wouldn't tell you.

    The window now works again but I did f*** one thing up which I imagine will come back to haunt me. I accidentally used a speaker screw to attach the left metal regulator track to the door (behind the speaker) and by the time I realized it (when I went to install the speaker) the damage was done. I removed the speaker screw and inserted the correct screw and perhaps I was better off leaving the wrong screw in because now the correct screw doesn't secure the metal track tightly (different width and threading). There is now a little bit of play. Oh well. Live and learn. I guess it pays to stuff those screws into the cardboard like the OP said. :-)

    A few things which were gotchas ... a) the first power harness you detach from the motor assembly has a weird orange latching mechanism that has to swing out before you can disconnect the plug; there is a notch underneath the latch where you can put your fingernail and it unclips almost effortlessly. If you're using too much strength, you're doing it wrong (like I did for about 10 minutes; I should have paid more attention to the video). b) the sound absorbing material in my door was re-glued on fairly well and the adhesive had dried beyond reuse; consider getting another sound absorber panel when replacing the regulator; the part number for the front passenger door is 8e0863980b and sells for around $65 (ECS Tuning has it). I just carefully removed mine and stripped all goo off of it and the door surface and then used some aquarium-safe silicone adhesive to reinstall (tried Googling the correct type of adhesive but couldn't find it and didn't want to take too long). c) the metal tracks from the regulator fasten to the carrier but can go any which direction (they don't fit into any guide or impression in the carrier). The video I previously posted on here mentions drawing an outline of the old tracks onto cardboard below and then using that as a guide for the new tracks. Eventually there is only one way for them to attach to the bottom of the door with those screws ... Unless you f*** it up like I did and use the wrong screw and then there is a little play. ;-) d) contrary to the warning in the video, I didn't break any of the clips on the outer door assembly. I had more of an issue with all the little white wire fastener clips which shattered left and right. The one that came with the new regulator didn't have a large enough V expander thingy for the size of the hole on the carrier. That sucker got a nice dab of adhesive on it and shouldn't be going anywhere.

    I'm off to get some dinner and a beer ... More of a consolatory rather than congratulatory beer. Oh, for the ultimate in FU from the universe, as soon as I started the engine to take the car around the block for a test drive of the new regulator and reinstallation of the door, what pops up on the dash??? "Low coolant", motherf***er! That probably means the thermostat DIY (damage it yourself) I did back in April didn't correct the real problem which is that coolant leaks when the temperature drops during winter. I'll see if I can pinpoint where it's coming from.

    I'm ready for another car at this point ... One with warranty and complimentary scheduled maintenance. And this car is ready for the boneyard. It would probably prefer that to me doing any more work on it.
    2019 Audi e-tron Prestige | Glacier White | 21” | Cold Weather | Audi Beam Rings

  32. #32
    Senior Member Two Rings
    Join Date
    Feb 29 2012
    AZ Member #
    89052
    Location
    Charlotte, NC

    As promised, the photos I took of the DIY ... https://plus.google.com/u/0/photos/1...02790063815281

    If there is something to gain from it, please feel free to pilfer.
    2019 Audi e-tron Prestige | Glacier White | 21” | Cold Weather | Audi Beam Rings

  33. #33
    Established Member Two Rings nvds4's Avatar
    Join Date
    Jun 20 2011
    AZ Member #
    77146
    Location
    Elk Grove, CA

    Well, i replaced my window regulator for the SECOND TIME in 2 years yesterday. I had ordered the same one as last time on Amazon (VDO WR40048HD $49.) but it didn't arrive in time as it was supposed to. So I ran off to the dealer to buy an OEM VW/Audi one for $155. Seems to actually fit better than the VDO one. Also, when we took it apart, not only were the cables frayed, but one of the cables in a sleeve was bent 90 degrees. I recall that it didn't fit perfectly last time. very happy with this OEM one, hopefully it lasts.
    -Neil

    '06 S4 B7 Saloon, 6MT, Brilliant Red, JHM ShShifter+wt'd knurl SS knob, 641 relay delete, K&N drop-in, Vogtland C/O's, stock 18x8 BBS-CH (winter), 19x8.5 VMR v710's/Hankook V12 (summer), Audi Euro Flat-Bottom steering wheel, Seat Cupra R Lip, Euro front plate, F1 Classic tint 5% bk/Pinnacle ceramic 50% frt, Dension GW16AC1 & IPO5DC9 iPod Integr, Tune/Exhaust/Piggies soon (JHM/FI)

  34. #34
    Veteran Member Four Rings
    Join Date
    Feb 20 2010
    AZ Member #
    54926
    My Garage
    TT225, Touareg, Tiguan, TDI, A3, RS6, Jetta
    Location
    Brighton, MI

    Quote Originally Posted by nvds4 View Post
    I had ordered the same one as last time on Amazon (VDO WR40048HD $49.) buy an OEM VW/Audi one for $155. Seems to actually fit better than the VDO one.
    Isn't VDO the OEM supplier for the regulator?
    01 Allroad Tiptronic, TCU tune, mild stg 3 (350 HP) tune (stock injectors) KraftwerkTurbo TM1. Lower, Wider. Custom tip vent pod with Podi
    02 Allroad 6 spd, Kraftwerk Turbo TM6, 750cc, 3" MAF, piggy, FMIC, CM stg 5 (hate). 30 psi at 3600 rpm. Needs stronger rods (coming).
    05 Golf TDI
    Looking for 2001 A4 1.8T quattro manual with blown motor
    www.regulatorfix.com
    www.kraftwerkturbo.com

  35. #35
    Established Member Two Rings nvds4's Avatar
    Join Date
    Jun 20 2011
    AZ Member #
    77146
    Location
    Elk Grove, CA

    Possibly, but there is the VDO (or in this case below, "Uro"), then there's the VW/Audi. I'll stick with paying a bit more in the future due to what a pain in the *ss of a job it is to do.

    http://www.autohausaz.com/search/pro...ow%20Regulator
    -Neil

    '06 S4 B7 Saloon, 6MT, Brilliant Red, JHM ShShifter+wt'd knurl SS knob, 641 relay delete, K&N drop-in, Vogtland C/O's, stock 18x8 BBS-CH (winter), 19x8.5 VMR v710's/Hankook V12 (summer), Audi Euro Flat-Bottom steering wheel, Seat Cupra R Lip, Euro front plate, F1 Classic tint 5% bk/Pinnacle ceramic 50% frt, Dension GW16AC1 & IPO5DC9 iPod Integr, Tune/Exhaust/Piggies soon (JHM/FI)

  36. #36
    Veteran Member Four Rings
    Join Date
    Feb 20 2010
    AZ Member #
    54926
    My Garage
    TT225, Touareg, Tiguan, TDI, A3, RS6, Jetta
    Location
    Brighton, MI

    Quote Originally Posted by nvds4 View Post
    Possibly, but there is the VDO (or in this case below, "Uro"), then there's the VW/Audi. I'll stick with paying a bit more in the future due to what a pain in the *ss of a job it is to do.

    http://www.autohausaz.com/search/pro...ow%20Regulator
    URO, Audi. Didn't you say VDO as well?
    On the Audi part, there should be the VDO name/stamp (at least is on the other VW/Audi OEM regulators I have on laying around).
    01 Allroad Tiptronic, TCU tune, mild stg 3 (350 HP) tune (stock injectors) KraftwerkTurbo TM1. Lower, Wider. Custom tip vent pod with Podi
    02 Allroad 6 spd, Kraftwerk Turbo TM6, 750cc, 3" MAF, piggy, FMIC, CM stg 5 (hate). 30 psi at 3600 rpm. Needs stronger rods (coming).
    05 Golf TDI
    Looking for 2001 A4 1.8T quattro manual with blown motor
    www.regulatorfix.com
    www.kraftwerkturbo.com

  37. #37
    Established Member Two Rings nvds4's Avatar
    Join Date
    Jun 20 2011
    AZ Member #
    77146
    Location
    Elk Grove, CA

    There probably is, but for some reason there's different P/N's floating around. Sorry I didn't check for the VDO stamp. Comparing the two at that time, the springs at the blue regulator were tighter in the Audi version. Also different color spring/plugs. But for me, the cable on the first install (VDO) was a tad too long, which is probably why it kinked 90 degrees, eventually stopping the cable altogether. The Audi version went in perfectly.

    VDO: http://www.amazon.com/gp/product/B00...?ie=UTF8&psc=1
    AUDI: http://www.ecstuning.com/Audi-B7_S4--V8/ES438316/
    -Neil

    '06 S4 B7 Saloon, 6MT, Brilliant Red, JHM ShShifter+wt'd knurl SS knob, 641 relay delete, K&N drop-in, Vogtland C/O's, stock 18x8 BBS-CH (winter), 19x8.5 VMR v710's/Hankook V12 (summer), Audi Euro Flat-Bottom steering wheel, Seat Cupra R Lip, Euro front plate, F1 Classic tint 5% bk/Pinnacle ceramic 50% frt, Dension GW16AC1 & IPO5DC9 iPod Integr, Tune/Exhaust/Piggies soon (JHM/FI)

  38. #38
    Established Member Two Rings nvds4's Avatar
    Join Date
    Jun 20 2011
    AZ Member #
    77146
    Location
    Elk Grove, CA

    CORRECTION: I actually ordered THIS ONE on 11/10/2011. Seems a tad different in P/N (WR40048, vs the current WR40048HD):

    http://www.amazon.com/VDO-WR40048-Fr...vglnk-c1005-20
    -Neil

    '06 S4 B7 Saloon, 6MT, Brilliant Red, JHM ShShifter+wt'd knurl SS knob, 641 relay delete, K&N drop-in, Vogtland C/O's, stock 18x8 BBS-CH (winter), 19x8.5 VMR v710's/Hankook V12 (summer), Audi Euro Flat-Bottom steering wheel, Seat Cupra R Lip, Euro front plate, F1 Classic tint 5% bk/Pinnacle ceramic 50% frt, Dension GW16AC1 & IPO5DC9 iPod Integr, Tune/Exhaust/Piggies soon (JHM/FI)

  39. #39
    Veteran Member Four Rings
    Join Date
    Feb 20 2010
    AZ Member #
    54926
    My Garage
    TT225, Touareg, Tiguan, TDI, A3, RS6, Jetta
    Location
    Brighton, MI

    Still looking for photos of the REAR B7 Regulator rail clips. Same as the 'big green' shown?
    DIY for B7 rear?

    Quote Originally Posted by vtraudt View Post
    Can some snap photos of the plastic rail clips?

    Email:

    [email protected]

    B6 clips font (A and B pair):


    B6 rear (L and R clip):

    01 Allroad Tiptronic, TCU tune, mild stg 3 (350 HP) tune (stock injectors) KraftwerkTurbo TM1. Lower, Wider. Custom tip vent pod with Podi
    02 Allroad 6 spd, Kraftwerk Turbo TM6, 750cc, 3" MAF, piggy, FMIC, CM stg 5 (hate). 30 psi at 3600 rpm. Needs stronger rods (coming).
    05 Golf TDI
    Looking for 2001 A4 1.8T quattro manual with blown motor
    www.regulatorfix.com
    www.kraftwerkturbo.com

Bookmarks

Posting Permissions

  • You may not post new threads
  • You may not post replies
  • You may not post attachments
  • You may not edit your posts
  •  


    © 2001-2025 Audizine, Audizine.com, and Driverzines.com
    Audizine is an independently owned and operated automotive enthusiast community and news website.
    Audi and the Audi logo(s) are copyright/trademark Audi AG. Audizine is not endorsed by or affiliated with Audi AG.