Audizine - An Automotive Enthusiast Community

Page 9 of 19 FirstFirst ... 7891011 ... LastLast
Results 321 to 360 of 739
  1. #321
    Veteran Member Four Rings a4darkness's Avatar
    Join Date
    Dec 01 2007
    AZ Member #
    23015
    Location
    San Jose CA

    Guest-only advertisement. Register or Log In now!
    Good good. Revo here as well, still quite pleased with it.

  2. #322
    Veteran Member Four Rings boy412's Avatar
    Join Date
    Jul 15 2007
    AZ Member #
    19553
    My Garage
    2015 Golf Sportwagen TDI, 1988 Alpineweiß 325iC
    Location
    Mount Rainier, MD

    Quote Originally Posted by a4darkness View Post
    Only been using Mobile 1 but it looks like an Auto-Rx is in order. That's not quite clean enough for my taste.

    Do you use that product regularly? Just curious.
    ~Eric
    SOLD: '03 Ming Blue A4 Avant 1.8TQM | GTRS | MTM cat/exhaust | Maestro | Spec Stage III+ | Vogtlant GT's | JHM trio | STE PPD | OEM+

  3. #323
    Veteran Member Four Rings A4OrlandoB6's Avatar
    Join Date
    Aug 03 2008
    AZ Member #
    31569
    Location
    Philadelphia, PA

    FWIW, the split in the CCV system is between early 2003's and late 2003's. My early-year '03 had a valve that used clamps to fasten the hoses to it. The new engine I'm putting in is from an '04 and all the hoses for the VVC system are heat-shrunk on. Also, the valve housing I purchased looked different than my original, and some of the hoses had updated fittings lining the insides of them.

    btw Thomas, this thread is ahhsum
    -Kyle

    2005 Audi A4 Avant USP / 1.8T / Brilliant Red

    2004 Audi A4 1.8T - big turbo and some stuff - gone

    2003 Audi A4 1.8TQM - gone

  4. #324
    Veteran Member Four Rings a4darkness's Avatar
    Join Date
    Dec 01 2007
    AZ Member #
    23015
    Location
    San Jose CA

    Quote Originally Posted by boy412 View Post
    Do you use that product regularly? Just curious.
    Something like that.

    In my two previous A4's, I used to get my oil changed at a Chevron Oil Stop (before I started doing all my own maint). A few times a year, I'd have them run their "seafoam" treatment through my system before changing the oil. It's a basic engine cleaner for sludge that you ask for prior to the change. They drop it in, run the engine for 5 min or so and then they change your oil. Done. This a light treatment of sorts so I did it more often than the standard Seafoam / Auto RX (which IIRC is only needed every 15-20k unless the engine is bad).

    Back then, I was driving far more miles under much harsher conditions. Now I'm out of LA, the daily floggings have subsided, I drive a lot less now and do pretty much all my own maint including oil changes. So when I recently pulled my valve cover to change the gaskets, my engine was nice n clean. So, I wasn't quite so unnerved about sludging. I'll probably run something through there this change if not the next. But the PO had ALL her maint, including oil changes, done at a dealership like clockwork... hence the lack o nasty build up.

    Regardless, the use and frequent changing of OEM filters and quality oil will significantly reduce the risk of sludge. Tried Lubro Molly last time, but discovered it was only a Group III so I'm moving to Motul X-Cess 8100, a true Group IV synthetic. Rad.


    Quote Originally Posted by A4OrlandoB6 View Post
    FWIW, the split in the CCV system is between early 2003's and late 2003's. My early-year '03 had a valve that used clamps to fasten the hoses to it. The new engine I'm putting in is from an '04 and all the hoses for the VVC system are heat-shrunk on. Also, the valve housing I purchased looked different than my original, and some of the hoses had updated fittings lining the insides of them.

    btw Thomas, this thread is ahhsum
    Very interesting David. If you find any updates from previous engine to new engine you find significant, snap a pic and post it up here. There are often times minor changes that are not fully documented (like via ETKA) but can make ppl's lives easier when replacing parts known to fail and whatnot.

    Hopefully I can continue to find minor points of failure to improve upon in order to have a more reliable BT in the future.

  5. #325
    Active Member Two Rings Makulu's Avatar
    Join Date
    Mar 12 2011
    AZ Member #
    72247
    My Garage
    07 Rav4!!
    Location
    PNW

    I know you have heard this a ton, but just wanted to say damn great thread man, saved me a lot of money and taught me a lot more. Its threads like this and people like you who make them that help us to enjoy these cars

  6. #326
    Veteran Member Four Rings boy412's Avatar
    Join Date
    Jul 15 2007
    AZ Member #
    19553
    My Garage
    2015 Golf Sportwagen TDI, 1988 Alpineweiß 325iC
    Location
    Mount Rainier, MD

    Quote Originally Posted by a4darkness View Post
    So I know this ATP fitting didn't really work out. However...I was at my local shop recently and saw THIS product from OmegaTek:


    I was originally drawn to their fly wheel spacers (in four fun anodized colors) then saw this little fitting on the shelf (I'm such a sucker for CNC machined parts). Anyway...I thought this might be a good fit for that spot? Comes in stealth black too.

    Last edited by boy412; 05-25-2011 at 06:25 PM.
    ~Eric
    SOLD: '03 Ming Blue A4 Avant 1.8TQM | GTRS | MTM cat/exhaust | Maestro | Spec Stage III+ | Vogtlant GT's | JHM trio | STE PPD | OEM+
  7. #327
    Veteran Member Four Rings a4darkness's Avatar
    Join Date
    Dec 01 2007
    AZ Member #
    23015
    Location
    San Jose CA

    Actually yes, it looks perfect. What diameter is it? Very nice too.

  8. #328
    Veteran Member Four Rings boy412's Avatar
    Join Date
    Jul 15 2007
    AZ Member #
    19553
    My Garage
    2015 Golf Sportwagen TDI, 1988 Alpineweiß 325iC
    Location
    Mount Rainier, MD

    Dunno. I'll find out!
    ~Eric
    SOLD: '03 Ming Blue A4 Avant 1.8TQM | GTRS | MTM cat/exhaust | Maestro | Spec Stage III+ | Vogtlant GT's | JHM trio | STE PPD | OEM+

  9. #329
    Veteran Member Four Rings a4darkness's Avatar
    Join Date
    Dec 01 2007
    AZ Member #
    23015
    Location
    San Jose CA

    This is a bit out of nowhere but since I never posted pics of my ER to Forge TIP swap, figured this would be a good addition.

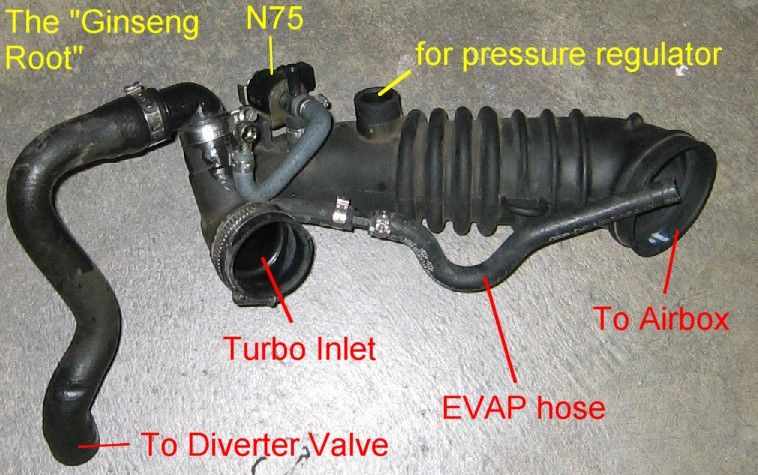
    The N75 (06A906283E) Just came up in another thread and quite often at that. The N75 is the device attached directly to the TIP (unsure if this varies in the 02, but pretty sure it's the same).

    Tyler explains it well here:

    Quote Originally Posted by nein-reis View Post
    The N75 in simple terms is a boost controller.
    Basically it has three ports and an electrical connection that allows the ECU to regulate the wastegate.
    1 port is the inlet the other two are outlets one leading to the wastegate and one leading back to the intake.
    The ecu reads the boost pressure entering the N75 valve and opens the wastegate by sending allowing the pressure to flow through.
    The ecu will open and close the N75 many times to regulate boost.

    Attaches directly to the TIP...


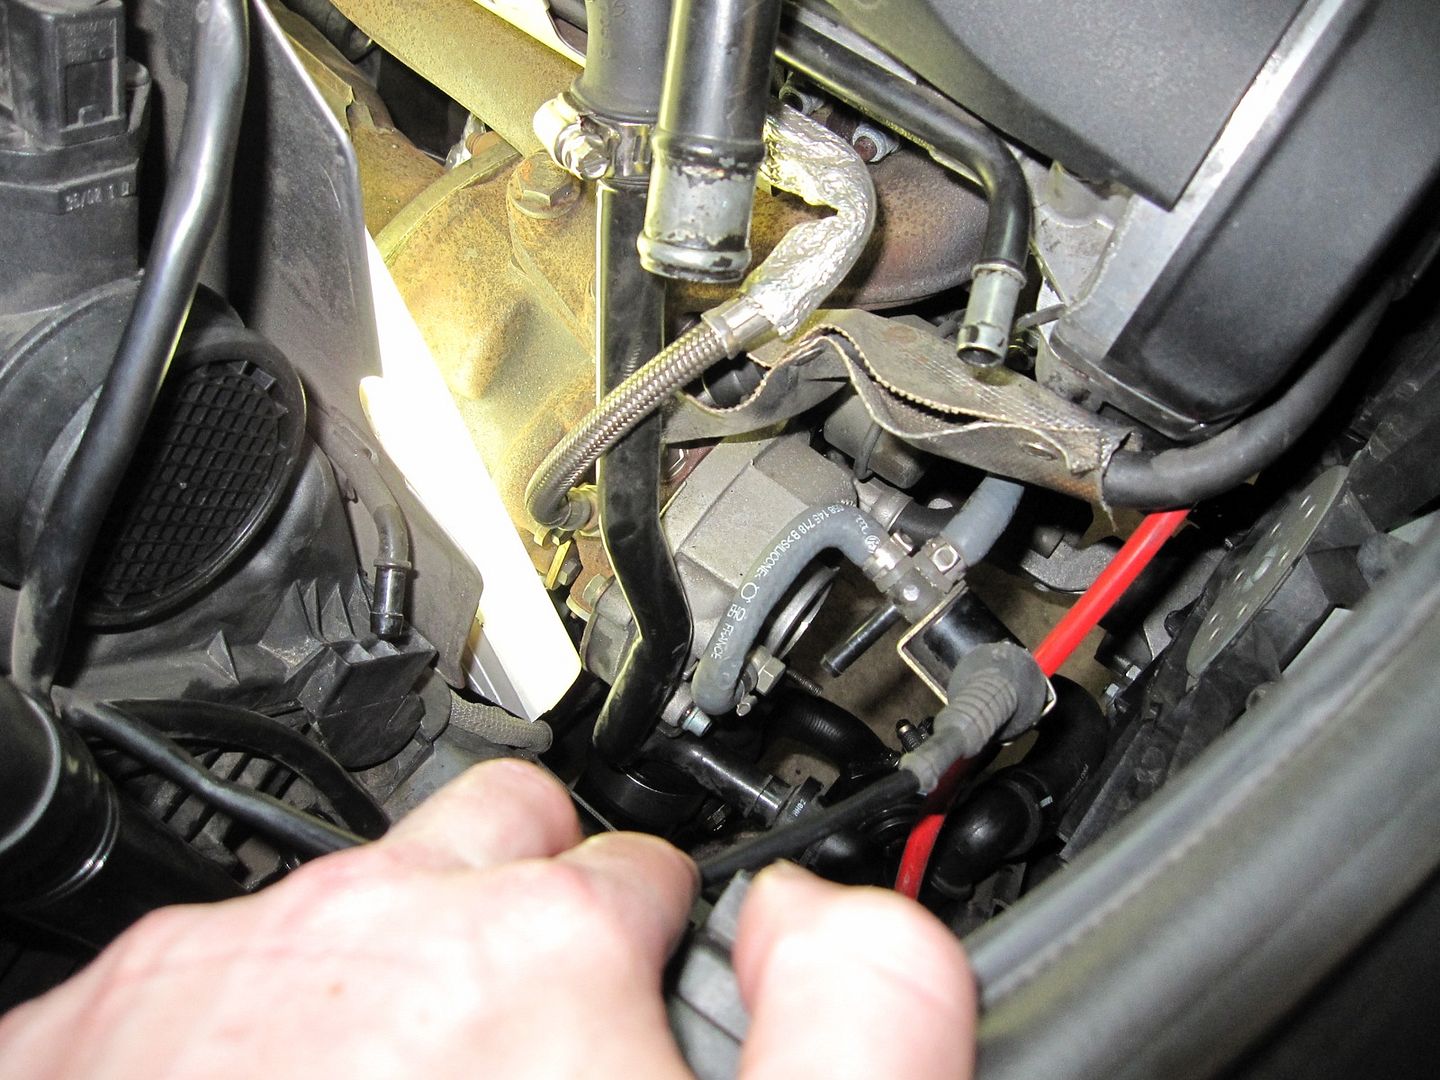
    And still in the bay, with the TIP removed...


    And attached to the OEM TIP.


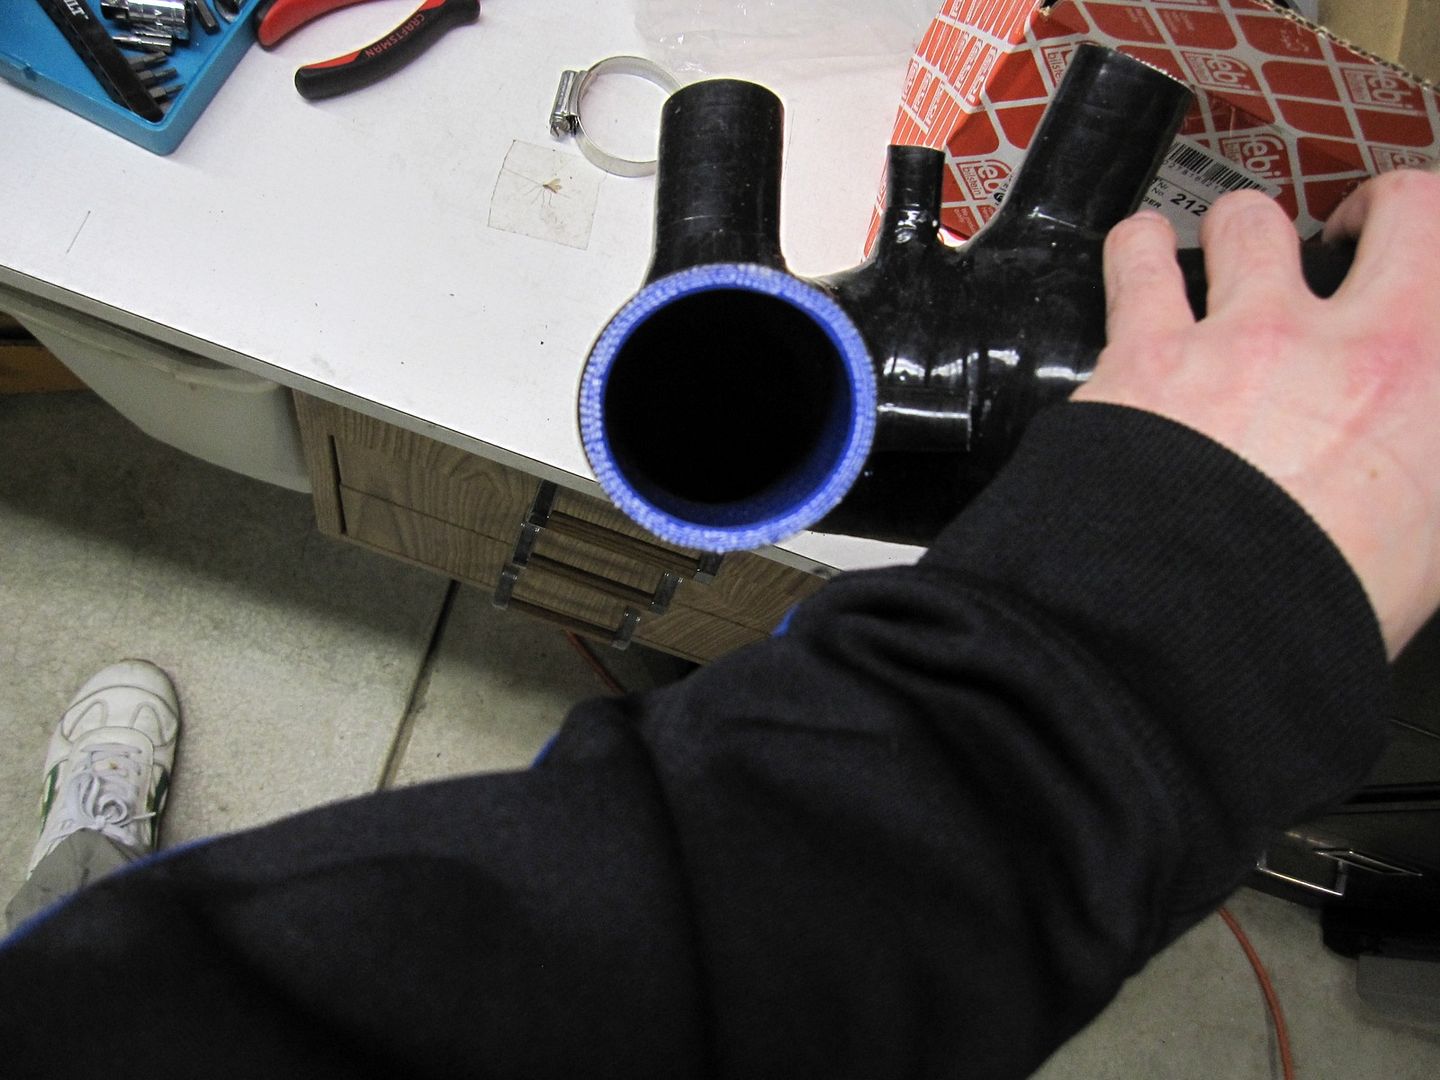
    And here's a shot of the turbo side of the Forge just for kicks. It was really easy to install.


    Last edited by a4darkness; 02-19-2022 at 07:42 PM.

  10. #330
    Veteran Member Four Rings a4darkness's Avatar
    Join Date
    Dec 01 2007
    AZ Member #
    23015
    Location
    San Jose CA

    Throttle Body Alignment / Reset

    If your car is running a bit wonky or its just been a while since you've done so, a TB reset is always a good idea. Example, I just found and hopefully completely addressed a boost leak on the pass side of the FMIC. Car seems to be running a bit better but it's peaky from time to time. Says to me the engine was used to the old amount of air / fuel so it's time to reset. I have Revo 1 which is known for being a tad on-off but this was more of a less smooth feeling. Hopefully this will set things right.

    Every time I do this, I have to dig around and eventually wind up on the Ross Tech site. So this time, I'm reposting the procedure here. Done.

    __________________________________________________ __________________

    Throttle Body Alignment / Reset (using Vag Com)

    Procedure for performing a Throttle Body Alignment on DBW Cars using KWP-2089:
    Check to see if the engine speaks KWP- 2089 by looking in the top left of the Open Controller Screen
    Some examples of KWP-2089 engine controllers are 2002+ Audi A4, 2002+ VW Passat, and Touareg
    http://www.ross-tech.com/vag-com/tour/open_screen.html


    Turn the key on but do not start the car.

    [Select]
    [01 - Engine]
    [Basic Settings - 04]
    Group 060
    [Go!]

    It should say "Basic Settings: OFF" on the top of your screen.
    Click [ON/OFF/Next] to turn on Basic Settings.
    It should now say "Basic Settings: ON" on the top of your screen.

    Once you do this you will see the top right display say ADP RUN.
    The TB adaptation is being done as soon as you switched basic settings on.
    You will see the values change and hear the TB cycle for the first few seconds then it will stop.
    Leave it in Basic Settings for about 30 seconds.

    Click [ON/OFF/Next] to turn off Basic Settings.
    It should now say "Basic Settings: OFF" on the top of your screen
    Click the [Done, Go Back] button and you're all set.

    Be sure not to touch the accelerator and make sure the engine is NOT running when you do this!

    Source:
    http://www.ross-tech.com/vag-com/cars/throttlebody.html
    __________________________________________________ __________________


    Last edited by a4darkness; 03-10-2018 at 01:46 AM.

  11. #331
    Veteran Member Four Rings vhstejskal's Avatar
    Join Date
    Feb 01 2011
    AZ Member #
    70333
    Location
    UT

    Lightbulb

    Tom, again I have to iterate this thread is so damn detailed for helping maintain what came from the factory...

    What I'm wondering is would someone from the sponsored sellers like ECS or others pickup on the fact that they could package the parts needed to do each of the sections you've broken down and sell them... I know not a novel idea but an eg is ECS sells a very basic vacuum line kit but it's not what's needed to complete what have been highlighted here. Maybe I've missed something I mean think about it one stop shop for a whole kit or just one of the three parts you've broken out here... Maybe I'm not being realistic so I'll end my soap box/2 cents...

  12. #332
    Veteran Member Four Rings a4darkness's Avatar
    Join Date
    Dec 01 2007
    AZ Member #
    23015
    Location
    San Jose CA

    Ya know Vic, I've wondered the same thing myself more than a few times. Go figure. And that was a large part of the reason for me starting this project. That and I had no idea what I was looking at.

    But outside of the ECS Vac Line kit (which they finally dropped the price on to a reasonable level) there's not much out there in terms of complete kits. I wouldn't say you're missing much of anything, it's just more a case of consumer demand. Replacing maintenance related items like check valves and vac lines isn't sexy. People are more interested in the go-fast parts, as they should be. They only want to replace these items when they need to, which usually equates to one at a time. So I tried to find some middle ground and broke the engine bay into sections. Thought that made sense.

    Bottom line, demystifying the process (take picture, label parts = hey, I can order these myself!) removes the need for a complete vendor package and also enables us to save some coin in the process.

  13. #333
    Veteran Member Four Rings vhstejskal's Avatar
    Join Date
    Feb 01 2011
    AZ Member #
    70333
    Location
    UT

    Yeah, good point on both accounts... Agreed that vacuum line fixes/maintenance isn't sexy; however it gets back to the basic maintenance. I know pipe dream on my part but to your other point sourcing this stuff ends up being cheaper which is always a huge plus... Which makes this a win, win, win...

  14. #334
    Veteran Member Four Rings boy412's Avatar
    Join Date
    Jul 15 2007
    AZ Member #
    19553
    My Garage
    2015 Golf Sportwagen TDI, 1988 Alpineweiß 325iC
    Location
    Mount Rainier, MD

    It would be worth an e-mail to the folks at GAP (Miramar Audi) to see if they would be interested in bundling some "packages". Easier for us to order and easier for them to pull stock! They could do a few different packages depending on what area of the engine bay you were tackling.

    Thanks for posting the pics of the TIP area. That's next on my list (ER TIP standing by waiting to be installed). As soon as I figure out this oil pressure problem!
    ~Eric
    SOLD: '03 Ming Blue A4 Avant 1.8TQM | GTRS | MTM cat/exhaust | Maestro | Spec Stage III+ | Vogtlant GT's | JHM trio | STE PPD | OEM+
  15. #335
    Veteran Member Four Rings a4darkness's Avatar
    Join Date
    Dec 01 2007
    AZ Member #
    23015
    Location
    San Jose CA

    jibberjive put together this stellar write-up using heater hose to replace the Crankcase Breather Hose (#9) using some off the shelf heater hose.


    Details about said hose can be found here in post #211.

    Check out his write up, great pics and uber clean engine bay. Hella jealous.

    DIY: B6 A4 1.8t ** Upper Vacuum/Breather Hose Replacement (Brittle/Crumbly)

  16. #336
    Veteran Member Four Rings a4darkness's Avatar
    Join Date
    Dec 01 2007
    AZ Member #
    23015
    Location
    San Jose CA

    For the past week or so, I've kinda felt like my car has lost a bit of pep. She's pretty consistent and I feel like now a-days if something is off I can tell right away. Likely, this means I've got a boost leak and need to track it down. Normally, this would be easy to verify if I had done the smart thing and already purchased a beautiful Podi boost gauge. But I'm a stubborn idiot and like to punish myself through procrastination.

    So then, time for a Boost Leak Test.

    First, credit to Martini for arguably the 1st/best writeup. This covers how to make your own leak tester and basics of the test itself.
    http://www.a4mods.com/index.php?page...tml&category=5

    Boost Leak Tester DIY
    http://www.audizine.com/forum/showth...st-Leak-Tester
    http://forums.vwvortex.com/showthrea...st-Leak-Tester

    If you're not interested in making your own, just drop the ~$30 and buy one.
    TurboBoostLeakTesters.com

    Obviously you're gonna need air, preferably in the form of a compressor or pressurized canister of sorts. Fortunately for me, my buddy Dustin/dcampana was able to help me out. Be thankful for your local Audi homies.

    In case you're scratching your head about WTF a Boost Leak Test is, basically it serves to push a certain PSI of air through *certain* parts of your engine (w/out it running) in order to find a boost leak.

    If your boost leak is really bad, then you can sometimes find it by adding pressure to or moving random hoses in your engine and hearing the idle slightly change. Example, I had a wicked bad leak coming from my FMIC hose and just applying some pressure changed the pitch of the idle.

    But this procedure is for the smaller, stubborn, more common leaks. Even a small leak can cause the loss of a few precious pounds of boost... and with a slow ass car like mine, every bit must be retained. Side note, I really want a larger turbo. Please send me one.
    This method of leak-hunting can be enhanced by adding some smoke into the TIP to make it easier to find said leaks. If you use a fog machine, be sure to have back up dancers available.

    If you have an 02 and your Pancake Valve is attached to the TIP, just follow the A4Mods writeup. It's pretty straight forward.

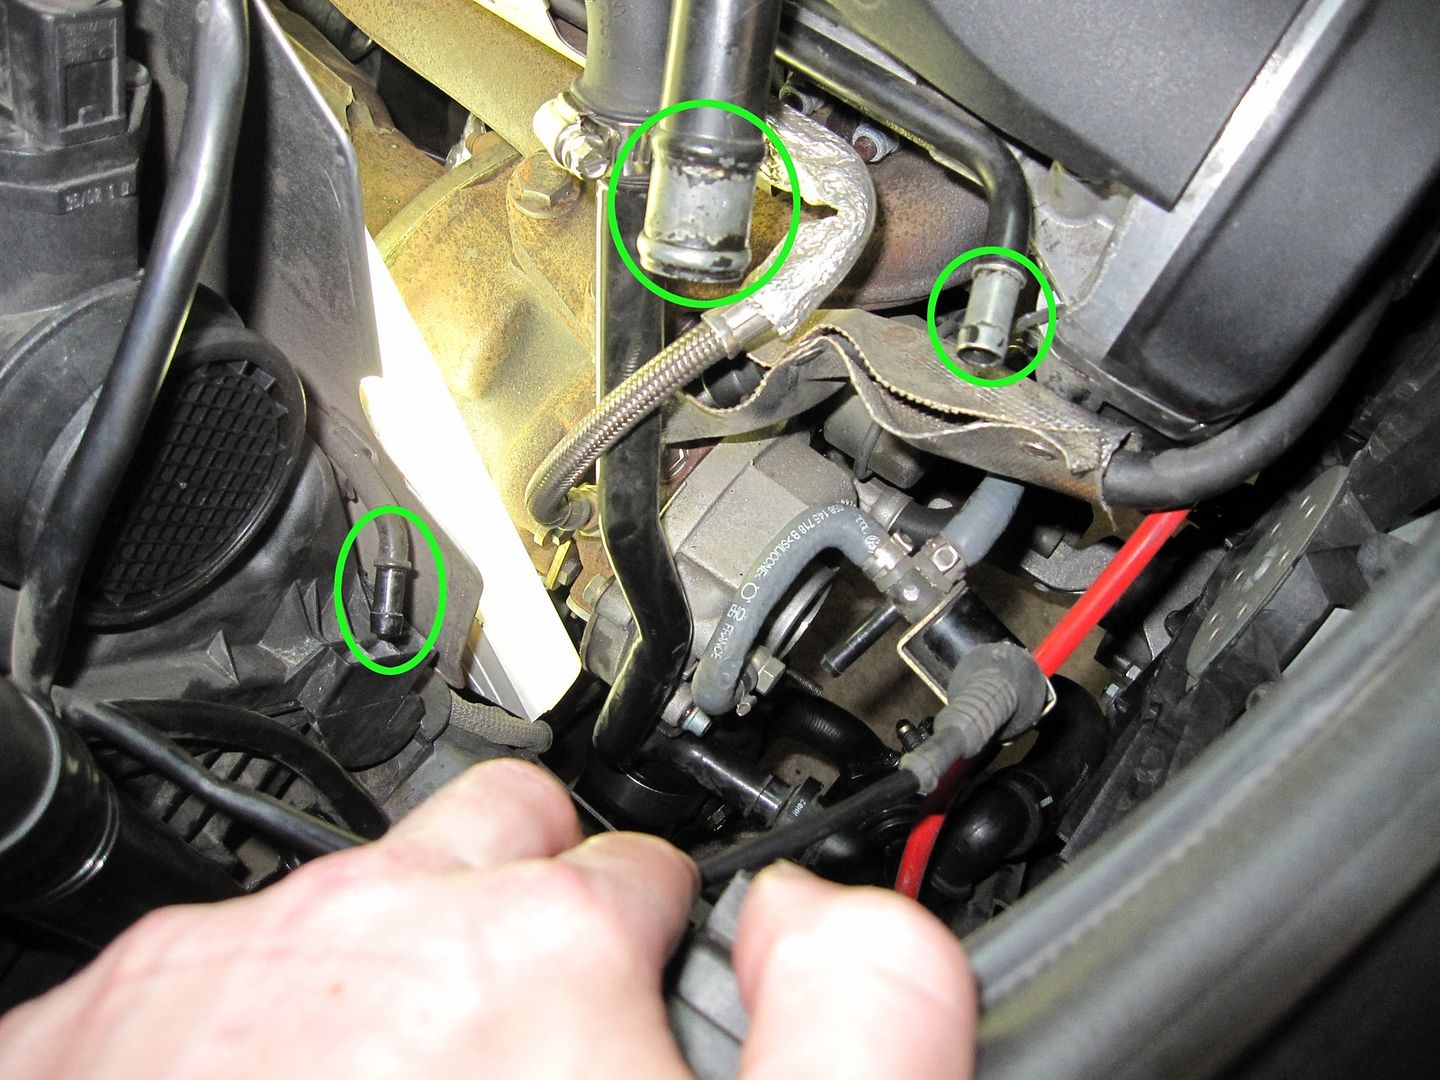
    If you have an 03-> your Pancake vale is behind the block and the procedure is a bit different but not any more difficult. There's just more hoses to cap off, specifically three attached to the TIP. These hoses lead to / attach to the corresponding hard lines:

    Check my invisible TIP. Hasn't even hit the market yet. I can feel your jealousy.


    The one on the lower left side leads back up towards the check valve above the airbox (#50). This check valve feeds air into that hard pipe so when running the leak test, this check valve will act as a cap of sorts and not allow air to go through it (towards the pass side fender of the car). But, it couldn't hurt to just remove this hose and cap it as well. Always a chance you'll blow out the check valve or just compromise it enough to make things run funny, especially if it's old and weak. Just a precaution.

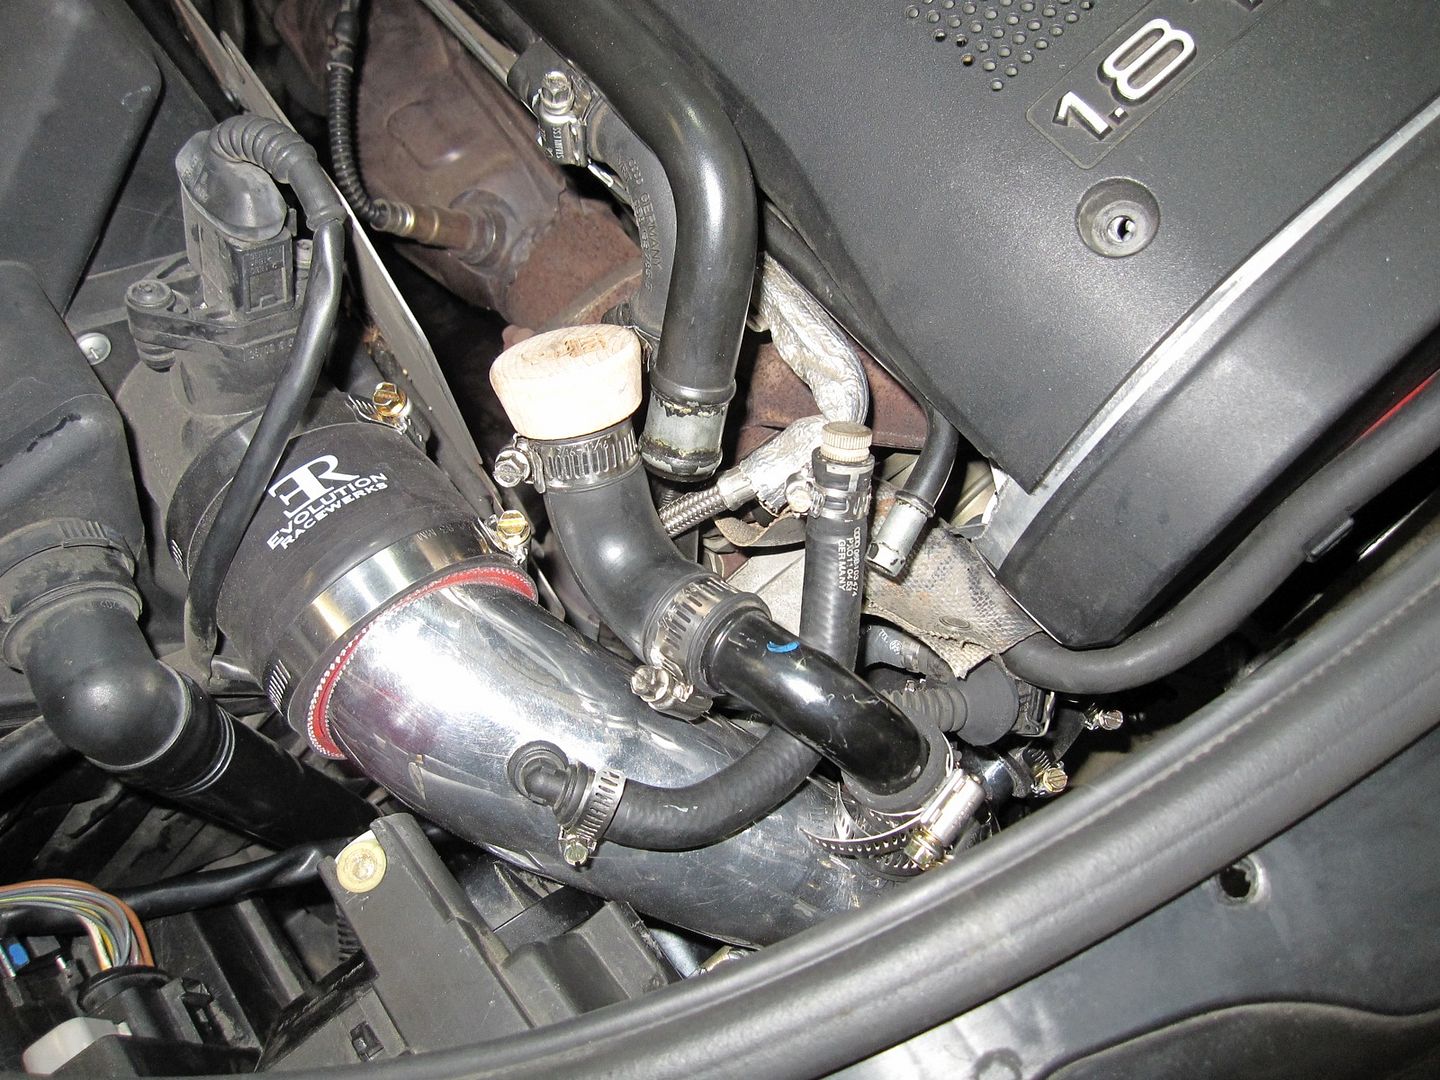
    Here's what it looked like when I capped off my ER TIP (3rd hose is removed + capped underneath)


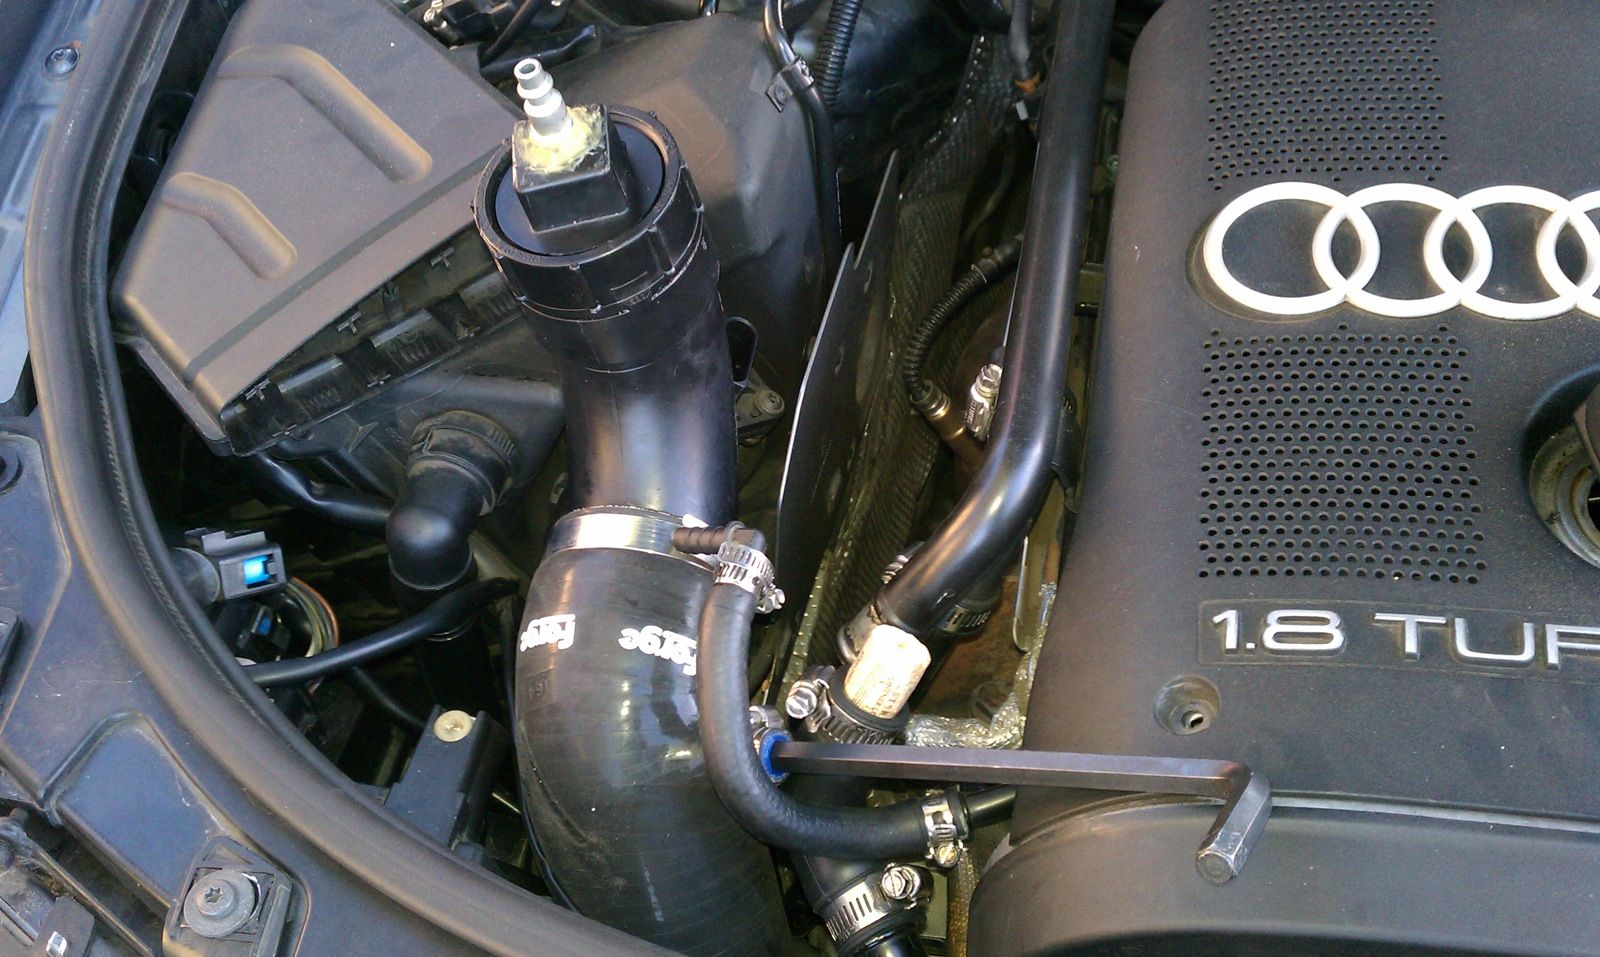
    And here's my Forge from today. Don't let the smaller hose appear misleading, I pulled it from the TIP and plugged it with the allen wrench rather than pulling the hose from the hard line and capping it at the end (above).


    YES you need to do this. No you can't skip this part. If you don't cap these hoses appropriately and run the test you'll force air into the back of the block and likely pressurize your crankcase. This is bad.

    Obviously, your leak tester needs to be inserted into the TIP and firmly tightened down. Then, just start with a nominal amount of air and listen + feel around for leaks. We used 10psi and never needed more than that, but it could certainly take more. Unsure what the threshold of the system is, but I'd think 25ish is a good ceiling. Obviously less is safer.

    First we pressurized and listened and didn't hear anything hissing at all. Tried it again and still nothing. So we left the air on at about 10psi and started putting hands on the hoses and connection point. Soon enough, we found a slight draft emanating from the driver's side FMIC hose. It was kinda weird... not like a pinhole leak but more like a draft in the general region.

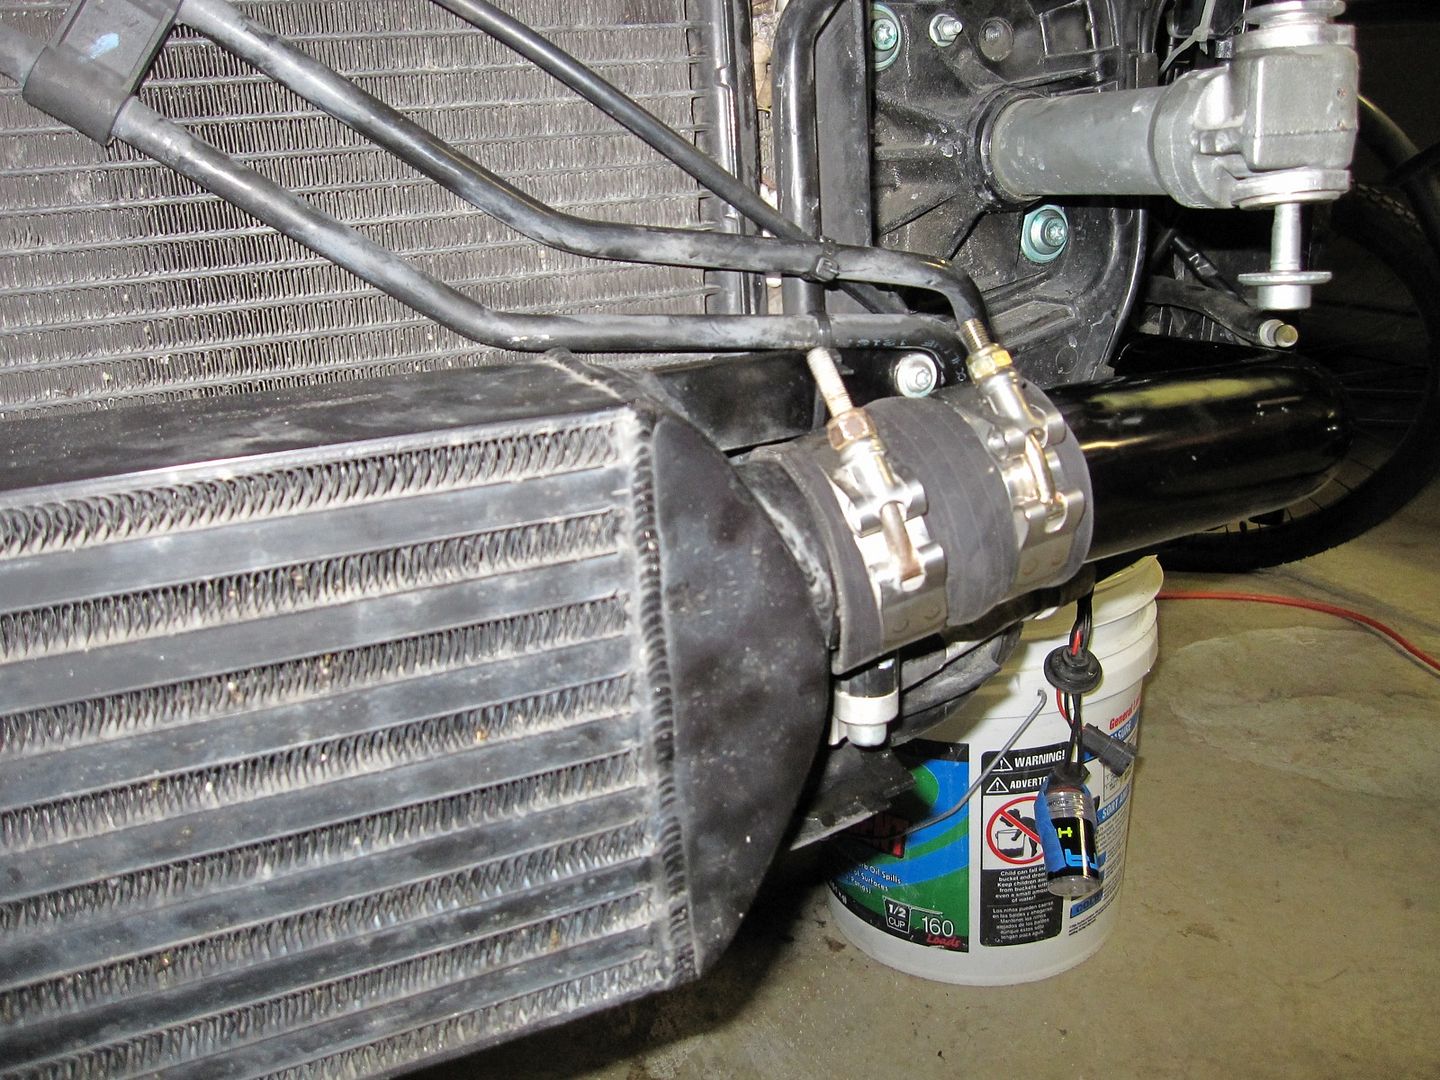
    Here's a pic when I was test fitting the FMIC piping. Now the clamps are moved further out and tightened much more. And there's a bumper in the way of taking a decent pic.


    I'm pretty sure there's a tear in the hose b/c it appears to be on there pretty well and the clamps are quite tight. So, Dustin was cool enough to spot me a piece of hose from his parts stack so I can take a stab at shoring up this leak.

    So, good news is that I not only was able to hunt down the leak but also confirm that I don't have any other leaks. Good times. Also thought it was pretty cool that I was able to tell that something was a tad off just by the driving characteristics. While my butt dyno might now truly be a precision instrument, this just goes to show how totally invaluable a boost gauge is. After replacing my front axle and rear brakes, that's next on the list. No more passing it by.


    Last edited by a4darkness; 02-12-2012 at 08:06 PM. Reason: assclown narwalls

  17. #337
    Veteran Member Four Rings boy412's Avatar
    Join Date
    Jul 15 2007
    AZ Member #
    19553
    My Garage
    2015 Golf Sportwagen TDI, 1988 Alpineweiß 325iC
    Location
    Mount Rainier, MD

    Quote Originally Posted by boy412 View Post
    So I know this ATP fitting didn't really work out. However...I was at my local shop recently and saw THIS product from OmegaTek:

    I ended up contacting them about this part and they were very informative. I told them where I wanted to use this part (sent them one of the awesome photos in this thread) and they sent me a photo of their fitting next to a check valve. Checkit:


    Looks like a winner to me. The next time I have $30 burning a hole in my pocket I think I'll pick one up! They make some pretty nice wheel spacers too...
    ~Eric
    SOLD: '03 Ming Blue A4 Avant 1.8TQM | GTRS | MTM cat/exhaust | Maestro | Spec Stage III+ | Vogtlant GT's | JHM trio | STE PPD | OEM+

  18. #338
    Veteran Member Four Rings a4darkness's Avatar
    Join Date
    Dec 01 2007
    AZ Member #
    23015
    Location
    San Jose CA

    You should definitely add some wheel spacers to that T valve. Could net up to 20whp, octane dependent of course.

    Excellent find Eric. Once you've got that installed, post up a pic and then we can add it to the master list in post 1. OmegaTek makes some really nice stuff. Something about nicely machined parts makes me all excited.

    Coolant System T-Fitting (Black) -> $25
    http://omegatekperformance.com/?page...product_id=121

    Last edited by a4darkness; 06-09-2011 at 10:47 AM. Reason: purrrdy picturz

  19. #339
    Veteran Member Three Rings Casius's Avatar
    Join Date
    Aug 14 2007
    AZ Member #
    20315
    Location
    Ottawa, ON, CA

    Just installed S4 mounts and a Stern tranny mount, vibrates like a $2 hooker at anything above idle. Ironically, at idle you can't tell the thing is on even.
    I think I have to loosen them up again and do some more adjustments cause yours doesnt vibrate right? I did it quick and dirty yesterday so that's prob why. One thing is I can't use my AC right now and I know that's one of the things that's mentioned to settle them properly :(
    2010 VW GTI

    Previous cars:
    2003 A4 1.8T APR Stage 1+

  20. #340
    Veteran Member Four Rings a4darkness's Avatar
    Join Date
    Dec 01 2007
    AZ Member #
    23015
    Location
    San Jose CA

    Quote Originally Posted by Casius View Post
    Just installed S4 mounts and a Stern tranny mount, vibrates like a $2 hooker at anything above idle. Ironically, at idle you can't tell the thing is on even.
    I think I have to loosen them up again and do some more adjustments cause yours doesnt vibrate right? I did it quick and dirty yesterday so that's prob why. One thing is I can't use my AC right now and I know that's one of the things that's mentioned to settle them properly :(
    Yeah, that's gotta be an adjustment issue. Mine don't vibrate at all. In fact, once the engine warmed up and the idle dropped it was the quietest of all the A4's I've ever had. It was so quiet I thought it was going to die or something. Then I laughed at myself for being an idiot and never changing my MMs.

    I've never done the trans mount so I can't comment on the procedure there, but I am certain that running the AC with everything loose gets the engine in a better spot for tightening. Perhaps giving the engine a little gas and bringing the RPMs up a little bit will help. Obviously not too much, just a few hundred K or so.

    Now that I think about it, maybe try adjusting the MMs and trans mount independently of one another. See if that helps figure out which one is the offending party. Could just be both, but that way it might make it easier to solve. Good luck Casius.

  21. #341
    Veteran Member Three Rings Casius's Avatar
    Join Date
    Aug 14 2007
    AZ Member #
    20315
    Location
    Ottawa, ON, CA

    Quote Originally Posted by a4darkness View Post
    Yeah, that's gotta be an adjustment issue. Mine don't vibrate at all. In fact, once the engine warmed up and the idle dropped it was the quietest of all the A4's I've ever had. It was so quiet I thought it was going to die or something. Then I laughed at myself for being an idiot and never changing my MMs.

    I've never done the trans mount so I can't comment on the procedure there, but I am certain that running the AC with everything loose gets the engine in a better spot for tightening. Perhaps giving the engine a little gas and bringing the RPMs up a little bit will help. Obviously not too much, just a few hundred K or so.

    Now that I think about it, maybe try adjusting the MMs and trans mount independently of one another. See if that helps figure out which one is the offending party. Could just be both, but that way it might make it easier to solve. Good luck Casius.
    It was getting late and I was 8 hours into ripping everything apart so I just threw everything together. I had the car up on ramp the entire time so I think the whole thing basically leaned back, but I did drive it off the ramp to adjust. Unfortunately my A/C is broken right now :( so I'll have to rely on RPMing it into place. Maybe I'll take a short drive up and down the street. I don't know about you but I saw that at the top of the mount there's really no place to move or really adjust, it just goes in and bolts down, no real room for it to move. All the adjustment would be at the bottom.
    Something else I noticed, my APR snub mount has squished and is no longer a tight fit in the bracket, there's some wiggle room which did not make me happy.

    At idle it's super smooth just as soon as I get off idle it starts to shake like crazy, it's really annoying. However, having said that from what I can feel, they've made a huge difference, it's unreal, everything feels so much more solid :) Tranny mount is a real piss off, won't tighten all the way so I have to figure something out for that too. Anyway, I'll report back for anyone else looking at this.
    2010 VW GTI

    Previous cars:
    2003 A4 1.8T APR Stage 1+

  22. #342
    Veteran Member Four Rings a4darkness's Avatar
    Join Date
    Dec 01 2007
    AZ Member #
    23015
    Location
    San Jose CA

    I don't know if actual driving with the mounts loose is acceptable or not. My gut says no.

    And perhaps I should not have used the word adjusting but rather settling. The mounts all fit into place, but you need to rev the car a bit to allow the mounts + engine to settle properly before fully tightening everything. So then

    * only hand tighten all your mounts (trans, motor, snub)
    * turn on engine and rev a few times
    * shut off engine
    * tighten all mounts

    If this doesn't work, I would try loosening one mount to hand tightened, start + rev engine, shut off and then tighten and restart engine to see if it fixes the issue. (Just be sure to do the MM as a pair.)

  23. #343
    Veteran Member Three Rings Casius's Avatar
    Join Date
    Aug 14 2007
    AZ Member #
    20315
    Location
    Ottawa, ON, CA

    Quote Originally Posted by a4darkness View Post
    I don't know if actual driving with the mounts loose is acceptable or not. My gut says no.

    And perhaps I should not have used the word adjusting but rather settling. The mounts all fit into place, but you need to rev the car a bit to allow the mounts + engine to settle properly before fully tightening everything. So then

    * only hand tighten all your mounts (trans, motor, snub)
    * turn on engine and rev a few times
    * shut off engine
    * tighten all mounts

    If this doesn't work, I would try loosening one mount to hand tightened, start + rev engine, shut off and then tighten and restart engine to see if it fixes the issue. (Just be sure to do the MM as a pair.)
    I think I'll put my ramps on the down slope of the driveway and drive up. Driveway is pretty steep, then I'll see how close to level the thing is, should be quite close, then I'll loosen everything and go to town. I really hope I can settle it out to be normal, it feels really nice now. I think I'll drive a wedge into my snub mount bracket to make it fit proper. I remember when I got it I could barely get it in, now the stupid thing has like 3 or 4mm of play.
    2010 VW GTI

    Previous cars:
    2003 A4 1.8T APR Stage 1+

  24. #344
    Veteran Member Four Rings boy412's Avatar
    Join Date
    Jul 15 2007
    AZ Member #
    19553
    My Garage
    2015 Golf Sportwagen TDI, 1988 Alpineweiß 325iC
    Location
    Mount Rainier, MD

    Thomas, did you swap out an ER TIP for a Forge one?

    'splain...si vous plais!
    ~Eric
    SOLD: '03 Ming Blue A4 Avant 1.8TQM | GTRS | MTM cat/exhaust | Maestro | Spec Stage III+ | Vogtlant GT's | JHM trio | STE PPD | OEM+
  25. #345
    Veteran Member Four Rings a4darkness's Avatar
    Join Date
    Dec 01 2007
    AZ Member #
    23015
    Location
    San Jose CA

    Yup, sure did.

    Lets be VERY clear here. ER makes a very high quality product. I had no beef with it in that regard. Rather it was the fact that it's pretty damn difficult to maneuver a solid TIP + corresponding silicone couplers into the proper place for attachment. If you were gonna set it and forget it, okay... no prob. But after I added a FMIC, I realized that sooner or later you were gonna need to chase down a boost leak (as clearly shown above). And while this is somewhat possible to do with the ER Tip, it is 1000x easier with a flexible tip.

    Nutshell, fitment is finite with the ER Tip and I quickly realized that spending excessive amounts of time wrassling with it was not productive. It'll take more time to get it reattached post boost leak test than the actual boost leak test. That's kinda silly. So, I ordered up a Forge and swapped em. Done.

  26. #346
    Veteran Member Three Rings Casius's Avatar
    Join Date
    Aug 14 2007
    AZ Member #
    20315
    Location
    Ottawa, ON, CA

    So the mounts are settling like crazy, the difference from day one is crazy. I still have to pull it all apart and go to town on aligning everything properly, the reverb at around 2000rpm is pretty bad, but the mounts make all the difference. I was looking at suspension and things of that nature to figure out why my car felt kind of sloppy, the engine mounts have made the whole car feel properly tight again. Once/if I get the reverb down I'll update again hopefully these will bne the single largest difference maker I've installed on this thing
    2010 VW GTI

    Previous cars:
    2003 A4 1.8T APR Stage 1+

  27. #347
    Veteran Member Four Rings boy412's Avatar
    Join Date
    Jul 15 2007
    AZ Member #
    19553
    My Garage
    2015 Golf Sportwagen TDI, 1988 Alpineweiß 325iC
    Location
    Mount Rainier, MD

    Quote Originally Posted by a4darkness View Post
    Yup, sure did.

    Lets be VERY clear here. ER makes a very high quality product. I had no beef with it in that regard. Rather it was the fact that it's pretty damn difficult to maneuver a solid TIP + corresponding silicone couplers into the proper place for attachment. If you were gonna set it and forget it, okay... no prob. But after I added a FMIC, I realized that sooner or later you were gonna need to chase down a boost leak (as clearly shown above). And while this is somewhat possible to do with the ER Tip, it is 1000x easier with a flexible tip.

    Nutshell, fitment is finite with the ER Tip and I quickly realized that spending excessive amounts of time wrassling with it was not productive. It'll take more time to get it reattached post boost leak test than the actual boost leak test. That's kinda silly. So, I ordered up a Forge and swapped em. Done.
    Gotcha. Haven't installed my ER TIP yet...looks to be a pain in the arse. Trying to scrounge up the motivation!
    ~Eric
    SOLD: '03 Ming Blue A4 Avant 1.8TQM | GTRS | MTM cat/exhaust | Maestro | Spec Stage III+ | Vogtlant GT's | JHM trio | STE PPD | OEM+
  28. #348
    Veteran Member Four Rings dcampana's Avatar
    Join Date
    Nov 01 2006
    AZ Member #
    13044
    My Garage
    04 Allroad, 01a41.8Q
    Location
    Nor Cal

    Silicone tip ftw!!!! Nice write ups man! Glad i can be of help. Can't wait for the day comes when your quarter sized turbo is a paperweight;-) just kidding.

    I love the attention to detail.
    my ride: 2001 A4qtm... 2871r, 440cc, 3 bar, turbo xs dv, custom 3" exhaust, test pipe, Cm fx400 billet LWFW...
    2004 AR... stage 1 DAZ tune
    Timing belts, clutches, and all done in the North Bay. Pm me.

  29. #349
    Established Member Two Rings audioclip's Avatar
    Join Date
    May 26 2008
    AZ Member #
    29192
    Location
    Toronto, Canada

    Regarding B5 S4 engine mounts.

    A quick question to Thomas, Casius and other folks who have installed B5 S4 MM's: When you stand by the driver's wheel, grab the intake manifold with both hands and try to move the engine by pushing/pulling, how much 'play' in engine do you observe?

    The reason I ask is that the nice 'tight' feel in my car after installing the S4 MM's a few weeks ago doesn't seem quite as tight' anymore - some of the 'wobbly' handling characteristics seem to have returned. The side-to-side engine play I see now (with the little test above) is about 3/4" to 1". I wonder if this amount of engine movement is normal, or if I've blown one of the mounts in two weeks?
    '10 S4 6MT | Deep Sea Blue Metallic | Premium (Canada) | Black Nappa | B&O | Nav MMI | Carbon Atlas | ADS with Active Dampening | Sport Diff | 19" Peelers, 19" S5s | Side Assist | Rear Cam | Advanced Key

    '02 A4 1.8TQT | Ming Blue | APR 1+ | Koni Yellow & '02 sport | RS4 sway, S4 upper CAs, solid TRs, APR snub, S4 engine mounts | S4 grille, clear corner, cf DiNoc interior, B5 RS4 18", 35% ceramic

  30. #350
    Veteran Member Three Rings Casius's Avatar
    Join Date
    Aug 14 2007
    AZ Member #
    20315
    Location
    Ottawa, ON, CA

    Quote Originally Posted by audioclip View Post
    Regarding B5 S4 engine mounts.

    A quick question to Thomas, Casius and other folks who have installed B5 S4 MM's: When you stand by the driver's wheel, grab the intake manifold with both hands and try to move the engine by pushing/pulling, how much 'play' in engine do you observe?

    The reason I ask is that the nice 'tight' feel in my car after installing the S4 MM's a few weeks ago doesn't seem quite as tight' anymore - some of the 'wobbly' handling characteristics seem to have returned. The side-to-side engine play I see now (with the little test above) is about 3/4" to 1". I wonder if this amount of engine movement is normal, or if I've blown one of the mounts in two weeks?
    There is definitely wobble in the engine and I can tell you from just the couple hundred kms I've put on my mounts that they loosen up a lot quite quickly. I suspect they're just designed that way and the out of the box condition it considerably stiffer then they should be and will become. I really doubt you've blown it, I just think they've settled. I've undone mine again and realigned and I still get some reverb into the rev range like 2000rpm but it's becoming less and less. Darkness says he didn't have this revrb so I wonder if we just both have differnent perspectives or if mine are still out of line. I'm also kind of pissed that my APR snub mount has shrunk as much as it has and is now like a pebble in a canyon in terms of tightness.

  31. #351
    Established Member Two Rings audioclip's Avatar
    Join Date
    May 26 2008
    AZ Member #
    29192
    Location
    Toronto, Canada

    Quote Originally Posted by Casius View Post
    There is definitely wobble in the engine and I can tell you from just the couple hundred kms I've put on my mounts that they loosen up a lot quite quickly. I suspect they're just designed that way and the out of the box condition it considerably stiffer then they should be and will become. I really doubt you've blown it, I just think they've settled. I've undone mine again and realigned and I still get some reverb into the rev range like 2000rpm but it's becoming less and less. Darkness says he didn't have this revrb so I wonder if we just both have differnent perspectives or if mine are still out of line. I'm also kind of pissed that my APR snub mount has shrunk as much as it has and is now like a pebble in a canyon in terms of tightness.
    Thanks, I was beginning to think it was my imagination. It does seem reasonable that the mounts become more pliable as they get 'worked in'. Perhaps I should invest in a set of 034 street density mounts. Now that I've experienced that level of firmness (immediately after installation) it's difficult to go back.

    In terms of vibrations, I would say that it is a bit smoother (throughout the rev range) after the new motor and tranny mounts were installed. The only increase in vibration I noticed came after installing the APR snub (speaking of which I'll need to inspect it, hoping it hasn't shrunk to a 'pebble' lol).
    '10 S4 6MT | Deep Sea Blue Metallic | Premium (Canada) | Black Nappa | B&O | Nav MMI | Carbon Atlas | ADS with Active Dampening | Sport Diff | 19" Peelers, 19" S5s | Side Assist | Rear Cam | Advanced Key

    '02 A4 1.8TQT | Ming Blue | APR 1+ | Koni Yellow & '02 sport | RS4 sway, S4 upper CAs, solid TRs, APR snub, S4 engine mounts | S4 grille, clear corner, cf DiNoc interior, B5 RS4 18", 35% ceramic

  32. #352
    Veteran Member Three Rings Casius's Avatar
    Join Date
    Aug 14 2007
    AZ Member #
    20315
    Location
    Ottawa, ON, CA

    Quote Originally Posted by audioclip View Post
    Thanks, I was beginning to think it was my imagination. It does seem reasonable that the mounts become more pliable as they get 'worked in'. Perhaps I should invest in a set of 034 street density mounts. Now that I've experienced that level of firmness (immediately after installation) it's difficult to go back.

    In terms of vibrations, I would say that it is a bit smoother (throughout the rev range) after the new motor and tranny mounts were installed. The only increase in vibration I noticed came after installing the APR snub (speaking of which I'll need to inspect it, hoping it hasn't shrunk to a 'pebble' lol).
    Hmm, I wonder what the hell I did, cause my vibrations from the motor in the 2000 to 2500 have gotten much stronger then it smooths out. At idle however is silky smooth which is ironic. I'm going to give them a couple of weeks to settle and see how it all feels, maybe loosen them up again and see about settling them. I wonder if new coils would help too, I think mine are on the way out again.
    What kind of tranny mount did you put in?
    2010 VW GTI

    Previous cars:
    2003 A4 1.8T APR Stage 1+

  33. #353
    Established Member Two Rings audioclip's Avatar
    Join Date
    May 26 2008
    AZ Member #
    29192
    Location
    Toronto, Canada

    Quote Originally Posted by Casius View Post
    Hmm, I wonder what the hell I did, cause my vibrations from the motor in the 2000 to 2500 have gotten much stronger then it smooths out. At idle however is silky smooth which is ironic. I'm going to give them a couple of weeks to settle and see how it all feels, maybe loosen them up again and see about settling them. I wonder if new coils would help too, I think mine are on the way out again.
    What kind of tranny mount did you put in?
    I used the ordinary Meyle oem replacement mount ($25 from ECS). One thing I noticed is that it makes a difference if settling the mounts while the car is level versus tilted (if possible ensure the car is level during revving/AC/re-tightening).
    '10 S4 6MT | Deep Sea Blue Metallic | Premium (Canada) | Black Nappa | B&O | Nav MMI | Carbon Atlas | ADS with Active Dampening | Sport Diff | 19" Peelers, 19" S5s | Side Assist | Rear Cam | Advanced Key

    '02 A4 1.8TQT | Ming Blue | APR 1+ | Koni Yellow & '02 sport | RS4 sway, S4 upper CAs, solid TRs, APR snub, S4 engine mounts | S4 grille, clear corner, cf DiNoc interior, B5 RS4 18", 35% ceramic

  34. #354
    Veteran Member Three Rings Casius's Avatar
    Join Date
    Aug 14 2007
    AZ Member #
    20315
    Location
    Ottawa, ON, CA

    Quote Originally Posted by audioclip View Post
    I used the ordinary Meyle oem replacement mount ($25 from ECS). One thing I noticed is that it makes a difference if settling the mounts while the car is level versus tilted (if possible ensure the car is level during revving/AC/re-tightening).
    I might pull the Stern mount out if it doesn't change, I get a hell of a lot of whine transfered to the cabin between 115 and 125km/h :( but I also have a B5 2.8 tranny so its probably different from most people. Wish I had a 6spd
    I pull it all apart yesterday while it was level, but i didn't lift the engine, just the tranny, so I might undo the bottom bolts on the mounts and lift the engine again, then resettle. I also don't have a working AC right now, I need to get it leak tested and I'm afraid that my condenser has sprung a leak, which is an expensive part and a bitch of a fix :(
    2010 VW GTI

    Previous cars:
    2003 A4 1.8T APR Stage 1+

  35. #355
    Veteran Member Four Rings a4darkness's Avatar
    Join Date
    Dec 01 2007
    AZ Member #
    23015
    Location
    San Jose CA

    Quote Originally Posted by audioclip View Post
    Regarding B5 S4 engine mounts.
    A quick question to Thomas, Casius and other folks who have installed B5 S4 MM's: When you stand by the driver's wheel, grab the intake manifold with both hands and try to move the engine by pushing/pulling, how much 'play' in engine do you observe?
    The reason I ask is that the nice 'tight' feel in my car after installing the S4 MM's a few weeks ago doesn't seem quite as tight' anymore - some of the 'wobbly' handling characteristics seem to have returned. The side-to-side engine play I see now (with the little test above) is about 3/4" to 1". I wonder if this amount of engine movement is normal, or if I've blown one of the mounts in two weeks?
    I would highly doubt that you've already blown a mount. Maybe if you were BAT and performing daily floggings. That's the only scenario I can conceive that would produce said result, but have no 1st hand experience with such.
    A little movement is normal. But only a very little. Just went out to my car, popped the hood and tried to test the engine movement by pushing down (bouncing) on the manifold. There was very little play. Like, maybe 5mm at the most.
    Obviously check the condition of the mounts (under car, push the rubber jacket-cover up and use the flashlight) to see if they're leaking. Also, check both the condition and location of the snub. If it was shot from the get go, adding new MM's will only amplify it's weakness.

    Quote Originally Posted by Casius View Post
    I might pull the Stern mount out if it doesn't change, I get a hell of a lot of whine transfered to the cabin between 115 and 125km/h :( but I also have a B5 2.8 tranny so its probably different from most people. Wish I had a 6spd
    I pull it all apart yesterday while it was level, but i didn't lift the engine, just the tranny, so I might undo the bottom bolts on the mounts and lift the engine again, then resettle. I also don't have a working AC right now, I need to get it leak tested and I'm afraid that my condenser has sprung a leak, which is an expensive part and a bitch of a fix :(
    Casius, I just had a thought. Exactly which mount did you buy? That trans takes a different mount than one for a B6, let alone a 1.8T. I'm banking this isn't a valid concern but it just popped into my noggin so figured I'd ask.

  36. #356
    Established Member Two Rings audioclip's Avatar
    Join Date
    May 26 2008
    AZ Member #
    29192
    Location
    Toronto, Canada

    Quote Originally Posted by a4darkness View Post
    I would highly doubt that you've already blown a mount. Maybe if you were BAT and performing daily floggings. That's the only scenario I can conceive that would produce said result, but have no 1st hand experience with such.
    A little movement is normal. But only a very little. Just went out to my car, popped the hood and tried to test the engine movement by pushing down (bouncing) on the manifold. There was very little play. Like, maybe 5mm at the most.
    Obviously check the condition of the mounts (under car, push the rubber jacket-cover up and use the flashlight) to see if they're leaking. Also, check both the condition and location of the snub. If it was shot from the get go, adding new MM's will only amplify it's weakness.
    Agreed, next chance I get I'm going to visually inspect those engine mounts from underneath; while I'm down there I'll check my APR snub as well. The 'play' I have is more side-to-side rather than up/down..sorry I could have described that better in my post.

    Just wondering if you've noticed the feeling of the new mounts developing more play over time (in terms of how 'tight' the car feels)?
    '10 S4 6MT | Deep Sea Blue Metallic | Premium (Canada) | Black Nappa | B&O | Nav MMI | Carbon Atlas | ADS with Active Dampening | Sport Diff | 19" Peelers, 19" S5s | Side Assist | Rear Cam | Advanced Key

    '02 A4 1.8TQT | Ming Blue | APR 1+ | Koni Yellow & '02 sport | RS4 sway, S4 upper CAs, solid TRs, APR snub, S4 engine mounts | S4 grille, clear corner, cf DiNoc interior, B5 RS4 18", 35% ceramic

  37. #357
    Veteran Member Four Rings a4darkness's Avatar
    Join Date
    Dec 01 2007
    AZ Member #
    23015
    Location
    San Jose CA

    Perhaps my method for testing sounded too specific, wasn't intended to sound like that. That was pretty much the only way I could get some movement out of the engine. It's pretty firm all around... side to side, up down etc. And I would be far more inclined to check your snub now that I know it's an APR. In the past they've been known to be far less durable than a Stern, Neuspeed or Apikol. Brand aside, since your engine now has two new mounts the older of the three is the weak point. I hope that's what it is for it's easy fix. Again, could just need an alignment + tightening.

    To answer your question, there is little if any play in the new mounts. Still tight and has felt the same since day one.
    If you felt a drastic change, I would venture that something is up. But this is all theory until something is discovered. Hopefully that doesn't require extensive searching on your part.

  38. #358
    Established Member Two Rings audioclip's Avatar
    Join Date
    May 26 2008
    AZ Member #
    29192
    Location
    Toronto, Canada

    Quote Originally Posted by a4darkness View Post
    Perhaps my method for testing sounded too specific, wasn't intended to sound like that. That was pretty much the only way I could get some movement out of the engine. It's pretty firm all around... side to side, up down etc. And I would be far more inclined to check your snub now that I know it's an APR. In the past they've been known to be far less durable than a Stern, Neuspeed or Apikol. Brand aside, since your engine now has two new mounts the older of the three is the weak point. I hope that's what it is for it's easy fix. Again, could just need an alignment + tightening.

    To answer your question, there is little if any play in the new mounts. Still tight and has felt the same since day one.
    If you felt a drastic change, I would venture that something is up. But this is all theory until something is discovered. Hopefully that doesn't require extensive searching on your part.
    Thanks Thomas. So it sounds like my snub mount might be the culprit, which would also be consistent with Casius' observation. It's amazing that the APR snub is only one month old (though perhaps the APR snub may have been worn down from the movement due to the unchanged worn motor/tranny mounts at the time). Maybe the lesson is to change all the mounts together? Either way I'll be getting under there to check things out first hand.
    '10 S4 6MT | Deep Sea Blue Metallic | Premium (Canada) | Black Nappa | B&O | Nav MMI | Carbon Atlas | ADS with Active Dampening | Sport Diff | 19" Peelers, 19" S5s | Side Assist | Rear Cam | Advanced Key

    '02 A4 1.8TQT | Ming Blue | APR 1+ | Koni Yellow & '02 sport | RS4 sway, S4 upper CAs, solid TRs, APR snub, S4 engine mounts | S4 grille, clear corner, cf DiNoc interior, B5 RS4 18", 35% ceramic

  39. #359
    Veteran Member Four Rings a4darkness's Avatar
    Join Date
    Dec 01 2007
    AZ Member #
    23015
    Location
    San Jose CA

    While it's not required or anything, it's probably a good idea to swap em all at the same time (unless of course you've already replaced the snub) since you have to remove the snub to do the MMs anyway. While the APR snub isn't known for it's longevity, one month is far too early for it to fail. Again, could just be loose or out of place. Bottom line, no assumptions till you check it out. ;-) Then let us know what's up.

    Unrelated to our MM convo but relevant to this thread, was going to swap my front O2 Sensor just now. But realized the special tool is completely necessary to do so. Might bounce over to Harbor Freight real quick.

  40. #360
    Established Member Two Rings audioclip's Avatar
    Join Date
    May 26 2008
    AZ Member #
    29192
    Location
    Toronto, Canada

    Quote Originally Posted by a4darkness View Post
    While it's not required or anything, it's probably a good idea to swap em all at the same time (unless of course you've already replaced the snub) since you have to remove the snub to do the MMs anyway. While the APR snub isn't known for it's longevity, one month is far too early for it to fail. Again, could just be loose or out of place. Bottom line, no assumptions till you check it out. ;-) Then let us know what's up.

    Unrelated to our MM convo but relevant to this thread, was going to swap my front O2 Sensor just now. But realized the special tool is completely necessary to do so. Might bounce over to Harbor Freight real quick.
    Hopefully will do it this weekend, will let you guys know how it goes. Coincidentally I just did my front O2 as well - only needed an ordinary adjustable wrench. Took a bit of fiddling but it works: Loosen the airbox to shift it out of the way (or take it right out), spray a little penetrant on the O2 sensor nut, wait a few minutes, put on some oven mitts (to cover the wrists too) and flip the wrench to the right orientation that will give the most degrees of rotation with the handle facing the turbo, and you'll have plenty of leverage to loosen it. Mine was mummified with white crust when it came out. Original with my '02.
    '10 S4 6MT | Deep Sea Blue Metallic | Premium (Canada) | Black Nappa | B&O | Nav MMI | Carbon Atlas | ADS with Active Dampening | Sport Diff | 19" Peelers, 19" S5s | Side Assist | Rear Cam | Advanced Key

    '02 A4 1.8TQT | Ming Blue | APR 1+ | Koni Yellow & '02 sport | RS4 sway, S4 upper CAs, solid TRs, APR snub, S4 engine mounts | S4 grille, clear corner, cf DiNoc interior, B5 RS4 18", 35% ceramic

Page 9 of 19 FirstFirst ... 7891011 ... LastLast


Tags for this Thread

Bookmarks

Posting Permissions

  • You may not post new threads
  • You may not post replies
  • You may not post attachments
  • You may not edit your posts
  •  


    © 2001-2025 Audizine, Audizine.com, and Driverzines.com
    Audizine is an independently owned and operated automotive enthusiast community and news website.
    Audi and the Audi logo(s) are copyright/trademark Audi AG. Audizine is not endorsed by or affiliated with Audi AG.