Audizine - An Automotive Enthusiast Community

Results 1 to 27 of 27
  1. #1
    Established Member Two Rings Spacecadet_CC's Avatar
    Join Date
    Oct 21 2004
    AZ Member #
    3876
    My Garage
    2001 Audi TT - 225 Quattro Coupe, Manual
    Location
    Winnipeg, Canada

    DIY Weekend - Springs, Sway Bar, Spacers

    Guest-only advertisement. Register or Log In now!
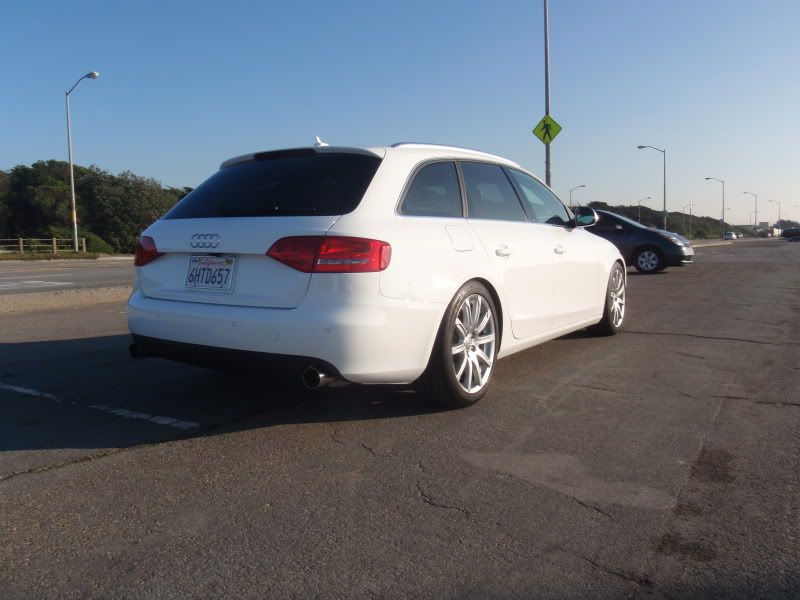
    This past weekend my brother and I got under the car and made a few mods to my B8.

    This was the first time that either of us have attempted springs, although we have both done B6 Sway bar and brakes. In the end, I would definitely recommend doing this yourself if you have any kind of handiness or are interested in knowing more about how your car works. It took us some time, but it was pretty much all in the easy-intermediate range of skill.

    Special shout outs go to the following: ItsDubC and tXfactor and harry here on AZ, and also to rs4-380 on VWVortex.

    ItsDubC and tXfactor did this mod some months ago and posted links to rs4-380’s DIY guide and without that, we would never have been able to do this. On top of that, the original DIY was for an A5, so they made a number of comments on a few differences with the A4 which really saved some time. Big respect and Rep to you guys.

    harry sold me his 15/20 spacers and they arrived in what I would call mint condition. Thanks very much and rep for you as well!

    Below are links to the different DIY guides with comments I have made about them. I combined all of this together, under the subject line because when I was looking for DIY guides, I had a hell of a time finding this information until I had searched and sifted through a number of posts. I am hoping to make it easier for the next guy who wants help with this great mod.

    I call this the ‘poor man’s suspension mods’ as what you probably REALLY want to do is get coilovers and wheels instead of springs and spacers. And do both front and back sways/ARB instead of just the back. But I have a limited car budget (darn kids!) so you do what ya gotta do. This is definitely better than doing nothing. All items purchased, including a few tools I didn’t own, was about $800. Pretty reasonable as the coilover wheel alternative would be a minimum of $3000, but likely more.


    Part 1 - Springs
    H&R Sport Springs


    ItsDubC posted the link to the original A5 Spring DIY on VWVortex, courtesy of rs4-380. Here it is.
    This DIY is perfect for a guy like me because I didn’t know all of the parts under the car (I do now), so having lots of pics with things circled in bright red made it a snap.

    They also posted comments about what is adjusted for the A4:
    Quote Originally Posted by tXfactor View Post
    i helped ItsDubC with the install and it's definitely a 2-person job. i think i could've done it by myself, but the 2nd person is especially handy to help hold the strut in place when trying to bolt up the hat, or to position the jacks and raise/lower the control arm to help align the upper control arm bolts or sway bar end link, etc.

    so, it's little things that make the 2nd person almost a requirement, though i'm not going to say that it can't be done alone.

    i'm sure chris will post the link to the write-up we used, and it's a good one except you we didn't need to disconnect the rear shocks.

    specialty tools aren't required, except maybe torx bits, but i reckon you already have a basic set, considering Audi like to use it on anything and everything.

    you'll need a 10, 13, 16, 18, and 19mm socket and open end wrench. some extensions and a swivel would be nice in a few places (i used a 3in and 6in extension). and it would actually help to have (2) 16mm and 18mm open end wrenches.

    a 1/2in drive ratchet and 18mm socket would also come in real handy, as well as a breaker bar or cheater bar to slide over the ratchet.

    the only other tools i used were 2 pry bars, a hammer, and screw drivers.

    the first side will be difficult (up to 2hrs), but once you get to the other side you can have it done in 30min.

    we rented a spring compressor, but you can easily do the entire install without it. indeed, the typical spring compressor that you can rent is a poor design and would actually make this spring install more difficult, due to space constraints.
    For us, this was pretty much bang on. Some additional comments that we struggled through:

    First of all - all the DIY we looked at the undersides were so clean! How the hell do you guys accomplish this? My car was essentially all grey underneath, even with a rinse. I guess that is due to the dusty summers and harsh winters here in Winnipeg. So I apologize for looking like a pig in the pics.

    We didn’t know what the level sensor looked like, but we figured out that it is one of the connectors with the ABS bundle (we were looking for something separate). The cables are released by pushing the plug in and then popping up the clip on the side. Sort of tricky until you do it the first time and then it is fairly simple.

    Having two 16mm and two 18mm open/box wrenches was excellent advice. Do it. It makes a few places so much better. In fact, we had a few ‘ratchet box wrenches’ that were a godsend. If you don’t own any, now is the time.

    We had two floor jacks on hand, so we used one for the car and the other we used to raise and lower the wheel knuckles to relieve/add pressure where needed. It really helped in getting bolts out and back in.


    Our biggest issue was Step 8 and getting the 18mm nut off the top of the strut. We didn’t have a strong compressor, so the impact gun seemed to not do much other than spin the nut. We couldn’t figure out how to do the nut countered with the allen wrench because of course the socket covers up the access to the allen wrench and there is not enough space for a open/box wrench. We totally fluked into having a (pretty much) proper fitting tool made for a chain saw! It is basically a socket with a holder bar which allows for an opening in the top for allen wrench access (pictured). That tool was the hero of the day. We viced the allen wrench and then used our impromtu tool. We spent an hour trying to solve this one til we got lucky. How did other people get it off? Because you wouldn’t restrain the lower strut because it could be scraped/damaged, right?

    The Inanimate Carbon Rod!:


    Fronts took us 2-3 hours first side and 1 hour the second side. We’re slower than the other guys above but were trying to be careful.

    The back was pretty easy. We did not need to release the rear struts at all, as the guys mention above.
    We didn’t need a spring compressor, but found that ratchet-straps assisted getting the rear springs out. Not sure if a compressor would have fit in there, and we probably could have gotten them out with anything, but they were handy and it made it a tad easier. The rears definitely go fast when you know what to expect. It took us 2 hours for the first side and honestly, like 20 minutes for the second side.

    2013 S4 :: Lava Grey :: 6spd :: VMR710
    2001 TT - 225 Quattro Coupe :: Silver/Black :: 6spd
    IE Engine Rebuild :: STaSIS BBK front and back :: Defcons :: Haldex Comp Controller
    MadMax DV :: MadMax Control Arms :: turning this into a Targa Rally car


    Previous:
    2009 A4 Phant Blk/Blk, 6spd, APR :: 2004 S4 Silv/Blk, 6spd :: 2005 A4 Blk/Blk UltraSport, 6spd

  2. #2
    Established Member Two Rings Spacecadet_CC's Avatar
    Join Date
    Oct 21 2004
    AZ Member #
    3876
    My Garage
    2001 Audi TT - 225 Quattro Coupe, Manual
    Location
    Winnipeg, Canada

    Part 2 - Sway Bar on 2.0T
    H&R Rear Sway Bar

    For this I pretty much knew what I was doing as I have done this before, but there is actually a decent DIY from Stasis, which is good, but a number of things are not required. This is the Stasis Guide. (click on the ‘How to Install’ button on right)

    Also, AZ member fredjones posted great pics of his install (once again, annoyingly clean under his car too - haha). I took a few photos, but not only is this one very easy, but their pics are cleaner than mine! Here they are.

    The first thing is to get the car raised. You want to have the suspension level and (as I am told) you don’t want the suspension dangling. So we ramped the car. The backend was a little low so we used some 2x4s to ease up onto the ramp.


    This may be the one time when you are thankful for the single-sided exhaust. It basically means that you do not have to drop or loosen the exhaust at all. I remember fighting under the B6 trying to get that sway out and then in (not to mention I put it in backwards at first, so had to do it all twice - moron!). You can essentially skip steps 2, 3, 4 and 5 in the Stasis guide (I will refer to this guide’s step #s)

    Step 6 and 7
    Remove lower drop link bolts and loosen upper drop link bolts. I tackled the bolts as indicated by the Stasis guide, but for me, anyway, found that harder. So instead I removed the lower drop link bolts and loosened the upper ones from the drop link. I found it much easier to keep the link attached at the top than to be trying to access it and get it back together under the car (on a hoist, this would be easier, though). The space to access the upper link bolts is ridiculously small (why did I do springs first?) so used two floor jacks to raise the car evenly just a little so that the suspension opened up for better access. If you look closely at the Stasis picture, you will notice a second wrench tucked in pointing to the front of the car - this is the best place to put that wrench, but you have to do a reach around.


    Step 8
    Remove 4 bolts from mounting brackets - 2 on each side. Pretty simple. This can be done with a Torx 50 if you do not have a Triple Square (I bought one but ended up using the Torx because it was more compact). Note that the securing nuts are formed into the baseplate, so they won’t drop and it is simple, simple to get it all back in.


    Steps 9, 10, 11, 12
    Remove mounting brackets from old sway and use them over bushings of new sway. Pretty straightforward. I bought the H&R swaybar and it didn’t have any grease, but I put on silicone tape anyway. Instead of putting the mounting brackets on here, I measured and got everything lined up under the car and tightened the brackets over the bushings when torxing everything together. Once again, it was just so easy to get this bar back in place. I attached the mounting brackets and replaced the torx/triple-square bolts, but did not tighten down yet.

    Step 13
    Essentially I attached, but did not tighten, all of the bolts back in - the four bolts in the mounting brackets, and the upper and lower drop link bolts on each side. This made it incredibly easy to get everything placed without the tension. Then it is just a matter of remeasuring to ensure the bar is centered (although I guess that this doesn’t really matter). Tighten the mounting brackets, then the upper drop link bolts and then the lower drop link bolts. I was able to torque some of the bolts as indicated, but I have no idea how Stasis accessed the uppers to get them torqued right.

    And that’s it! This took me a little over half an hour, but again, I was going slow and the upper drop link bolts were a big pain for me.
    2013 S4 :: Lava Grey :: 6spd :: VMR710
    2001 TT - 225 Quattro Coupe :: Silver/Black :: 6spd
    IE Engine Rebuild :: STaSIS BBK front and back :: Defcons :: Haldex Comp Controller
    MadMax DV :: MadMax Control Arms :: turning this into a Targa Rally car


    Previous:
    2009 A4 Phant Blk/Blk, 6spd, APR :: 2004 S4 Silv/Blk, 6spd :: 2005 A4 Blk/Blk UltraSport, 6spd

  3. #3
    Established Member Two Rings Spacecadet_CC's Avatar
    Join Date
    Oct 21 2004
    AZ Member #
    3876
    My Garage
    2001 Audi TT - 225 Quattro Coupe, Manual
    Location
    Winnipeg, Canada

    Part 3 - Spacers and Done!
    H&R Wheel Spacers

    I put the spacers on when I was finished the springs and they really do finish off the car nicely. I put 15mm up front and 20mm spacers in the back.

    The drive quality is great. It is definitely more stiff all around, but not really in a bad way. I could definitely see that some people may find is a tad too harsh, especially if moving from non-sport to this - that would probably be much more dramatic. I have the sport package and it feels like things just got a bit tighter - a bit more tidy.

    The sway bar feels really good. Easy turns are improved, but it is really the harder and/or faster turning is where it shines. You also immediately know that you have to be a little more cautious and slow with bumps and small potholes - you feel those a lot more and you want to ensure you don’t bounce into your liners.

    If you have the money, I would definitely suggest going coilovers and new wheels as well as the front sway bar. But if you are on a tighter budget, this is an excellent mod. Not only does the handling improve, but the look is fantastic. The 18” wheels are still a little too small looking, but I can’t afford to do much about that at this time. It is also great to be able to get under your car to understand how it all fits together.


    2013 S4 :: Lava Grey :: 6spd :: VMR710
    2001 TT - 225 Quattro Coupe :: Silver/Black :: 6spd
    IE Engine Rebuild :: STaSIS BBK front and back :: Defcons :: Haldex Comp Controller
    MadMax DV :: MadMax Control Arms :: turning this into a Targa Rally car


    Previous:
    2009 A4 Phant Blk/Blk, 6spd, APR :: 2004 S4 Silv/Blk, 6spd :: 2005 A4 Blk/Blk UltraSport, 6spd

  4. #4
    Veteran Member Four Rings k9lovr's Avatar
    Join Date
    Aug 30 2009
    AZ Member #
    47084
    My Garage
    14 ML350 Bluetec, 17 MKVII
    Location
    Fredericksburg, VA

    Nice write up. Dont worry, my car was not as clean as others either. I just got done putting the H&R OE springs on my car this weekend. I had the fortune of a lift which helped alot. We were able to complete the entire spring install in 2.5 hours for all 4. I also used the install guide provided by dubc. One suggestion if you have a lift if loosening of all 4 subfram mount bolts in the rear in stead of just the front. This allowed us to have more room to get the spring out without too much hassel. I will be posting some before and after pics soon. I was especially pleased with the new stance given I have the stock 17" wheels and it (IMO) still looks good, although a wheel upgrade is on order.
    [B]Current: Shopping now....

  5. #5
    Active Member Four Rings Okan509's Avatar
    Join Date
    Sep 30 2009
    AZ Member #
    48590
    Location
    b

    Nice, making the sport package look sweet! Can you get more sunny pictures of the ride height/wheel gap? Much appreciated write as well!

  6. #6
    Veteran Member Three Rings LI Audi's Avatar
    Join Date
    Mar 13 2009
    AZ Member #
    39836
    Location
    Long Island NY

    Are those OE sport or Super sport? looks really low
    2009 A4 premium Plus Quartz/Black/Wood
    2.0 quattro, Tiptronic ,NAV, 50% tint, H&R OE sport springs, 18"S4 reps


    1969 Datsun Roadster

  7. #7
    Veteran Member Four Rings coolwater's Avatar
    Join Date
    Nov 06 2009
    AZ Member #
    50333
    My Garage
    2023 X3 M40
    Location
    NYC / DC/MD/VA

    Looking good. Seen this exact setup on a white car in person. Really transforms the car.

    -cW
    2024 RS3 Turbo Blue with Carbon Pack
    2023 X3 M40i Alpine White
    Gone - 2023 RS3 Mythos Black - 2019 SQ5 - 2019 RS5 Coupe - 2015 S3 - 2014 Audi A5 2.0T - 2013 S4 3.0 -2010 A4 2.0T
    Youtube Channel: https://www.youtube.com/channel/UC4z...OgbcLzxwZEOt1A

  8. #8
    Senior Member Three Rings harry's Avatar
    Join Date
    May 09 2009
    AZ Member #
    42274
    Location
    The Valley

    Great work! The car looks nice. However, the woman in the picture freaks me out.

  9. #9
    Established Member Two Rings Spacecadet_CC's Avatar
    Join Date
    Oct 21 2004
    AZ Member #
    3876
    My Garage
    2001 Audi TT - 225 Quattro Coupe, Manual
    Location
    Winnipeg, Canada

    Quote Originally Posted by LI Audi View Post
    Are those OE sport or Super sport? looks really low
    Neither, actually 8-)
    They are the 'Sport Springs' (metallic black), which is between the 'OE Sport' (grey) and 'Super Sport' (blue). The gap ends up being not quite a finger. You can snugly slide your finger through the gap. The push of the spacers might also be affecting the look of the gap.
    2013 S4 :: Lava Grey :: 6spd :: VMR710
    2001 TT - 225 Quattro Coupe :: Silver/Black :: 6spd
    IE Engine Rebuild :: STaSIS BBK front and back :: Defcons :: Haldex Comp Controller
    MadMax DV :: MadMax Control Arms :: turning this into a Targa Rally car


    Previous:
    2009 A4 Phant Blk/Blk, 6spd, APR :: 2004 S4 Silv/Blk, 6spd :: 2005 A4 Blk/Blk UltraSport, 6spd

  10. #10
    Established Member Two Rings Spacecadet_CC's Avatar
    Join Date
    Oct 21 2004
    AZ Member #
    3876
    My Garage
    2001 Audi TT - 225 Quattro Coupe, Manual
    Location
    Winnipeg, Canada

    Quote Originally Posted by harry View Post
    Great work! The car looks nice. However, the woman in the picture freaks me out.
    Haha - that is wifey in the driver's seat shuttling the car around for me in no stopping zones. She is usually smiling but in this pic she looks ominous and there is a reflection making it look like she is scowling!
    2013 S4 :: Lava Grey :: 6spd :: VMR710
    2001 TT - 225 Quattro Coupe :: Silver/Black :: 6spd
    IE Engine Rebuild :: STaSIS BBK front and back :: Defcons :: Haldex Comp Controller
    MadMax DV :: MadMax Control Arms :: turning this into a Targa Rally car


    Previous:
    2009 A4 Phant Blk/Blk, 6spd, APR :: 2004 S4 Silv/Blk, 6spd :: 2005 A4 Blk/Blk UltraSport, 6spd

  11. #11
    Veteran Member Three Rings hiwords1's Avatar
    Join Date
    Sep 13 2007
    AZ Member #
    21069
    Location
    PA

    wow they got smart with the spring setup on the rear end. the front end is almost exactly the same as the B5. instead of having that awesome tool you had, i used a long allen and vise clamped a socket to hold the nut lol. mickey mouse but it's worked great for the 4 times i changed springs on my old car. great stance too. those are going to be first few my mods in the future. props to you for DIYing.
    Present: 2010 Audi A4 2.0TQ Tip. Mods: APR chip, clear bra side mirrors and headlights, krautoparts.com interior/lic plate LEDs, and VAG COM mods

    Past: 2001 Audi A4 2.8QM. Mods: H&R race springs, CC mod, tinted tails, RS4 mirrors, ST chip, and VAG COM mods. Traded in
    2002 Honda Civic EX auto. Totaled

  12. #12
    Active Member One Ring
    Join Date
    Sep 12 2009
    AZ Member #
    47642
    Location
    Spring TX

    Spacecadet, what an awesome write-up! i didn't have the patience to either take pics during our install, or to write such an excellent DIY article. i'm glad our tips came in handy during your install. :)
    ARB air lockers front/rear

  13. #13
    Active Member Four Rings Blake P's Avatar
    Join Date
    Mar 02 2007
    AZ Member #
    16074
    Location
    Fresno, CA

    Great job, your car looks goood and your wifey looks about as pissed as mine would be if I asked her to sit in the car while I take pics! X-D
    2017 Q7 2.0T: premium plus, graphite grey, black leather, black/grey oak wood, 20" 10 spoke wheels
    Options: black headliner, vision, driver assistance, warm weather packages

  14. #14
    Senior Member Two Rings FmL 50cmonsters's Avatar
    Join Date
    Mar 18 2010
    AZ Member #
    56288
    Location
    Hilton Head Island, SC

    Unfortunately, I am also on a non-coilover kind of budget. This writeup will be a real help since I was going to do exactly these mods within the next couple of months. Props for a job well done.
    Stock: 2010 Deep Sea Blue/Cardamon Beige A4 Premium 2.0T 6MT w/Sport Package
    Mods Installed: APR Stage II Tune, 034 HFC, Eurocode IC Pipe, H&R RSB, AWE Downpipe/catback, VAG-COM, Halogen > Ecodes, H&R Spacers 20r/15f, Weathertech floor liners, JHM Solid Throw Short Shifter, Blesk LED license plate
    On the way: Saving for dem coils
    Chris

  15. #15
    Established Member Two Rings lphiewok's Avatar
    Join Date
    Dec 31 2009
    AZ Member #
    52768
    Location
    Los Angeles, CA

    wow it looks really good! and nice write-up
    that thing looks cleannn
    2010 Audi A4 B8 Premium Plus.
    Current Mods: LED Interior Conversion. LED License Plate. Hoen Xenon Match Fog Lights.
    Trunk Lid Spoiler. Chrome Grill Inserts. Hardwired Valentine 1. VAG-COM. E-codes Headlights, Touchscreen NAV / Reverse Cam / DVD Player.
    Glossy Black Plate Delete. Gunmetal S5 Rep. 245/35/19. ST Coilovers.

  16. #16
    Veteran Member Four Rings ItsDubC's Avatar
    Join Date
    May 26 2009
    AZ Member #
    42934
    Location
    Houston, TX

    Man, that looks amazing! I miss my sport pkg wheels

    Personally, the DIY spring install was a huge learning experience (contrary to what tXfactor says, I helped him, not the other way around ) The most significant benefit to me that came from DIYing the spring install was the knowledge gained, and I'm glad we were able to provide you w/ enough information for you to confidently tackle it. The results speak for themselves; the car looks awesome, you know that the job was done carefully and precisely, you saved money on install costs, and you now know much more about your car than you did before.

    Much respect for taking the time to document this and share it w/ everyone; this is a huge contribution to the community. If I ever end up getting an RSB, I know where to look for install tips Hopefully others will be inspired to do their own DIYs and document their processes. Thanks again for this thread!
    OEM+ '09 Meteor Gray A4 2.0T Tip Quattro Prem+ Sport Saloon
    All-Weather Mats • Hüper Optik Stark 30 • APR Stage I • A5 S-line Y-spokes • Hankook Ventus V12 evos • S-line Stone Guards • VAG-COM'd
    Bilstein PSS10s • Eurocode IC Pipe • Avant Dual Exhaust • StopTech Pads • Lamin-X'd • Smoked Ambers • Blesk 5000ks • 034 Trans Mount

  17. #17
    Veteran Member Four Rings MiracleWhips's Avatar
    Join Date
    Jun 02 2009
    AZ Member #
    43229
    Location
    San Francisco

    And lets not forget a special shout out to MW for the inspiration!


    But seriously, the whip looks great especially in black. Makes me miss this setup. How many miles on the springs when the photo was taken?

    Looks like my "Avant Sport Springs" after only 30 miles in the above pic are just a tad bit lower than your "Sport Springs".
    APR II+ / STaSIS 23mm RARB / AWE FMIC & Exhaust / Eurocode IP / Carbonio / 034 HFC & TIP / 20% Tint / S5 Mirrors / Rotiform MIAs 19x8.5 / Hankook 255/35 / H&R Avant Sport Springs / RS6 Pedals / Hoen Fogs /Stoneguards / ecodes / A4L Fog grills

  18. #18
    Veteran Member Four Rings ThePiombino's Avatar
    Join Date
    Dec 01 2008
    AZ Member #
    35851
    Location
    North JerZ

    Quote Originally Posted by FmL 50cmonsters View Post
    Unfortunately, I am also on a non-coilover kind of budget. This writeup will be a real help since I was going to do exactly these mods within the next couple of months. Props for a job well done.
    Same here. I was hesitant at first, but it seems the job might not be as hard as I initially thought. Great job, OP!
    09 A4 2.0T Quattro - Tip - Black/Black /// MODS: APR Stage II+ | AWE CB Exhaust | 034 HFC l EC HFIC Pipe | Forge DV Spacer | 3M Di-NOC Carbon Fiber Interior Trim | 3M Chrome Grille Trim | SG Supreme 28 | Debadged | Fly Eyes Kit (f&r) | Needle Sweep | Window/Moonroof control w/Keyfob | Seat Belt Chime Disabled | "Wink" Disabled | Double Unlock "Beep"

  19. #19
    Veteran Member Four Rings MiracleWhips's Avatar
    Join Date
    Jun 02 2009
    AZ Member #
    43229
    Location
    San Francisco

    For the price, I was very happy going with springs, RSB and spacers. Performance is fantastic.

    If you don't DIY, most of the labor rate will be with the springs. RSB and spacers will be a snap for the installers since all that is mostly taken apart for the spring swap anyways.
    APR II+ / STaSIS 23mm RARB / AWE FMIC & Exhaust / Eurocode IP / Carbonio / 034 HFC & TIP / 20% Tint / S5 Mirrors / Rotiform MIAs 19x8.5 / Hankook 255/35 / H&R Avant Sport Springs / RS6 Pedals / Hoen Fogs /Stoneguards / ecodes / A4L Fog grills

  20. #20
    Established Member Two Rings Spacecadet_CC's Avatar
    Join Date
    Oct 21 2004
    AZ Member #
    3876
    My Garage
    2001 Audi TT - 225 Quattro Coupe, Manual
    Location
    Winnipeg, Canada

    Quote Originally Posted by MiracleWhips View Post
    And lets not forget a special shout out to MW for the inspiration! How many miles on the springs when the photo was taken?
    Man, I totally forgot to praise MW! 8-)

    Srsly - the pics were about a day later and 60 miles. I'll be cleaning and taking pics later today for a compare now that it is settled in.
    2013 S4 :: Lava Grey :: 6spd :: VMR710
    2001 TT - 225 Quattro Coupe :: Silver/Black :: 6spd
    IE Engine Rebuild :: STaSIS BBK front and back :: Defcons :: Haldex Comp Controller
    MadMax DV :: MadMax Control Arms :: turning this into a Targa Rally car


    Previous:
    2009 A4 Phant Blk/Blk, 6spd, APR :: 2004 S4 Silv/Blk, 6spd :: 2005 A4 Blk/Blk UltraSport, 6spd

  21. #21
    Active Member Two Rings 2.7guy's Avatar
    Join Date
    Jan 23 2011
    AZ Member #
    69862
    Location
    denver

    Nice job I just start doing mine yesterday and was only able to get them half way done. Sounds like you got your done pretty fast, but you car look sweet. Even with mine only half done it looks ten time better!!!

  22. #22
    Established Member Two Rings mxz's Avatar
    Join Date
    Aug 22 2010
    AZ Member #
    63071
    Location
    Woodbridge, Ontario

    Thanks for the write up, I definately ran into more problems then all of these guys it seems. The springs in the rears were basically stuck to the top and bottom boot's and even with spring compressors they did not want to come out. Also when taking out the fronts we ran into problems getting the springs out because there was no room to maneuver them around all the arms and the restriction of the short brake line always pinching. So we had to yank down on the rotors as much as possible and do a lot of wiggling to make as much room as possible, and ended up dislocating the cv joint :S Time to search if anyone has a write up on these and hopefully it is easy!

    One thing I would like to know is if anyone has any torque specs for all the bolts.... Because I hope everybody didn't just 'tighten by hand'. If anyone has any torque specs for all the spring components that would be great thanks!

  23. #23
    Veteran Member Four Rings hoppy6698's Avatar
    Join Date
    Sep 10 2009
    AZ Member #
    47559
    My Garage
    2015 BMW M235i
    Location
    Yorktown, VA

    Very nice mate - I put the super sport springs (blue) on mine with the H&R RSB as well. For comparison on prestige 18" wheels. Think mine may sit about 1/2" lower than yours? Not sure by your angles. But I can't put my finger in between the front tire and wheel well horizontally and have it fit. With spacers it would definitely be impossible.

    If anyone is interested in the H&R Springs though, or near the KC area, I could sell em to ya. Put about 10k miles on them, all still in beautiful condition. I have pics somewhere too. Now sitting on ST coilover kit, same height all round.


    Sorry, found a better pic of the gap on the front tires here:

    "A man who won´t die for something is not fit to live." - MLK Jr.

  24. #24
    Senior Member Two Rings Cody Maverick's Avatar
    Join Date
    Sep 28 2011
    AZ Member #
    81820
    My Garage
    2015 SQ5, 2004 R32
    Location
    Baltimore

    I will probably be doing my h&r sport spring install this weekend.. kinda excited.. kinda not.. I am glad to here that the ride isnt too rough going from sport to these.. I was concerned about that, the height looks great on yours

    also, i know in the DIY it says u can do it without a spring compressor, did you use one?
    2015 SQ5
    2013 S4
    2004 R32

  25. #25
    Established Member Two Rings mxz's Avatar
    Join Date
    Aug 22 2010
    AZ Member #
    63071
    Location
    Woodbridge, Ontario

    Quote Originally Posted by Cody Maverick View Post
    I will probably be doing my h&r sport spring install this weekend.. kinda excited.. kinda not.. I am glad to here that the ride isnt too rough going from sport to these.. I was concerned about that, the height looks great on yours

    also, i know in the DIY it says u can do it without a spring compressor, did you use one?
    I used two spring compressors on the rears like these: http://www.roadraceengineering.com/3...compressor.jpg but they barely helped as much as hoped. The only way I ended up getting the spring out of the housings in the rear was to grab a large enough socket that filled out the hole in the bottom of the boot and jacked the socket up with a jackstand. I know it probably doesnt make sense right now because I know I'm not using the best terms to describe it but I took some pictures of how we did it, hopefully I can load them up as soon as possible for your help.

  26. #26
    Established Member Two Rings Shaner777's Avatar
    Join Date
    Jul 15 2015
    AZ Member #
    342708
    Location
    Aviano, Italy

    Quote Originally Posted by Spacecadet_CC View Post
    Part 2 - Sway Bar on 2.0T
    H&R Rear Sway Bar

    For this I pretty much knew what I was doing as I have done this before, but there is actually a decent DIY from Stasis, which is good, but a number of things are not required. This is the Stasis Guide. (click on the ‘How to Install’ button on right)

    Also, AZ member fredjones posted great pics of his install (once again, annoyingly clean under his car too - haha). I took a few photos, but not only is this one very easy, but their pics are cleaner than mine! Here they are.

    The first thing is to get the car raised. You want to have the suspension level and (as I am told) you don’t want the suspension dangling. So we ramped the car. The backend was a little low so we used some 2x4s to ease up onto the ramp.


    This may be the one time when you are thankful for the single-sided exhaust. It basically means that you do not have to drop or loosen the exhaust at all. I remember fighting under the B6 trying to get that sway out and then in (not to mention I put it in backwards at first, so had to do it all twice - moron!). You can essentially skip steps 2, 3, 4 and 5 in the Stasis guide (I will refer to this guide’s step #s)

    Step 6 and 7
    Remove lower drop link bolts and loosen upper drop link bolts. I tackled the bolts as indicated by the Stasis guide, but for me, anyway, found that harder. So instead I removed the lower drop link bolts and loosened the upper ones from the drop link. I found it much easier to keep the link attached at the top than to be trying to access it and get it back together under the car (on a hoist, this would be easier, though). The space to access the upper link bolts is ridiculously small (why did I do springs first?) so used two floor jacks to raise the car evenly just a little so that the suspension opened up for better access. If you look closely at the Stasis picture, you will notice a second wrench tucked in pointing to the front of the car - this is the best place to put that wrench, but you have to do a reach around.


    Step 8
    Remove 4 bolts from mounting brackets - 2 on each side. Pretty simple. This can be done with a Torx 50 if you do not have a Triple Square (I bought one but ended up using the Torx because it was more compact). Note that the securing nuts are formed into the baseplate, so they won’t drop and it is simple, simple to get it all back in.


    Steps 9, 10, 11, 12
    Remove mounting brackets from old sway and use them over bushings of new sway. Pretty straightforward. I bought the H&R swaybar and it didn’t have any grease, but I put on silicone tape anyway. Instead of putting the mounting brackets on here, I measured and got everything lined up under the car and tightened the brackets over the bushings when torxing everything together. Once again, it was just so easy to get this bar back in place. I attached the mounting brackets and replaced the torx/triple-square bolts, but did not tighten down yet.

    Step 13
    Essentially I attached, but did not tighten, all of the bolts back in - the four bolts in the mounting brackets, and the upper and lower drop link bolts on each side. This made it incredibly easy to get everything placed without the tension. Then it is just a matter of remeasuring to ensure the bar is centered (although I guess that this doesn’t really matter). Tighten the mounting brackets, then the upper drop link bolts and then the lower drop link bolts. I was able to torque some of the bolts as indicated, but I have no idea how Stasis accessed the uppers to get them torqued right.

    And that’s it! This took me a little over half an hour, but again, I was going slow and the upper drop link bolts were a big pain for me.
    I know this is an old post but thanks for the detailed write-up. It made my install both front and rear easy to do.
    2013 A4 B8.5 P+ 6MT
    Parallax Wheels, H&R Sport Springs, H&R F/R Sway Bars, RS4 Style Grille, 18% Window Tint, ECS Short Shifter, Red BFI Full Billet Heavy Shifter Knob, 034 Trans/Diff mounts, 2x T1D412 Power Rockford Fosgate 12" subs in custom ported enclosure, RF 1500 Watt Power Amp, Alpine tweeters and door speakers, XS Power D4900 Main Battery

  27. #27
    Quote Originally Posted by Shaner777 View Post
    I know this is an old post but thanks for the detailed write-up. It made my install both front and rear easy to do.
    Thank you so much,,, this DIY made my change of coilsprings on my B8 so much easy(er)
    I tried to look on the web for simple DIYs on the B8,, and this was one of the most helpful ones,,,

Bookmarks

Posting Permissions

  • You may not post new threads
  • You may not post replies
  • You may not post attachments
  • You may not edit your posts
  •  


    © 2001-2025 Audizine, Audizine.com, and Driverzines.com
    Audizine is an independently owned and operated automotive enthusiast community and news website.
    Audi and the Audi logo(s) are copyright/trademark Audi AG. Audizine is not endorsed by or affiliated with Audi AG.