Audizine - An Automotive Enthusiast Community

Results 1 to 26 of 26
  1. #1
    Veteran Member Four Rings fly300kts's Avatar
    Join Date
    Oct 16 2008
    AZ Member #
    34255
    My Garage
    03 Golf GTI - 03 Golf 2.0l - 04 Golf 2.0L
    Location
    South Florida - Ft Lauderdale

    CC Mod - The DIY (B7)

    Guest-only advertisement. Register or Log In now!
    Hi Guys,

    Because a lot of questions have been asked on the subject numerous times, I took time today, to take some shots while I was doing a LED strip integration. Of course, this is not the only way to proceed, but it is my way, and it’s a safe way (you don’t end up with broken tabs or other issue). This DIY is performed on a Xenon housing (more complex than Halogen) but the same steps can be performed for both type of headlights.

    This DIY has 2 chapters due to the number of pictures (too many - Right not granted by Admin)

    Time = 1hr per headlight
    Difficulty = 4

    The Tools

    WARNING: The internal chrome components are really fragile and I highly recommend wearing cotton gloves once you start to manipulate them.

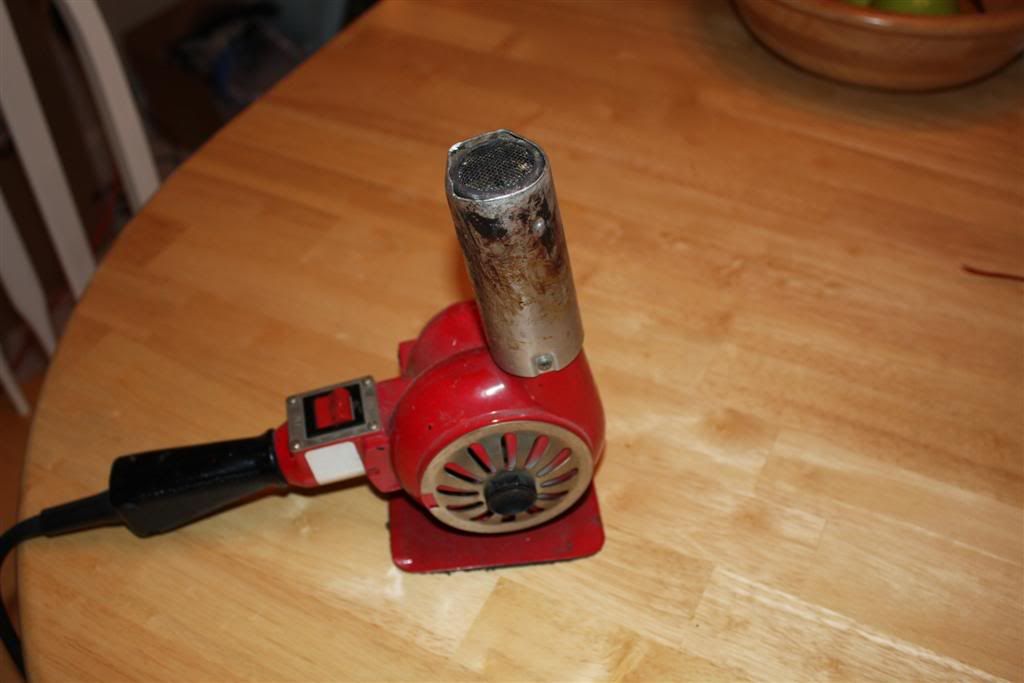
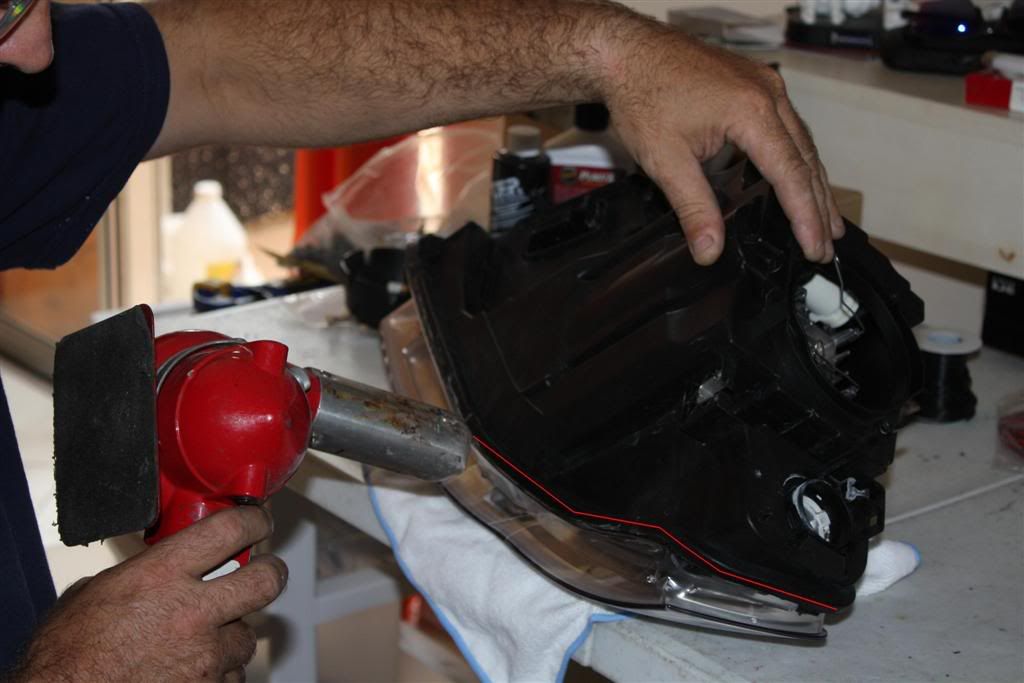
    Heat Gun
    Some of you prefer to stick the headlight in the stove. To have personally gutted out numerous Xenon headlights and seen the amount of tinny plastic components, I don’t want to take the risk.


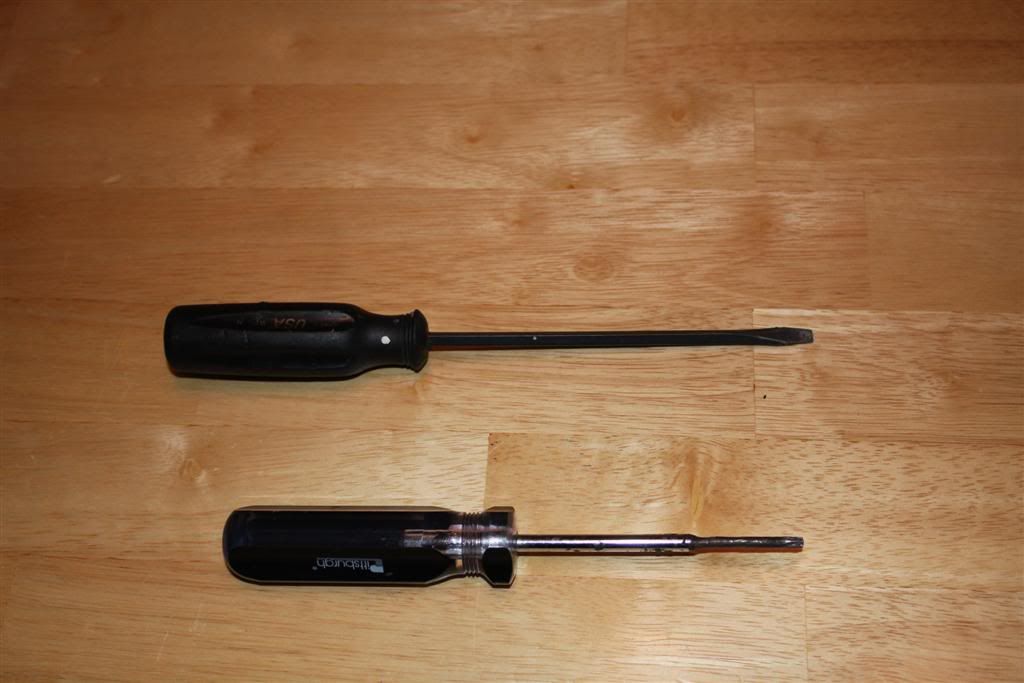
    Flat screwdriver
    T25 Torks screwdriver (grinded to the diameter minimum, you will understand later why)


    Using the flat screwdriver, snap off the clips: 5 of them
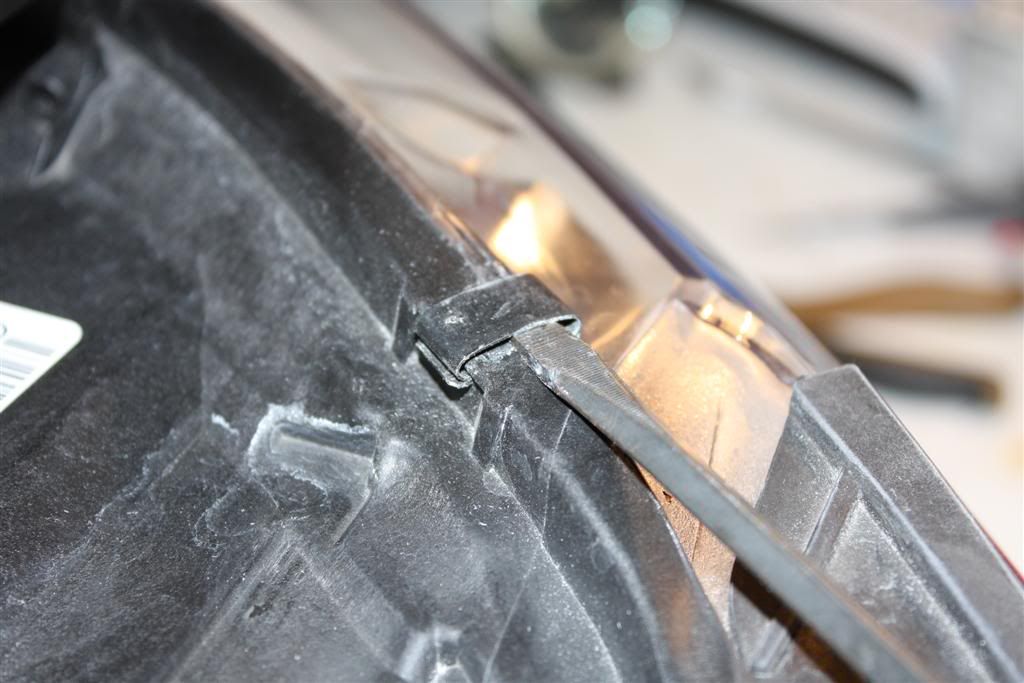


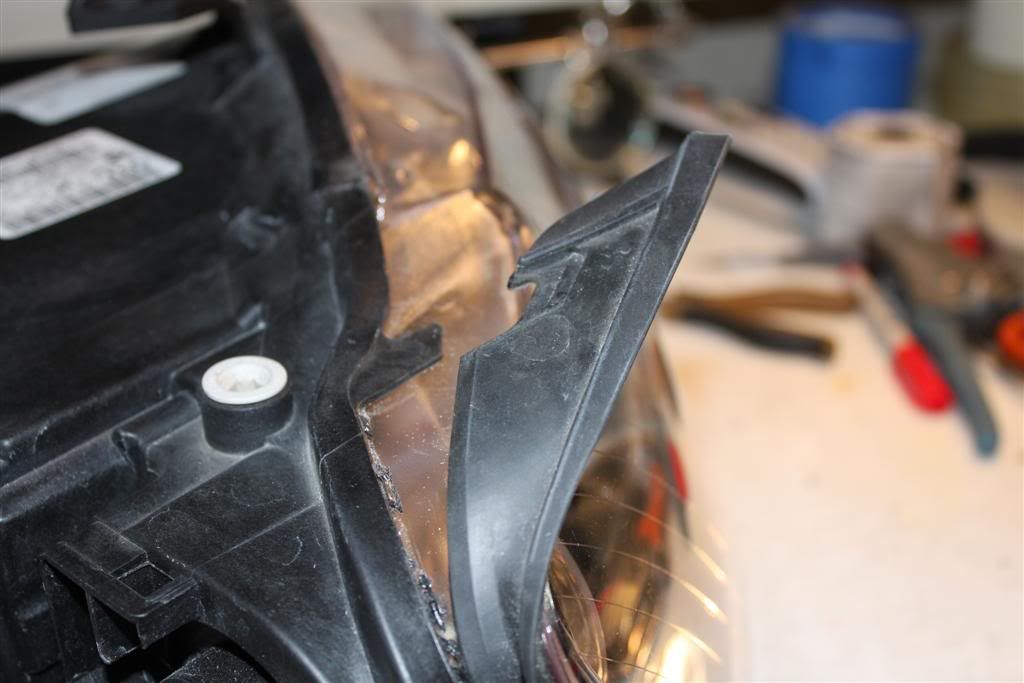
    Pull off the rubber protector


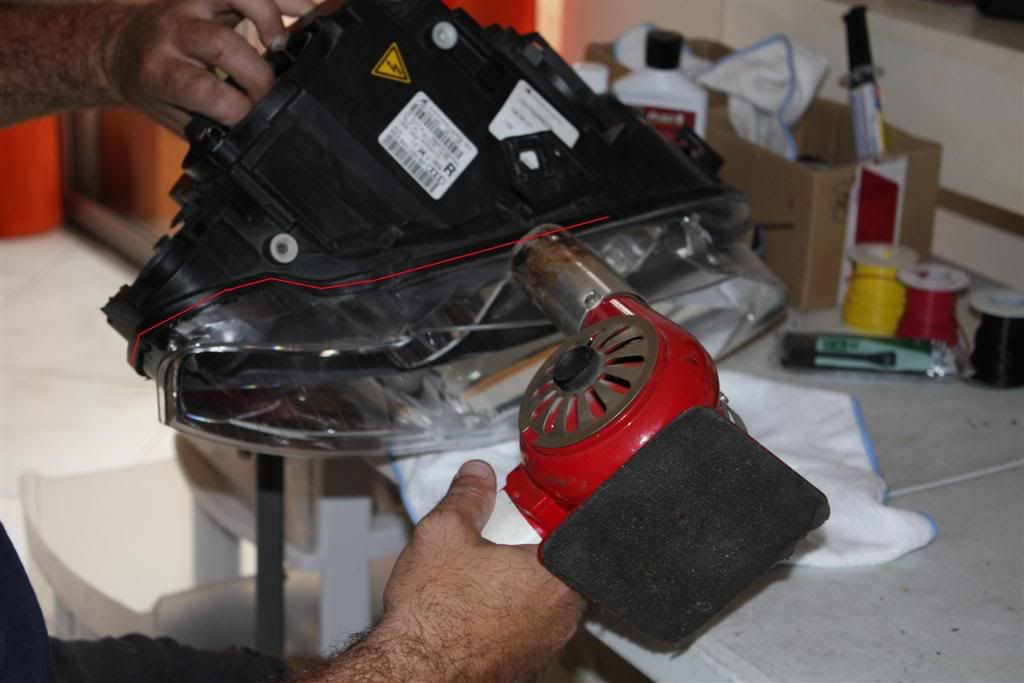
    Install the headlight on a soft rag (prevent scratching the lens) and you are going to heat up the seal between the housing and the lens. No need to heat the entire perimeter, the glue used is messy enough when soft and you don’t want it to stick to the chrome. Heat the area for 10 mn.

    Materialized in red the area to be heated.


    Now, grab two rags, hold the headlight vertically and separate the lens from the housing. The lens shape on the turn signal side provides a good grip. If it’s too hard to pull, you can heat up a bit more the area.
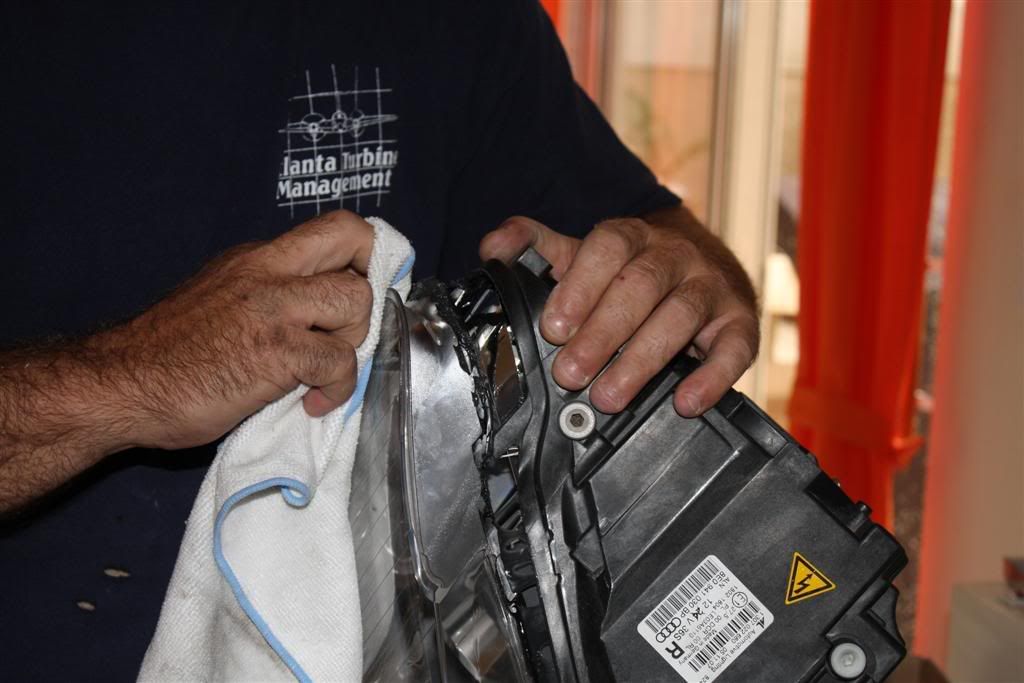


    Use a razor blade to cut the cold sealant.
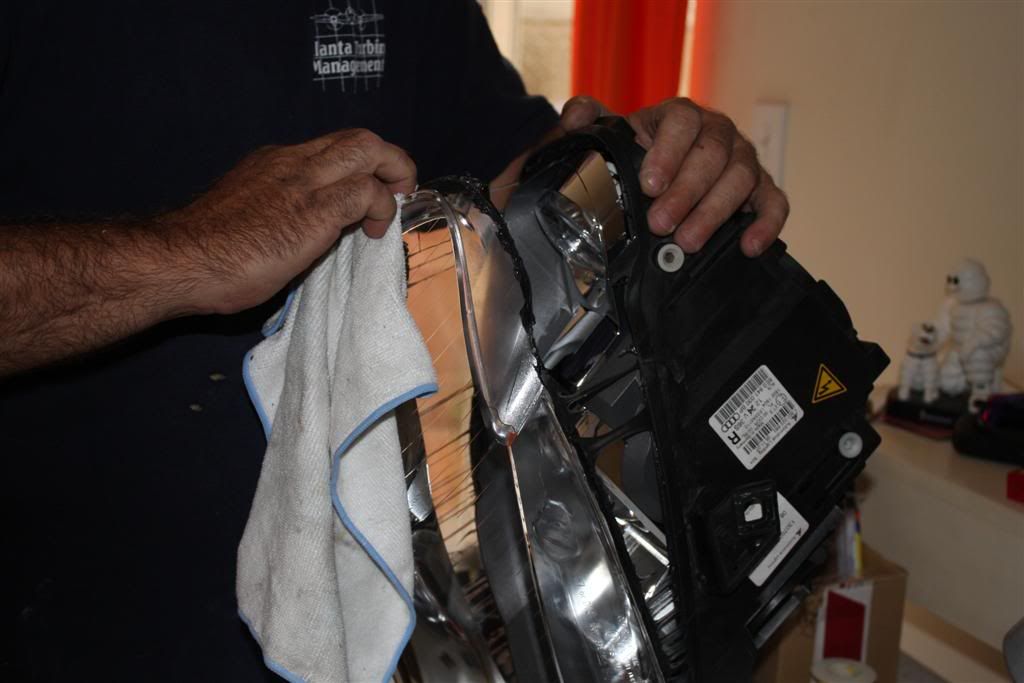


    Voila, headlight is open
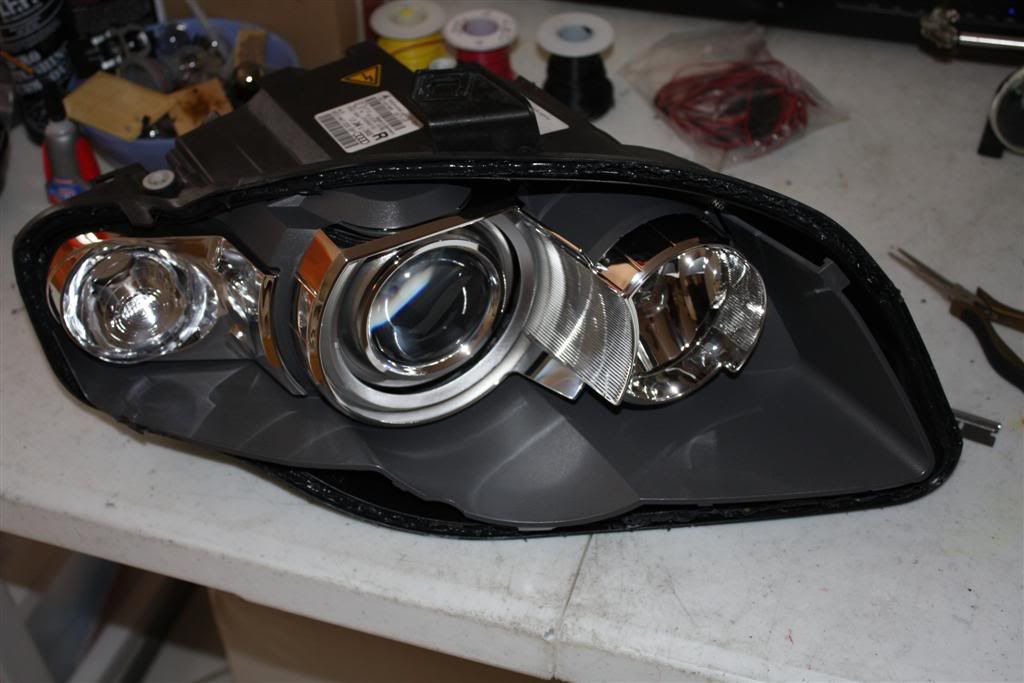


    Now you need to remove the internal housing. There are 3 screws holding it in place. Location materialized in red
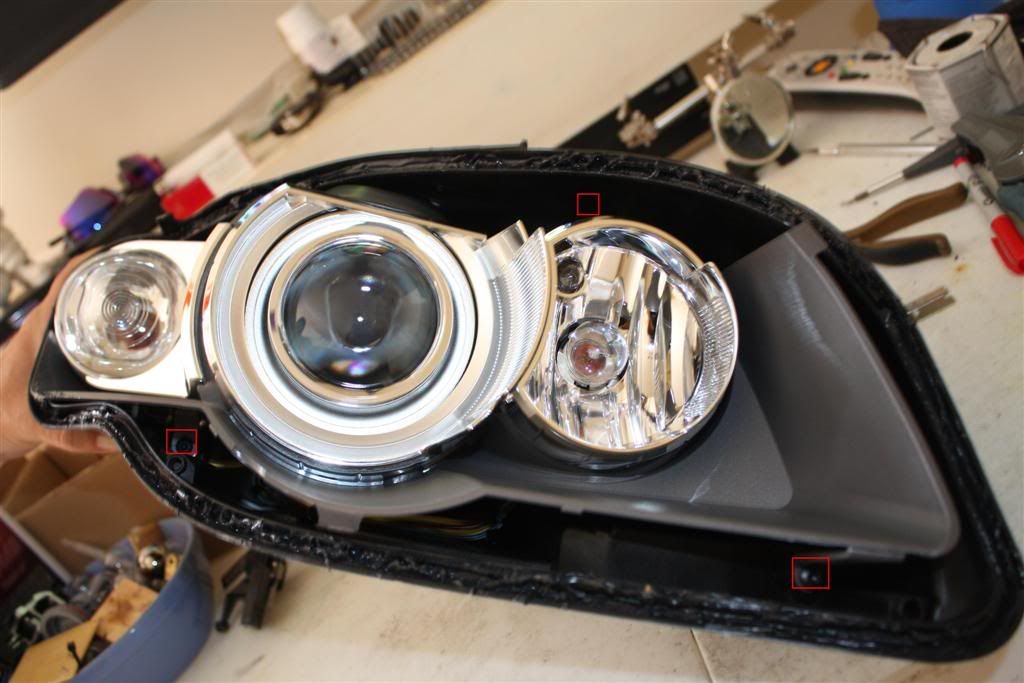


    Close up of screw #1


    Close up of screw #2
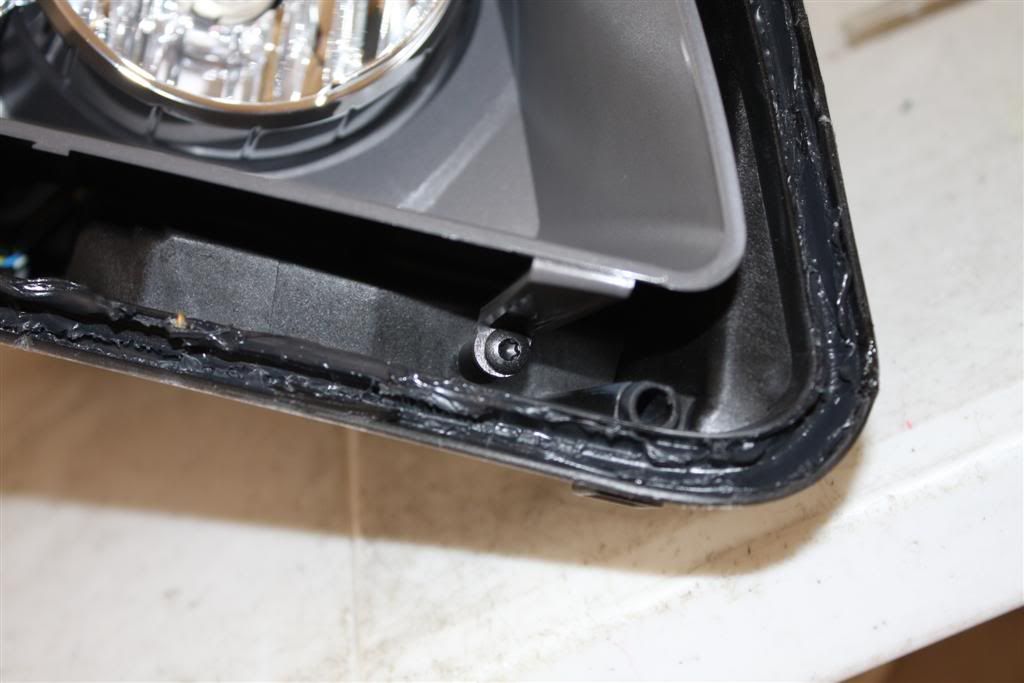


    Close up of screw #3
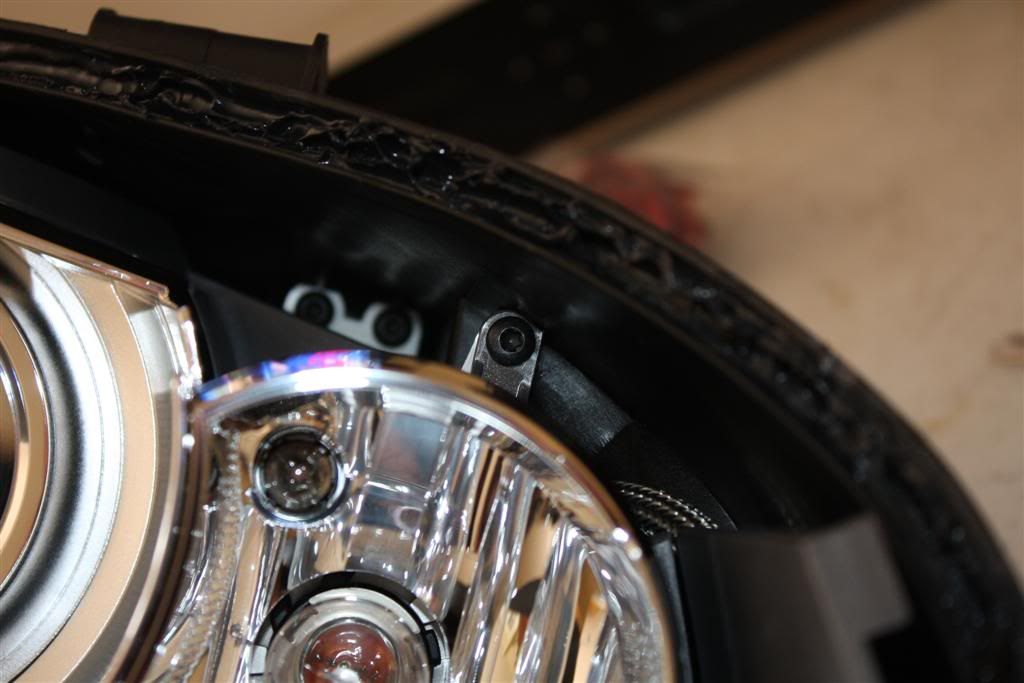


    Now, the housing should slide off
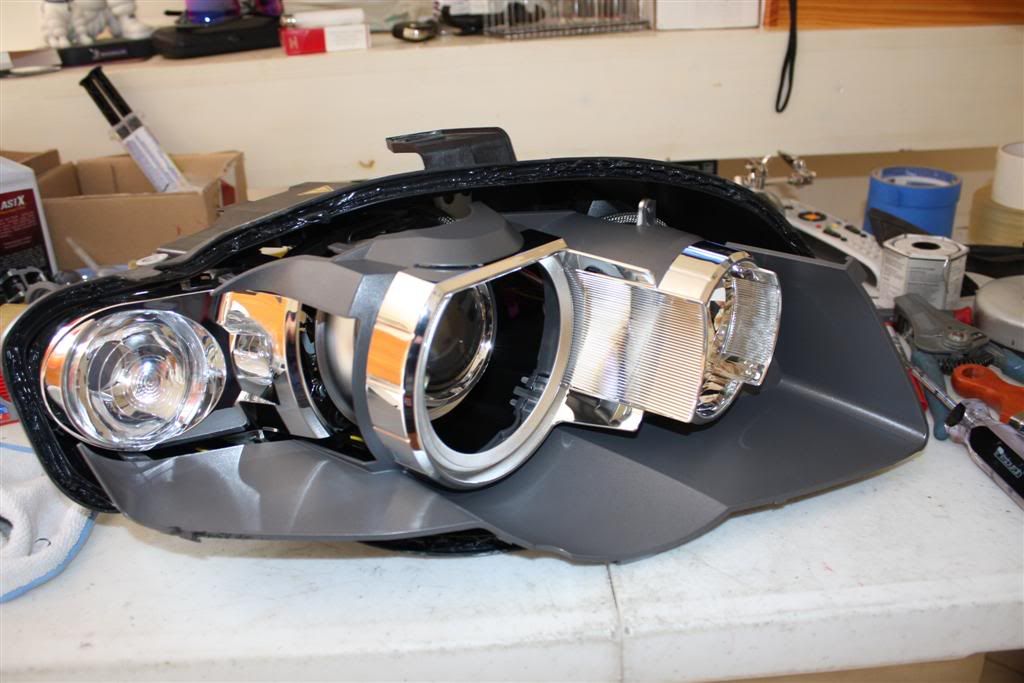


    On some headlights, it’s a bit more difficult because the housing stays clipped in the turn signal area. Gently pry under the plastic tab to release it.
    Here is a close up of the tab that may stay clipped
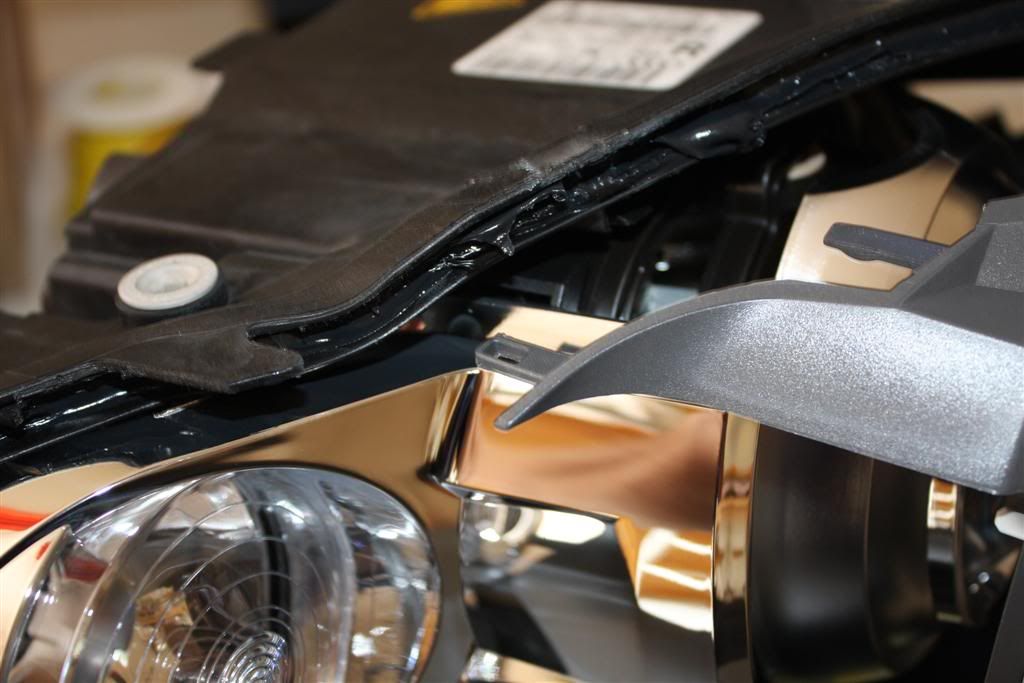


    Once the housing is removed, there is an additional screw to be removed right under the turn signal.


    At this stage, I have seen people banging the orange corner with the screwdriver: 99% of the time, you will end up breaking the turn signal tabs !!!


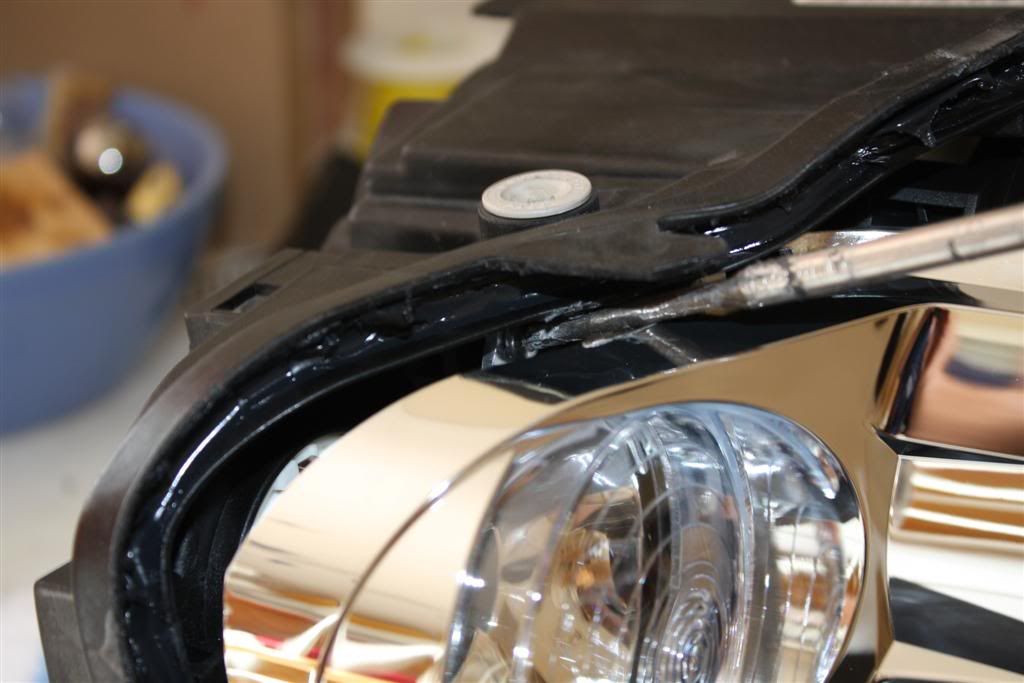
    Now, the tricky screw: He is hiding behind the chrome housing. This is where I use my trimmed screwdriver and work it thru between the headlight housing and the chrome piece. Even if you scratch a bit the edge of the chrome housing, do not worry about it, you won’t longer see it once the headlight is reassembled.
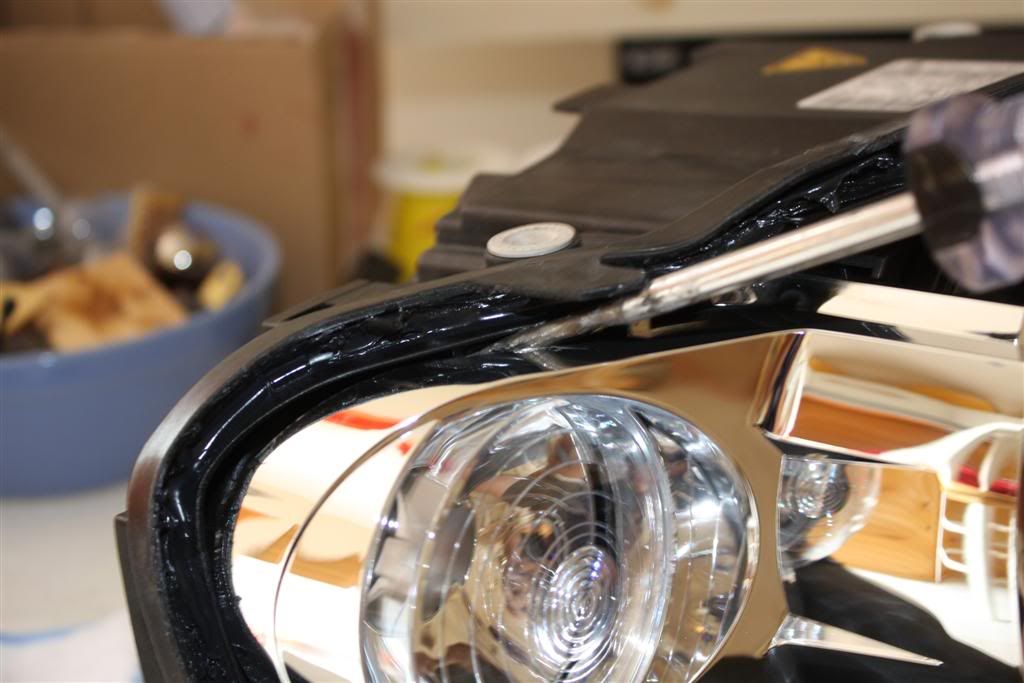


    You can really see the sucker hiding on this one


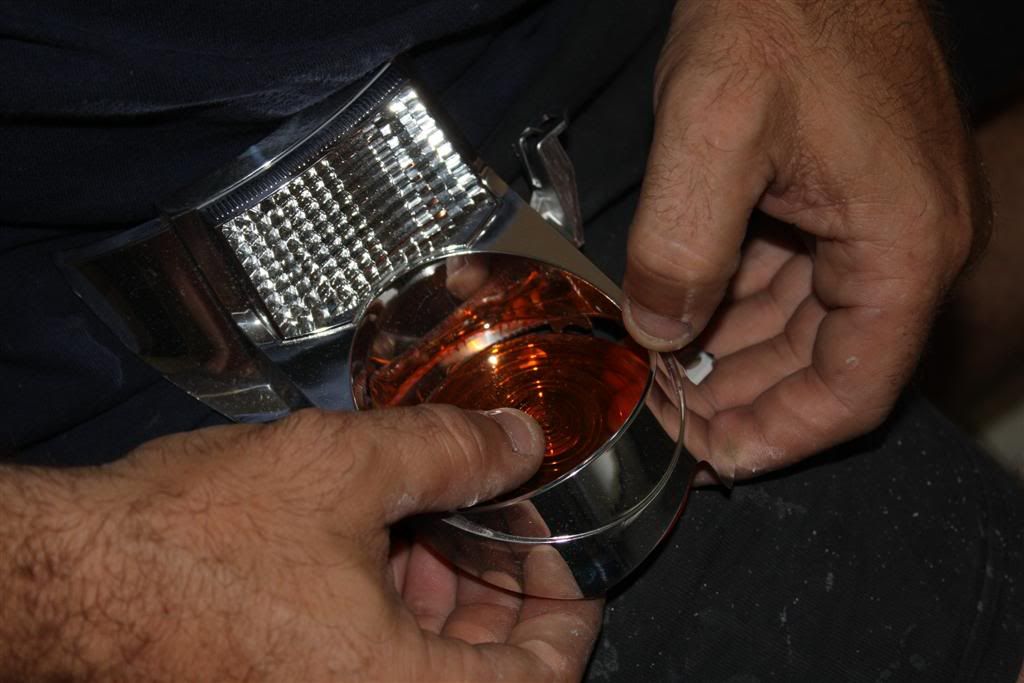
    Now, you are going to separate the two plastic parts of the turn signal.
    Take a close look at the little plastic shaft preventing the separation
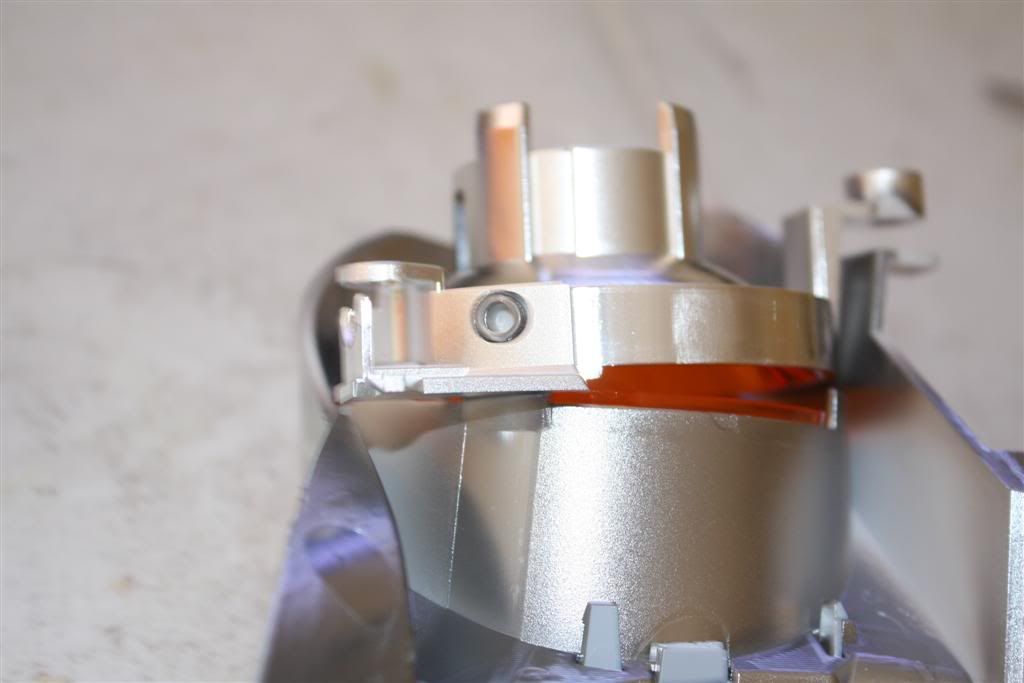


    Using a razor blade, you are going to trim just a bit of the edge of the center pin, trying to make a chamfer.
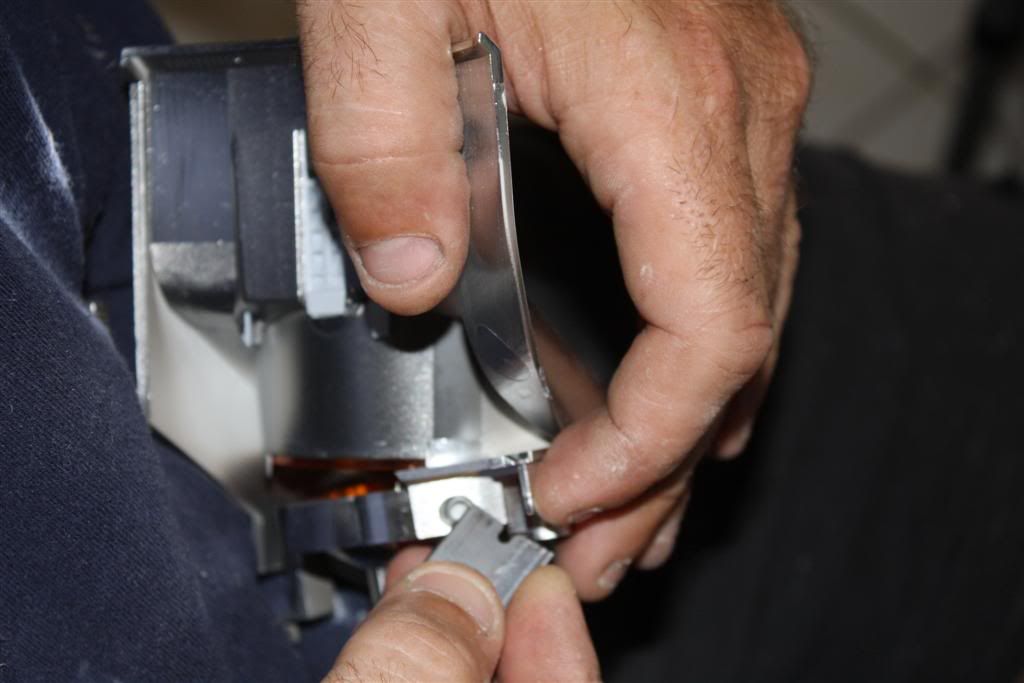


    Once trimmed, it should look like this
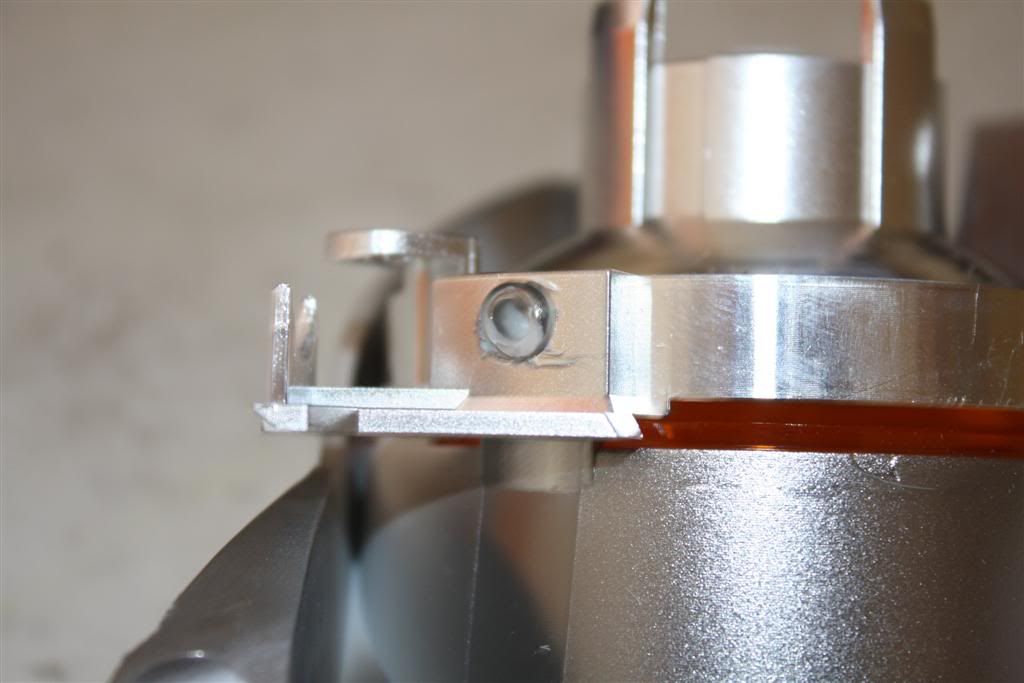


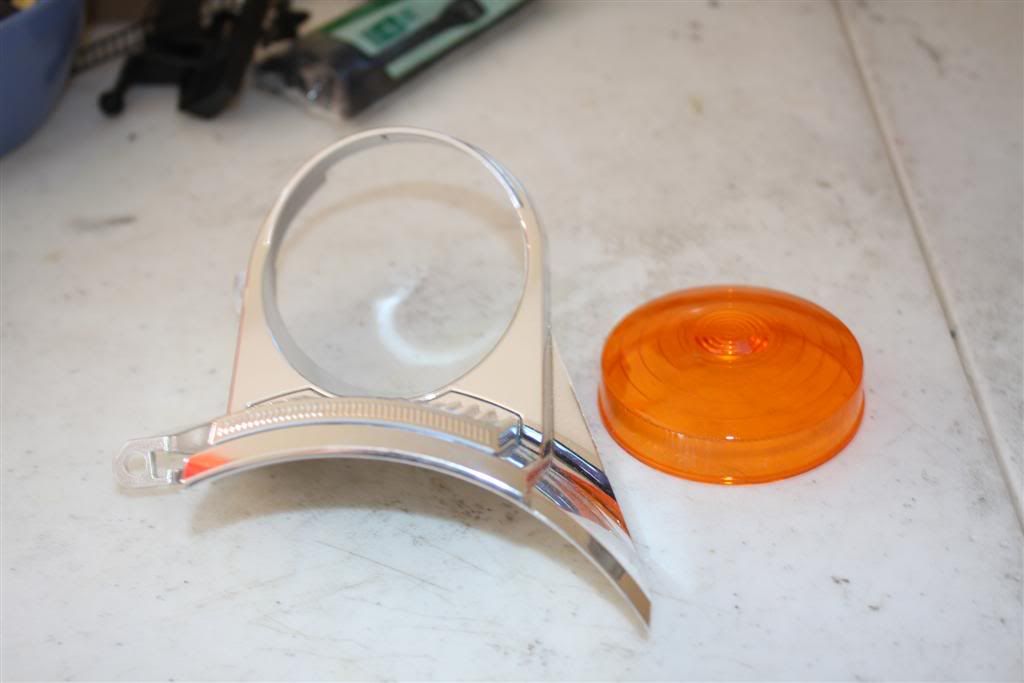
    And now, if trimmed enough, you will be able to slide and separate the 2 pieces.


    And Voila
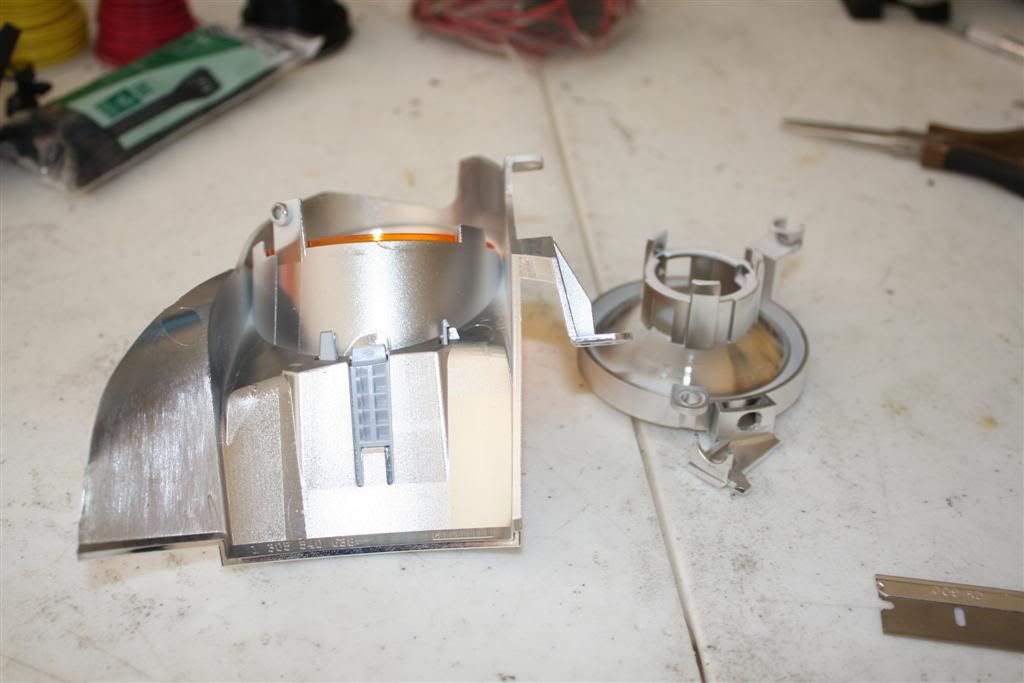


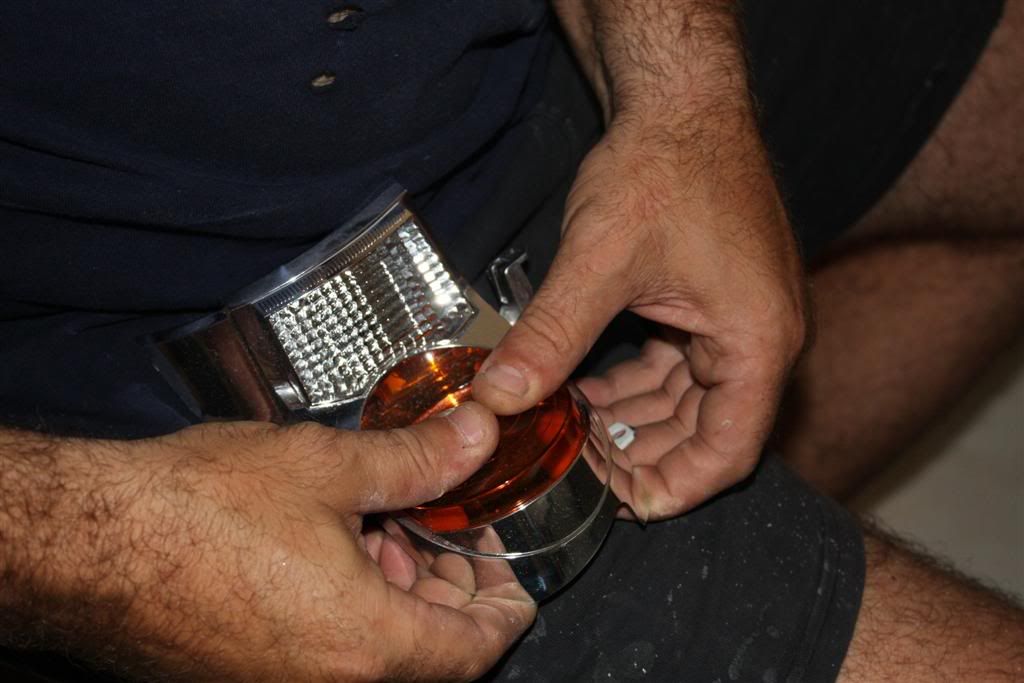
    Now, to remove the orange cap, just push on it, towards the inside.


  2. #2
    Veteran Member Three Rings ZachPDX's Avatar
    Join Date
    Jun 09 2008
    AZ Member #
    29693
    Location
    PDX

    Re: CC Mod - The DIY (B7)

    nice What did you use to do the black? looks great.

    **Edit** where did the pics of the black housing go?
    Last edited by ZachPDX; 08-17-2009 at 09:53 AM.
    05
    JHM SM/LW Flywheel + Stg3 clutch | JHM Piggy's | Milltek nonres | JHM Tune | JHM 4:1 Center Diff | Neuspeed 25mm Rear Sway | APR snub | Apikol Rear Diff | JHM SSTS | Vogtland GT's


    SomeGuyInAChair - "I'll be honest about why I signed up for a car forum without thorough knowledge of cars. I merely did a Google search with the following key words: "milf cougar forum advice help tips"

  3. #3
    Veteran Member Four Rings fly300kts's Avatar
    Join Date
    Oct 16 2008
    AZ Member #
    34255
    My Garage
    03 Golf GTI - 03 Golf 2.0l - 04 Golf 2.0L
    Location
    South Florida - Ft Lauderdale

    Re: CC Mod - The DIY (B7)

    I use Krylon paint

    Phil

  4. #4

    Re: CC Mod - The DIY (B7)

    Phil,

    Thanks for taking the time to put this together. The labor required is quite different between the B6 and the B7.

  5. #5
    Veteran Member Four Rings
    Join Date
    Dec 20 2006
    AZ Member #
    14346
    Location
    CAN

    Re: CC Mod - The DIY (B7)

    Canuck-RS4 CC Mod
    For those with an RS4. Here ya go!
    emilyPay.com - Payment Processing for Professionals

    2025 RS6 Performance - Florett Silver, Blue Plus RS Design Pkg, Carbon Matte Optics Pkg, Dynamic Pkg, Black Dinamica Headliner.
    Wife - 2024 SQ8 - Chili Red
    Old Friends: 2021 RS6 Nardo Grey, 2021 Cayenne GTS, 2018 Panamera 4S ST, 2016 RS7, 2014 RS7, TT/RS, E90M3, B7RS4, B7S4

  6. #6
    Veteran Member Four Rings Beelzeebub's Avatar
    Join Date
    Oct 08 2008
    AZ Member #
    33987
    My Garage
    B7 S4
    Location
    NJ

    Re: CC Mod - The DIY (B7)

    excellent write up and pics. Thanks for sharing. stupid question: so in order to do this, we need to fabricate a trimmed screw driver to get at the last screw in order to remove the turn signal light?

  7. #7
    Registered Member Two Rings
    Join Date
    Aug 11 2009
    AZ Member #
    46263
    My Garage
    2005 Audi A4 2.0T
    Location
    Southern California

    Re: CC Mod - The DIY (B7)

    thanks for the great write up. I'm considering doing this sometime soon

  8. #8
    Veteran Member Four Rings WinterRunner's Avatar
    Join Date
    Oct 11 2007
    AZ Member #
    21717
    My Garage
    12' DG R8 5.2 6mt 22' CG Q3 S+ 07' DG RS4 01' A4 avant 5mt
    Location
    Suburbia

    Re: CC Mod - The DIY (B7)

    Nice write up, unfortunately I do not have the balls to try this myself....

  9. #9
    Veteran Member Three Rings durrmcdanks's Avatar
    Join Date
    Feb 25 2008
    AZ Member #
    25729
    My Garage
    S4,RS4
    Location
    MN

    Re: CC Mod - The DIY (B7)

    What did you use to re seal the lights? Also, Joey whats different about the labor?

  10. #10
    Veteran Member Four Rings fly300kts's Avatar
    Join Date
    Oct 16 2008
    AZ Member #
    34255
    My Garage
    03 Golf GTI - 03 Golf 2.0l - 04 Golf 2.0L
    Location
    South Florida - Ft Lauderdale

    Re: CC Mod - The DIY (B7)

    Quote Originally Posted by joeycuccaro View Post
    Phil,

    Thanks for taking the time to put this together. The labor required is quite different between the B6 and the B7.
    Correct and I would not even try on the B6.
    B7 uses sealent while B6 uses glue and 95% of the time, when you want to open a B6 housing, you end up distroying it

    Phil

  11. #11
    Veteran Member Four Rings fly300kts's Avatar
    Join Date
    Oct 16 2008
    AZ Member #
    34255
    My Garage
    03 Golf GTI - 03 Golf 2.0l - 04 Golf 2.0L
    Location
    South Florida - Ft Lauderdale

    Re: CC Mod - The DIY (B7)

    Quote Originally Posted by WinterRunner View Post
    Nice write up, unfortunately I do not have the balls to try this myself....
    Send them to me, I'll take care of you

    Phil

  12. #12
    Veteran Member Four Rings fly300kts's Avatar
    Join Date
    Oct 16 2008
    AZ Member #
    34255
    My Garage
    03 Golf GTI - 03 Golf 2.0l - 04 Golf 2.0L
    Location
    South Florida - Ft Lauderdale

    Re: CC Mod - The DIY (B7)

    Quote Originally Posted by durrmcdanks View Post
    What did you use to re seal the lights? Also, Joey whats different about the labor?
    I use OEM sealent (very messy) than a bit of silicone

    Phil

  13. #13

    Re: CC Mod - The DIY (B7)

    Quote Originally Posted by fly300kts View Post
    Correct and I would not even try on the B6.
    B7 uses sealent while B6 uses glue and 95% of the time, when you want to open a B6 housing, you end up distroying it

    Phil
    Yeah, it is a good thing you don't have to open the B6 housing in order to do the clear corner modification.

  14. #14
    Veteran Member Four Rings Sharkfin's Avatar
    Join Date
    Nov 01 2007
    AZ Member #
    22242
    My Garage
    B7 A4 2.0TQT
    Location
    PA

    Re: CC Mod - The DIY (B7)

    B6 is really tough because they are glued together (rock solid at that). And for the B7 he uses Butol which is what Audi uses.

  15. #15
    Veteran Member Three Rings durrmcdanks's Avatar
    Join Date
    Feb 25 2008
    AZ Member #
    25729
    My Garage
    S4,RS4
    Location
    MN

    Re: CC Mod - The DIY (B7)

    so not even a heat gun would take care of the glue on a B6 housing?

  16. #16
    Veteran Member Four Rings beemercer's Avatar
    Join Date
    Aug 14 2008
    AZ Member #
    31944
    My Garage
    '90 Cq - '13 R
    Location
    obamaland

    Re: CC Mod - The DIY (B7)

    Quote Originally Posted by durrmcdanks View Post
    so not even a heat gun would take care of the glue on a B6 housing?
    Not in my experience. It'll help soften the glue so you can get at it with a pick and try to separate the lens from the housing, but it's still not easy or delicate.
    You represent the idiocy of today.

  17. #17
    Veteran Member Three Rings durrmcdanks's Avatar
    Join Date
    Feb 25 2008
    AZ Member #
    25729
    My Garage
    S4,RS4
    Location
    MN

    Re: CC Mod - The DIY (B7)

    Damn, I really want to black out my headlights.

  18. #18
    Veteran Member Four Rings iconoclast's Avatar
    Join Date
    Sep 15 2006
    AZ Member #
    11431
    Location
    In, Out and Around...

    Re: CC Mod - The DIY (B7)

    excellent review and write up... unfortunately i do not have the courage to do this i think i am going to stick with my instinct and buy a set of ecodes.

  19. #19
    Active Member Two Rings
    Join Date
    Feb 23 2009
    AZ Member #
    39088
    Location
    SouthLand

    Re: CC Mod - The DIY (B7)

    Does anyone sell replacement headlight lenses? My Xenons are fine but the outermost main lens has some weird cloudiness that polishing didn't remove.

    Thanks-

  20. #20
    Veteran Member Four Rings fly300kts's Avatar
    Join Date
    Oct 16 2008
    AZ Member #
    34255
    My Garage
    03 Golf GTI - 03 Golf 2.0l - 04 Golf 2.0L
    Location
    South Florida - Ft Lauderdale

    Re: CC Mod - The DIY (B7)

    Quote Originally Posted by bleicht View Post
    Does anyone sell replacement headlight lenses? My Xenons are fine but the outermost main lens has some weird cloudiness that polishing didn't remove.

    Thanks-
    Send them to me and I promise, I will bring them back to life

  21. #21
    Veteran Member Four Rings beemercer's Avatar
    Join Date
    Aug 14 2008
    AZ Member #
    31944
    My Garage
    '90 Cq - '13 R
    Location
    obamaland

    Re: CC Mod - The DIY (B7)

    Quote Originally Posted by durrmcdanks View Post
    Damn, I really want to black out my headlights.
    It's definitely possible, see what Xoticautowerks did here LEDs in B6, it's just a lot tougher than the bake and separate.
    You represent the idiocy of today.

  22. #22
    Veteran Member Four Rings whartung's Avatar
    Join Date
    Feb 01 2007
    AZ Member #
    15319
    Location
    Los Angeles

    NECROBUMP!

    About to tackle this project on Tuesday or Wednesday finally.

    Few quick questions:

    How did Canuck manage to remove his turn signal surround without that modified torx screwdriver to get behind the lens?

    Is the 3/16" 8" flathead screwdriver the best way to loosen the outermost headlight bolts?

    Will most matte black spray paints work just to blackout that front surround piece?

    Is additional sealant required or is it just precautionary?
    Sold: 2005.5 Sprint Blue Pearl Audi S4 Sedan 6MT
    Corsa w/ 12" Resonators - Vogt GT's - Trexturk Catless Downpipes - JHM Tuned - JHM SS - JHM Intake Spacers - JHM/Apikol Rear Differential Mount - JHM LWCP - K&N - RS4 Sway - Blackout Grille - ClearCornered and Blackedout Headlights - Xeonmatch - ECS Snub

  23. #23
    Veteran Member Four Rings whartung's Avatar
    Join Date
    Feb 01 2007
    AZ Member #
    15319
    Location
    Los Angeles

    Quote Originally Posted by whartung View Post
    NECROBUMP!

    About to tackle this project on Tuesday or Wednesday finally.

    Few quick questions:

    How did Canuck manage to remove his turn signal surround without that modified torx screwdriver to get behind the lens?

    Is the 3/16" 8" flathead screwdriver the best way to loosen the outermost headlight bolts?

    Will most matte black spray paints work just to blackout that front surround piece?

    Is additional sealant required or is it just precautionary?
    Buller?...
    Sold: 2005.5 Sprint Blue Pearl Audi S4 Sedan 6MT
    Corsa w/ 12" Resonators - Vogt GT's - Trexturk Catless Downpipes - JHM Tuned - JHM SS - JHM Intake Spacers - JHM/Apikol Rear Differential Mount - JHM LWCP - K&N - RS4 Sway - Blackout Grille - ClearCornered and Blackedout Headlights - Xeonmatch - ECS Snub

  24. #24
    Senior Member Two Rings CKS's Avatar
    Join Date
    Sep 28 2009
    AZ Member #
    48495
    Location
    Truckee, CA

    Quote Originally Posted by whartung View Post
    NECROBUMP!
    Is additional sealant required or is it just precautionary?
    I can only help with your last question. I didn't use additional sealant and had one light seal and one didn't, then I had to go back in and sealed them both. Lesson? seal 'em

  25. #25
    Veteran Member Four Rings whartung's Avatar
    Join Date
    Feb 01 2007
    AZ Member #
    15319
    Location
    Los Angeles

    Quote Originally Posted by CKS View Post
    I can only help with your last question. I didn't use additional sealant and had one light seal and one didn't, then I had to go back in and sealed them both. Lesson? seal 'em
    word
    Sold: 2005.5 Sprint Blue Pearl Audi S4 Sedan 6MT
    Corsa w/ 12" Resonators - Vogt GT's - Trexturk Catless Downpipes - JHM Tuned - JHM SS - JHM Intake Spacers - JHM/Apikol Rear Differential Mount - JHM LWCP - K&N - RS4 Sway - Blackout Grille - ClearCornered and Blackedout Headlights - Xeonmatch - ECS Snub

  26. #26
    Active Member Two Rings Jonny2shoes's Avatar
    Join Date
    Dec 12 2010
    AZ Member #
    68177
    Location
    Greenville / SC

    Quick note. On my B7 (98) the torx bit I had to use was definitely a T-20 and not a T-25 for the screws inside the headlight housing. I know this because I just did the CC mod this weekend and the T-25 bit that I modified did not fit the screw behind the turn signal or any of the other screws. It was too big. I got an elongated T20 and modified it and it worked like a charm. Phil are you sure you used a T-25? If you did there may be a difference in sizes of screws between the different years of the B7. Thought I would check and let everyone know just in case you do this mod soon. Great write up Phil. This is not as bad of job as it looks like....the scariest part is prying the headlight lenses from the housing, just because you know that is the point of no return. Overall this write up was awesome and definitely made a job I would never consider taking on, possible.
    08 A4 Avant. Apr Stage 2+. 19" VMR 708 / 245 Michelin's

Bookmarks

Posting Permissions

  • You may not post new threads
  • You may not post replies
  • You may not post attachments
  • You may not edit your posts
  •  


    © 2001-2025 Audizine, Audizine.com, and Driverzines.com
    Audizine is an independently owned and operated automotive enthusiast community and news website.
    Audi and the Audi logo(s) are copyright/trademark Audi AG. Audizine is not endorsed by or affiliated with Audi AG.