


Here is the first half of the DIY I was writing for it:
Originally I was going to have mine vinyl wrapped until I came across a guy who painted his which IMO is a better solution.
When I previously did research everyone kept saying you had to break the back small window and disassemble the doors to remove the trim to paint it. I can now confirm neither is needed.
With that, here is some preliminary research. I might post a proper DIY when I do mine if I get enough interest here.
Removing Body Window Trim
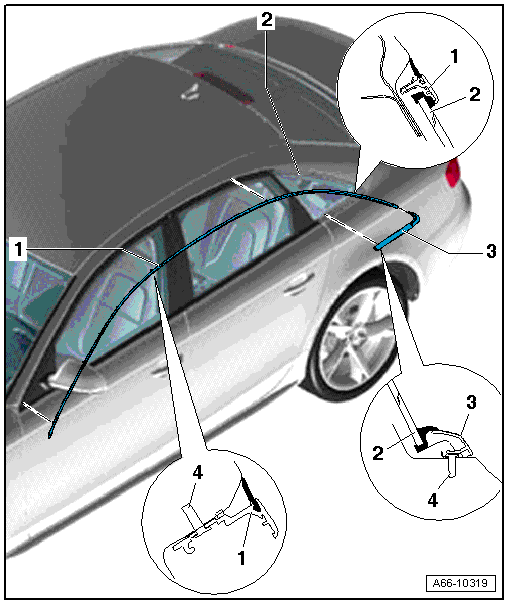
1. Roof Trim Molding
3. Decorative Trim Strip
Removing Door Window Trim
When I previously did research everyone kept saying you had to break the back small window and disassemble the doors to remove the trim to paint it. I can now confirm neither is needed.
With that, here is some preliminary research. I might post a proper DIY when I do mine if I get enough interest here.
Removing Body Window Trim
1. Roof Trim Molding
Standard roof trim molding:
2. Side Window-- Remove the roof trim molding from the body beginning at the C-pillar.
High gloss roof trim strip:-- Pull the lower trim strip out the clips beginning on the side of the C-pillar.
-- Carefully pry the roof trim strip out of the clips above the side window and unclip it from the body flange.
-- Beginning at the A-pillar, unclip the roof trim strip from the body moving downward.
-- Carefully pry the roof trim strip out of the clips above the side window and unclip it from the body flange.
-- Beginning at the A-pillar, unclip the roof trim strip from the body moving downward.
3. Decorative Trim Strip
-- To remove the C-pillar, pry it out of the clips beginning at the side.
-- Pry the roof trim molding on the roof out of the side clips.
-- Slide the trim molding down out of the roof trim molding.
-- Pry the roof trim molding on the roof out of the side clips.
-- Slide the trim molding down out of the roof trim molding.
Removing Door Window Trim

 Reply With Quote


Bookmarks