Audizine - An Automotive Enthusiast Community

Results 1 to 14 of 14
  1. #1
    Senior Member Three Rings AllroadMass's Avatar
    Join Date
    Oct 30 2015
    AZ Member #
    363796
    Location
    Massachusetts

    Power Steering Return Hose DIY

    Guest-only advertisement. Register or Log In now!
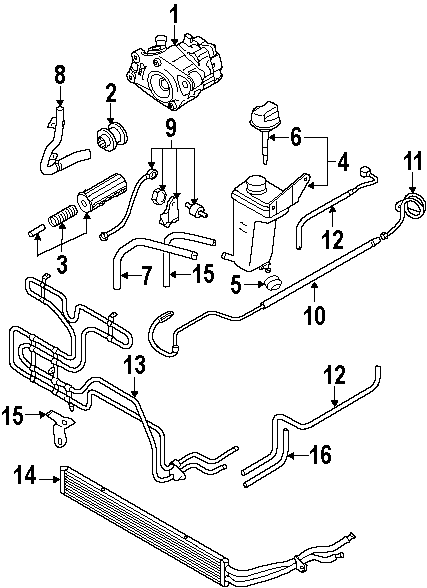
    Just finished installing my power steering return hose and wanted to put up some documentation to the community. Took me approximately 3.5 hours from start to finish including pictures and writing this up. Thanks to Badger, the following are part numbers of what you'll need to do the job.

    P/N 8E1422891AK "Return hose"
    P/N WHT000507 for "Pressure hose Bolt" (banjo bolt)
    P/N N0138487 for "Steering gear and linkage Pump and hoses Seal Type 1 Type 1" (crush washers)
    22mm offset wrench (I used 2 of them)

    I bought my kit with all required items from ECS for $130 bucks but I had my own oetiker clamp. https://www.ecstuning.com/ES2771229/

    The return hose is #12 and it's once piece even though the picture shows it as 2 separate hoses.

    1) Jack up the car and remove the wheel. Noticed the outter tie rod end, upper control arms, knuckle, and strut/spring. I thought about removing the strut/spring and knuckle to get more room but found a way to get to the hose at the rack without removing any of that stuff. There's a plastic cover around the outter/inner tie rod end, you'll have to remove to get access to the hose/rack connection.


    2)Remove the connector that's currently in front of the plastic cover. Mine was zip-tied together and I was able to simple pull it away from the plastic cover after snipping it. Disconnect the connectors and move it aside


    3)Remove the acorn nut (10mm) and 2 plastic push-pin that's holding the plastic cover to the car. The acorn nut is on the right hand side of the plastic cover and the 2 push-pin are on the left side hiding behind the springs.


    4)Pleasantly surprised that the cover doesn't have a slit where you can slide it off the tie rods, it's a once piece cover and I wiggled it out and slid it out/around the upper control arms. I thought about cutting a tiny slit at the bottom but I had plenty of clearance by just moving it so didn't see any benefits in cutting it


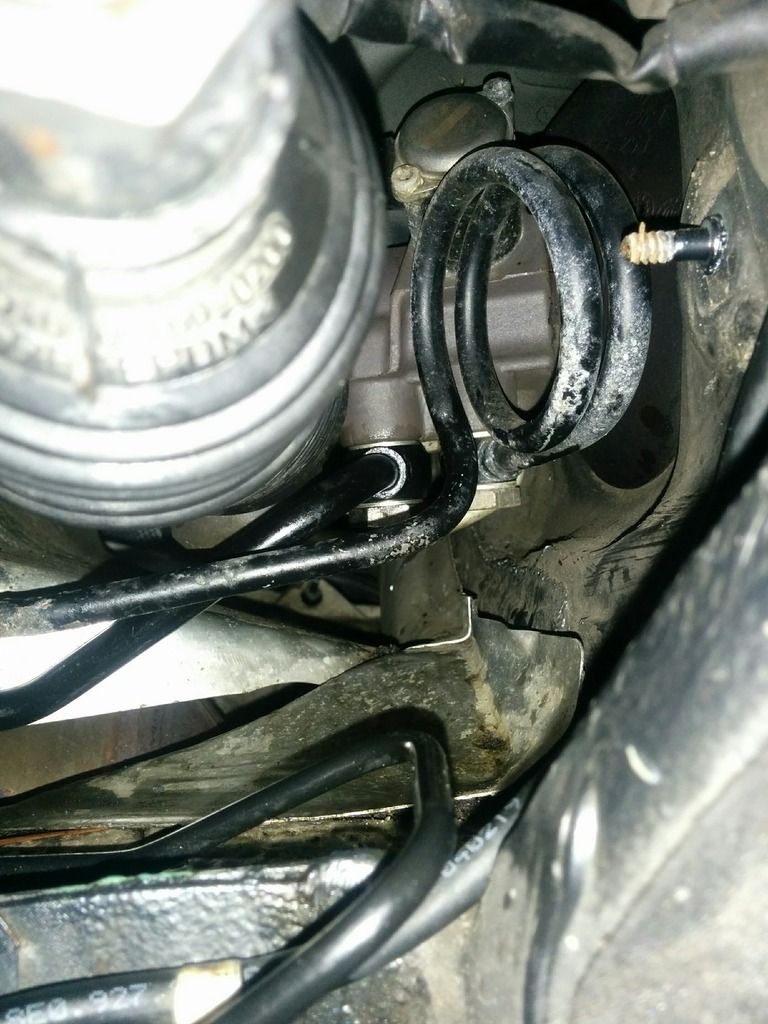
    5)Now you see the two lines attached to the rack. The one with the loop is the high pressure and the gold/copper color below it is the return hose that we need to remove. I put my bottle jack below the rotor and push it up a few inches to create some more room for myself. That way the tie rods would be slightly higher and allow a tiny bit more room for my offset wrench. I had to used 2 different 22mm offset wrenches to loosen the bolt a few turns. After that, I just hand twisted the rest of the way. I'm not going to lie, I'm pretty sure the birth canal is bigger that the room you have to play with so be patient and don't get frustrated.


    6)Now that you have the banjo bolt off the rack, there are 3 places where the hose is clipped to the car. There are two netting clip things in the engine bay and the 3rd place you'll have to get from underneath the car. After undoing all 3 clips, pull the hose up in the engine bay as much as possible. Then wiggle the hard connection out and around the tie rod and the rest of the hose will follow.


    7)The rest of it is now doing everything in the reverse order. I slid the hose through the same opening near the tie rod and wiggle it as far as I could. Go up into the engine bay and pull up as much as you can. Be patient, it's not a straight line so it's going to take a bit of time.

    8)Putting the banjo bolt back on the rack is loads of fun. Don't forget your crush washers. Put the washer on the banjo bolt and slide it into hose opening. The washer on top of the hose always has a way of slipping off for me so I put a little bit of coconut butter (whatever you have to make it stick to the hose) on it and slide it through the banjo bolt. You're pretty much doing it blink so keep sticking it in the hole and I'm sure a thread will catch. Don't tighten it all the way just yet, leave some room so you can wiggle the hose the rest of the way down to the cooler line.

    9) I routed the hose the exact same way that I took it out and found it much easier to remove the little plastic clip holding the two connectors behind the headlight.


    10) Connect the hose to the cooler line and make sure you clamp at the correct location, ask 924Carrera why. The hard line has a bulge at the end so make sure you push the hose all the way in and clamp as close as you can to the end.


    I overfilled the reservoir and started the car. Shouldn't look like a waterfall in there so if it does, add more fluid. While the wheels are off the ground, turn it lock to lock to remove as much air from the system. Take it for a ride and wait for the next thing to break because you know it will.

  2. #2
    Veteran Member Four Rings Terry.Reese's Avatar
    Join Date
    Oct 05 2015
    AZ Member #
    359932
    My Garage
    2005 Audi Allroad 2.7 Biturbo V6, 2000 Lexus 2JZGE GS300 and my old skate board
    Location
    Billings, MT

    Awesome! I wish I would have had time to actually do mine but I was very hard pressed for time. Nice job!

  3. #3
    Veteran Member Four Rings badger.'s Avatar
    Join Date
    Mar 31 2014
    AZ Member #
    168335
    My Garage
    '18 RS3 | '05 S4 Avant
    Location
    KY


    great write-up & pictures!
    '18 RS3 Glacier White: DS1 Stg 2 | Wagner EVO1 IC | 034 4" Turbo Inlet | 034 4" Intake
    '05 S4 Avant Brilliant Red: JHM Tune | JHMv1 Headers | Fast Intentions Catback | Ported IM & Spacers | JHM LWCP | JHM ATF Cooler | Thor Skid Plate | Koni Yellows | Apikol Rear Diff | JHM LW Rotors | AudioQ 1200D w/Dual 10" CVRs

  4. #4
    Senior Member Three Rings stevemiller333's Avatar
    Join Date
    Oct 22 2016
    AZ Member #
    383668
    My Garage
    05 B6 S4 SDN, E46 M3 VERT, 2018 F150
    Location
    Rochester, NY

    Thank you! I added to my list of links I have been gathering to help me handle future problems. It is getting rather long!

  5. #5
    Senior Member Three Rings REVOofRustler's Avatar
    Join Date
    Jan 18 2014
    AZ Member #
    139289
    Location
    Redmond, WA

    Nice work! This doesn't look as bad as I thought, but I'm still glad I did mine with the engine out lol

    Sent from my SM-N900V using Audizine mobile app
    2004 S4 Avant 6MT Dolphin Grey
    | JHM Tune | JHM Short Throw Shifter Trio Package | Fast Intentions Dual 2.5 Resonated Catback | JHM 4:1 Center Diff | BC BR Type Coilovers | Hotchkiss Rear Sway Bar
    Instagram: tha_notorious_b | rotational.media

  6. #6
    Senior Member Two Rings
    Join Date
    Apr 18 2012
    AZ Member #
    92081
    My Garage
    1995 Toyota Land Cruiser (FJ80/FZJ80)
    Location
    Central Texas

    excellent! it's a moderate pain, mostly for the banjo bolt and routing things just right.

    the routing of the power steering return puts it RIGHT next to the exhaust manifold shield (which is tiny), which is also where mine burst. in hopes of preventing future failures, i put the line inside silicone & fiberglass fire tubing, the same stuff used to protect fuel lines. hopefully it'll dissipate some of that direct heat.

    - emilio
    Vorsprung durch Service Position
    Buy shirts & help me buy tires!

  7. #7
    Senior Member Three Rings AllroadMass's Avatar
    Join Date
    Oct 30 2015
    AZ Member #
    363796
    Location
    Massachusetts

    Thanks guys! My line had a small gash 4 inches from the end of the line where it connects to the cooler. Must have rubbed the support bracket for the aux radiator and finally burst.

  8. #8
    Veteran Member Four Rings gcoy's Avatar
    Join Date
    Apr 06 2009
    AZ Member #
    40835
    My Garage
    2005 B6 S4 6mt Avant & 2001 B5 S4 6mt Avant (Sold) & 2007 VW Passat 3.6 4Mo wagon
    Location
    Boise Id

    Great write up. That Damn Banjo bolt.
    I cut a cheap socket with my Dremel. Worked like a charm.

    [IMG][/IMG]

  9. #9
    Senior Member Three Rings AllroadMass's Avatar
    Join Date
    Oct 30 2015
    AZ Member #
    363796
    Location
    Massachusetts

    I'm actually going to make one of these this weekend, Wicked awesome idea Gcoy. I'm sure it will come in handy when I have to do my allroad (it's just weeping at the moment).

  10. #10
    Established Member Two Rings 4kqlifer's Avatar
    Join Date
    Feb 25 2012
    AZ Member #
    88823
    Location
    Issaquah

    Quote Originally Posted by AllroadMass View Post
    I'm actually going to make one of these this weekend, Wicked awesome idea Gcoy. I'm sure it will come in handy when I have to do my allroad (it's just weeping at the moment).
    I will add that getting the top washer back on was the biggest challenge for me. I ended up buy a long telescoping magnet and really long needle nose pliers. The magnet makes it easy to get the bolt in there and up into the fitting. Then the needle nose to gingerly drop the top washer (with a light grease to keep it in place) onto the bolt. Then threading it wasn't hard at all. Also, running the line back down was tough to get lined up from the top as it has a slight curve, and always wanted to get hung up. I bent a pc of hard wire (bucket handle) and made a hook with it. That way when you are fishing the tube down that narrow hole you can hook it from below and pull it down. Obviously be careful and make sure there are no sharp edges.

  11. #11
    Registered Member One Ring S42L's Avatar
    Join Date
    May 10 2019
    AZ Member #
    481713
    My Garage
    2014 VW Passat TSI & 2003 A4 Quattro 1.8T
    Location
    Lexington, Kentucky

    Thank you for this great explanation. It saved me $$$$. I was able to use a shallow socket wrench to squeeze back in there and get the banjo bolt off. Reinstalling the top crush washer was definitely the worst part. Also, unbolting the tie rod end (13mm and 16mm) and moving it out of the way helped tremendously. It only took 5 mins. My bolts were not rusted though. Thanks again!!

  12. #12
    Veteran Member Three Rings Velox's Avatar
    Join Date
    Mar 30 2016
    AZ Member #
    371041
    My Garage
    S4
    Location
    Oranjestd

    Just use Teflon tape to hold the washer in place

  13. #13
    Junior Member Two Rings cyberduc748's Avatar
    Join Date
    Nov 30 2018
    AZ Member #
    432198
    Location
    Mountain View/CA

    Reviving an old thread. My turn.

    Hear a "swosh" driving and immediatly noticed lost of power steering. Drove back home 2 miles and put on Quickjack. Fluid still dripping below and power steering fluid container empty. Add fluid and noticed the bubling leaing on the return hose where it bends back down into the fender and under the headlight.

    Luckilly I have all the hoses ( 7 total) already and banjo bushing.

    Followed all the tips from this thread. Took no more than 15 mintures to remove the retun line from the steering rack (banjo) to the cooler. Also remove the short return hose from the cooler to the fluid container. Snaking the new hose back took another 20-30min.,

    Now is the challenge. Treading the banjo/washer to the rack. I have a "small" hand.....um....and I can barely get my hand in the space under the rack and can only use two fingers to turn the bolt. Tried for 30-45min with no succcess, The upper crushed washer keeps falling up. Tried the teflon tape but still no go. Decided to make a break and drink a couple beer to think better way.

    *** Tip: use a safety wire to hold the bold and washer. ***

    Now I can focus on just treading the bajo bolt, again wil only two fingers. In less than two minutes, I manged to get 1-2 turns in. I removed the safety wire and continue turning with two fingers as much as possible then finished it with the offset wrench. The other end was just clamped on.......Done.

    Decided to do the supply hoses and pressure hoses another day as it looks like I might need to remove the bumper cover in put in service more to get the hoses that connects to the PS pump......

    thanks.......
    Last edited by cyberduc748; 09-05-2023 at 09:24 PM.
    B7 S4 Avant: ECU Tune, FI downpipes + Miltek catback, RS4 6pd MT & Diff, RS4 front brakes, Voshmods B8 S4 rear brakes

  14. #14
    Senior Member Two Rings calebtbay's Avatar
    Join Date
    Sep 06 2016
    AZ Member #
    380297
    My Garage
    2006 Range Rover Sport SC, 1998 Range Rover P38, 2005 Izuzu NQR, 2007 Toyota Forklift
    Location
    Bedford, IN

    Nice! I’ll probably need to do this soon. Love the wire idea.

Bookmarks

Posting Permissions

  • You may not post new threads
  • You may not post replies
  • You may not post attachments
  • You may not edit your posts
  •  


    © 2001-2024 Audizine, Audizine.com, and Driverzines.com
    Audizine is an independently owned and operated automotive enthusiast community and news website.
    Audi and the Audi logo(s) are copyright/trademark Audi AG. Audizine is not endorsed by or affiliated with Audi AG.