Audizine - An Automotive Enthusiast Community

Results 1 to 11 of 11
  1. #1
    Established Member Two Rings
    Join Date
    May 10 2016
    AZ Member #
    373099
    Location
    Southeastern PA

    B7 RS4 Inner CV Joint and Rear Prop CV Joint play normal?

    Guest-only advertisement. Register or Log In now!
    Hello all,

    I'm hoping for some feedback regarding the amount of CV joint play in the videos below. FYI-The car was on ramps, in gear, with the parking brake on. You'll notice the driver's side axle was recently replaced by the previous owner and it has more play than the OEM axle on the passenger side.


    Any input would be greatly appreciated : )

    Inner CV joints of front axles:


    Driveshaft rear CV:
    Last edited by sti2relaxxin; 09-22-2016 at 06:11 PM.

  2. #2
    Veteran Member Four Rings ven0m's Avatar
    Join Date
    May 10 2015
    AZ Member #
    332001
    My Garage
    Audi RS6 c7 (Avant), Audi RS4 b7 (Sedan), Audi A4 AllRoad b8.5 (Avant)
    Location
    Slovenia

    The "play" looks absolutely normal to me. The "play" has nothing to do with the axle or CV joints themselves as those are directly bolted to the transmission via the bolts you see where you're holding your hand. All the "play" you are seeing is from the transmission and differentials themselves and as far as my mechanical knowledge reaches the open-differentials which are connecting your axles & prop shaft to the transmission output shaft always have a minimum amount of "play" in them. The reason one side showing more play than the other is due to the diff stopping in that exact position.

    Anybody please chime in and correct me if I'm wrong on this.

    PS: image attached for a better visualisation of the front and rear diff. The central diff is self-locking and a bit more complex to understand, so I rather only show the two open-diffs front and back.

    Jeremy Clarkson: "So when you were saying that it won’t slide, what you meant was, ‘I can’t slide it.’“
    James May: "Yes."

  3. #3
    Established Member Two Rings
    Join Date
    May 10 2016
    AZ Member #
    373099
    Location
    Southeastern PA

    Thank you for your input ven0m. The majority of threads that discuss this are mostly commentary so it's difficult to figure out how much movement is normal vs. too much.

    I got the car up in the air again today and removed the 2 heat shield bolts to examine the central joint of the prop (driveshaft) and was surprised to find out the bolts also hold the center support bearing in place. The whole thing sagged down as I was removing the bolts and I'm amazed that a 400+hp car's driveshaft requires so little support at the center bearing!

    The center support bushing seems pretty shot as I was able to move the driveshaft up/down a good 1/2" before I unbolted the mount. I made the below video to capture how much forward/aft movement of the driveshaft where it connects to the rear diff. It moves in and out 1/2"-1" at the rear diff and the same amount where it meets the transmission. Would you mind taking a look and letting me know if this is normal?


  4. #4
    Veteran Member Four Rings ven0m's Avatar
    Join Date
    May 10 2015
    AZ Member #
    332001
    My Garage
    Audi RS6 c7 (Avant), Audi RS4 b7 (Sedan), Audi A4 AllRoad b8.5 (Avant)
    Location
    Slovenia

    Sorry for the late reply sti2.

    The slack on the second video seems a bit much. Did you check the bushings of the rear differential? Some slack is normal, but too much I would say has to do with shot differential bushings at the back.

    Check them out and if they need replacement yea have a ton of options here on the forums from 034 to Powerflex, etc. You can't go wrong with any of them. My personal preference would be, that you go with a higher densety bushing, because then you reduce the slack which was already there from the factory and the car will/should feel more lively.
    Jeremy Clarkson: "So when you were saying that it won’t slide, what you meant was, ‘I can’t slide it.’“
    James May: "Yes."

  5. #5
    Established Member Two Rings
    Join Date
    May 10 2016
    AZ Member #
    373099
    Location
    Southeastern PA

    Thanks for your input ven0m; no worries on the delayed response!

    When I was installing the Apikol rear diff mount I noticed those bushings back there and realized they'd need to be replaced. That was a few weeks ago though and I completely forgot about them. I purchased the 034 Motorsports bushing inserts and will report back with the results.

    On another note, I used 3M Window Weld to fill the cavity in the rubber bushing in the center driveshaft support and that made a major difference in the driveline slop I've been experiencing. As others have mentioned, when you replace the engine, torque, transmission, and rear diff mounts, the worn out rubber in the center driveshaft mount can't handle the added stress and vibrations/clunking can become more prevalent. I have only been experiencing slight vibrations (no clunk), but when I got under there and moved the driveshaft around in the mount it was very clear the rubber was totally worn out. The previous owner took very good care of this vehicle and the driveshaft has no rust and looks nice and black, so hopefully my quick fix will endure. Otherwise I'll get a new driveshaft instead of rebuilding it.

    Thanks again for your help ven0m!

  6. #6
    Veteran Member Four Rings ven0m's Avatar
    Join Date
    May 10 2015
    AZ Member #
    332001
    My Garage
    Audi RS6 c7 (Avant), Audi RS4 b7 (Sedan), Audi A4 AllRoad b8.5 (Avant)
    Location
    Slovenia

    Good idea with the window weld! I'll have a look myself how that rubber is doing. That's a very good topic you brought up with that driveshaft bushing. I'm undergoing a complete suspension rebuild myself - all adjustable upper control arms with fixed spherical bearings, update tie rods, all bushings on the lower arms, all aluminium sub-frame mounts, I'm throwing the DRC out and replacing with KW Clubsport, etc.

    And lately I've been considering to also change all drive-train mounts if I already have the car in the air and "bare-foot". A couple months back I got the engine mounts replaced with OEM so I'm still not 100% sure to go for it as I rather first feel how the car handles with the suspension adjusted and later do the complete drive-train to see the change.
    Jeremy Clarkson: "So when you were saying that it won’t slide, what you meant was, ‘I can’t slide it.’“
    James May: "Yes."

  7. #7
    Established Member Two Rings
    Join Date
    May 10 2016
    AZ Member #
    373099
    Location
    Southeastern PA

    If you do choose to use the window weld, you should unbolt the exhaust hanger mounts and lower the exhaust to give you room to work.
    Also- don't forget to check/replace the torque mount on the side of the engine. Mine was sheared in half, which may have been a result of raising the engine to change the engine mounts. Given that the car is 8 years old I think it had more to do with the rubber being dry rotted.

    Torque mount tips:
    1) Only remove the bumper fasteners on the passenger side, and unscrew the bumper adjusters 1.5 turns. This allows the passenger side of the bumper to be pulled away enough to remove the headlight easily.
    2) When it comes time to install the new torque mount, use duct tape to secure the nut and washer to your socket attached to a few ratchet extensions. This allows you to hold the nut up were it needs to be with one arm, while you manually screw in the new torque mount with the other arm. I was able to start the screw into the nut in less than 5 minutes which is at least 25 minutes faster than any of the other DIY threads I read which didn't utilize this technique. You can screw on the new torque mount almost all the way on this way until it's snug and anchored down, then you get under the car and do just a few turns with your crows foot attached to your ratchet extensions to get it tight. My RS4 had a few shims under the piece of metal that reaches over and secures the torque mount, and I had to remove one of them in order to allow the extension to settle down on top of the torque mount and anchor it in place. I used the 034 torque mount FYI.

  8. #8
    Veteran Member Four Rings ven0m's Avatar
    Join Date
    May 10 2015
    AZ Member #
    332001
    My Garage
    Audi RS6 c7 (Avant), Audi RS4 b7 (Sedan), Audi A4 AllRoad b8.5 (Avant)
    Location
    Slovenia

    Good to know, thanks for the info regarding the easy torque mount install! And that trick for removing the headlight with the bumper on is gold for this forum, I hope you know that!

    Also my torque mount broke in two when I had a traffic accident. Basically my passenger side wheel got twisted out and due to the impact the bottom passenger side bracket which holds the engine mount cracked 1/2 way through, so the engine sagged down on the passenger side and the torque mount got split. (the frame was untouched in the collision, the wheel got the full impact - but wasn't that dramatic thankfully - front end completely rebuilt and put her back on the road!)

    During the rebuild I changed out all the engine mounts and torque mount. That's why I'm still deciding if I go with 034 mounts as all my mounts are still new at this time. I rather go step-by-step to see the differences what a track suspension setup makes and then later how it feels when you take the drive train slop out. Of course that means double work.
    Jeremy Clarkson: "So when you were saying that it won’t slide, what you meant was, ‘I can’t slide it.’“
    James May: "Yes."

  9. #9
    Established Member Two Rings
    Join Date
    May 10 2016
    AZ Member #
    373099
    Location
    Southeastern PA

    I wish I could say that it was my idea to just pull one side of the bumper away to do the torque mount install, but someone else mentioned that they were able to do it this way in one of the many random threads I read while researching the install.

    Here are some tips:
    1) Loosen the 3 bumper adjusters 1.5 turns. No need to loosen the 4th one on the far side of the driver's side headlight.
    2) Remove the 3 Torx screws between the headlights
    3) Remove the undertray
    4) Remove the screws for the passenger side fender liner; I think there are 3 or 4. Whatever it takes to be able to peel it away to gain access with your ratchet extensions.
    5) Remove the little screw that goes down through the metal part of the fender and into the plastic of the bumper. Right when you pull the fender liner back you'll see it about 5" in on the right. This screw is not talked about on the forums and doesn't show up in the DIYs, so I of course didn't remove it even though every shred of common sense in my body told me otherwise. As I pulled the bumper away from the quarter panel that screw cut a nice little trail through the tab it was screwed into. Luckily it attaches to a metal clamp type thing so when I reinstalled the bumper (after loosening the screw so the plastic tab would fit back in via the trail I had made; arrggghh!!!) it tightened down nicely. No one will ever see the damage and it's still functional so no biggie.

    It's right where letter "B" points to in this picture:
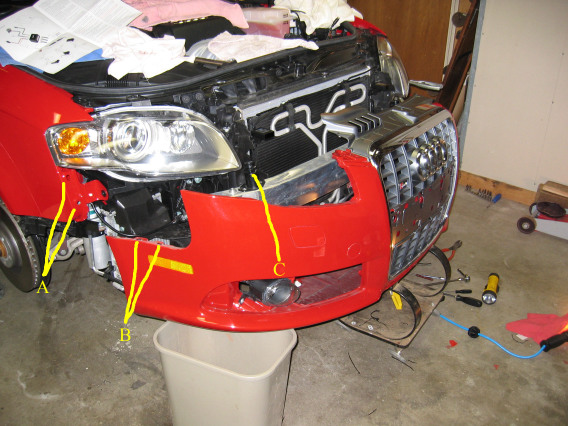

    6) Remove the 2 screws deep in the bumper and follow the instructions for removing the headlight. Once I pulled the bumper out from the side and then forward a tiny bit away from the car there was plenty of room to access the screws for the headlight and to unplug it. Hello Torque mount you pesky bugger!


    I never experienced the car when the OEM mounts were new, so I can't give you any advice as to whether or not you should replace them with an aftermarket brand. My gut tells me you should leave them in and only swap them out if you are noticing excessive movement of the engine or you want to tighten the drive train further after you've replaced all the other mounts.

    By the way; I installed the 034 Motorsport Rear Diff Carrier Bushing Inserts last night and the short cruise I took afterwards makes me thing I have finally removed the last bit of slop in my driveline. I'll need to drive it on some backroads though before I'm convinced though. Thanks again for suggesting replacing/tending to them : )

  10. #10
    Veteran Member Four Rings quattroism25's Avatar
    Join Date
    Jun 04 2007
    AZ Member #
    18545
    Location
    Exiled in Utah

    I recently made a vid to ask this very same question. Hard to believe all that play is normal

    Daytona Grey S7
    MORO BLUE JHM modded V8 Sold

  11. #11
    Veteran Member Three Rings
    Join Date
    Jul 15 2015
    AZ Member #
    342719
    Location
    Rochester NY

    My wife's car has what I think is excessive slop in the drivetrain, meaning, from gas-on to gas-off, there's a lot of backlash, so I have a couple of questions on this topic:
    - I can think of some items that need to be checked: left and right engine mounts, snub mount, transmission mount, trans subframe mount bushings, driveshaft carrier bearing mount, rear diff mount bushings, all four half-shafts, and then all suspension bushings. Is there anything else that folks recommend to check. I've done both front half-shafts, engine mounts, snub mount, and front control arm bushings. There's still a LOT of slop, making gear shifts way worse than they should be
    - it was mentioned in this thread something about a torque mount - is that just another name for the snub mount, or is there something else in there on the passenger side? I did not connect anything other than those three points when I replaced the engine after a timing job
    - has anyone worked on excessive slop in either the front or rear diff? I checked my center diff when I did the synchros and it, and the front diff seemed to be ok for backlash, but I haven't checked the rear diff yet

Tags for this Thread

Bookmarks

Posting Permissions

  • You may not post new threads
  • You may not post replies
  • You may not post attachments
  • You may not edit your posts
  •  


    © 2001-2024 Audizine, Audizine.com, and Driverzines.com
    Audizine is an independently owned and operated automotive enthusiast community and news website.
    Audi and the Audi logo(s) are copyright/trademark Audi AG. Audizine is not endorsed by or affiliated with Audi AG.