Audizine - An Automotive Enthusiast Community

Results 1 to 24 of 24
  1. #1
    Veteran Member Four Rings vavJETTAw36's Avatar
    Join Date
    Jul 04 2012
    AZ Member #
    96276
    Location
    Woodbridge, VA

    Wastegate leak: Hardline separated from soft line

    Guest-only advertisement. Register or Log In now!
    Alright guys, I found a leak in the WG line where the hardline crimps to soft line and gets hose clamped onto the actuator nipple. This is on the passenger side.

    Need a solution to run a line from the Y split near N75 down directly to the WG actuator bypassing the hardline. What hose size and material do I need? How do I route? Need this to work for a long time until the next time I pull the engine.

    Looks like I can simply drop the sway bar and gain enough room for my small hands. should be able to move the airbox to get some room for routing.


    Thanks,
    Shawn

  2. #2
    Veteran Member Four Rings erykv1's Avatar
    Join Date
    Jul 01 2014
    AZ Member #
    260666
    Location
    'murca

    I ended up just replacing just the silicone sections of the line, but I had my motor out.
    I believe I used a 3/16 ID 1 ply hose (similar to OEM) and reconnected it to the hardline using an oiteker clamp. I believe most 1 ply hoses in this range are rated up to 350*F, and burst pressures are around 300psi which is way more than what your wastegates will ever see.

    Just to be safe I covered the line in some fire sleeve that you can buy from summit racing. Probably overkill, but it does get pretty hot in our bays.

  3. #3
    Veteran Member Four Rings vavJETTAw36's Avatar
    Join Date
    Jul 04 2012
    AZ Member #
    96276
    Location
    Woodbridge, VA

    Quote Originally Posted by erykv1 View Post
    I ended up just replacing just the silicone sections of the line, but I had my motor out.
    I believe I used a 3/16 ID 1 ply hose (similar to OEM) and reconnected it to the hardline using an oiteker clamp. I believe most 1 ply hoses in this range are rated up to 350*F, and burst pressures are around 300psi which is way more than what your wastegates will ever see.

    Just to be safe I covered the line in some fire sleeve that you can buy from summit racing. Probably overkill, but it does get pretty hot in our bays.
    Im assuming you just cut off the compression/crimped ends?

  4. #4
    Veteran Member Four Rings erykv1's Avatar
    Join Date
    Jul 01 2014
    AZ Member #
    260666
    Location
    'murca

    Yes. They're barbed underneath. I did the same to the coolant lines as well while I was there.

    Sent from my LGLS990 using Tapatalk

  5. #5
    Veteran Member Three Rings Wagonholic's Avatar
    Join Date
    Mar 01 2014
    AZ Member #
    150261
    My Garage
    2001 B5 S4 Avant (Laser Red)
    Location
    Los Angeles, CA

    Hmmm... my motor is out right now, wondering if I should do this. My WG lines are original, but are in pretty good shape.

    Thinking about possibly using some steel braided line or something...
    Justin
    I have a major problem, I'm a boost addict and a wagon addict
    #toomuchboost #racewagon #becauseracecar
    B5 S4 Avant - Laser Red. 6-speed Manual. 1 of 18. Unleashed by STUKLR
    Going big or going home. Doing a garage build. View my build thread.
    #YEengineering

  6. #6
    Veteran Member Four Rings christianb5s4's Avatar
    Join Date
    Aug 24 2014
    AZ Member #
    277489
    Location
    Newport Beach, CA

    Another option is the wastegate lines Cinesnow makes, IMO they offer many advantages over the stock lines and the quality is fantastic. Well worth the $270 for both the WG actuator and reference lines.
    Imola 2001 Stage 3 S4: 324K - 157mph 1/2 mile - 543whp/530ftlbs Mustang Dyno - Built BEL Block - RS4 cams/intake - TTE600s - Ringer Racing Stage 5 - Etspec - SRM V3 Intercoolers - AA built trans - 4:1 Diff - Vast cooler - JHM Trio - 034 - H&R Coilovers - OZ Racing - SRM/SSAC exhaust
    2024 M3 Comp xDrive
    2016 A6 prestige w/ s-line, APR Stg 1, Melen TCU, PS4S, valcona S6 interior parts

  7. #7
    Veteran Member Four Rings erykv1's Avatar
    Join Date
    Jul 01 2014
    AZ Member #
    260666
    Location
    'murca

    Quote Originally Posted by Wagonholic View Post
    Hmmm... my motor is out right now, wondering if I should do this. My WG lines are original, but are in pretty good shape.

    Thinking about possibly using some steel braided line or something...
    The top sections that are connected by the Y are usually in pretty good shape, its the ones that connect to the wastegates nipple get old / brittle over time... especially by the clamp
    I also contemplated going to the stainless line, but I dont think the interior line holds up well in high temps. Theres a thread on this somewhere I think where it melted on someone.
    Plus it comes w/ 1 ply silicone from the factory... figured if it was good enough for Audi its good enough for me.

  8. #8
    Veteran Member Four Rings vavJETTAw36's Avatar
    Join Date
    Jul 04 2012
    AZ Member #
    96276
    Location
    Woodbridge, VA

    Thanks for all the help guys. With help from Eric, Christian, and Brad (corradovolksb) I came up with simply removing the soft line from the WG and replacing it. I believe I can gain enough room by simply dropping the sway bar. With long reach side cutters, I will remove the soft line and use a new line and two hose clamps.

    Bought 5/32" (4mm) with a 3mm wall for replacement. If this fails my plan b is to run a full soft line from WG to Y pipe and wrap it in thermal wrap like "s4 gasm aka LOTR" did. Next engine pull I will install cinesnow lines.


    Sent from my iPhone using Tapatalk

  9. #9
    Veteran Member Four Rings Zba's Avatar
    Join Date
    Nov 05 2009
    AZ Member #
    50303
    Location
    Denver

    Quote Originally Posted by Wagonholic View Post
    Hmmm... my motor is out right now, wondering if I should do this. My WG lines are original, but are in pretty good shape.

    Thinking about possibly using some steel braided line or something...
    Absolutely replace them while your engine is out!

    Silicone hoses with the OE heat shield on there you should be good to go. Or if you're all in go for the cinesnow lines.

  10. #10
    Veteran Member Four Rings christianb5s4's Avatar
    Join Date
    Aug 24 2014
    AZ Member #
    277489
    Location
    Newport Beach, CA

    Quote Originally Posted by Zba View Post
    Absolutely replace them while your engine is out!

    Silicone hoses with the OE heat shield on there you should be good to go. Or if you're all in go for the cinesnow lines.
    Agreed with this.
    Imola 2001 Stage 3 S4: 324K - 157mph 1/2 mile - 543whp/530ftlbs Mustang Dyno - Built BEL Block - RS4 cams/intake - TTE600s - Ringer Racing Stage 5 - Etspec - SRM V3 Intercoolers - AA built trans - 4:1 Diff - Vast cooler - JHM Trio - 034 - H&R Coilovers - OZ Racing - SRM/SSAC exhaust
    2024 M3 Comp xDrive
    2016 A6 prestige w/ s-line, APR Stg 1, Melen TCU, PS4S, valcona S6 interior parts

  11. #11
    Veteran Member Three Rings DanS4's Avatar
    Join Date
    Oct 03 2008
    AZ Member #
    33802
    My Garage
    01.5 Audi S4, 00 golf Tdi
    Location
    Reading, PA

    Quote Originally Posted by vavJETTAw36 View Post
    Alright guys, I found a leak in the WG line where the hardline crimps to soft line and gets hose clamped onto the actuator nipple. This is on the passenger side.

    Need a solution to run a line from the Y split near N75 down directly to the WG actuator bypassing the hardline. What hose size and material do I need? How do I route? Need this to work for a long time until the next time I pull the engine.

    Looks like I can simply drop the sway bar and gain enough room for my small hands. should be able to move the airbox to get some room for routing.


    Thanks,
    Shawn


    I did this with the engine in the car. This is not "easy" to do.


    You need to get under the car and get some long tools. You best friend is a very long screwdriver. Slide a hose( i forget size) with the screwdriver over the barbed portion of the wastegate.

    I routed the wastegate line towards the front of the motor along the turbo inlet pipe.
    SOLD Silver 01.5 S4 ; VAST tuned k04s, piggies, ASP exhaust, FMIC, Tracksports, DTS, ...

    http://www.socals4.com/

  12. #12
    Veteran Member Four Rings zillarob's Avatar
    Join Date
    Nov 16 2010
    AZ Member #
    67118
    My Garage
    2kS4, 84gli, 84caddy dsl
    Location
    WetSide, WA

    Best way is take the motor mount out for easy access and fix it right.
    Can cut the metal ferrule off and put a new hose on. Pside is pretty easy, but dside is tucked up between the turbo and motor and a lil tight to get at.

    Easiest is just run a new hose from the tee to the turbo. Usually need to run over the top of the motor and come back to the turbo from the front to keep it away from the ex mani.
    You can do this one without taking anything apart if you have the right pliers.
    There are only 2 things needed to make an Audi work properly - Duct tape and WD40. If it moves and it shouldn't - Duct tape. If it doesn’t move and it should - WD40.

  13. #13
    Veteran Member Four Rings xalents23's Avatar
    Join Date
    Oct 26 2011
    AZ Member #
    83081
    Location
    CA

    As zillarob mentioned above. I use a hose plier to work on the driver-side wastegate line. Without removing the engine. Takes patience to get the darn wastegate hose on though.


  14. #14
    Veteran Member Four Rings f4m0u5's Avatar
    Join Date
    Aug 04 2014
    AZ Member #
    270797
    Location
    Gloucester MA USA

    I'm going through this exact same problem right now haha...


    How long of a line did you run to the front and under?

    I got 10 feet of high temp silicone hose and heat shield sleeving to go over it.

  15. #15
    Veteran Member Four Rings zillarob's Avatar
    Join Date
    Nov 16 2010
    AZ Member #
    67118
    My Garage
    2kS4, 84gli, 84caddy dsl
    Location
    WetSide, WA

    That should be plenty.
    When I have done the temp fix like that, I run it over the top and down with the evap lines on the inlets to keep it from burning on the exhaust.

    It doesnt seem to really affect anything, but one tuner thought it made the waste gates a lil less responsive.
    There are only 2 things needed to make an Audi work properly - Duct tape and WD40. If it moves and it shouldn't - Duct tape. If it doesn’t move and it should - WD40.

  16. #16
    Veteran Member Four Rings vavJETTAw36's Avatar
    Join Date
    Jul 04 2012
    AZ Member #
    96276
    Location
    Woodbridge, VA

    Alright guys my new line hasn't come yet so I'm still waiting on that.

    But managed get the OeM line off and the lines are ready to accept the new hose.

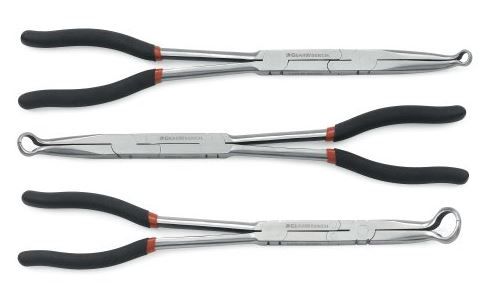
    Tools I used are the long reach hose needle nose like shown above and a long reach side cutter (11 inch). Took me 3 hours to get to it and the OeM line off.

    Here's how it's done:
    Lift car
    Drop sway bar
    Remove airbox
    Detach inlet and move it as far forward as possible.

    That'll give you enough room to sneak your arm behind and over the sub frame to hold the hardline down while you use your right hand to cut the end off.

    As it sits:


    Sent from my iPhone using Tapatalk

  17. #17
    Veteran Member Three Rings Corradovolksb's Avatar
    Join Date
    Aug 29 2013
    AZ Member #
    122066
    My Garage
    2018 VW Atlas
    Location
    Phoenix AZ

    Nice man. That's great you got the old one off. Working on our cars is so much fun

  18. #18
    Veteran Member Four Rings vavJETTAw36's Avatar
    Join Date
    Jul 04 2012
    AZ Member #
    96276
    Location
    Woodbridge, VA

    Quote Originally Posted by Corradovolksb View Post
    Nice man. That's great you got the old one off. Working on our cars is so much fun
    Bahaha. Oh my gosh, it is so much fun!!! Not!

    Worth it in the end though. Now I've learned more and have a new tool for the tool cart.


    Sent from my iPhone using Tapatalk

  19. #19
    Veteran Member Three Rings Corradovolksb's Avatar
    Join Date
    Aug 29 2013
    AZ Member #
    122066
    My Garage
    2018 VW Atlas
    Location
    Phoenix AZ

    Hell yah it will be.

    It's always good to add tools to the tool box that way it will be there when you need it again.

  20. #20
    Veteran Member Four Rings zillarob's Avatar
    Join Date
    Nov 16 2010
    AZ Member #
    67118
    My Garage
    2kS4, 84gli, 84caddy dsl
    Location
    WetSide, WA

    Quote Originally Posted by vavJETTAw36 View Post
    Alright guys my new line hasn't come yet so I'm still waiting on that.

    But managed get the OeM line off and the lines are ready to accept the new hose.

    Tools I used are the long reach hose needle nose like shown above and a long reach side cutter (11 inch). Took me 3 hours to get to it and the OeM line off.

    Here's how it's done:
    Lift car
    Drop sway bar
    Remove airbox
    Detach inlet and move it as far forward as possible.

    That'll give you enough room to sneak your arm behind and over the sub frame to hold the hardline down while you use your right hand to cut the end off.
    I think you did it the hard way
    If you ever do it again, look up the motor mount diy. Once the mount is out of the way you can get right at them.
    There are only 2 things needed to make an Audi work properly - Duct tape and WD40. If it moves and it shouldn't - Duct tape. If it doesn’t move and it should - WD40.

  21. #21
    Veteran Member Four Rings vavJETTAw36's Avatar
    Join Date
    Jul 04 2012
    AZ Member #
    96276
    Location
    Woodbridge, VA

    Quote Originally Posted by zillarob View Post
    I think you did it the hard way
    If you ever do it again, look up the motor mount diy. Once the mount is out of the way you can get right at them.
    Actually I think the motor mount is exactly the same with extra steps. You still have to move the inlet to get to the top bolt. The sway bar was probably extra work but gives you a little extra work

    Anyways, got 'r done. No leaks from my line. I always manage to walk away with a boost leak though. Got a free BOV ;) jk, forgot to tighten a clamp and the vertical inlet clamp broke and didn't tighten up all the way. Now she's as air tight as a fish's butthole.


    Sent from my iPhone using Tapatalk

  22. #22
    Veteran Member Three Rings okkim's Avatar
    Join Date
    Dec 07 2004
    AZ Member #
    4397
    Location
    Finland

    I have changed that without removing the motor mount.

    I remove the lower motor mount nut and lift motor as much as I can. Then I remove the air box, right light and then the intake pipe can be pulled away. Then the hose can be removed from the waste gate actuator. I remove the whole pipe/hose line, and put in a new one, or fix the old line. It makes no sense to try to fix it in situ. The most difficult part is to get new hose over the actuator nipple. It takes about 3-4 hours from start to finish.

  23. #23
    Veteran Member Four Rings vavJETTAw36's Avatar
    Join Date
    Jul 04 2012
    AZ Member #
    96276
    Location
    Woodbridge, VA

    Quote Originally Posted by okkim View Post
    I have changed that without removing the motor mount.

    I remove the lower motor mount nut and lift motor as much as I can. Then I remove the air box, right light and then the intake pipe can be pulled away. Then the hose can be removed from the waste gate actuator. I remove the whole pipe/hose line, and put in a new one, or fix the old line. It makes no sense to try to fix it in situ. The most difficult part is to get new hose over the actuator nipple. It takes about 3-4 hours from start to finish.
    I didn't touch motor mounts or light but I also wasn't running new line or pulling the hard line. You're right about the line over the nipple. Took me 15 min just to do that!!!


    Sent from my iPhone using Tapatalk

  24. #24
    Veteran Member Four Rings zillarob's Avatar
    Join Date
    Nov 16 2010
    AZ Member #
    67118
    My Garage
    2kS4, 84gli, 84caddy dsl
    Location
    WetSide, WA

    I guess I do use a lift, pole jack to support the motor, and a bent all to hell 13mm wrench for the upper mount nuts.
    Those things prob play a huge role in making that the easiest method for me.

    If doing it at home, I could see attacking it from the top having some benefits.
    There are only 2 things needed to make an Audi work properly - Duct tape and WD40. If it moves and it shouldn't - Duct tape. If it doesn’t move and it should - WD40.

Bookmarks

Posting Permissions

  • You may not post new threads
  • You may not post replies
  • You may not post attachments
  • You may not edit your posts
  •  


    © 2001-2024 Audizine, Audizine.com, and Driverzines.com
    Audizine is an independently owned and operated automotive enthusiast community and news website.
    Audi and the Audi logo(s) are copyright/trademark Audi AG. Audizine is not endorsed by or affiliated with Audi AG.