Audizine - An Automotive Enthusiast Community

Results 1 to 16 of 16
  1. #1
    Senior Member Three Rings caldy315's Avatar
    Join Date
    Mar 18 2013
    AZ Member #
    111578
    My Garage
    WJ & WK2 Jeep Grand Cherokees
    Location
    Mpls, MN

    Timing belt crank pulley question

    Guest-only advertisement. Register or Log In now!
    Long story short, my Gates timing belt decided to shear about 10" of teeth off with ~45k miles on it about a month ago. Got the head off and had it rebuilt with newer exhaust valves. I get all parts needed (gaskets, misc hardware etc) together and start putting it back together yesterday. Get the head on with a new head gasket, new cylinder bolts, valve cover on with new gaskets there as well. Everything is going smoothly yet slow. Getting ready to put the timing belt on and check the timing on the head, and it's timed correctly with the notch in the cam gear in line with the casting mark on the head. Go to check the crank pulley [the one that interfaces with the timing belt (TB), not the serpentine belt (SB)] and remember that I had pulled the accessory pulley (SB) off to get the old belt out. The accessory/serpentine pulley (SB) that is bolted to the crank pulley (TB) holds the correct timing mark. It's off the engine at the moment. I get to looking and noticed I marked the crank pulley (TB) with a sharpie from the last time I did this. I also just found a post from OldGuy that shows a dimple on the crank pulley (TB) that aligns with another mark. Good news, I can reference TDC from both these marks, in conjunction with throwing something in cylinder 1 to visually see TDC correct?

    My question is, can I turn the crank pulley (TB) without the pistons kissing the valves to get it correctly timed? Or have I made a critical mistake and now need to take the head off again and set the piston timing via the crank pulley (TB) first, with the head off, and then put the head on and finally the timing belt?

  2. #2
    Veteran Member Four Rings Wet0willy01's Avatar
    Join Date
    Nov 17 2008
    AZ Member #
    35356
    My Garage
    05 A4 USP, 00 S4, 01 A4, 16 A3
    Location
    USA

    Didn't read the whole post but if you're worried about piston to valve contact pull the cams caps and lift them out of the journals. All the valves will be closed. Time the bottom end to TDC (screwdriver method if needed) and then drop the cams back in at TDC.
    -Andrew
    2005 Dolphin Grey Ultra Sport
    630AWHP HTA3582R 1.8L 93+ Meth
    Before camber and tire stretch, there was horsepower and performance.

  3. #3
    Senior Member Three Rings caldy315's Avatar
    Join Date
    Mar 18 2013
    AZ Member #
    111578
    My Garage
    WJ & WK2 Jeep Grand Cherokees
    Location
    Mpls, MN

    Quote Originally Posted by Wet0willy01 View Post
    Didn't read the whole post but if you're worried about piston to valve contact pull the cams caps and lift them out of the journals. All the valves will be closed. Time the bottom end to TDC (screwdriver method if needed) and then drop the cams back in at TDC.
    That's essentially the question. Didn't think about that way though. What's the process with that, wouldn't I have to take out the cams? I just got a Bentley service manual and am severely disappointed with the lack of technical subjects like that. For the engine all they show is how to replace the timing belt and a little about the cylinder head cover.


    B6 A4 Ultrasport (Dolphin Gray) -- Passed down to brother
    B9 S4 Prestige (Daytona Gray) -- Current
    WK2 Jeep Grand Cherokee Overland (Steel Blue) -- Wife's ride

  4. #4
    Veteran Member Four Rings customa4's Avatar
    Join Date
    Apr 07 2011
    AZ Member #
    73592
    My Garage
    02 A4 1.8T CVT, 02 A4 1.8TQ 5spd, 92 Geo Prizm
    Location
    CT

    Here ya go. Click
    K&N-Milltek HFC-Magnaflow Catback-APR snub mount-ER Sport FMIC-Forge TIP-Forge DV-Podi-034 Motor Mounts-034 Rear Sway/End Links-STaSIS Street Sport Coils-Bentley Manual

  5. #5
    Senior Member Three Rings caldy315's Avatar
    Join Date
    Mar 18 2013
    AZ Member #
    111578
    My Garage
    WJ & WK2 Jeep Grand Cherokees
    Location
    Mpls, MN

    Quote Originally Posted by customa4 View Post
    Here ya go. Click
    That actually is far better than what I have. Where is that from? I could have used something like that when disassembling the car to get the head off.

  6. #6
    Veteran Member Four Rings customa4's Avatar
    Join Date
    Apr 07 2011
    AZ Member #
    73592
    My Garage
    02 A4 1.8T CVT, 02 A4 1.8TQ 5spd, 92 Geo Prizm
    Location
    CT

    ElsaWin
    K&N-Milltek HFC-Magnaflow Catback-APR snub mount-ER Sport FMIC-Forge TIP-Forge DV-Podi-034 Motor Mounts-034 Rear Sway/End Links-STaSIS Street Sport Coils-Bentley Manual

  7. #7
    Senior Member Three Rings caldy315's Avatar
    Join Date
    Mar 18 2013
    AZ Member #
    111578
    My Garage
    WJ & WK2 Jeep Grand Cherokees
    Location
    Mpls, MN

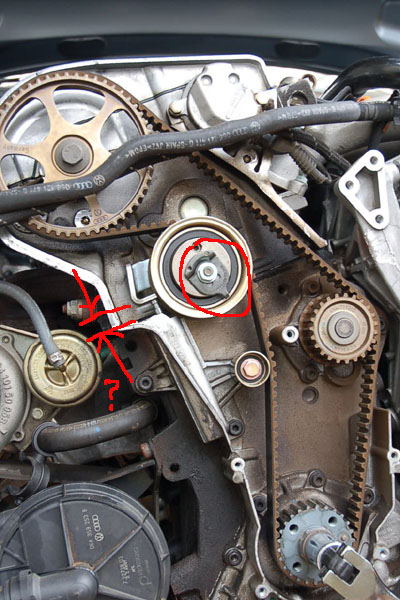
    So I got it all situated after pulling the plugs and putting the transmission in neutral. I was getting some resistance with a 3ft breaker bar and was concerned I was getting contact with the valves but it was from the transmission. Got it timed and installed the components from a new Gates blue timing belt kit. The tensioner is different than the one before though. Anyone seen one like this and know how to turn the eccentric to set the gap right?


    B6 A4 Ultrasport (Dolphin Gray) -- Passed down to brother
    B9 S4 Prestige (Daytona Gray) -- Current
    WK2 Jeep Grand Cherokee Overland (Steel Blue) -- Wife's ride

  8. #8
    Veteran Member Three Rings 5ktq's Avatar
    Join Date
    Aug 15 2016
    AZ Member #
    378564
    Location
    Western Canada

    The belt on my mkiv golf was like that, there's nothing to adjust. It sits on that shoulder bolt and the eccentric portion is free to rotate, and the tensioner-piston rotates it on the eccentric bit. If that makes any sense.


    I noticed when inspecting the belt on my new a4, that the tensioner roller is a bit different, also eccentric but with a stainless clip on the nut. I'm not sure how that one works, I guess that's what you had installed before?

    one on my current engine looks like so:


    What's the deal with that variant? adjust roughly tension with the spring steel clip, and tensioner takes over from there?


    edit: why would they have two different versions, and which is superior?!
    Last edited by 5ktq; 08-31-2016 at 10:28 PM.

  9. #9
    Senior Member Three Rings caldy315's Avatar
    Join Date
    Mar 18 2013
    AZ Member #
    111578
    My Garage
    WJ & WK2 Jeep Grand Cherokees
    Location
    Mpls, MN

    Quote Originally Posted by 5ktq View Post
    .


    I noticed when inspecting the belt on my new a4, that the tensioner roller is a bit different, also eccentric but with a stainless clip on the nut. I'm not sure how that one works, I guess that's what you had installed before?

    one on my current engine looks like so:


    What's the deal with that variant? adjust roughly tension with the spring steel clip, and tensioner takes over from there?
    The one I had on there previously looked like the one in the picture that you posted. What you could do was get an Allen/hex but and stick it in the eccentric hole. That would give you leverage to turn the tensioner to set the height between the tensioner puller "fork" and the piston of the hydraulic tensioner to around 7mm. Once that was set you then could tighten the but on that arm pointer deal.

    With this on e the only thing you can tighten is the eccentric shoulder bolt that the tensioner pivots off of. That has no control of the tensioner itself so not sure on how to set the gap. May have to call Gates tomorrow. Was hoping someone here had installed one recently


    B6 A4 Ultrasport (Dolphin Gray) -- Passed down to brother
    B9 S4 Prestige (Daytona Gray) -- Current
    WK2 Jeep Grand Cherokee Overland (Steel Blue) -- Wife's ride

  10. #10
    Veteran Member Three Rings 5ktq's Avatar
    Join Date
    Aug 15 2016
    AZ Member #
    378564
    Location
    Western Canada

    Yeah, they must have given you a kit for a mkiv golf with 1.8t... though maybe both tensioner variants were used on both engine variants? I've never seen the adjustable type on golf, though.

    It's really weird that they would have two different tensioner types on the same engine, same year, different car. You're right, the 'golf' variant has no adjustment. Maybe the tensioner damper is different (more travel?) to compensate, and will work fine?

  11. #11
    Veteran Member Three Rings 5ktq's Avatar
    Join Date
    Aug 15 2016
    AZ Member #
    378564
    Location
    Western Canada

    So etka lists 06B109243B for our engine, superseded to 06B109243E. This is adjustable kind, which sits on a stud.

    golf has 06B109243D, non adjustable, sits on a collar bolt. You must have got this on accident.

    Did you remove the stud to install the one that came in the kit?

    The tensioner-damper is also a different PN, 06B109477A for us, 06B109477 for golf.
    Audi kind looks like it should have a groove near the end of the piston, where the retainign clip sits (before you install it).
    Golf style has a smooth pin, no groove, no clip, and a grenade pin instead.


    I still don't know why the engines have a different setup, but they do, as far as etka is concerned anyway.

  12. #12
    Senior Member Three Rings caldy315's Avatar
    Join Date
    Mar 18 2013
    AZ Member #
    111578
    My Garage
    WJ & WK2 Jeep Grand Cherokees
    Location
    Mpls, MN

    Yep I have the non adjustable one for sure. I did pull out a stud to get this one in. The tensioner itself though has a normal style clip that I'm just to, not the grenade pin. Looks like I got the wrong one by accident. Wonder if it's still usable.


    B6 A4 Ultrasport (Dolphin Gray) -- Passed down to brother
    B9 S4 Prestige (Daytona Gray) -- Current
    WK2 Jeep Grand Cherokee Overland (Steel Blue) -- Wife's ride

  13. #13
    Senior Member Three Rings caldy315's Avatar
    Join Date
    Mar 18 2013
    AZ Member #
    111578
    My Garage
    WJ & WK2 Jeep Grand Cherokees
    Location
    Mpls, MN

    As an update RockAuto didn't have a problem returning that non adjustable one. Got the correct one and on my merry way.

    As a general question, how does one make sure the camshaft is synced right? It makes one revolution while the crank makes two. Isn't there a scenario that a person could have both marks aligned perfectly but not correctly times?


    B6 A4 Ultrasport (Dolphin Gray) -- Passed down to brother
    B9 S4 Prestige (Daytona Gray) -- Current
    WK2 Jeep Grand Cherokee Overland (Steel Blue) -- Wife's ride

  14. #14
    Veteran Member Three Rings chad99's Avatar
    Join Date
    Apr 22 2012
    AZ Member #
    92290
    Location
    Fremont, CA

    The crank mark just says cylinder 1 is at TDC it does not care what the valves are doing, basically you time the valves to the crank. TDC on exhaust is the same as TDC on compression crank doesn't know the difference.

  15. #15
    Veteran Member Three Rings 5ktq's Avatar
    Join Date
    Aug 15 2016
    AZ Member #
    378564
    Location
    Western Canada

    Yeah, the crank turns twice but both states are equal. That the valvetrain is synced with it is all that matters.

  16. #16
    Senior Member Three Rings caldy315's Avatar
    Join Date
    Mar 18 2013
    AZ Member #
    111578
    My Garage
    WJ & WK2 Jeep Grand Cherokees
    Location
    Mpls, MN

    Quote Originally Posted by chad99 View Post
    The crank mark just says cylinder 1 is at TDC it does not care what the valves are doing, basically you time the valves to the crank. TDC on exhaust is the same as TDC on compression crank doesn't know the difference.
    This all makes sense. Forgot the simple rule that a 4 stroke makes 4 strokes in a power cycle. Therefore you'll have two redundant movements of the piston in the same direction for different purposes. Got it.

    Lastly I was setting the timing belt tensioner per Bentley and the ECS DIY but the darn thing is being a pain. I'm using a pair of snap ring pliers but it's not working great. It says to get metal bracket from the tensioner pulley level with the tensioner, pull the retainer plate and then use the pliers to turn the adjustment collar until you can get 8mm underneath the tensioner and metal bracket from the pulley. The thing is, every time I pull the retainer plate that moves the bracket beyond 8mm, even when holding the adjustment collar. Moving that collar clockwise creates more space under that metal bracket so I end up redoing it by compressing the tensioner and inserting the retainer plate. There has got to be a better way


    B6 A4 Ultrasport (Dolphin Gray) -- Passed down to brother
    B9 S4 Prestige (Daytona Gray) -- Current
    WK2 Jeep Grand Cherokee Overland (Steel Blue) -- Wife's ride

Bookmarks

Posting Permissions

  • You may not post new threads
  • You may not post replies
  • You may not post attachments
  • You may not edit your posts
  •  


    © 2001-2024 Audizine, Audizine.com, and Driverzines.com
    Audizine is an independently owned and operated automotive enthusiast community and news website.
    Audi and the Audi logo(s) are copyright/trademark Audi AG. Audizine is not endorsed by or affiliated with Audi AG.