Audizine - An Automotive Enthusiast Community

Page 1 of 4 123 ... LastLast
Results 1 to 40 of 133
  1. #1
    Established Member Two Rings will.bates94's Avatar
    Join Date
    Jul 17 2012
    AZ Member #
    97011
    Location
    United States

    3.0 Intake Manifold questions

    Guest-only advertisement. Register or Log In now!
    Just finished soaking the intake manifold for two days now in degreaser and it came out spectacular. My next issue to tackle now is the broken runner actuator within the manifold itself. I'm going to attempt repairing it myself with a piece of metal rod to secure it to the actuator.

    If I can't get the runner fixed how bad will it be to run the intake manifold without it? I'm sure I'll lose a lot of bottom end torque but is that it? I don't want to pay 500+ for a new actuator unit and I can't even find used ones.

    Sent from my Nexus 6P using Tapatalk
    2018 TT-RS /// Unitronic Stage 1+ ECU, Stage 2 TCU, Midpipes, 4" Inlet /// 034 Trailing Arms, RSB, Rear Subframe Inserts /// Carbotech 1521 & XP8

  2. #2
    Veteran Member Four Rings diagnosticator's Avatar
    Join Date
    Aug 26 2005
    AZ Member #
    7741
    Location
    Seattle, WA

    The actuator is outside the manifold, mounted on the front, not inside. Are you asking about the long cylindrical runner change over valve inside the manifold? Without the actuator, the change over valve can't move between low speed torque and high speed power settings.You can select one position or the other, and lock the change over valve in that position. I think setting to the low speed torque position would be the best of the two for daily street driving.
    Vorsprung durch Technik

  3. #3
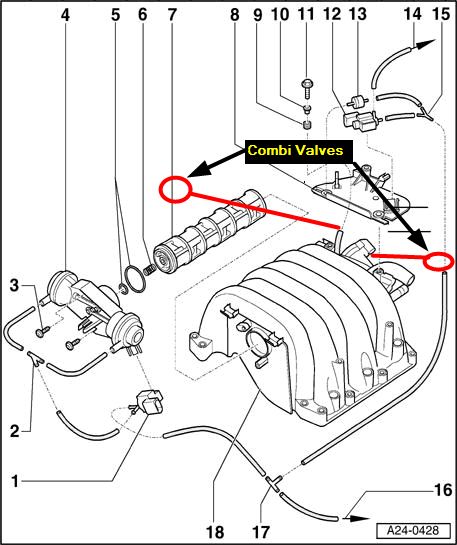
    Established Member Two Rings will.bates94's Avatar
    Join Date
    Jul 17 2012
    AZ Member #
    97011
    Location
    United States

    Quote Originally Posted by diagnosticator View Post
    The actuator is outside the manifold, mounted on the front, not inside. Are you asking about the long cylindrical runner change over valve inside the manifold? Without the actuator, the change over valve can't move between low speed torque and high speed power settings.You can select one position or the other, and lock the change over valve in that position. I think setting to the low speed torque position would be the best of the two for daily street driving.
    Yeah I'm referring to the cylinder within the manifold itself. Here is a picture to show what I'm dealing with.


    Sent from my Nexus 6P using Tapatalk
    2018 TT-RS /// Unitronic Stage 1+ ECU, Stage 2 TCU, Midpipes, 4" Inlet /// 034 Trailing Arms, RSB, Rear Subframe Inserts /// Carbotech 1521 & XP8

  4. #4
    Established Member Two Rings will.bates94's Avatar
    Join Date
    Jul 17 2012
    AZ Member #
    97011
    Location
    United States

    So my plan was to fit a metal rod into the little shaft in the picture and then bond it to the actuating unit. Going to use JB weld most likely.

    Sent from my Nexus 6P using Tapatalk
    2018 TT-RS /// Unitronic Stage 1+ ECU, Stage 2 TCU, Midpipes, 4" Inlet /// 034 Trailing Arms, RSB, Rear Subframe Inserts /// Carbotech 1521 & XP8

  5. #5
    Veteran Member Four Rings diagnosticator's Avatar
    Join Date
    Aug 26 2005
    AZ Member #
    7741
    Location
    Seattle, WA

    Yeah, that is the typical failure mode for the actuator. If you don't want to repair the actuator to change over valve coupling, either leave the actuator off the manifold and pin the change over valve into the low or high speed position. Or install the actuator and disconnect the vacuum hoses from the actuator diaphragms. The reason the actuator coupling fails, is due to the change over valve getting sticky and hard to rotate in the manifold, overloading the coupling.
    Last edited by diagnosticator; 08-04-2016 at 08:56 PM.
    Vorsprung durch Technik

  6. #6
    Veteran Member Four Rings imnuts's Avatar
    Join Date
    Aug 12 2009
    AZ Member #
    46297
    My Garage
    '21 F-150 Powerboost Lariat & '14 Acura RDX
    Location
    Dirty Jerz

    When you have it set in one position, you'll lose low end torque or top end power. Personally, I'd leave it at the default setting for better torque at low RPMs. Other than a power curve change, there shouldn't be any other issues.

    Sent from my Nexus 6

  7. #7
    Established Member Two Rings will.bates94's Avatar
    Join Date
    Jul 17 2012
    AZ Member #
    97011
    Location
    United States

    Update thus far.

    Tapped the center of the shaft with a 5/16 24 tap and I will be going to the hardware tomorrow to grab a nut that will fit within the actuator itself.


    Sent from my Nexus 6P using Tapatalk
    2018 TT-RS /// Unitronic Stage 1+ ECU, Stage 2 TCU, Midpipes, 4" Inlet /// 034 Trailing Arms, RSB, Rear Subframe Inserts /// Carbotech 1521 & XP8

  8. #8
    Veteran Member Three Rings 19jdog's Avatar
    Join Date
    Jul 28 2014
    AZ Member #
    268946
    My Garage
    2006 Mini Cooper s - 2013 Mini Cooper S - 2007 C6 Avant - 2006 GSXR 750
    Location
    SACRAMENTO

    Damn actuator valve. I said f it and bought it new. Mine disintegrated with plastic pieces all in my intake.
    11 Q7 Prestige TDI S Line - Stance SF 03 20x10

    04 B6 A4 USP 2.7t
    USP CLUB MEMBER #198
    BEL 2.7t SWAP- Rohana RC7 19x9.5 33mm - 034 REAR SWAYBAR - TIP TO 6 SPEED SWAP

  9. #9
    Established Member Two Rings will.bates94's Avatar
    Join Date
    Jul 17 2012
    AZ Member #
    97011
    Location
    United States

    I may design one up before I put it back together in solidworks so that way I'll have a metal one in the future

    Sent from my Nexus 6P using Tapatalk
    2018 TT-RS /// Unitronic Stage 1+ ECU, Stage 2 TCU, Midpipes, 4" Inlet /// 034 Trailing Arms, RSB, Rear Subframe Inserts /// Carbotech 1521 & XP8

  10. #10
    Veteran Member Three Rings pablolizarraga's Avatar
    Join Date
    Jul 18 2014
    AZ Member #
    264970
    My Garage
    "Hers": SQ5 His: 1966 Ford Mustang Coupe, 1965 Ford Mustang Fastback
    Location
    Los Angeles, CA

    Good to see others working on the 3.0! I'm learning a lot from you guys. Because of the info here, I recently took the intake manifold as a result of a leak in one of the nipples of the coolant pipe. While I was in there, I also installed the 034 spacers, did most of the hard to reach vacuum lines, and removed the change over mechanism to inspect it. It didn't look as bad as I expected and it did rotate when I tested it by sucking on the end of the vacuum line when removed from the changeover valve (N 156). However, after reinstalling and revving to 5k, the changeover valve did not rotate. The valve still requires quite a bit of force to get it to rotate by hand. When I get more time, I'll try cleaning it like you did. This is what changeover valve looked like.

    And this is where it's currently stuck; which I believe is the high RPM position?


    Good luck in the repair! Looking forward to seeing what you were able to come up with.


    Sent from my iPhone using Audizine mobile app

  11. #11
    Established Member Two Rings will.bates94's Avatar
    Join Date
    Jul 17 2012
    AZ Member #
    97011
    Location
    United States

    Quote Originally Posted by pablolizarraga View Post
    Good to see others working on the 3.0! I'm learning a lot from you guys. Because of the info here, I recently took the intake manifold as a result of a leak in one of the nipples of the coolant pipe. While I was in there, I also installed the 034 spacers, did most of the hard to reach vacuum lines, and removed the change over mechanism to inspect it. It didn't look as bad as I expected and it did rotate when I tested it by sucking on the end of the vacuum line when removed from the changeover valve (N 156). However, after reinstalling and revving to 5k, the changeover valve did not rotate. The valve still requires quite a bit of force to get it to rotate by hand. When I get more time, I'll try cleaning it like you did. This is what changeover valve looked like.

    And this is where it's currently stuck; which I believe is the high RPM position?


    Good luck in the repair! Looking forward to seeing what you were able to come up with.


    Sent from my iPhone using Audizine mobile app
    Yeah I ended up ditching the idea of the threaded bit because it would create too much depth. I ended up lining it up and jb welding the inside of it and it works perfect now. This is what the manifold looks like now and I'll post pics of the change over cylinder in the AM.


    Sent from my Nexus 6P using Tapatalk
    2018 TT-RS /// Unitronic Stage 1+ ECU, Stage 2 TCU, Midpipes, 4" Inlet /// 034 Trailing Arms, RSB, Rear Subframe Inserts /// Carbotech 1521 & XP8

  12. #12
    Established Member Two Rings
    Join Date
    May 22 2012
    AZ Member #
    93933
    Location
    FAIRBANKS/AK/USA

    I would like to set mine up in the low rpm position until I can afford the new change over cylinder.

    What position is that if you are facing the front of the engine?
    2002 A4 3.0 MT

  13. #13
    Senior Member Two Rings DJHoro's Avatar
    Join Date
    Dec 16 2014
    AZ Member #
    303501
    Location
    Fresno

    Would revving it to 5k make the changeover valve rotate? You dont have to be in motion?

  14. #14
    Veteran Member Three Rings pablolizarraga's Avatar
    Join Date
    Jul 18 2014
    AZ Member #
    264970
    My Garage
    "Hers": SQ5 His: 1966 Ford Mustang Coupe, 1965 Ford Mustang Fastback
    Location
    Los Angeles, CA

    That's looking really good. Glad the jb weld worked out! I'm guessing that mine is stuck on the high rev position based on a couple of videos. But here's the best one.
    https://youtu.be/oSeBf7pFCpM

    @DJHoro Based on the videos and some research, it seems you don't have to be in motion for valve to rotate.
    http://workshop-manuals.com/audi/a4_...ing/page_2097/

    I'll be troubleshooting mine starting by cleaning actuators and rotating valve.
    https://store-lyr7tp5r.mybigcommerce...d_Link_DIY.pdf

    Keep the updates coming


    Sent from my iPhone using Audizine mobile app

  15. #15
    Veteran Member Four Rings SJorge3442's Avatar
    Join Date
    Aug 27 2013
    AZ Member #
    121842
    Location
    Philly

    Quote Originally Posted by pablolizarraga View Post
    That's looking really good. Glad the jb weld worked out! I'm guessing that mine is stuck on the high rev position based on a couple of videos. But here's the best one.
    https://youtu.be/oSeBf7pFCpM

    @DJHoro Based on the videos and some research, it seems you don't have to be in motion for valve to rotate.
    http://workshop-manuals.com/audi/a4_...ing/page_2097/

    I'll be troubleshooting mine starting by cleaning actuators and rotating valve.
    https://store-lyr7tp5r.mybigcommerce...d_Link_DIY.pdf

    Keep the updates coming


    Sent from my iPhone using Audizine mobile app
    Damn, that first video is making me think something is wrong with my 3.0. Mine is always sitting in the resting position and I don't think it opens up to the low end position when the car is started. I'll be checking this later today. My vacuum lines are all in good shape, so I wonder what could cause this. Maybe broken wires in the actuator drive? Bad vacuum?
    2017 A4 6 Speed - Sport Plus - Mythos Black
    2018 Q5 - Prestige - Manhattan Grey

  16. #16
    Veteran Member Three Rings pablolizarraga's Avatar
    Join Date
    Jul 18 2014
    AZ Member #
    264970
    My Garage
    "Hers": SQ5 His: 1966 Ford Mustang Coupe, 1965 Ford Mustang Fastback
    Location
    Los Angeles, CA

    As suggested in the work-shop manual, I would start by trying to move/push the rods manually. If they're difficult to move, chances are that gunk has built up and prevents the rotating valve from turning. I was unable to move mine by hand. Don't use tools to turn it because you'll break plastic rods. I finally saw valve rotate when I tested the vacuum line removed from the N-156 valve (#1 in diagram) by sucking on it like a straw and it moved a little!
    https://docs.google.com/file/d/0B-07...iletype=msword

    Until I clean out valve and inspect actuator I plan to disconnect vacuum line leading out from N-156 and trying to devise a way to lock actuator into low RPM setting (as recommended by diagnosticator). Otherwise, risk arms and valve being stressed and having to go through what will.bates94 is going through.


    Sent from my iPhone using Audizine mobile app

  17. #17
    Veteran Member Four Rings SJorge3442's Avatar
    Join Date
    Aug 27 2013
    AZ Member #
    121842
    Location
    Philly

    Quote Originally Posted by pablolizarraga View Post
    As suggested in the work-shop manual, I would start by trying to move/push the rods manually. If they're difficult to move, chances are that gunk has built up and prevents the rotating valve from turning. I was unable to move mine by hand. Don't use tools to turn it because you'll break plastic rods. I finally saw valve rotate when I tested the vacuum line removed from the N-156 valve (#1 in diagram) by sucking on it like a straw and it moved a little!
    https://docs.google.com/file/d/0B-07...iletype=msword

    Until I clean out valve and inspect actuator I plan to disconnect vacuum line leading out from N-156 and trying to devise a way to lock actuator into low RPM setting (as recommended by diagnosticator). Otherwise, risk arms and valve being stressed and having to go through what will.bates94 is going through.


    Sent from my iPhone using Audizine mobile app
    Thanks for the tip! Last time I checked, the arms moved without issue. I cleaned my intake and replaced the actuator last winter with a known working unit.
    2017 A4 6 Speed - Sport Plus - Mythos Black
    2018 Q5 - Prestige - Manhattan Grey

  18. #18
    Veteran Member Three Rings
    Join Date
    Mar 21 2016
    AZ Member #
    370603
    My Garage
    69 Nova
    Location
    California

    Wow, I'm gonna have to see if mine move that easily now...
    12 S4 Quattro 6 Speed
    04 A4 3.0 Quattro 6 Speed
    69 Nova with a bunch of stuffs
    19 Sportster 883

  19. #19
    Veteran Member Three Rings pablolizarraga's Avatar
    Join Date
    Jul 18 2014
    AZ Member #
    264970
    My Garage
    "Hers": SQ5 His: 1966 Ford Mustang Coupe, 1965 Ford Mustang Fastback
    Location
    Los Angeles, CA

    You may have to check the valves to which the vacuum lines connect. Don't know how to do this but I found this guide on the interwebs:

    https://www.dropbox.com/s/h1pzsic1hs...0over.pdf?dl=0

    In the meantime I came up with a way to lock valve into low RPM setting;

    1) Disconnect hose
    https://drive.google.com/open?id=0B-...HV0VW1jQ0Z5ams

    2) Insert about a foot long 3.5mm inner diameter silicone hose (Verocious Motorsports)
    https://drive.google.com/open?id=0B-...U1TaWVkNmx0R0k

    3) Suck on hose until valve fully rotates
    https://drive.google.com/open?id=0B-...FNaX2pyV0NMQUE

    4) Crimp hose to hold vacuum and use a screw to plug. (Donor screws from your inner wheel wells fit perfectly)
    https://drive.google.com/open?id=0B-...Vl5dVdtZ09EWGs

    5) Plug the hose leading out from N-156 valve with another donor screw. (Not sure how important this is or if it will cause problems, but don't feel too comfortable with an open-ended hose)

    Results
    I test drove car for a couple of minutes around block and the car pulled like never before! Will test drive it more thoroughly (e.g. highways) and report back. I only have VCDS-lite but I'll run a scan to see if this set-up causes any codes. If no adverse effects (e.g. DTC's, misfires, gas consumption, overheating, etc.) from this "modification", then I would highly recommend doing it if your actuator and rotating valve aren't functioning.


    Sent from my iPhone using Audizine mobile app

  20. #20
    Veteran Member Four Rings SJorge3442's Avatar
    Join Date
    Aug 27 2013
    AZ Member #
    121842
    Location
    Philly

    Quote Originally Posted by pablolizarraga View Post
    You may have to check the valves to which the vacuum lines connect. Don't know how to do this but I found this guide on the interwebs:

    https://www.dropbox.com/s/h1pzsic1hs...0over.pdf?dl=0

    In the meantime I came up with a way to lock valve into low RPM setting;

    1) Disconnect hose
    https://drive.google.com/open?id=0B-...HV0VW1jQ0Z5ams

    2) Insert about a foot long 3.5mm inner diameter silicone hose (Verocious Motorsports)
    https://drive.google.com/open?id=0B-...U1TaWVkNmx0R0k

    3) Suck on hose until valve fully rotates
    https://drive.google.com/open?id=0B-...FNaX2pyV0NMQUE

    4) Crimp hose to hold vacuum and use a screw to plug. (Donor screws from your inner wheel wells fit perfectly)
    https://drive.google.com/open?id=0B-...Vl5dVdtZ09EWGs

    5) Plug the hose leading out from N-156 valve with another donor screw. (Not sure how important this is or if it will cause problems, but don't feel too comfortable with an open-ended hose)

    Results
    I test drove car for a couple of minutes around block and the car pulled like never before! Will test drive it more thoroughly (e.g. highways) and report back. I only have VCDS-lite but I'll run a scan to see if this set-up causes any codes. If no adverse effects (e.g. DTC's, misfires, gas consumption, overheating, etc.) from this "modification", then I would highly recommend doing it if your actuator and rotating valve aren't functioning.


    Sent from my iPhone using Audizine mobile app
    Good idea. I wonder if this will cause issues with the acuator. There's gotta be a reason why they have the unit rest in the other position when the car is off.

    I tried sucking on the line (phrasing) that heads to the vacuum canister and I couldn't get the unit to rotate. All lines are where they belong too.

    Which way does the vacuum pull from? The back of the manifold or the blue vacuum ball?

    Sent from my Nexus 6 using Tapatalk
    2017 A4 6 Speed - Sport Plus - Mythos Black
    2018 Q5 - Prestige - Manhattan Grey

  21. #21
    Veteran Member Three Rings pablolizarraga's Avatar
    Join Date
    Jul 18 2014
    AZ Member #
    264970
    My Garage
    "Hers": SQ5 His: 1966 Ford Mustang Coupe, 1965 Ford Mustang Fastback
    Location
    Los Angeles, CA

    So far so good. Car started smoothly and reliably with the locked low RPM setting. My understanding is that the rotating valve ("changeover mechanism" according to diagram) is by default on this low RPM setting. I think that it momentarily rotates to the high RPM on cold start but sets back to low; as seen in the video. It only kicks into high RPM setting at about 4200 RPM; which in daily driving you rarely get to.

    If artificially creating a vacuum (aka "sucking on the line") did not rotate the changeover mech, I wonder if the rubber bellows within the actuator aren't holding the vacuum? Can you rotate it by hand? If you said you just replaced it, I would video your actuator in action and see if it rotates at least when you hit 5k RPM. Maybe there's something wrong w/ my actuator which allowed me to do this temporary fix.

    As far as where and how vacuum pulls from, I'll be doing some research and trial and error to get this working properly. I'm really loving the regained torque on the lower end of RPM's. It's definitely noticeable to the point where it may get me a traffic violation because it just keeps pulling. But the trade off is felt on highway where I'm trying to accelerate.

    Will.bates94, how are things going?


    Sent from my iPhone using Audizine mobile app

  22. #22
    Senior Member Two Rings DJHoro's Avatar
    Join Date
    Dec 16 2014
    AZ Member #
    303501
    Location
    Fresno

    Tried revving my car to 5k RPMs and the Vacuum actuator didnt move from the rest position. Looks like mines broken too. Explains why I have no power at high rpm.

  23. #23
    Veteran Member Three Rings pablolizarraga's Avatar
    Join Date
    Jul 18 2014
    AZ Member #
    264970
    My Garage
    "Hers": SQ5 His: 1966 Ford Mustang Coupe, 1965 Ford Mustang Fastback
    Location
    Los Angeles, CA

    If it's stuck like mine was, you didn't have power at low RPM. Mine was stuck at what I'm informally referring to as High RPM setting because that's the position to which the valve rotates when it gets to ~4200RPM.


    If yours is stuck like mine, at your own risk, try locking it as I did and you'll be much happier if you do more street driving than HWY driving.

    Ran VCDS-lite and had no error codes after 45 min combined street/HWY driving.


    Sent from my iPhone using Audizine mobile app

  24. #24
    Veteran Member Three Rings pablolizarraga's Avatar
    Join Date
    Jul 18 2014
    AZ Member #
    264970
    My Garage
    "Hers": SQ5 His: 1966 Ford Mustang Coupe, 1965 Ford Mustang Fastback
    Location
    Los Angeles, CA

    Ooops...


    Sent from my iPhone using Audizine mobile app

  25. #25
    Veteran Member Four Rings diagnosticator's Avatar
    Join Date
    Aug 26 2005
    AZ Member #
    7741
    Location
    Seattle, WA

    Quote Originally Posted by SJorge3442 View Post
    Good idea. I wonder if this will cause issues with the acuator. There's gotta be a reason why they have the unit rest in the other position when the car is off.

    I tried sucking on the line (phrasing) that heads to the vacuum canister and I couldn't get the unit to rotate. All lines are where they belong too.

    Which way does the vacuum pull from? The back of the manifold or the blue vacuum ball?
    I suspect the reason the change over valve is default at the high RPM setting, and requires vacuum applied to the actuator to shift to the low RPM torque position, is because with low manifold vacuum, like when the throttle is open fully, will cause the change over valve to automatically shift to the high RPM position setting due to the low manifold vacuum at WOT. On the other hand with the throttle valve closed or mostly closed, manifold vacuum pressure is highest, and high vacuum at idle or low loads to shift the change over valve to low RPM torque position is coexisting and convenient. However, this also means the fail safe position of the change over valve is at the high speed power position.
    Vorsprung durch Technik

  26. #26
    Veteran Member Three Rings pablolizarraga's Avatar
    Join Date
    Jul 18 2014
    AZ Member #
    264970
    My Garage
    "Hers": SQ5 His: 1966 Ford Mustang Coupe, 1965 Ford Mustang Fastback
    Location
    Los Angeles, CA

    In trying to fix the actuation of the changeover valve, I'm trying to understand how it works. Thanks for the info diagnosticator!
    I figure that since me "artificially creating a vacuum" rotated the changeover valve, those components function. Working my way from there, next step would be to check if the N-156 valve is functioning. Any tips on how to check this?


    Sent from my iPhone using Audizine mobile app

  27. #27
    Veteran Member Four Rings imnuts's Avatar
    Join Date
    Aug 12 2009
    AZ Member #
    46297
    My Garage
    '21 F-150 Powerboost Lariat & '14 Acura RDX
    Location
    Dirty Jerz

    I watched the video and I now want to go look at my car and see what it does. I've never really noticed an issue, but maybe there is one and I didn't even realize it.

  28. #28
    Veteran Member Three Rings john_gonzo's Avatar
    Join Date
    Feb 03 2009
    AZ Member #
    38267
    Location
    Florida

    Quote Originally Posted by diagnosticator View Post
    I suspect the reason the change over valve is default at the high RPM setting, and requires vacuum applied to the actuator to shift to the low RPM torque position, is because with low manifold vacuum, like when the throttle is open fully, will cause the change over valve to automatically shift to the high RPM position setting due to the low manifold vacuum at WOT. On the other hand with the throttle valve closed or mostly closed, manifold vacuum pressure is highest, and high vacuum at idle or low loads to shift the change over valve to low RPM torque position is coexisting and convenient. However, this also means the fail safe position of the change over valve is at the high speed power position.
    A vacuum switch is also in play. (#1 below)


    Image credit: SlickFix's 3.0 vacuum line DIY

  29. #29
    Veteran Member Three Rings pablolizarraga's Avatar
    Join Date
    Jul 18 2014
    AZ Member #
    264970
    My Garage
    "Hers": SQ5 His: 1966 Ford Mustang Coupe, 1965 Ford Mustang Fastback
    Location
    Los Angeles, CA

    Quote Originally Posted by imnuts View Post
    I watched the video and I now want to go look at my car and see what it does. I've never really noticed an issue, but maybe there is one and I didn't even realize it.
    I wonder how many of us 3.0's are driving with a stuck actuator and missing out on the low RPM torque. If it is stuck, lock it as I did and you'll be very happy. I'm on my 2nd day driving it like this and I've had no issues; other than running out of road.


    Sent from my iPhone using Audizine mobile app

  30. #30
    Veteran Member Three Rings pablolizarraga's Avatar
    Join Date
    Jul 18 2014
    AZ Member #
    264970
    My Garage
    "Hers": SQ5 His: 1966 Ford Mustang Coupe, 1965 Ford Mustang Fastback
    Location
    Los Angeles, CA

    Quote Originally Posted by john_gonzo View Post
    A vacuum switch is also in play. (#1 below)


    Image credit: SlickFix's 3.0 vacuum line DIY
    Yes. ECS refers to it as the purge valve.
    https://www.ecstuning.com/b-pierburg...37906283c~pie/

    And there's #12 in diagram to check as well. Problem is that I don't know how to check if they're functioning properly. I believe that the combi valves are also involved in actuating the changeover valve w/i intake manifold. Does anyone know how to test these parts?


    Sent from my iPhone using Audizine mobile app

  31. #31
    Veteran Member Three Rings john_gonzo's Avatar
    Join Date
    Feb 03 2009
    AZ Member #
    38267
    Location
    Florida

    If purge valve (#1) switches at 4200 RPM...

    First method:
    Disconnect hoses from purge valve, connect a spare hose, start engine, blow through hose while a helper revs past 4200 RPM. Air should pass through the valve on one side of 4200 RPM but not the other.

    Second method:
    Disconnect hoses from purge valve, connect a vacuum tester to one port, pull a vacuum, start engine, rev through 4200 RPM while watching the gauge on vacuum tester (to see if it drops to zero).

  32. #32
    Veteran Member Three Rings pablolizarraga's Avatar
    Join Date
    Jul 18 2014
    AZ Member #
    264970
    My Garage
    "Hers": SQ5 His: 1966 Ford Mustang Coupe, 1965 Ford Mustang Fastback
    Location
    Los Angeles, CA

    Quote Originally Posted by john_gonzo View Post
    If purge valve (#1) switches at 4200 RPM...

    First method:
    Disconnect hoses from purge valve, connect a spare hose, start engine, blow through hose while a helper revs past 4200 RPM. Air should pass through the valve on one side of 4200 RPM but not the other.

    Second method:
    Disconnect hoses from purge valve, connect a vacuum tester to one port, pull a vacuum, start engine, rev through 4200 RPM while watching the gauge on vacuum tester (to see if it drops to zero).
    Thanks for the tip! To be clear, in the first method you disconnect lines from point A and B. Spare hose connects to ... A? Then air passes or gets sucked through B? I thought that air gets sucked at B because I artificially created a vacuum ("sucking the line") at B and that's what rotated the changeover valve.


    Sent from my iPhone using Audizine mobile app

  33. #33
    Veteran Member Three Rings pablolizarraga's Avatar
    Join Date
    Jul 18 2014
    AZ Member #
    264970
    My Garage
    "Hers": SQ5 His: 1966 Ford Mustang Coupe, 1965 Ford Mustang Fastback
    Location
    Los Angeles, CA

    Quote Originally Posted by john_gonzo View Post
    If purge valve (#1) switches at 4200 RPM...

    First method:
    Disconnect hoses from purge valve, connect a spare hose, start engine, blow through hose while a helper revs past 4200 RPM. Air should pass through the valve on one side of 4200 RPM but not the other.

    Second method:
    Disconnect hoses from purge valve, connect a vacuum tester to one port, pull a vacuum, start engine, rev through 4200 RPM while watching the gauge on vacuum tester (to see if it drops to zero).


    Forgot diagram, sorry. Thanks again for the tip!


    Sent from my iPhone using Audizine mobile app

  34. #34
    Veteran Member Three Rings john_gonzo's Avatar
    Join Date
    Feb 03 2009
    AZ Member #
    38267
    Location
    Florida

    Quote Originally Posted by pablolizarraga View Post
    Thanks for the tip! To be clear, in the first method you disconnect lines from point A and B. Spare hose connects to ... A? Then air passes or gets sucked through B? I thought that air gets sucked at B because I artificially created a vacuum ("sucking the line") at B and that's what rotated the changeover valve.
    A or B, suck or blow... any combo should be fine. The pressure differential you can create is much less than that produced by the engine.

  35. #35
    Veteran Member Three Rings pablolizarraga's Avatar
    Join Date
    Jul 18 2014
    AZ Member #
    264970
    My Garage
    "Hers": SQ5 His: 1966 Ford Mustang Coupe, 1965 Ford Mustang Fastback
    Location
    Los Angeles, CA

    Quote Originally Posted by john_gonzo View Post
    A or B, suck or blow... any combo should be fine. The pressure differential you can create is much less than that produced by the engine.
    Great! Thanks again. Will the same procedure apply in order to test the valve labeled #12?


    Sent from my iPhone using Audizine mobile app

  36. #36
    Veteran Member Three Rings john_gonzo's Avatar
    Join Date
    Feb 03 2009
    AZ Member #
    38267
    Location
    Florida

    Kind of. Parts #1 and #12 appear to be the same (Audi PN 037906283C), but I don't know when #12 changes position. That valve (#12) could probably be tested with engine off and then again when the engine is running. What I mean is:

    - With engine and key off, disconnect hoses from #12 and try to blow through it. (See note below)
    - Then reconnect the hoses, start engine, then slide one of the hoses off and listen/feel for vacuum.

    NOTE: It would help to know what the default unpowered position of these valves is supposed to be. If they close without power applied then you shouldn't be able to blow through it with the engine off.

  37. #37
    Veteran Member Three Rings pablolizarraga's Avatar
    Join Date
    Jul 18 2014
    AZ Member #
    264970
    My Garage
    "Hers": SQ5 His: 1966 Ford Mustang Coupe, 1965 Ford Mustang Fastback
    Location
    Los Angeles, CA

    Quote Originally Posted by john_gonzo View Post
    Kind of. Parts #1 and #12 appear to be the same (Audi PN 037906283C), but I don't know when #12 changes position. That valve (#12) could probably be tested with engine off and then again when the engine is running. What I mean is:

    - With engine and key off, disconnect hoses from #12 and try to blow through it. (See note below)
    - Then reconnect the hoses, start engine, then slide one of the hoses off and listen/feel for vacuum.

    NOTE: It would help to know what the default unpowered position of these valves is supposed to be. If they close without power applied then you shouldn't be able to blow through it with the engine off.
    Thanks again! Does your actuator function properly or is it stuck?


    Sent from my iPhone using Audizine mobile app

  38. #38
    Veteran Member Three Rings pablolizarraga's Avatar
    Join Date
    Jul 18 2014
    AZ Member #
    264970
    My Garage
    "Hers": SQ5 His: 1966 Ford Mustang Coupe, 1965 Ford Mustang Fastback
    Location
    Los Angeles, CA

    Bdw, after 2nd day of driving w/ valve locked at low RPM position, I rechecked vacuum lines from actuator. If you have installed JHM Intake Manifold spacers, chances are the line from the passenger side of actuator will make contact w/ this very hot pipe. It was starting to scald that line.


    Sent from my iPhone using Audizine mobile app

  39. #39
    Veteran Member Four Rings ZimbutheMonkey's Avatar
    Join Date
    Mar 27 2010
    AZ Member #
    56705
    Location
    solar system

    To answer the question 'what direction should my broken actuator be clocked to ?"

    Put it in HIGH RPM POWER position. Alternatively you can even pull it out altogether.

    However, buy a replacement actuator as you pick up a bunch of low end torque when it's working properly.

  40. #40
    Veteran Member Three Rings pablolizarraga's Avatar
    Join Date
    Jul 18 2014
    AZ Member #
    264970
    My Garage
    "Hers": SQ5 His: 1966 Ford Mustang Coupe, 1965 Ford Mustang Fastback
    Location
    Los Angeles, CA

    Quote Originally Posted by john_gonzo View Post
    Kind of. Parts #1 and #12 appear to be the same (Audi PN 037906283C), but I don't know when #12 changes position. That valve (#12) could probably be tested with engine off and then again when the engine is running. What I mean is:

    - With engine and key off, disconnect hoses from #12 and try to blow through it. (See note below)
    - Then reconnect the hoses, start engine, then slide one of the hoses off and listen/feel for vacuum.

    NOTE: It would help to know what the default unpowered position of these valves is supposed to be. If they close without power applied then you shouldn't be able to blow through it with the engine off.
    Thanks for the tip! You're suggestion, combined w/ info from this video helped.
    https://youtu.be/Zj-_bAiPq9Y

    I manually tested #1 & #12 solenoid valves by disconnecting hose at the left side of T labeled #17 to check if there was suction. There was suction, so I kept holding my finger at the T while placing my thumb on #12 to "feel test" if it clicked over. You can feel it click over after about 5 seconds from placing finger at end of T. Since #1 and #12 are same part numbers, I swapped one for the other. Swapping them gives better access to feel test #1 because it'll be in the same place where #12 was. After doing this feel test a few times to confirm that I was indeed feeling the switch happen, I heard a pop in the actuator and noticed that it had rotated to low RPM! I reconnected hoses and proceeded to test functioning. It works!!! We'll see how it holds up in my drive tomorrow.

    Start:


    ~4500RPM:


    Turning off engine:


    I'm assuming that somehow in feel testing it and making the changeover valve move a number of times either by hand or artificial vacuum, the changeover valve loosened up enough for the solenoid valves to be effective...?


    Sent from my iPhone using Audizine mobile app

Page 1 of 4 123 ... LastLast


Bookmarks

Posting Permissions

  • You may not post new threads
  • You may not post replies
  • You may not post attachments
  • You may not edit your posts
  •  


    © 2001-2024 Audizine, Audizine.com, and Driverzines.com
    Audizine is an independently owned and operated automotive enthusiast community and news website.
    Audi and the Audi logo(s) are copyright/trademark Audi AG. Audizine is not endorsed by or affiliated with Audi AG.