Audizine - An Automotive Enthusiast Community

Results 1 to 19 of 19
  1. #1
    Senior Member Three Rings
    Join Date
    Nov 30 2014
    AZ Member #
    299216
    Location
    Dallas, TX

    Intake Manifold Cover Gasket NEED HELP!

    Guest-only advertisement. Register or Log In now!
    Hey guys, got a quick question. I intend to remove the intake manifold cover and get it re-painted, and I know that when I take it apart I am most likely going to rip up the gasket, so I've been planning ahead and trying to buy a replacement gasket online

    BUT

    I haven't been able to find a part number or any information online, genuineaudiparts wants me to buy the whole intake manifold because it won't split it apart into a parts diagram, can anyone help me with this? I've looked on ecs, jhm, fcp euro and a few more parts websites I've used in the past. Going to go to an Audi dealership to see if they're parts department can help me out but I thought I'd post about it too.

  2. #2
    Senior Member Three Rings
    Join Date
    Nov 30 2014
    AZ Member #
    299216
    Location
    Dallas, TX

    Just to clarify, I am not talking about the intake manifold gasket, I have those, I am talking about the gasket that goes between the intake manifold cover and the rest of the manifold assembly.

  3. #3
    Veteran Member Four Rings badger.'s Avatar
    Join Date
    Mar 31 2014
    AZ Member #
    168335
    My Garage
    '18 RS3 | '05 S4 Avant
    Location
    KY

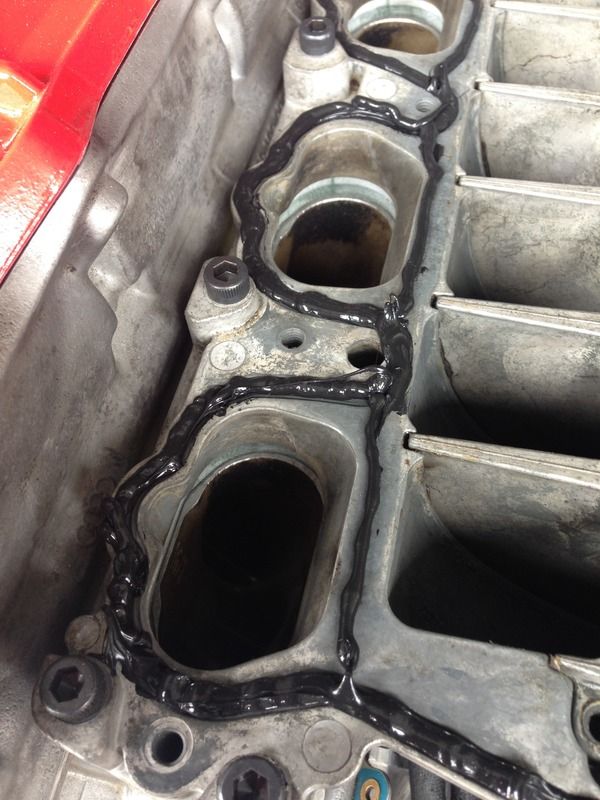
    There is no pre-formed gasket there. You have to "make" a new one with a gasket compound, typically silicone RVT. Permatex is popular.


    https://www.permatex.com/product-cat...ype=automobile
    '18 RS3 Glacier White: DS1 Stg 2 | Wagner EVO1 IC | 034 4" Turbo Inlet | 034 4" Intake
    '05 S4 Avant Brilliant Red: JHM Tune | JHMv1 Headers | Fast Intentions Catback | Ported IM & Spacers | JHM LWCP | JHM ATF Cooler | Thor Skid Plate | Koni Yellows | Apikol Rear Diff | JHM LW Rotors | AudioQ 1200D w/Dual 10" CVRs

  4. #4
    Senior Member Three Rings
    Join Date
    Nov 30 2014
    AZ Member #
    299216
    Location
    Dallas, TX

    Thanks!

  5. #5
    Veteran Member Three Rings jmcS4's Avatar
    Join Date
    Nov 16 2013
    AZ Member #
    130459
    My Garage
    q7 tdi+, b5 s4, r56 mcs
    Location
    Lower NH

    Quote Originally Posted by gautam View Post
    Thanks!
    take your time and be careful. i highly doubt you want to pull it a second time due to there being a vacuum leak
    >04' S4, Nitrous
    >01.5' S4 dps, tune
    >12' Q7 TDI S-Line Plus
    >R56 Mini S w/jcw aero kit

  6. #6
    Veteran Member Three Rings jakeoboy67's Avatar
    Join Date
    Oct 21 2013
    AZ Member #
    126068
    My Garage
    mk2 Jetta Tdi
    Location
    NB , Canada

    there is a picture somewhere that show exactly where the sealant bead should be , I think it comes from the bentley manual . . .

  7. #7
    Veteran Member Four Rings badger.'s Avatar
    Join Date
    Mar 31 2014
    AZ Member #
    168335
    My Garage
    '18 RS3 | '05 S4 Avant
    Location
    KY

    Quote Originally Posted by jakeoboy67 View Post
    there is a picture somewhere that show exactly where the sealant bead should be , I think it comes from the bentley manual . . .
    It is pretty obvious once the two halves are apart, there is a groove in the lower half. The worst part is cleaning all the old gunk out.
    '18 RS3 Glacier White: DS1 Stg 2 | Wagner EVO1 IC | 034 4" Turbo Inlet | 034 4" Intake
    '05 S4 Avant Brilliant Red: JHM Tune | JHMv1 Headers | Fast Intentions Catback | Ported IM & Spacers | JHM LWCP | JHM ATF Cooler | Thor Skid Plate | Koni Yellows | Apikol Rear Diff | JHM LW Rotors | AudioQ 1200D w/Dual 10" CVRs

  8. #8
    Senior Member Three Rings
    Join Date
    Nov 30 2014
    AZ Member #
    299216
    Location
    Dallas, TX

    Quote Originally Posted by badger. View Post
    There is no pre-formed gasket there. You have to "make" a new one with a gasket compound, typically silicone RVT. Permatex is popular.


    https://www.permatex.com/product-cat...ype=automobile
    Do I need the sensor safe high temp rtv or the high temp red rtv? Is it necessary to buy the caulking gun or just squeeze it out of the tube?

  9. #9
    Veteran Member Four Rings pwest15's Avatar
    Join Date
    Sep 15 2013
    AZ Member #
    123191
    My Garage
    2017 S3
    Location
    Denver, CO College Station, TX

    Quote Originally Posted by gautam View Post
    Do I need the sensor safe high temp rtv or the high temp red rtv? Is it necessary to buy the caulking gun or just squeeze it out of the tube?
    Squeezing it out is fine. Black/ grey rtv is perfectly fine for the IM. Be sure to put plenty of the stuff on. IM leaks suck

  10. #10
    Veteran Member Four Rings Terry.Reese's Avatar
    Join Date
    Oct 05 2015
    AZ Member #
    359932
    My Garage
    2005 Audi Allroad 2.7 Biturbo V6, 2000 Lexus 2JZGE GS300 and my old skate board
    Location
    Billings, MT

    I guess I don't understand or realize what part you are removing? I am taking my intake manifold off to add spacers and replace the oil check valve kit, will this pertain to me also? good info if it does.

    Thanks.

  11. #11
    Veteran Member Four Rings badger.'s Avatar
    Join Date
    Mar 31 2014
    AZ Member #
    168335
    My Garage
    '18 RS3 | '05 S4 Avant
    Location
    KY

    Quote Originally Posted by Terry.Reese View Post
    I guess I don't understand or realize what part you are removing? I am taking my intake manifold off to add spacers and replace the oil check valve kit, will this pertain to me also? good info if it does.

    Thanks.

    No need to worry about it if you are just doing spacers and the check valve kit. What is being talked about here is that the Intake Manifold actually separates into two halves (upper and lower). The only reason I ever split mine is because I wanted to paint the upper half. I can throw some pics up later if you want.
    '18 RS3 Glacier White: DS1 Stg 2 | Wagner EVO1 IC | 034 4" Turbo Inlet | 034 4" Intake
    '05 S4 Avant Brilliant Red: JHM Tune | JHMv1 Headers | Fast Intentions Catback | Ported IM & Spacers | JHM LWCP | JHM ATF Cooler | Thor Skid Plate | Koni Yellows | Apikol Rear Diff | JHM LW Rotors | AudioQ 1200D w/Dual 10" CVRs

  12. #12
    Veteran Member Four Rings Terry.Reese's Avatar
    Join Date
    Oct 05 2015
    AZ Member #
    359932
    My Garage
    2005 Audi Allroad 2.7 Biturbo V6, 2000 Lexus 2JZGE GS300 and my old skate board
    Location
    Billings, MT

    Yeah that would be great! I am still learning all this stuff. I wanted to change the color of my top, but decided not to as it looks fine now. all paint done by me with high temp ceramic paint.


  13. #13
    Veteran Member Four Rings Gosser's Avatar
    Join Date
    Jun 05 2013
    AZ Member #
    116640
    My Garage
    2005 A4 1.8QMT, 2006 3.2 Sedan and Wagon auto, 2004 S4, 1990 300zx TTRHD, 1988 Buick Lesabre T-Type
    Location
    Ottawa

    I used black RTV last year, so far so good!


    Photo taken from here
    2007 RS4 Avant
    2006 A4 2.7 MT Avant
    2007 A4 2.0 AT Avant
    2013 Q5 3.0 AT - Wifes

  14. #14
    Veteran Member Four Rings Terry.Reese's Avatar
    Join Date
    Oct 05 2015
    AZ Member #
    359932
    My Garage
    2005 Audi Allroad 2.7 Biturbo V6, 2000 Lexus 2JZGE GS300 and my old skate board
    Location
    Billings, MT

    ahh! I tightened them once, they were hand loose and I was getting all kinds of Bank errors, once i tightened those bolts down, gone were the errors. Thanks for clarifying that.

  15. #15
    Veteran Member Four Rings Gosser's Avatar
    Join Date
    Jun 05 2013
    AZ Member #
    116640
    My Garage
    2005 A4 1.8QMT, 2006 3.2 Sedan and Wagon auto, 2004 S4, 1990 300zx TTRHD, 1988 Buick Lesabre T-Type
    Location
    Ottawa

    One thing to note with installing the spacers, you need to remove your driver side rear engine bracket... otherwise it will interfere with the top half of the manifold, messing up all your RTV.
    2007 RS4 Avant
    2006 A4 2.7 MT Avant
    2007 A4 2.0 AT Avant
    2013 Q5 3.0 AT - Wifes

  16. #16
    Veteran Member Four Rings Terry.Reese's Avatar
    Join Date
    Oct 05 2015
    AZ Member #
    359932
    My Garage
    2005 Audi Allroad 2.7 Biturbo V6, 2000 Lexus 2JZGE GS300 and my old skate board
    Location
    Billings, MT

    I got the walk through from ECS for both the spacers and installing the oil check valve kit, I should be good, not removing the top half of the manifold like described above.

  17. #17
    Senior Member Three Rings
    Join Date
    Nov 30 2014
    AZ Member #
    299216
    Location
    Dallas, TX

    Quote Originally Posted by badger. View Post
    No need to worry about it if you are just doing spacers and the check valve kit. What is being talked about here is that the Intake Manifold actually separates into two halves (upper and lower). The only reason I ever split mine is because I wanted to paint the upper half. I can throw some pics up later if you want.
    Pics would be great!

    @Gosser thanks for the info on the engine mount, I'll remove it before putting the intake manifold back on.

  18. #18
    Veteran Member Four Rings badger.'s Avatar
    Join Date
    Mar 31 2014
    AZ Member #
    168335
    My Garage
    '18 RS3 | '05 S4 Avant
    Location
    KY

    Here is the bottom:


    Here is the top:


    Here is is mostly back together, upside down and backwards :)


    And here are two more (after my second paint job a year or two later). The different colors differentiate the two halves. First pic from the from, second is from the back:


    '18 RS3 Glacier White: DS1 Stg 2 | Wagner EVO1 IC | 034 4" Turbo Inlet | 034 4" Intake
    '05 S4 Avant Brilliant Red: JHM Tune | JHMv1 Headers | Fast Intentions Catback | Ported IM & Spacers | JHM LWCP | JHM ATF Cooler | Thor Skid Plate | Koni Yellows | Apikol Rear Diff | JHM LW Rotors | AudioQ 1200D w/Dual 10" CVRs

  19. #19
    Senior Member Three Rings
    Join Date
    Nov 30 2014
    AZ Member #
    299216
    Location
    Dallas, TX

    Quote Originally Posted by badger. View Post
    Here is the bottom:


    Here is the top:


    Here is is mostly back together, upside down and backwards :)


    And here are two more (after my second paint job a year or two later). The different colors differentiate the two halves. First pic from the from, second is from the back:


    Thanks for the pics!! I'll post some pics when I get around to doing the work, need to find a medical cure to laziness first :p

Tags for this Thread

Bookmarks

Posting Permissions

  • You may not post new threads
  • You may not post replies
  • You may not post attachments
  • You may not edit your posts
  •  


    © 2001-2024 Audizine, Audizine.com, and Driverzines.com
    Audizine is an independently owned and operated automotive enthusiast community and news website.
    Audi and the Audi logo(s) are copyright/trademark Audi AG. Audizine is not endorsed by or affiliated with Audi AG.