Audizine - An Automotive Enthusiast Community

Page 1 of 2 12 LastLast
Results 1 to 40 of 59
  1. #1
    Veteran Member Four Rings eljay's Avatar
    Join Date
    Aug 13 2015
    AZ Member #
    348695
    Location
    NS

    A couple of new issues

    Guest-only advertisement. Register or Log In now!
    Well, I started my timing belt job. Besides taking an hour to disconnect the headlight due to broken connectors (I know how to remove them properly, but mine had the clips broken), I found a few more issues shown in the picture below:
    1. The headlight tray is pushing into the TIP. Any way to resolve that? I had a heck of a time as is getting the TIP back onto the 3" MAF when I did the rear coolant flange.
    2. The SAI breather tube opening on the air filter housing is cover in cloth! WTF! Should I block it off with a vacuum cap or should I put a mini filter on it? Does air need to come in through there?
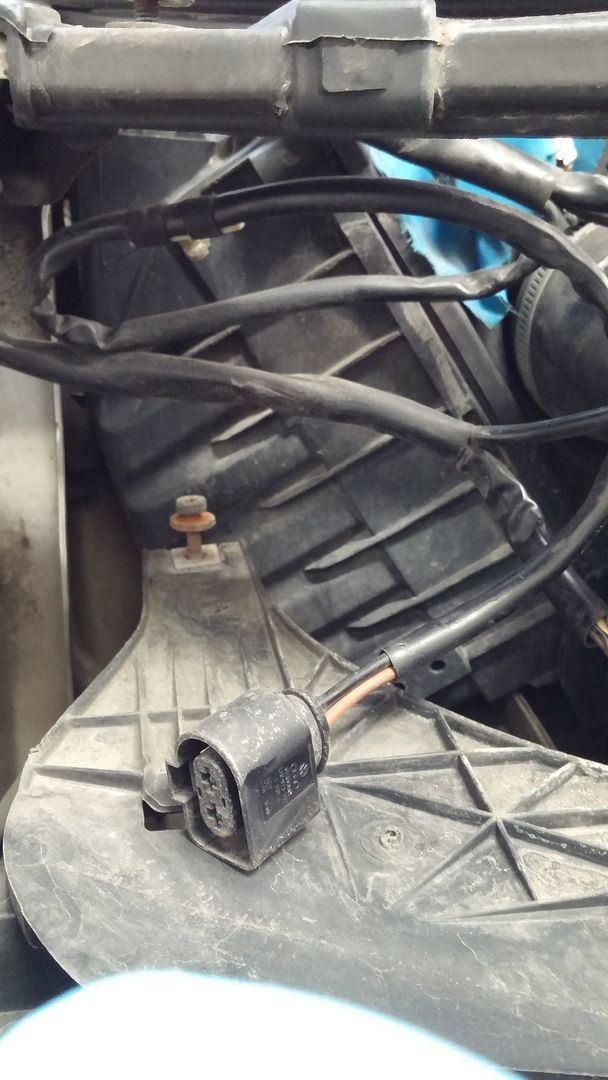
    3. I discovered a 2-pin connector that was not attached to anything under passenger side headlight. Everything on my car seems to be working. The connector part number is 1J0 973 752.

    Thanks!

    Current: 2016 Audi A4 Allroad (in progress)
    Past: 2005 Audi A4 1.8T Quattro Avant / 6-speed / Ultrasport - SOLD

  2. #2
    Veteran Member Four Rings old guy's Avatar
    Join Date
    Dec 28 2006
    AZ Member #
    14483
    My Garage
    '13 A5, '24 Tiguan SEL R-Line
    Location
    Western Maryland

    1. When I installed a Forge TIP I had the same issue. I ended up shortening the TIP where it attaches to the turbo inlet to get it away from the headlight mounting plate. I also rounded off the corner of the mounting plate to gain a little more clearance.

    2. Since you apparently are not running the SAI pump you should cap off the airbox opening. No need to be pulling air in from there behind the air filter.

    3. Check your airbag crash sensor. That would be the yellow plastic sensor just to the right of the headlight mounting plate. You can see the sensor in the top right corner of your pic. Make sure it's plugged in.
    Last edited by old guy; 04-24-2016 at 09:58 AM. Reason: left out "are not"
    '03 A4 5-MT Motoza tuned Frankenturbo F21L With full supporting mods. Sold (and missed dearly).
    '13 A5 6-MT Needs more Fun Stuff: Neuspeed PM / 3.0 TDI Intercooler / H&R OE Sport Springs / Bilstein B8 Shocks / TyrolSport Brake Stiffeners / ECS Short Shifter / S5 Side Skirts / RS Grille

  3. #3
    Veteran Member Four Rings eljay's Avatar
    Join Date
    Aug 13 2015
    AZ Member #
    348695
    Location
    NS

    Quote Originally Posted by old guy View Post
    1. When I installed a Forge TIP I had the same issue. I ended up shortening the TIP where it attaches to the turbo inlet to get it away from the headlight mounting plate. I also rounded off the corner of the mounting plate to gain a little more clearance.

    2. Since you apparently running the SAI pump you should cap off the airbox opening. No need to be pulling air in from there behind the air filter.

    3. Check your airbag crash sensor. That would be the yellow plastic sensor just to the right of the headlight mounting plate. You can see the sensor in the top right corner of your pic. Make sure it's plugged in.
    1. Thanks. That makes sense! I'll try that while I have the front off.
    2. Yep, no SAI on the car. :( Previous owners' work. I guess this also explains the higher levels of silica in my oil analysis. They suggested I replace air filter, but it seems that even with a new filter, this hole bypasses it.
    3. Sorry, I wasn't too clear. The yellow plug is fine. It's a black 2-pin plug. Here's a better picture of it:

  4. #4
    Veteran Member Four Rings old guy's Avatar
    Join Date
    Dec 28 2006
    AZ Member #
    14483
    My Garage
    '13 A5, '24 Tiguan SEL R-Line
    Location
    Western Maryland

    SAI pump. Obviously now redundant.
    '03 A4 5-MT Motoza tuned Frankenturbo F21L With full supporting mods. Sold (and missed dearly).
    '13 A5 6-MT Needs more Fun Stuff: Neuspeed PM / 3.0 TDI Intercooler / H&R OE Sport Springs / Bilstein B8 Shocks / TyrolSport Brake Stiffeners / ECS Short Shifter / S5 Side Skirts / RS Grille

  5. #5
    Veteran Member Four Rings eljay's Avatar
    Join Date
    Aug 13 2015
    AZ Member #
    348695
    Location
    NS

    Quote Originally Posted by old guy View Post
    SAI pump. Obviously now redundant.
    Thanks. Makes sense.

    Marked the belt now, trying to remove the tensioner. The DIY on this site just says to remove the bolts holding it to the block and then remove the 13mm nut. That does not seem right. Do I need to rotate it with snap ring pliers and hold it while I remove the belt?

  6. #6
    Veteran Member Four Rings old guy's Avatar
    Join Date
    Dec 28 2006
    AZ Member #
    14483
    My Garage
    '13 A5, '24 Tiguan SEL R-Line
    Location
    Western Maryland

    When you loosen the 13mm nut the tensioner roller will rotate and reduce tension on the belt. Then simply pull the belt off.
    '03 A4 5-MT Motoza tuned Frankenturbo F21L With full supporting mods. Sold (and missed dearly).
    '13 A5 6-MT Needs more Fun Stuff: Neuspeed PM / 3.0 TDI Intercooler / H&R OE Sport Springs / Bilstein B8 Shocks / TyrolSport Brake Stiffeners / ECS Short Shifter / S5 Side Skirts / RS Grille

  7. #7
    Veteran Member Four Rings eljay's Avatar
    Join Date
    Aug 13 2015
    AZ Member #
    348695
    Location
    NS

    Got it off!
    Onto to the next stages. And I discovered a few more other issues unrelated to the TB job. :( That is exactly why I wanted to do this myself and learn and I'm sure not too many shops will look around to address other things. I'll post those later when I get the TB/water pump done.

    Also the lower TB covers look rusty. I wonder if I should replace them or at least scrape off the rust and paint them with some high heat anti-rust paint.

    BTW, the gap on the tensioner before I touched it was 14mm! No wonder this belt was showing small cracks after 50k miles.

  8. #8
    Veteran Member Three Rings
    Join Date
    Apr 10 2012
    AZ Member #
    91607
    My Garage
    2003 Audi A4 1.8T Quattro
    Location
    Fort Worth,TX

    Quote Originally Posted by eljay View Post
    Got it off!
    Onto to the next stages. And I discovered a few more other issues unrelated to the TB job. :( That is exactly why I wanted to do this myself and learn and I'm sure not too many shops will look around to address other things. I'll post those later when I get the TB/water pump done.

    Also the lower TB covers look rusty. I wonder if I should replace them or at least scrape off the rust and paint them with some high heat anti-rust paint.

    BTW, the gap on the tensioner before I touched it was 14mm! No wonder this belt was showing small cracks after 50k miles.

    Do you see any evidence of the Water pump leaking causing the rust?
    2003 A4 1.8T Quattro Auto, Custom Stage1 tune, N70, 550cc Fuel Injectors, B7 console (with cup holders!)

  9. #9
    Veteran Member Four Rings eljay's Avatar
    Join Date
    Aug 13 2015
    AZ Member #
    348695
    Location
    NS

    Quote Originally Posted by daverdfw View Post
    Do you see any evidence of the Water pump leaking causing the rust?
    It's pretty dirty there, but does not look like coolant, although close to you picture before you took of the belt.
    The pump is now out. Time to clean the area. Did you use any cleaner there? Like carb cleaner etc.?

  10. #10
    Veteran Member Four Rings old guy's Avatar
    Join Date
    Dec 28 2006
    AZ Member #
    14483
    My Garage
    '13 A5, '24 Tiguan SEL R-Line
    Location
    Western Maryland

    I just use a little Scotch Brite to clean it up.
    '03 A4 5-MT Motoza tuned Frankenturbo F21L With full supporting mods. Sold (and missed dearly).
    '13 A5 6-MT Needs more Fun Stuff: Neuspeed PM / 3.0 TDI Intercooler / H&R OE Sport Springs / Bilstein B8 Shocks / TyrolSport Brake Stiffeners / ECS Short Shifter / S5 Side Skirts / RS Grille

  11. #11
    Veteran Member Four Rings eljay's Avatar
    Join Date
    Aug 13 2015
    AZ Member #
    348695
    Location
    NS

    Quote Originally Posted by old guy View Post
    I just use a little Scotch Brite to clean it up.
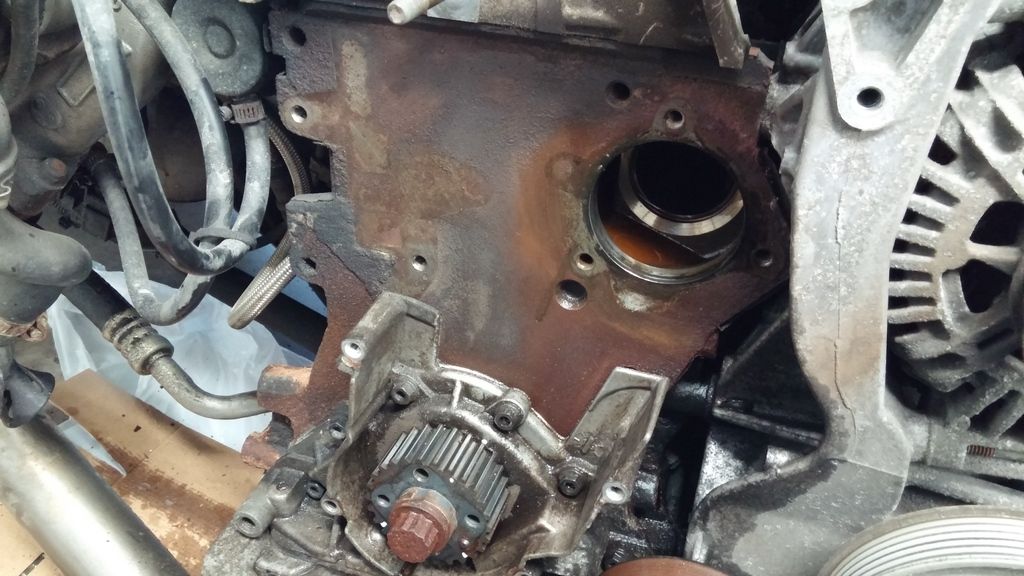
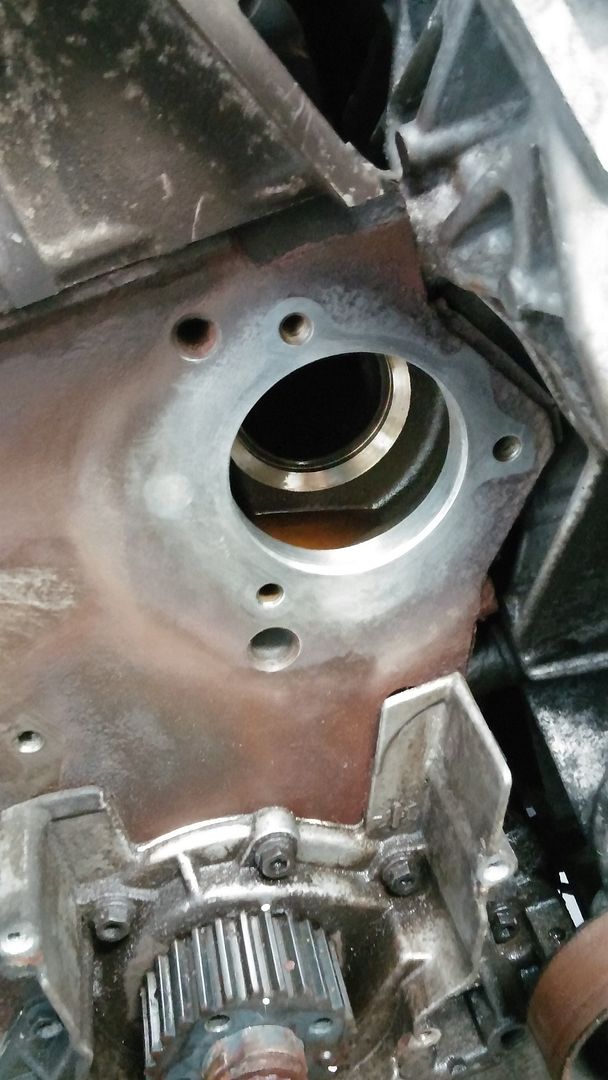
    Perfect. That's what I'm using. Is this clean enough to install water pump?

    before:


    after:

  12. #12
    Veteran Member Four Rings eljay's Avatar
    Join Date
    Aug 13 2015
    AZ Member #
    348695
    Location
    NS

    Also, is there any specific torque for all of these bolts? Or as old guy says "guten tight" is good enough?

  13. #13
    Veteran Member Four Rings old guy's Avatar
    Join Date
    Dec 28 2006
    AZ Member #
    14483
    My Garage
    '13 A5, '24 Tiguan SEL R-Line
    Location
    Western Maryland

    Quote Originally Posted by eljay View Post
    Also, is there any specific torque for all of these bolts? Or as old guy says "guten tight" is good enough?
    Looks really clean! Ready to go back together. I typically don't bother with torque wrenches for stuff like water pumps or tensioners. But here are all the specs if you feel so inclined: Clicky click®
    '03 A4 5-MT Motoza tuned Frankenturbo F21L With full supporting mods. Sold (and missed dearly).
    '13 A5 6-MT Needs more Fun Stuff: Neuspeed PM / 3.0 TDI Intercooler / H&R OE Sport Springs / Bilstein B8 Shocks / TyrolSport Brake Stiffeners / ECS Short Shifter / S5 Side Skirts / RS Grille

  14. #14
    Veteran Member Four Rings eljay's Avatar
    Join Date
    Aug 13 2015
    AZ Member #
    348695
    Location
    NS

    Thank you!
    the pump is in, belt is marked, onto to the tensioner pulley.

    Does my crank pulley look ok, oil resideu-wise? I just see a bit of oil coating, but it could be from another source. Anyways, I'm not planning to replace it.

  15. #15
    Veteran Member Four Rings old guy's Avatar
    Join Date
    Dec 28 2006
    AZ Member #
    14483
    My Garage
    '13 A5, '24 Tiguan SEL R-Line
    Location
    Western Maryland

    It looks fine. There are no signs of oil leaking around the pulley. A bit of grime is expected.
    '03 A4 5-MT Motoza tuned Frankenturbo F21L With full supporting mods. Sold (and missed dearly).
    '13 A5 6-MT Needs more Fun Stuff: Neuspeed PM / 3.0 TDI Intercooler / H&R OE Sport Springs / Bilstein B8 Shocks / TyrolSport Brake Stiffeners / ECS Short Shifter / S5 Side Skirts / RS Grille

  16. #16
    Veteran Member Four Rings customa4's Avatar
    Join Date
    Apr 07 2011
    AZ Member #
    73592
    My Garage
    02 A4 1.8T CVT, 02 A4 1.8TQ 5spd, 92 Geo Prizm
    Location
    CT

    Little late to the party but this may help. Click
    K&N-Milltek HFC-Magnaflow Catback-APR snub mount-ER Sport FMIC-Forge TIP-Forge DV-Podi-034 Motor Mounts-034 Rear Sway/End Links-STaSIS Street Sport Coils-Bentley Manual

  17. #17
    Veteran Member Four Rings eljay's Avatar
    Join Date
    Aug 13 2015
    AZ Member #
    348695
    Location
    NS

    Quote Originally Posted by customa4 View Post
    Little late to the party but this may help. Click
    Thanks for that document!
    Actually, I had to abandon the work yesterday as something came up. So, I stopped at installing the tensioner and the damper and the belt (the paint marks are lined up even though both cam and crank pulleys moved a little - that was a great tip from OG above!). I did not yet proceed with trying to set the proper tension distance on it, so this will be helpful. I am still trying to understand the steps and what to hold where to set the proper 8mm gap. It sounds like 3 hands are needed: one to hold the adjuster on the damper with snap ring pliers, one to hold the 8mm hex in the damper, so it doesn't move and one to remove the tensioner locking plate when all is set. Am I correct? I may be overthinking it.

  18. #18
    Veteran Member Four Rings eljay's Avatar
    Join Date
    Aug 13 2015
    AZ Member #
    348695
    Location
    NS

    Quote Originally Posted by old guy View Post
    1. When I installed a Forge TIP I had the same issue. I ended up shortening the TIP where it attaches to the turbo inlet to get it away from the headlight mounting plate. I also rounded off the corner of the mounting plate to gain a little more clearance.
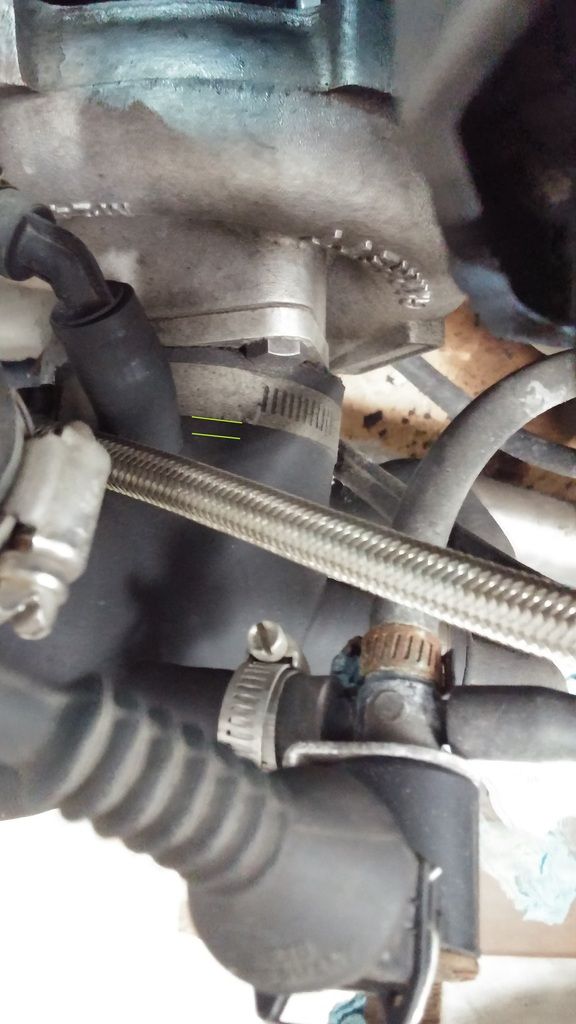
    May I ask how much did you trim from your Forge TIP? Looking at my setup, I don't see that I can trim much if anything at all as there's perhaps 2-3mm before the clamp would be hitting that first little nipple/inlet (the distance between the two green lines in this picture:


    Also, on my GTRS turbo, I think I have this inlet adapter installed there:


    So, another issue I'm worried about is that if I trim too much and slide the TIP onto the adapter, the adapter would be blocking part of that first inlet closest to the turbo.

    And here's another sloppy install of the PRV tube connector to the TIP.

    The first rubber hose off the hard PRV tube is looking to be in a bad shape, so I will be replacing it with a silicone one (like this one). I wonder if I'll get enough give in the new hose to angle this one a bit better.

    Is there anything else, I should be checking while I have the front off? Perhaps a vacuum and boost leak test? Any good links for those? It seems like the tennis ball method will not work for this larger TIP, huh?

    Thank you again.

  19. #19
    Veteran Member Four Rings customa4's Avatar
    Join Date
    Apr 07 2011
    AZ Member #
    73592
    My Garage
    02 A4 1.8T CVT, 02 A4 1.8TQ 5spd, 92 Geo Prizm
    Location
    CT

    Quote Originally Posted by eljay View Post
    Thanks for that document!
    Actually, I had to abandon the work yesterday as something came up. So, I stopped at installing the tensioner and the damper and the belt (the paint marks are lined up even though both cam and crank pulleys moved a little - that was a great tip from OG above!). I did not yet proceed with trying to set the proper tension distance on it, so this will be helpful. I am still trying to understand the steps and what to hold where to set the proper 8mm gap. It sounds like 3 hands are needed: one to hold the adjuster on the damper with snap ring pliers, one to hold the 8mm hex in the damper, so it doesn't move and one to remove the tensioner locking plate when all is set. Am I correct? I may be overthinking it.
    Just pay very close attention to the steps mentioned in the manual and it will make sense. I had a tough time at first comprehending what the hell I was supposed to do but after reading it and looking at the pictures a couple times, it all made sense.

    You have to turn the "eccentric adjuster"(Item A in the picture) counter-clockwise until the little arm is resting on the hydraulic pin there.


    Once you have it looking like the picture in the manual. ^^ You will have to hold the adjuster in place when you pull the pin. Once you pull the pin, you will turn the adjuster clockwise until there is an 8mm gap there. An allen wrench works perfect for that. Once the 8mm gap is set, tighten the adjuster to spec and you're good to go.
    K&N-Milltek HFC-Magnaflow Catback-APR snub mount-ER Sport FMIC-Forge TIP-Forge DV-Podi-034 Motor Mounts-034 Rear Sway/End Links-STaSIS Street Sport Coils-Bentley Manual

  20. #20
    Veteran Member Four Rings eljay's Avatar
    Join Date
    Aug 13 2015
    AZ Member #
    348695
    Location
    NS

    Quote Originally Posted by customa4 View Post
    Just pay very close attention to the steps mentioned in the manual and it will make sense. I had a tough time at first comprehending what the hell I was supposed to do but after reading it and looking at the pictures a couple times, it all made sense.

    You have to turn the "eccentric adjuster"(Item A in the picture) counter-clockwise until the little arm is resting on the hydraulic pin there.


    Once you have it looking like the picture in the manual. ^^ You will have to hold the adjuster in place when you pull the pin. Once you pull the pin, you will turn the adjuster clockwise until there is an 8mm gap there. An allen wrench works perfect for that. Once the 8mm gap is set, tighten the adjuster to spec and you're good to go.
    Thanks. So, the hex hole in the damper plays no part in setting the distance on a new tensioner assembly and it's only used to push the tensioner piston back in just in case the gap becomes too large and has to be readjusted from the beginning, correct?

    And do I have to have the timing marks aligned before setting the tensioner? Both my pulleys moved an equal amount by about one tooth off the tdc timing mark on the cam sprocket. The belt is installed correctly according to the paint marks I transferred from the old belt.
    Current: 2016 Audi A4 Allroad (in progress)
    Past: 2005 Audi A4 1.8T Quattro Avant / 6-speed / Ultrasport - SOLD

  21. #21
    Veteran Member Four Rings customa4's Avatar
    Join Date
    Apr 07 2011
    AZ Member #
    73592
    My Garage
    02 A4 1.8T CVT, 02 A4 1.8TQ 5spd, 92 Geo Prizm
    Location
    CT

    Correct, you shouldn't need to use the hex hole.

    As long as the paint marks match up, you're fine.
    K&N-Milltek HFC-Magnaflow Catback-APR snub mount-ER Sport FMIC-Forge TIP-Forge DV-Podi-034 Motor Mounts-034 Rear Sway/End Links-STaSIS Street Sport Coils-Bentley Manual

  22. #22
    Veteran Member Four Rings old guy's Avatar
    Join Date
    Dec 28 2006
    AZ Member #
    14483
    My Garage
    '13 A5, '24 Tiguan SEL R-Line
    Location
    Western Maryland

    If I recall I trimmed at least ½” off of the Forge TIP. It doesn’t look like you will be able to trim much if any off of your .034 TIP. Maybe you can trim some off of the MAF end?

    As to the timing marks, once the belt has been installed and the paint marks are aligned it really doesn’t matter if the crank/cam is turned. Once you aligned the marks the timing was set.
    '03 A4 5-MT Motoza tuned Frankenturbo F21L With full supporting mods. Sold (and missed dearly).
    '13 A5 6-MT Needs more Fun Stuff: Neuspeed PM / 3.0 TDI Intercooler / H&R OE Sport Springs / Bilstein B8 Shocks / TyrolSport Brake Stiffeners / ECS Short Shifter / S5 Side Skirts / RS Grille

  23. #23
    Veteran Member Four Rings eljay's Avatar
    Join Date
    Aug 13 2015
    AZ Member #
    348695
    Location
    NS

    Quote Originally Posted by old guy View Post
    If I recall I trimmed at least ½” off of the Forge TIP. It doesn’t look like you will be able to trim much if any off of your .034 TIP. Maybe you can trim some off of the MAF end?

    As to the timing marks, once the belt has been installed and the paint marks are aligned it really doesn’t matter if the crank/cam is turned. Once you aligned the marks the timing was set.
    OK, I'll see what I can do about the TIP fitment.

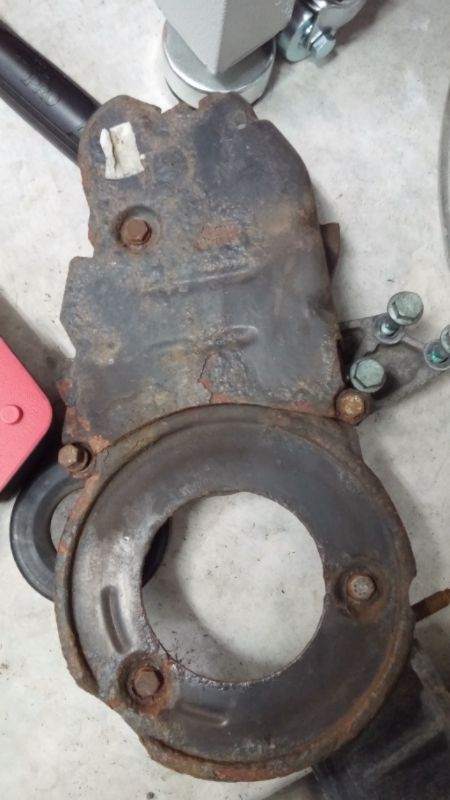
    Another issue is that the middle and lower timing covers are quite rusty. :( New replacements are over $100 for both, so I was going to just paint them with some rust converter paint. But I can only find rust paint OR regular high heat paint, but not both in one product. I just don't want any rust flaking off into the belt area in the future.
    I also need to refinish brake dust shields that have some rust spots, so I was hoping to find a product that would work for both. Brush on is preferred. Any ideas? Or will Tremclad Rust Paint be able to withstand any engine compartment heat in that area?
    Current: 2016 Audi A4 Allroad (in progress)
    Past: 2005 Audi A4 1.8T Quattro Avant / 6-speed / Ultrasport - SOLD

  24. #24
    Veteran Member Four Rings old guy's Avatar
    Join Date
    Dec 28 2006
    AZ Member #
    14483
    My Garage
    '13 A5, '24 Tiguan SEL R-Line
    Location
    Western Maryland

    The brake dust shields and the timing belt covers really don't get hot enough to require a special high temp paint. The Tremclad should work OK.
    '03 A4 5-MT Motoza tuned Frankenturbo F21L With full supporting mods. Sold (and missed dearly).
    '13 A5 6-MT Needs more Fun Stuff: Neuspeed PM / 3.0 TDI Intercooler / H&R OE Sport Springs / Bilstein B8 Shocks / TyrolSport Brake Stiffeners / ECS Short Shifter / S5 Side Skirts / RS Grille

  25. #25
    Senior Member Three Rings B6ayfour's Avatar
    Join Date
    Jun 21 2015
    AZ Member #
    338610
    My Garage
    2014 S4 6MT, 1989 535i5
    Location
    LI, NY

    Quote Originally Posted by old guy View Post
    the timing belt covers really don't get hot enough to require a special high temp paint.
    Not too sure about that OG... Its basically the front of the engine, i (accidentally) touched that thing today and it was very hot. Regular paint cant go past around 250 degrees right? and i feel like it might get somewhere close to that...
    14 B8.5 S4 6MT Current Daily
    01.5 B5 S4 6MT SOLD
    04 C5 A6 2.7T S-line SOLD
    02 B6 A4 1.8TQM DG Sport Package SOLD
    Motoza Stage 2, USP front end conversion w/ Cupra lip, S4 rear bumper, 18" BBS CH, OBX catback exhaust, Genesis 380cc injectors, PSI concepts test pipe, Stratmosphere Hyperboost DV, CX Racing FMIC, Forge TIP, S4 BBK, etc...

  26. #26
    Veteran Member Four Rings old guy's Avatar
    Join Date
    Dec 28 2006
    AZ Member #
    14483
    My Garage
    '13 A5, '24 Tiguan SEL R-Line
    Location
    Western Maryland

    Quote Originally Posted by B6ayfour View Post
    Not too sure about that OG... Its basically the front of the engine, i (accidentally) touched that thing today and it was very hot. Regular paint cant go past around 250 degrees right? and i feel like it might get somewhere close to that...
    Rust Oleum and Krylon both make numerous different high temp spray paints that should suffice for your application. High temp paints are usually made for constant temperatures of 500° and above.
    '03 A4 5-MT Motoza tuned Frankenturbo F21L With full supporting mods. Sold (and missed dearly).
    '13 A5 6-MT Needs more Fun Stuff: Neuspeed PM / 3.0 TDI Intercooler / H&R OE Sport Springs / Bilstein B8 Shocks / TyrolSport Brake Stiffeners / ECS Short Shifter / S5 Side Skirts / RS Grille

  27. #27
    Veteran Member Four Rings eljay's Avatar
    Join Date
    Aug 13 2015
    AZ Member #
    348695
    Location
    NS

    Quote Originally Posted by old guy View Post
    Rust Oleum and Krylon both make numerous different high temp spray paints that should suffice for your application. High temp paints are usually made for constant temperatures of 500° and above.
    Here's the paint in question and it's MSDS.
    From that MSDS, I'm not sure whether these are the relevant data points:
    Boiling Range, °C: 149 - 204
    Flash Point, °C: 40

    They also make this high heat enamel and it's MSDS says:
    Boiling Range, °C: 136 - 537
    Flash Point, °C: 40

    So, then I figured that I should look at the operating temperature range for the timing belt, because, hey, if that can withstand certain amount of heat, then the cover should withstand at least as much. And here are the operating temperature ranges for the various timing belts (click on the names for source):
    Conti SynchroBelt: -20°C to +100°C
    Conti Basic Runner: -32°C to +150°C
    Gates Mectrol Urethane: -5°C(+23°F) to +70°C(+158°F) or -40°C to 80°C(175°F) with short term to 120°C (250°F)
    Optibelt Standard (on page 7): –30 °C to +100 °C

    So, it sounds like the timing belt will melt before the regular non-high-heat Tremclad Rust Paint will boil from heat exposure (not flames, obviously). Am I comparing the correct data?

    I don't want to use the high heat version, because I don't want the rust to come back and flake off. And rust will come back, that's a given (even with the rust paint, but it should be much slower).

  28. #28
    Veteran Member Four Rings old guy's Avatar
    Join Date
    Dec 28 2006
    AZ Member #
    14483
    My Garage
    '13 A5, '24 Tiguan SEL R-Line
    Location
    Western Maryland

    The flash points and boiling points listed in the MSDS’s are referring to the paint in its liquid state. It has to do with the solvents used to suspend the paint solids. Once the paint is applied the solvents evaporate thus leaving the solid paint layer. Flash points and boiling points don’t have anything to do with the finished product.
    '03 A4 5-MT Motoza tuned Frankenturbo F21L With full supporting mods. Sold (and missed dearly).
    '13 A5 6-MT Needs more Fun Stuff: Neuspeed PM / 3.0 TDI Intercooler / H&R OE Sport Springs / Bilstein B8 Shocks / TyrolSport Brake Stiffeners / ECS Short Shifter / S5 Side Skirts / RS Grille

  29. #29
    Veteran Member Four Rings eljay's Avatar
    Join Date
    Aug 13 2015
    AZ Member #
    348695
    Location
    NS

    Quote Originally Posted by old guy View Post
    The flash points and boiling points listed in the MSDS’s are referring to the paint in its liquid state. It has to do with the solvents used to suspend the paint solids. Once the paint is applied the solvents evaporate thus leaving the solid paint layer. Flash points and boiling points don’t have anything to do with the finished product.
    Got it. Thanks!
    Would it be correct to assume though that paint, in its cured state, should withstand at least its minimum liquid boiling temperature (149°C)? For example, the marketing for the high-heat enamel gloss finish states that it can be applied to BBQs and engine parts and will withstand 350 °C.
    So, if the timing belt is fine up to 100°C-120°C, the non-high-heat rust paint when cured, should withstand at least as much?

  30. #30
    Veteran Member Four Rings old guy's Avatar
    Join Date
    Dec 28 2006
    AZ Member #
    14483
    My Garage
    '13 A5, '24 Tiguan SEL R-Line
    Location
    Western Maryland

    That is correct.
    '03 A4 5-MT Motoza tuned Frankenturbo F21L With full supporting mods. Sold (and missed dearly).
    '13 A5 6-MT Needs more Fun Stuff: Neuspeed PM / 3.0 TDI Intercooler / H&R OE Sport Springs / Bilstein B8 Shocks / TyrolSport Brake Stiffeners / ECS Short Shifter / S5 Side Skirts / RS Grille

  31. #31
    Veteran Member Four Rings eljay's Avatar
    Join Date
    Aug 13 2015
    AZ Member #
    348695
    Location
    NS

    Well, so I decided to call Tremclad support line. They said that Rust Paint can withstand 140-150F (65C) when dry. That sounds kind of low. They also suggested that I can just use the high-heat enamel because apparently, all of their products have anti-rust properties, so even coating the surface rust (after cleaning off any loose rust) with the high-heat enamel will stop rust from coming through. Interesting. I just don't want to be taking off those covers for a very very long time, so I'm trying to do it right once.

  32. #32
    Senior Member Three Rings B6ayfour's Avatar
    Join Date
    Jun 21 2015
    AZ Member #
    338610
    My Garage
    2014 S4 6MT, 1989 535i5
    Location
    LI, NY

    Yeahh also the belt is only really touching the pulleys and tensioner so i wouldnt imagine those parts get quite as hot as the front of the engine itself. I woulf just play it safe and use high temp paint.
    14 B8.5 S4 6MT Current Daily
    01.5 B5 S4 6MT SOLD
    04 C5 A6 2.7T S-line SOLD
    02 B6 A4 1.8TQM DG Sport Package SOLD
    Motoza Stage 2, USP front end conversion w/ Cupra lip, S4 rear bumper, 18" BBS CH, OBX catback exhaust, Genesis 380cc injectors, PSI concepts test pipe, Stratmosphere Hyperboost DV, CX Racing FMIC, Forge TIP, S4 BBK, etc...

  33. #33
    Veteran Member Four Rings eljay's Avatar
    Join Date
    Aug 13 2015
    AZ Member #
    348695
    Location
    NS

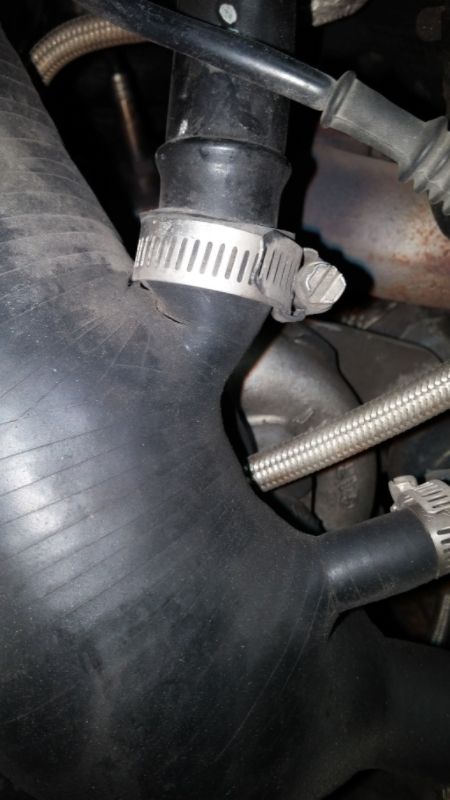
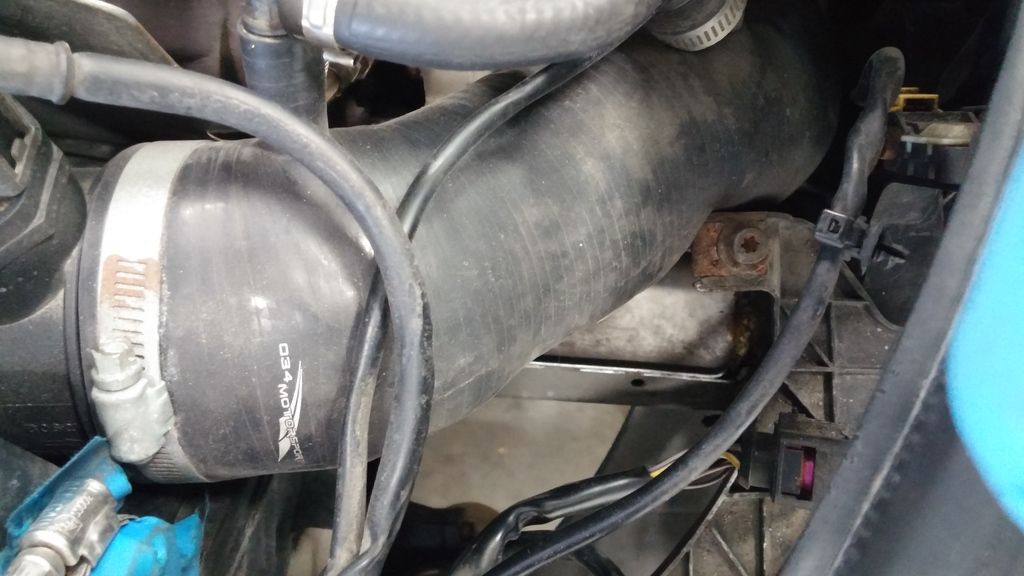
    Yeah, I think I'll just get the high heat paint. I'm sure that cleaning up the rust a little and a good coating should keep the rust away for a little while I hope. Here's what I'm dealing with:

    The tensioner gap is set! I rotated the engine twice and the marks line up at the cam and crank. Phew!


    It will be a little while until I put it all back together as I wan to paint those timing belt covers, replace a couple of vacuum hoses and also put in an OEM DV instead of the Forge Splitter valve I have there now. I just want it quiet without the whoosh drama when letting off the gas.

    Then, I hope to figure something out for that TIP. I think I can push the TT MAF further into the air filter housing, but I'd have to file the top surface off it to push it any further.
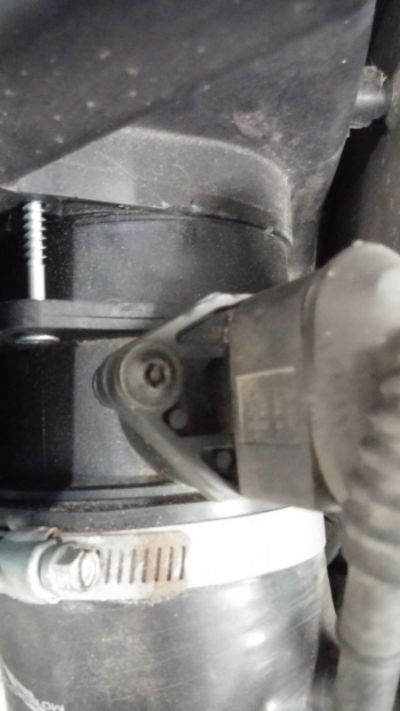
    Note: Yes, that is a construction screw in the housing!

    And then I have the tube coming off the PRV tube at a crazy angle with the clamp cutting into the TIP. Let's hope these 034 hoses are strong! I will be replacing the sorry-looking tube. I'm just not sure it will correct the angle of that nipple on the TIP.
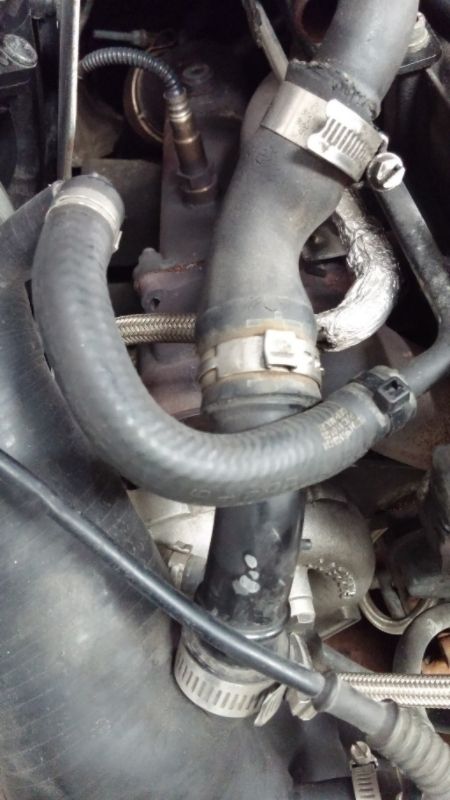

    Sorry for the giants pics. I resized them to 800x600 on photobucket, but they keep showing up huge.

    Next job while I have this apart is the valve cover and cam tensioner seals!
  34. #34
    Veteran Member Four Rings old guy's Avatar
    Join Date
    Dec 28 2006
    AZ Member #
    14483
    My Garage
    '13 A5, '24 Tiguan SEL R-Line
    Location
    Western Maryland

    You should be able to insert the 3" MAF housing a lot further into the air box. First you will have to remove the inner lip in the air box as shown here:


    And then you can insert the MAF housing into the air box as shown here:


    That will allow you to get the TIP off of the headlight mounting bracket.

    And take those nasty covers to a shop with a sand blaster. That will clean them right up and ready for paint.
    '03 A4 5-MT Motoza tuned Frankenturbo F21L With full supporting mods. Sold (and missed dearly).
    '13 A5 6-MT Needs more Fun Stuff: Neuspeed PM / 3.0 TDI Intercooler / H&R OE Sport Springs / Bilstein B8 Shocks / TyrolSport Brake Stiffeners / ECS Short Shifter / S5 Side Skirts / RS Grille

  35. #35
    Veteran Member Four Rings eljay's Avatar
    Join Date
    Aug 13 2015
    AZ Member #
    348695
    Location
    NS

    Thank you OG! Let's hope that works.

    Do you or anyone else have any reference guide to alternatives for factory vacuum hoses around TIP? I would like to replace at least 4 of them and they are $50+ each. Except for the first one, I don't see any aftermarket replacements:
    06B103493AE - breather hose 23mm to 28mm ID (looks like 45-degree angle reduction hose)
    8E0133784G - from TIP to airbox hardline hose 30mm ID (seems like a straight-forward hose)
    06B145712Q - TIP to DV hose 84mm ID that is weirdly twisted

  36. #36
    Veteran Member Four Rings old guy's Avatar
    Join Date
    Dec 28 2006
    AZ Member #
    14483
    My Garage
    '13 A5, '24 Tiguan SEL R-Line
    Location
    Western Maryland

    Two suggestions. Check with 034 Motorsport. They have a lot of decent replacement hoses that are comparable to OEM ones for a lot less. Another suggestion is to figure out the length, diameter and angle of the hose you need and go to your local AutoZone or Advance Auto. They usually have a rack in the back with all sorts of shaped or curved radiator, coolant and heater hoses. They let me go back and look through the hoses until I found something that would work. It might be longer than you need or have some additional feature that isn't needed. I purchased the closest hose I could find and cut it to what I could use.

    I have a part number somewhere for the one I purchased to connect the PRV hardline to the TIP. I believe that is the one you are calling a 45° hose. I'll see if I can pull it up when I get home tonight. If I recall it was somewhere around $5.
    '03 A4 5-MT Motoza tuned Frankenturbo F21L With full supporting mods. Sold (and missed dearly).
    '13 A5 6-MT Needs more Fun Stuff: Neuspeed PM / 3.0 TDI Intercooler / H&R OE Sport Springs / Bilstein B8 Shocks / TyrolSport Brake Stiffeners / ECS Short Shifter / S5 Side Skirts / RS Grille

  37. #37
    Veteran Member Four Rings old guy's Avatar
    Join Date
    Dec 28 2006
    AZ Member #
    14483
    My Garage
    '13 A5, '24 Tiguan SEL R-Line
    Location
    Western Maryland

    Here's the thread that contained information on the Advance Auto hose that i mentioned: Clicky click®
    '03 A4 5-MT Motoza tuned Frankenturbo F21L With full supporting mods. Sold (and missed dearly).
    '13 A5 6-MT Needs more Fun Stuff: Neuspeed PM / 3.0 TDI Intercooler / H&R OE Sport Springs / Bilstein B8 Shocks / TyrolSport Brake Stiffeners / ECS Short Shifter / S5 Side Skirts / RS Grille

  38. #38
    Veteran Member Four Rings eljay's Avatar
    Join Date
    Aug 13 2015
    AZ Member #
    348695
    Location
    NS

    Quote Originally Posted by old guy View Post
    Here's the thread that contained information on the Advance Auto hose that i mentioned: Clicky click®
    Thank you. I'll look around our NAPA and Carquest stores here.
    Current: 2016 Audi A4 Allroad (in progress)
    Past: 2005 Audi A4 1.8T Quattro Avant / 6-speed / Ultrasport - SOLD

  39. #39
    Veteran Member Four Rings eljay's Avatar
    Join Date
    Aug 13 2015
    AZ Member #
    348695
    Location
    NS

    That hose around here is $40! You guys have stuff sooo much cheaper down there even without the exchange rate.

    Anyways, I found some leftover POR-15!! So, the first coat is now drying on those timing belt covers. :)

    Thinking ahead, to refill coolant, do I just follow the same method you've linked for me before? That is, elevate the reservoir and sloooooowly fill it up until it flows from the top bleeder holes on the hard pipe and the heater core hose?

    If I want to do a flush, should I fill it up with straight distilled water, warm up, drain from the temp sensor, repeat and then fill it up with proper ratio of G12/water? I've been keeping track of how much I drained, so hopefully I get close to 50/50 in the end.

    Cheers.
    Current: 2016 Audi A4 Allroad (in progress)
    Past: 2005 Audi A4 1.8T Quattro Avant / 6-speed / Ultrasport - SOLD

  40. #40
    Veteran Member Four Rings old guy's Avatar
    Join Date
    Dec 28 2006
    AZ Member #
    14483
    My Garage
    '13 A5, '24 Tiguan SEL R-Line
    Location
    Western Maryland

    $40 for a $5 hose?? Wow.....

    As to the coolant flush you can use your garden hose to thoroughly rinse the block, drain and then circulate some distilled water. Then drain everything again from the lower CTS and refill using the method you described above.

    Have fun!
    '03 A4 5-MT Motoza tuned Frankenturbo F21L With full supporting mods. Sold (and missed dearly).
    '13 A5 6-MT Needs more Fun Stuff: Neuspeed PM / 3.0 TDI Intercooler / H&R OE Sport Springs / Bilstein B8 Shocks / TyrolSport Brake Stiffeners / ECS Short Shifter / S5 Side Skirts / RS Grille

Bookmarks

Posting Permissions

  • You may not post new threads
  • You may not post replies
  • You may not post attachments
  • You may not edit your posts
  •  


    © 2001-2024 Audizine, Audizine.com, and Driverzines.com
    Audizine is an independently owned and operated automotive enthusiast community and news website.
    Audi and the Audi logo(s) are copyright/trademark Audi AG. Audizine is not endorsed by or affiliated with Audi AG.