Audizine - An Automotive Enthusiast Community

Page 1 of 2 12 LastLast
Results 1 to 40 of 46
  1. #1
    Established Member Two Rings
    Join Date
    Sep 17 2015
    AZ Member #
    356172
    Location
    United States

    upper control arms

    Guest-only advertisement. Register or Log In now!
    I am changing my suspensions, springs, shocks.
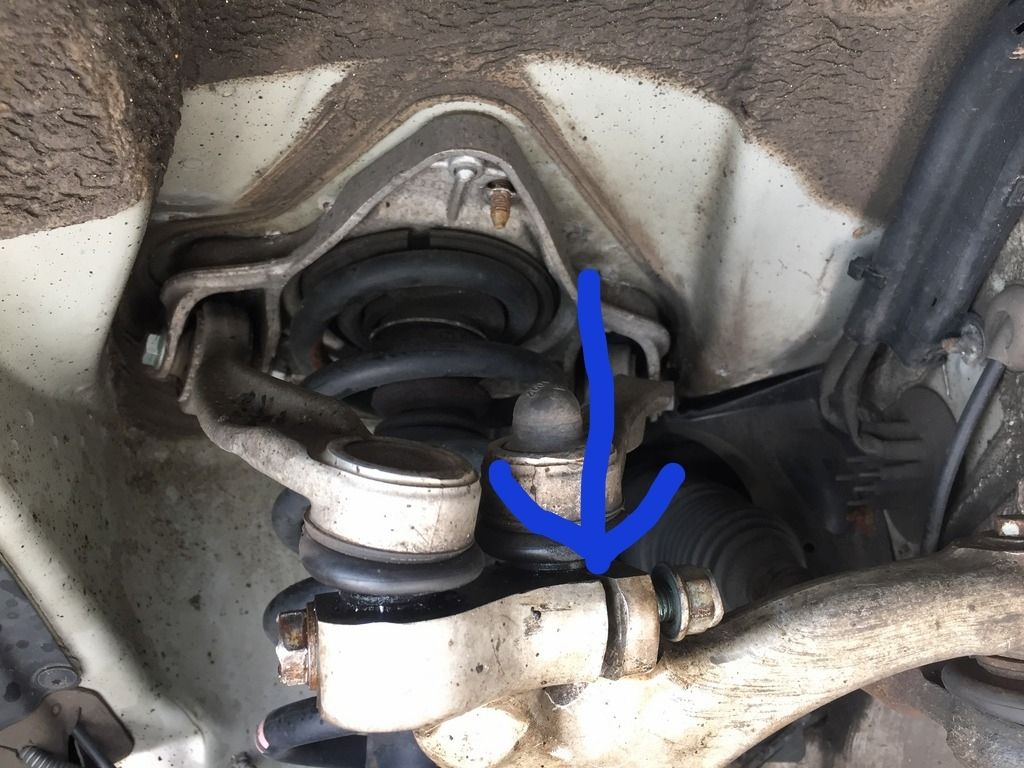
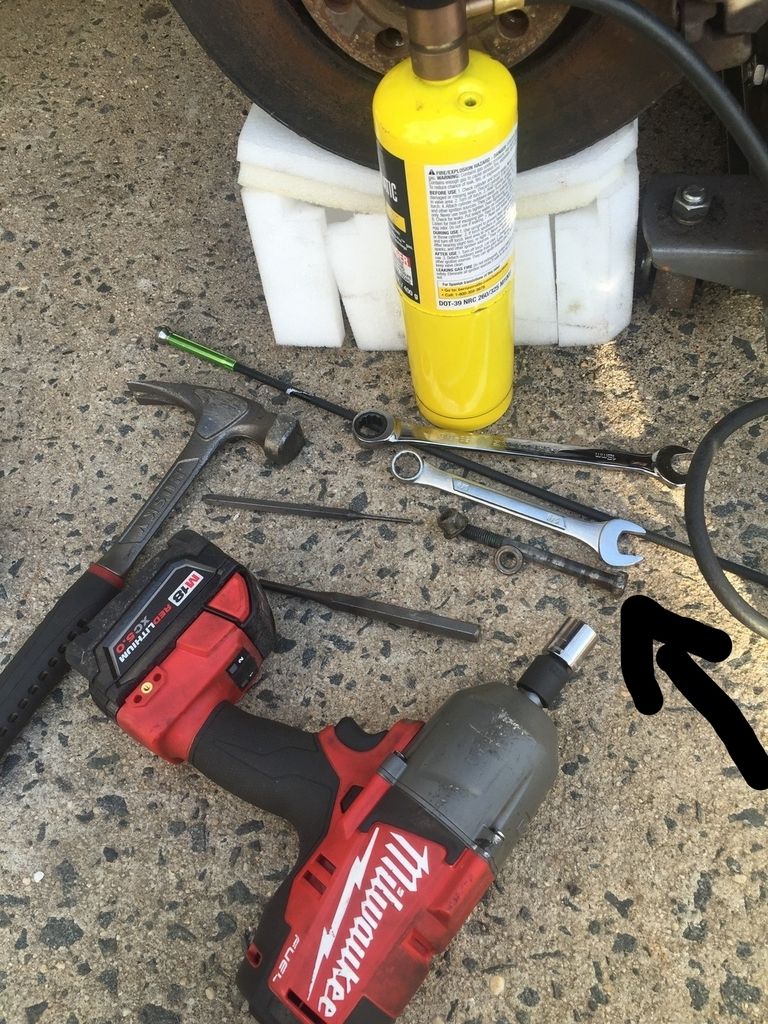
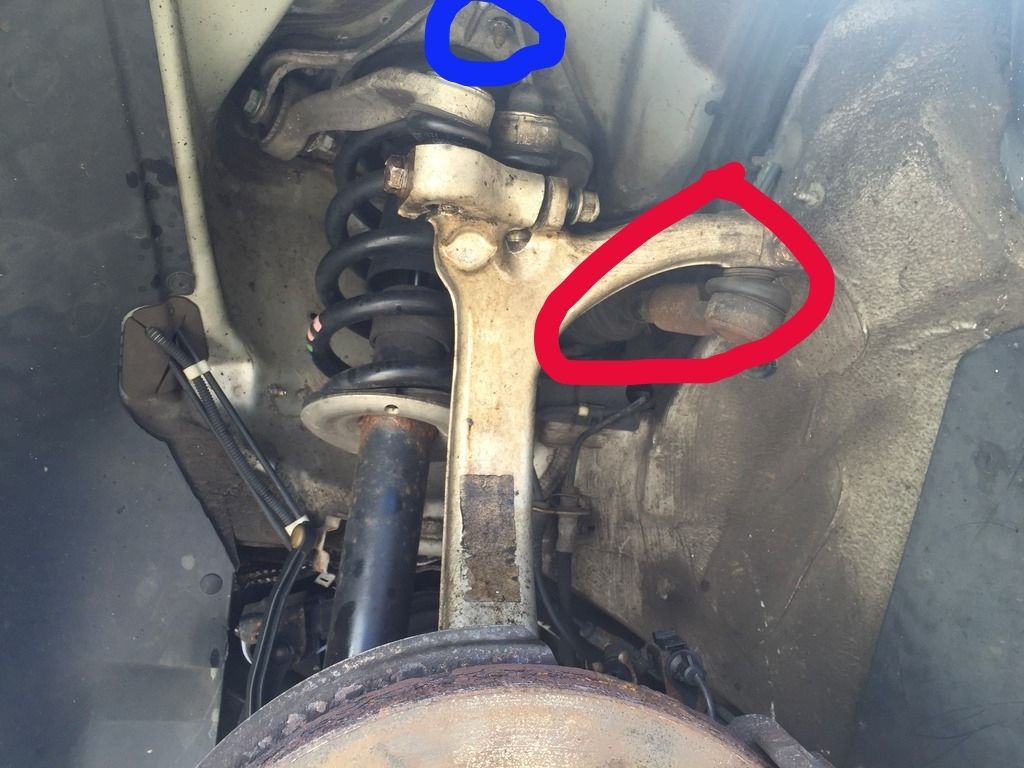
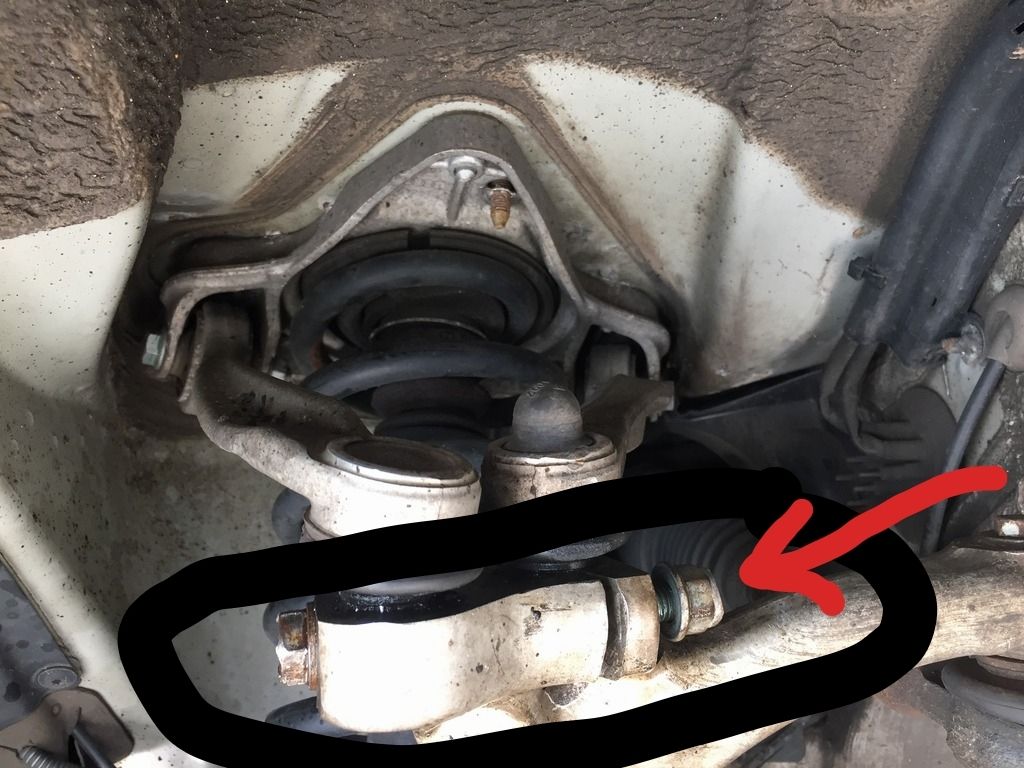
    I read about DIY on replacement of upper control arm with seize bolts. I am at that god damn seize bolt right now. i use a lot of lubricant, impact driver and yet, nothing move. not an micro movement. i want to use the air impact hammer but there is no space to get into the bolt. the red arrow is where i want to use the hammer to get the bolt back out but there isn't enough of space. any trick please help.


    do I use the chisel first or chisel after the bolt is removed? blue arrow point to the slot for chiseling


  2. #2
    Veteran Member Four Rings Seerlah's Avatar
    Join Date
    Dec 05 2007
    AZ Member #
    23104
    Location
    A place between here and there

    Heat, and lots of it.
    I hate it when my car acts like a little bitch, treating me like a bitch

  3. #3
    Veteran Member Four Rings old guy's Avatar
    Join Date
    Dec 28 2006
    AZ Member #
    14483
    My Garage
    '13 A5, '24 Tiguan SEL R-Line
    Location
    Western Maryland

    '03 A4 5-MT Motoza tuned Frankenturbo F21L With full supporting mods. Sold (and missed dearly).
    '13 A5 6-MT Needs more Fun Stuff: Neuspeed PM / 3.0 TDI Intercooler / H&R OE Sport Springs / Bilstein B8 Shocks / TyrolSport Brake Stiffeners / ECS Short Shifter / S5 Side Skirts / RS Grille

  4. #4
    Senior Member Three Rings fyremanpat's Avatar
    Join Date
    Jun 03 2014
    AZ Member #
    248487
    My Garage
    2011 4Runner
    Location
    757

    Snap the head off and drill it out.....seriously. I beat the shit out of mine for 4 hours. I tried heat and penetrating oil with no luck. Drilled both sides out in about 10 minutes. Good luck!
    04 A4 B6, VMR 710s, SB stage 2 daily, GTRS, 550cc inj, Motoza, Billy Boat stealth exhaust, test pipe, Carbonio intake, R1 Diverter, Black FMIC, B5 S4 front brakes, Meyle HD front end, Solo Werks coilovers, Ecodes

  5. #5
    Veteran Member Four Rings Audibot's Avatar
    Join Date
    May 20 2010
    AZ Member #
    59252
    Location
    Maryland

    I've used a punch to bust it out of there, after the nut comes off. Whether it sheers off or not, it's a reasonable way of doing it.

  6. #6
    Veteran Member Four Rings diagnosticator's Avatar
    Join Date
    Aug 26 2005
    AZ Member #
    7741
    Location
    Seattle, WA

    DO NOT use anything to spread open the gap in the control arm clamp! If the gap is spread open, the grip on the control arm ball joint will not be uniform around the ball joint shaft when the new bolt is retorqued, negatively effecting the gripping force developed by the clamp bolt on the ball joint shafts.

    For clearance using a pneumatic hammer gun, cut the head off the bolt with a hack saw, then hammer the bolt out of the triple clamp in the backward direction. Use an impact tool in the hammer gun that is slightly smaller diameter than the bolt, grind to size as needed, with a ground point on the tool to fit into a conical drill point drilled into the bolt shank, to help keep the impact tool from moving away from the bolt centerline before the bolt is moved enough for the bolt hole to guide the impact tool. As already mentioned above, apply limited heat to the triple clamp around the seized bolt, to help free up the bolt. DO NOT over heat the triple clamp! 200 to 300 degrees F, is the maximum heating temp. Overheating the aluminum triple clamp will weaken and damage the triple clamp.

    If when drilling the seized bolt, use a small pilot drilled hole first, then use a larger drill and conical point drill tool. The small pilot hole will be easier to drill, and will result in drilling with a larger drill bit will then be a lot easier and faster also.
    Last edited by diagnosticator; 04-17-2016 at 03:23 PM.
    Vorsprung durch Technik

  7. #7
    Senior Member Two Rings
    Join Date
    Apr 03 2016
    AZ Member #
    371241
    Location
    Up North

    Diagnosticator is right about the heat. Aluminum loses half its tensile strength at 400*F. Learned that the hard way flying airplanes with too lean a mixture/poor cooling. Jugs don't last long before cracking if you take it above that.

  8. #8
    Established Member Two Rings
    Join Date
    Sep 17 2015
    AZ Member #
    356172
    Location
    United States

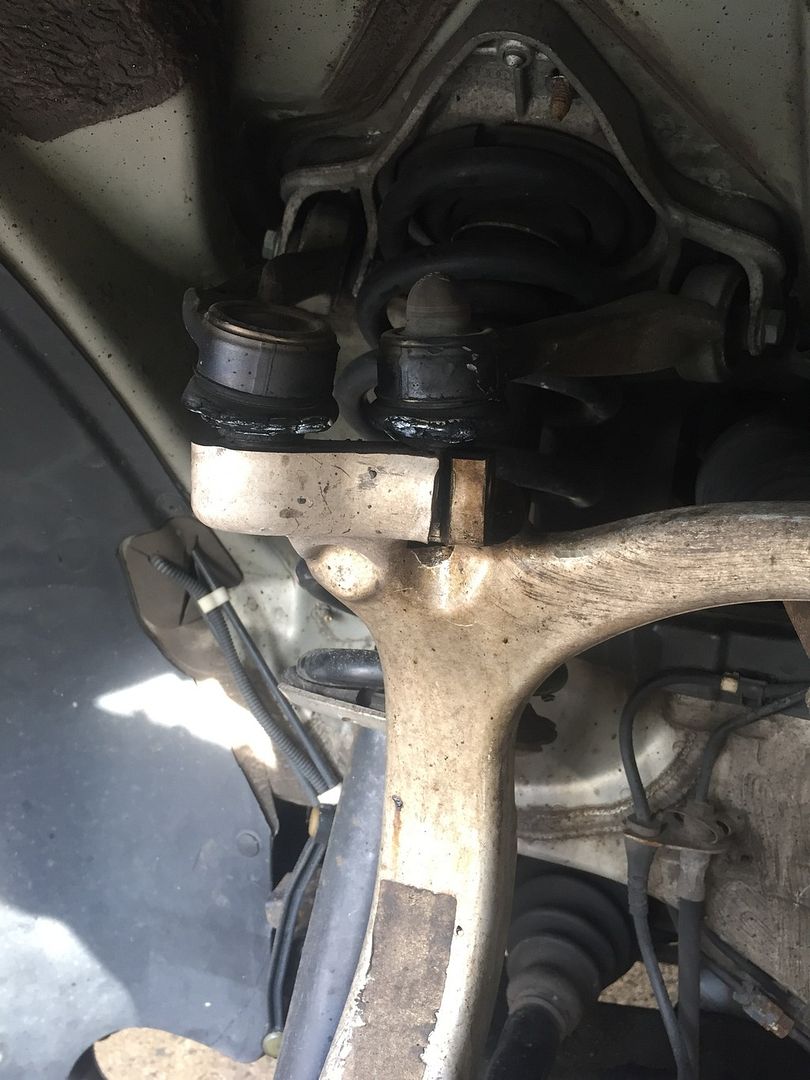
    i followed the method that OLDGUY recommend and got the pinch bolt out. i heat the triple clam and keep the temperature at 230 max. my son with the infrared thermometer keep checking the surface heat.
    thank you for all of your help and recommendations.

    Evil Bolt

    my next thing is how do i get the upper controller arm ball join out of the clam. i use the ball joint removal tool on the bottom. what should i use to remove the upper control arm ball joint? I watch the video from FCPro website and the technician that doing the demo using the chisel. but our experts (diagnostica and oldguy) said NO chisel.
    ??????????????

  9. #9
    Veteran Member Four Rings walky_talky20's Avatar
    Join Date
    Jun 30 2008
    AZ Member #
    30427
    Location
    Erie, Pennsylvania

    A smidge bit of chisel will be ok. Just a little. Then hit the joints from the bottom with hammer and punch and they'll pop right out.

    An air hammer would probably also make quick work of that, likely with no chisel/spreading action necessary.
    ^Don't listen to this guy, he's not even a mechanic.
    2001 Laser Red A4 1.8TQM, 5-Speed Swapped, 4.11 Final Drive, APR 93, 2.5" Exhaust, ST Coilovers, 034 RSB, A8 Brakes Front & Rear
    2006 Passion Red Volvo V50 T5 AWD 6MT
    2000 Satin Silver Passat 1.8T FWD Wagon, Slippy Tiptronic, 15" Hubcaps
    2001 Aluminum Silver Metallic A4 Avant 1.8TQM (winter sled)

  10. #10
    Active Member One Ring ase8427's Avatar
    Join Date
    Feb 06 2016
    AZ Member #
    368350
    Location
    Littleton Colorado

    This should be obvious, but follow the correct torque spec.! I was a lazy DUMB-ASS and used the 3/8 impact gun to re-tighten the pinch bolt. The small end of the knuckle where the nut goes broke right off! Looks like Bentley calls for 40 Nm,

  11. #11
    Veteran Member Four Rings old guy's Avatar
    Join Date
    Dec 28 2006
    AZ Member #
    14483
    My Garage
    '13 A5, '24 Tiguan SEL R-Line
    Location
    Western Maryland

    Quote Originally Posted by OlivierA4 View Post

    my next thing is how do i get the upper controller arm ball join out of the clam. i use the ball joint removal tool on the bottom. what should i use to remove the upper control arm ball joint? I watch the video from FCPro website and the technician that doing the demo using the chisel. but our experts (diagnostica and oldguy) said NO chisel.
    Jack up the steering knuckle close to the normal right height position before attempting to remove the upper ball joints. If the knuckle is hanging down it tends to put the ball joint shafts in a bind and requires a bit more force to remove them. Once again heat is your friend.
    '03 A4 5-MT Motoza tuned Frankenturbo F21L With full supporting mods. Sold (and missed dearly).
    '13 A5 6-MT Needs more Fun Stuff: Neuspeed PM / 3.0 TDI Intercooler / H&R OE Sport Springs / Bilstein B8 Shocks / TyrolSport Brake Stiffeners / ECS Short Shifter / S5 Side Skirts / RS Grille

  12. #12
    Established Member Two Rings
    Join Date
    Sep 17 2015
    AZ Member #
    356172
    Location
    United States

    Quote Originally Posted by walky_talky20 View Post
    A smidge bit of chisel will be ok. Just a little. Then hit the joints from the bottom with hammer and punch and they'll pop right out.

    An air hammer would probably also make quick work of that, likely with no chisel/spreading action necessary.
    Quote Originally Posted by ase8427 View Post
    This should be obvious, but follow the correct torque spec.! I was a lazy DUMB-ASS and used the 3/8 impact gun to re-tighten the pinch bolt. The small end of the knuckle where the nut goes broke right off! Looks like Bentley calls for 40 Nm,
    thank you for the torque spec.

    Quote Originally Posted by old guy View Post
    Jack up the steering knuckle close to the normal right height position before attempting to remove the upper ball joints. If the knuckle is hanging down it tends to put the ball joint shafts in a bind and requires a bit more force to remove them. Once again heat is your friend.
    I have the car on the floor jack (one side like changing tire but under the front rearward subframe), instead of of jack the steering knuckle up, can i lower the car to the normal heigh (same level with the passenger side) then bottle jack the knuckle up where the center of the brake disc the same height like the tire installed?

    do i need to heat up the triple clam and use the air hammer to hit the joints from the bottom? or just air hammer alone?

    thank you all for

  13. #13
    Veteran Member Four Rings SJorge3442's Avatar
    Join Date
    Aug 27 2013
    AZ Member #
    121842
    Location
    Philly

    You can leave the car jacked up (I hope your using jack stands or at least have the tire thrown under the frame) and then jack up the knuckle to the height where it would be if the car was on the ground. Then use a punch and whack those joints out. I used a normal tie rod tool to get mine off like this


    Put it around the joint and hammer it in. Should pop right out. A little heat can help too.
    2017 A4 6 Speed - Sport Plus - Mythos Black
    2018 Q5 - Prestige - Manhattan Grey

  14. #14
    Established Member Two Rings
    Join Date
    Sep 17 2015
    AZ Member #
    356172
    Location
    United States

    Jorge, thank you. i will try your method.

  15. #15
    Senior Member Two Rings
    Join Date
    Dec 11 2015
    AZ Member #
    365692
    Location
    PA

    I went to do this on Sunday. After about 5 minutes I decided, this isn't for me and packed up the tools. I'll be replacing my entire suspension (125k on original setup) and have the shop take care of these while I'm at it. I'm a rookie and not trying to break anything.

  16. #16
    Veteran Member Four Rings SJorge3442's Avatar
    Join Date
    Aug 27 2013
    AZ Member #
    121842
    Location
    Philly

    Quote Originally Posted by iksnoved25 View Post
    I went to do this on Sunday. After about 5 minutes I decided, this isn't for me and packed up the tools. I'll be replacing my entire suspension (125k on original setup) and have the shop take care of these while I'm at it. I'm a rookie and not trying to break anything.
    Due to the nature of the pinch bolt, I wouldn't recommend this job for a beginner mechanic. This is certainly up there on the list of PITA items to change. Being in PA I bet your stuff isn't in that great of shape either.
    2017 A4 6 Speed - Sport Plus - Mythos Black
    2018 Q5 - Prestige - Manhattan Grey

  17. #17
    Senior Member Two Rings
    Join Date
    Dec 11 2015
    AZ Member #
    365692
    Location
    PA

    Quote Originally Posted by SJorge3442 View Post
    Due to the nature of the pinch bolt, I wouldn't recommend this job for a beginner mechanic. This is certainly up there on the list of PITA items to change. Being in PA I bet your stuff isn't in that great of shape either.
    well, I had no problem getting off that first bolt, wasn't seized or anything. But after I looked at how much more involved the job was, I'll just have the shop do it. I'm a DIYer, but this one looks a bit more of a PITA than brakes/rotors.

  18. #18
    Stage 2 Banner Advertiser Four Rings ECS Tuning-Audi's Avatar
    Join Date
    Oct 02 2006
    AZ Member #
    70746
    Location
    Wadsworth,OH

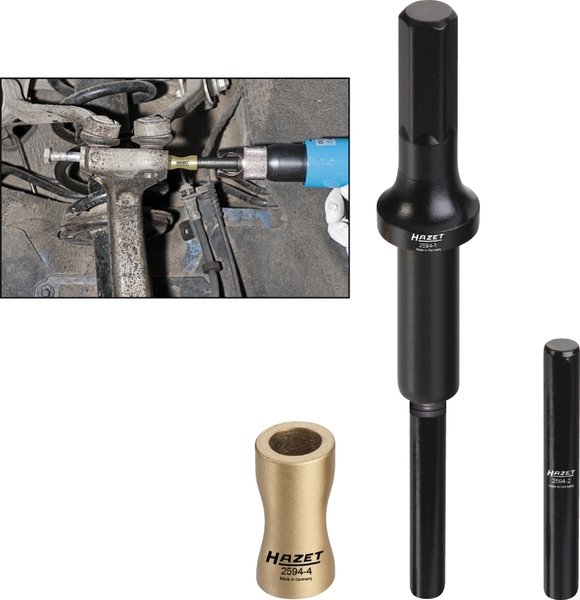
    Having the proper tools definitely helps as well!

    Click HERE to order or for more information


    **We plan on having a more affordable option in the future FYI.**

    Jason

  19. #19
    Established Member Two Rings
    Join Date
    Sep 17 2015
    AZ Member #
    356172
    Location
    United States

    I got the pinch bolt out after work today. just took me 5 mins with punch and hammer. I sprayed it first in the morning before I left and spraying it again when i got home. then 20 mins after the spray, i started with the punch and hammer. just little tap tap tap then it came out. feel quite an accomplishment today.
    how do I remove the factory retaining ring/washer on the shock plate? I removed 3 bolts to take the shock/spring and upper control arm out but there is a retaining clip and I can not get it out. what do you use to do it? i try to cut it but the metal nipper couldn't reach. i am thinking of sharp chisel :) or make a tool that similar to the tool that remove the door panel clip but stronger to pry this thing out. take a look at the blue circle.

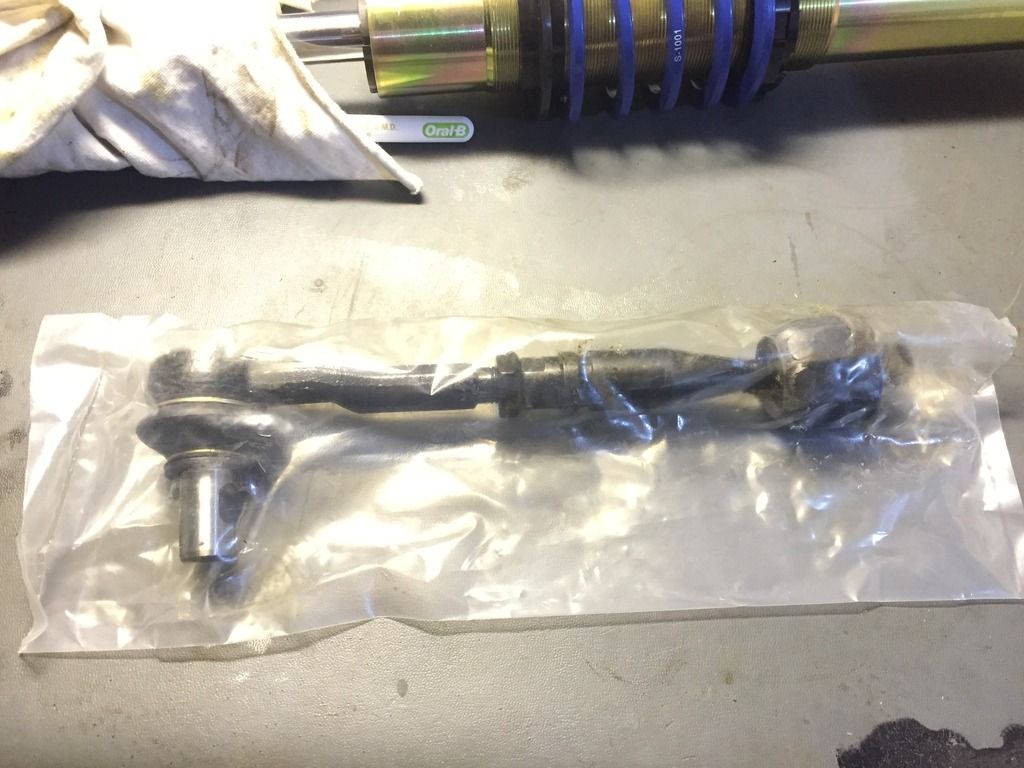
    I sort out parts from the kit that i bought from FCPRO. is this the piece that attach to the knuckle and the other end cover in the rubber boot? is this piece the same as the red circle ? what is the do and don't on this?
    .


    Olivier
    Last edited by OlivierA4; 04-19-2016 at 08:07 PM.

  20. #20
    Veteran Member Four Rings SJorge3442's Avatar
    Join Date
    Aug 27 2013
    AZ Member #
    121842
    Location
    Philly

    Part you circled is the piece you have. Its called an outer tie rod. Shock tower has 3 bolts accessible from under the hood holding it in. Those three and the bottom shock bolt on the control are the only thing holding the shock in

    Sent from my Nexus 6 using Tapatalk
    2017 A4 6 Speed - Sport Plus - Mythos Black
    2018 Q5 - Prestige - Manhattan Grey

  21. #21
    Veteran Member Three Rings cschuster's Avatar
    Join Date
    Jun 05 2013
    AZ Member #
    116637
    Location
    Lexington, KY

    For that little retaining washer - Remove the 3 bolts in the upper mount, leave the bottom shock bolt attached, then jump on the hub a little. It will either pop loose or right off.
    2011 TTS
    APR Stage 1|H&R Rear Sway|Bilstein B12 Pro-Kit|42DD Downpipe

    2002 A4 Quattro 3.0 6spd - sold
    ST Coils|RS4 Reps|Rebuilt 01E|Color DIS

  22. #22
    Veteran Member Three Rings 19jdog's Avatar
    Join Date
    Jul 28 2014
    AZ Member #
    268946
    My Garage
    2006 Mini Cooper s - 2013 Mini Cooper S - 2007 C6 Avant - 2006 GSXR 750
    Location
    SACRAMENTO

    I live in Cali and don't have to worry about rust. That damn pinch bolt always strips when removing. Thank god for the salvage yards near me!
    11 Q7 Prestige TDI S Line - Stance SF 03 20x10

    04 B6 A4 USP 2.7t
    USP CLUB MEMBER #198
    BEL 2.7t SWAP- Rohana RC7 19x9.5 33mm - 034 REAR SWAYBAR - TIP TO 6 SPEED SWAP

  23. #23
    Veteran Member Three Rings tHatOne guY's Avatar
    Join Date
    Aug 20 2012
    AZ Member #
    99020
    My Garage
    06' Yamaha R1...Raven
    Location
    Mesa, Az

    Quote Originally Posted by ECS Tuning-Audi View Post
    Having the proper tools definitely helps as well!

    Click HERE to order or for more information


    **We plan on having a more affordable option in the future FYI.**

    Jason

    Hazet has good tools but always been pricey... that said I picked up one of these a couple years back. Being that I have 3 Audis and work on quite a few others.

    http://www.ebay.com/itm/Laser-Tools-...851?rmvSB=true
    Last edited by tHatOne guY; 04-20-2016 at 09:20 PM.

  24. #24
    Veteran Member Four Rings
    Join Date
    Jun 26 2015
    AZ Member #
    339463
    Location
    Tampa, FL

    Quote Originally Posted by SJorge3442 View Post
    Part you circled is the piece you have. Its called an outer tie rod. Shock tower has 3 bolts accessible from under the hood holding it in. Those three and the bottom shock bolt on the control are the only thing holding the shock in

    Sent from my Nexus 6 using Tapatalk
    Not to be argumentative, but he actually has the whole tie rod assembly, both inner and outer parts. Make sure to adjust the new ones to the same length as the old ones. This will at least make the car driveable to the alignment shop.

  25. #25
    Established Member Two Rings
    Join Date
    Sep 17 2015
    AZ Member #
    356172
    Location
    United States

    do i really have to replace the whole tie rod assembly or just the outer part?

  26. #26
    Veteran Member Four Rings SJorge3442's Avatar
    Join Date
    Aug 27 2013
    AZ Member #
    121842
    Location
    Philly

    Quote Originally Posted by OlivierA4 View Post
    do i really have to replace the whole tie rod assembly or just the outer part?
    Either way, you're going to need an alignment. Not to mention, the inner tie rods are likely worn a bit. The rule of thumb is that if you push the inner tie rod up without the outer attached and it remains up and doesnt sag, then its still good. When they were, they lose their ability to hold themselves up.
    2017 A4 6 Speed - Sport Plus - Mythos Black
    2018 Q5 - Prestige - Manhattan Grey

  27. #27
    Established Member Two Rings
    Join Date
    Sep 17 2015
    AZ Member #
    356172
    Location
    United States

    I will have to order the clam for the replacement of the tie rod assembly. damn it another week of waiting.

  28. #28
    Veteran Member Four Rings SJorge3442's Avatar
    Join Date
    Aug 27 2013
    AZ Member #
    121842
    Location
    Philly

    Quote Originally Posted by OlivierA4 View Post
    I will have to order the clam for the replacement of the tie rod assembly. damn it another week of waiting.
    i used a big hose clamp for it. I dont have the tool for the other pliers and I've had no issues over the last 2 years. Just a normal 2" hoseclamp does the trick
    2017 A4 6 Speed - Sport Plus - Mythos Black
    2018 Q5 - Prestige - Manhattan Grey

  29. #29
    Veteran Member Four Rings Audibot's Avatar
    Join Date
    May 20 2010
    AZ Member #
    59252
    Location
    Maryland

    I've used a zip tie for the accordian hose. No issues either.

  30. #30
    Veteran Member Four Rings SJorge3442's Avatar
    Join Date
    Aug 27 2013
    AZ Member #
    121842
    Location
    Philly

    Quote Originally Posted by Audibot View Post
    I've used a zip tie for the accordian hose. No issues either.
    Yeah you basically just need to keep that cover in place. Its point is to prevent dust and dirk from getting to the steering rack seals.
    2017 A4 6 Speed - Sport Plus - Mythos Black
    2018 Q5 - Prestige - Manhattan Grey

  31. #31
    Established Member Two Rings
    Join Date
    Sep 17 2015
    AZ Member #
    356172
    Location
    United States

    Ok. I will use the SS hose clamp. Try to get one side done this weekend

  32. #32
    Veteran Member Four Rings walky_talky20's Avatar
    Join Date
    Jun 30 2008
    AZ Member #
    30427
    Location
    Erie, Pennsylvania

    Quote Originally Posted by tHatOne guY View Post
    Hazet has good tools but always been pricey... that said I picked up one of these a couple years back. Being that I have 3 Audis and work on quite a few others.

    http://www.ebay.com/itm/Laser-Tools-...851?rmvSB=true
    Ooh, Thanks for the tip. Just bought one of these. $28 shipped.
    ^Don't listen to this guy, he's not even a mechanic.
    2001 Laser Red A4 1.8TQM, 5-Speed Swapped, 4.11 Final Drive, APR 93, 2.5" Exhaust, ST Coilovers, 034 RSB, A8 Brakes Front & Rear
    2006 Passion Red Volvo V50 T5 AWD 6MT
    2000 Satin Silver Passat 1.8T FWD Wagon, Slippy Tiptronic, 15" Hubcaps
    2001 Aluminum Silver Metallic A4 Avant 1.8TQM (winter sled)

  33. #33
    Veteran Member Three Rings tHatOne guY's Avatar
    Join Date
    Aug 20 2012
    AZ Member #
    99020
    My Garage
    06' Yamaha R1...Raven
    Location
    Mesa, Az

    Absolutely. I love mine and at about a 10th the price of the Hazet tool!

  34. #34
    Veteran Member Four Rings
    Join Date
    Jun 26 2015
    AZ Member #
    339463
    Location
    Tampa, FL

    Quote Originally Posted by walky_talky20 View Post
    Ooh, Thanks for the tip. Just bought one of these. $28 shipped.
    Where did you get it for $28 shipped? Do you mean 28 GBP?

  35. #35
    Established Member Two Rings
    Join Date
    Sep 17 2015
    AZ Member #
    356172
    Location
    United States

    thank you everyone for chiming in.
    i am on the last stretch of the first time ever control arms replacement. I read tightening upper control arms and lower control arms at suspension loaded. the upper control arms are already tighten to the uppers struts mounting plate with measuring at 80mm for the front and 70mm for the back arm with reference from the top of the mounting plate to the flat part (near the ball join) of the control arms.
    I have my wheel off and have the car on the floor jack. I plan of using bottle jack to jack the knuckle up in simulate the suspension load condition. the question i have is how do i know when/where to stop jacking up the knuckle to the proper ride height? I search around for the stock suspension ride height on our audizine forums but it search results with all kind of numbers. 25.75, 25, etc. What is the spec. number? please help me.
    thank you again.

  36. #36
    Veteran Member Four Rings SJorge3442's Avatar
    Join Date
    Aug 27 2013
    AZ Member #
    121842
    Location
    Philly

    Quote Originally Posted by OlivierA4 View Post
    thank you everyone for chiming in.
    i am on the last stretch of the first time ever control arms replacement. I read tightening upper control arms and lower control arms at suspension loaded. the upper control arms are already tighten to the uppers struts mounting plate with measuring at 80mm for the front and 70mm for the back arm with reference from the top of the mounting plate to the flat part (near the ball join) of the control arms.
    I have my wheel off and have the car on the floor jack. I plan of using bottle jack to jack the knuckle up in simulate the suspension load condition. the question i have is how do i know when/where to stop jacking up the knuckle to the proper ride height? I search around for the stock suspension ride height on our audizine forums but it search results with all kind of numbers. 25.75, 25, etc. What is the spec. number? please help me.
    thank you again.
    ahh. This figure is dependent on your car, the age of the shocks, and the sag of the springs. You can always tighten the bolts enough to hold everything in place, lower the car back to the ground, and then measure the center of the wheel to the fender. That will give you the measurement you need.
    2017 A4 6 Speed - Sport Plus - Mythos Black
    2018 Q5 - Prestige - Manhattan Grey

  37. #37
    Established Member Two Rings
    Join Date
    Sep 17 2015
    AZ Member #
    356172
    Location
    United States

    Jorge,
    what should i reference my measurement to? I need some baseline number.
    I change these things in the car; upper and lower control arms, struts and spring (solo werk). so I need to get the suspension loaded at factory, then tight all control arms, then adjust the spring to the near factory ride height number.

    a little background, the car is 110k miles. i paid local shop to fix the car before but ...... so I just start this myself. i found out that, the shock, spring, control arms, tie rod assembly are all bad. ball join area were all good however all the rubber bushing is cracked and ripped. inner tie rod is not stiff and can not held itself up. I AM PISSED after I find out all of these things. basically, my trusted local shop and the dealer before that did not do it right nor cut corner. either way, i am fucked by it.

  38. #38
    Veteran Member Four Rings old guy's Avatar
    Join Date
    Dec 28 2006
    AZ Member #
    14483
    My Garage
    '13 A5, '24 Tiguan SEL R-Line
    Location
    Western Maryland

    Quote Originally Posted by OlivierA4 View Post
    I plan of using bottle jack to jack the knuckle up in simulate the suspension load condition. the question i have is how do i know when/where to stop jacking up the knuckle to the proper ride height?
    Simple. No need to measure anything. Jack the knuckle up to the point where the body of the car just starts to move. That would be the point that the suspension is fully loaded.
    '03 A4 5-MT Motoza tuned Frankenturbo F21L With full supporting mods. Sold (and missed dearly).
    '13 A5 6-MT Needs more Fun Stuff: Neuspeed PM / 3.0 TDI Intercooler / H&R OE Sport Springs / Bilstein B8 Shocks / TyrolSport Brake Stiffeners / ECS Short Shifter / S5 Side Skirts / RS Grille

  39. #39
    Established Member Two Rings
    Join Date
    Sep 17 2015
    AZ Member #
    356172
    Location
    United States

    Quote Originally Posted by old guy View Post
    Simple. No need to measure anything. Jack the knuckle up to the point where the body of the car just starts to move. That would be the point that the suspension is fully loaded.
    Old Guy,
    thank you and I HATE (in a good way) you. why everything seem so simple with you :).

  40. #40
    Veteran Member Four Rings old guy's Avatar
    Join Date
    Dec 28 2006
    AZ Member #
    14483
    My Garage
    '13 A5, '24 Tiguan SEL R-Line
    Location
    Western Maryland

    At least there are a FEW advantages of being old..........
    '03 A4 5-MT Motoza tuned Frankenturbo F21L With full supporting mods. Sold (and missed dearly).
    '13 A5 6-MT Needs more Fun Stuff: Neuspeed PM / 3.0 TDI Intercooler / H&R OE Sport Springs / Bilstein B8 Shocks / TyrolSport Brake Stiffeners / ECS Short Shifter / S5 Side Skirts / RS Grille

Bookmarks

Posting Permissions

  • You may not post new threads
  • You may not post replies
  • You may not post attachments
  • You may not edit your posts
  •  


    © 2001-2024 Audizine, Audizine.com, and Driverzines.com
    Audizine is an independently owned and operated automotive enthusiast community and news website.
    Audi and the Audi logo(s) are copyright/trademark Audi AG. Audizine is not endorsed by or affiliated with Audi AG.