Audizine - An Automotive Enthusiast Community

Results 1 to 37 of 37
  1. #1
    Veteran Member Three Rings
    Join Date
    Dec 26 2008
    AZ Member #
    36761
    Location
    STL

    Starter Removal, Audi S5 possibly RS5 as well. V8 FSI

    Guest-only advertisement. Register or Log In now!
    So I've been looking online for any at all procedures on starter removal, and I've come up short.
    My beautiful car got shipped and arrived, but underneath all that pretty is a big serious problem.
    Starter got burned and god knows what else, so to tackle the project I purchased a Bently Service manual.


    Step 1) Remove engine & Transmission.. F*$@!

    This was not an option for me as i don't have the space nor the equipment to remove the engine&transmission. Audi charges roughly around $3,000 and this is mostly labor to get this done.

    I am not doing a DIY in this thread but mostly some pictures and information so it can hopefully help someone along the way.
    This also will be a great Post for anyone looking to replace a passenger side engine mount. I will include simple instructions, not going into details.
    I am doing a few other maintenance items, so some items you may not wish to remove. The 0 gauge ground wire for the starter got burned in the process from previous owner, so i have to replace it as well while i'm there.

    You will need a lot of tools, from 8mm-19mm, 12point, 6 point, triple square, breaker bar, good set of gloves, jack stands, misc screw driver,etc.


    1) Place the front end in the air and support safely with jack stands. This might sound simple if you were working on any other car, but on S5 pinch weld is used to raise the car in the air. So with the Jack on the pinch weld you have to figure out where to place the jack stand safely (obviously can't go in the same place).

    2) Remove both front tires, support rear tires with wheel locks, emergency brake on and battery fully disconnected at this point.

    3) Remove the front bumper


    4) Remove the passenger wheel well liner

    5) Disconnect electrical equipment, anything you see (ground wires to chassis, airbag, motor mount, AUX air pump, anything).

    6) Remove the front AC condenser, set it aside. Remove upper & lower radiator hoses, pull the radiator out with the fans attached.


    7) Remove the Accessory belt, belt idler pulley, belt tensioner, main pulley (if you are upgrading, thanks JHM) :)


    8) Remove two bolts that hold the alternator, ligthly tap with rubber mullet and set alternator aside. remove electrical from it and pull it away from the car.

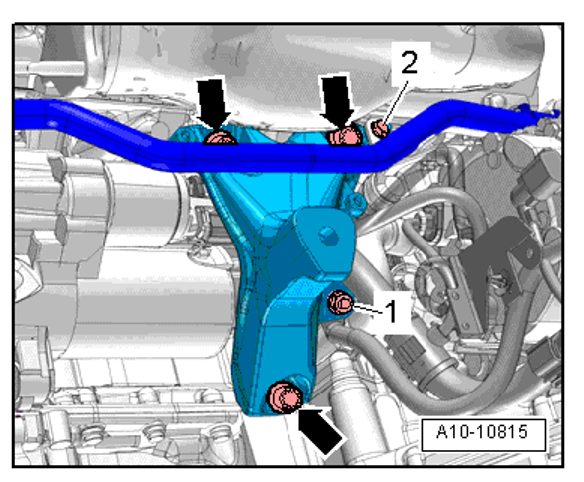
    9) Inside the passenger wheel, remove engine mount bolts, 2x 18mm, 1 big triple square, and two triple square units by the sway bar. Sway bar can stay, but i removed mine to get an inch more space.


    10) There is absolutely no need to drop the subframe or steering line. Raise the engine by the oil pan roughly 2-3cm. Use a long piece of smoothly finished wood, you do not want oil pan damage.


    11) Remove the front air tube box, i have no idea what this is called but it's a rectangular looking box and air tube goes in it from the back of the engine. 4 triple square 14mm i believe.
    Removed here:


    12) Remove the engine mount bracket from the car, remove the engine mount.

    13) You can see the starter now, remove the wiring harness by reaching from the front, and remove the 13mm nut on it.

    14) Remove the lower 16mm bolt on the starter and get some beer.

    15) Remove the air intake box & tube

    16) Remove the metal coolant pipe that goes to the top radiator hose, one bolt in the middle and one bolt behind passenger valve cover.

    Remove the plastic coolant T on the back as well, as you will need space to work.

    That's all the room you have from the top.

    17) Disconnect both O2 sensor harnesses, disconnect and move over to the firewall the air control unit on the top. Again, i'm not sure what it is. It's a sealed unit with Air hoses hooked up, one electrical connector. two bolts on the subframe hold it.

    18) Get ready for some knuckle damage on your left hand, using a long 18mm 12 point wrench, carefully place it on the bolt that goes through the transmission and into the starter.


    19) Say a few prayers and go at it. Once the bolt is out inch and half starter can be removed out the vehicle. Leave the bolt in place, cause god knows you won't be able to put it back manually.


    That's it, re-install everything in order of removal. Save some money and do it yourself :)

    Thank you all for reading, and hopefully this will help someone out. Thanks to ECS tuning & JHM for all the parts!

    And of course my best helper :)
    Last edited by Slobo7x; 03-29-2016 at 06:34 AM.

  2. #2
    Senior Member Three Rings rasetsu's Avatar
    Join Date
    Sep 24 2013
    AZ Member #
    123736
    My Garage
    2014 RS 5
    Location
    Frisco, TX, United States

    Nutso for a part that is "wear and tear". Thanks for posting all the pics!
    2014 RS 5 Sepang BLUE
    2017 Cayman S
    2018 Macan GTS

  3. #3
    Deactivated Four Rings
    Join Date
    Sep 15 2008
    AZ Member #
    33049
    My Garage
    Is Big
    Location
    Fort Worth, Texas

    Great info, I love the DIY projects, this is a big one; I would probably have 7 leftover bolts. I chose a different method that proved far easier...bought a new car.

  4. #4
    Veteran Member Three Rings
    Join Date
    Dec 26 2008
    AZ Member #
    36761
    Location
    STL

    Thanks guys, if it can help someone out that's what it's there for.

  5. #5
    Veteran Member Three Rings Reggie's Avatar
    Join Date
    Feb 27 2005
    AZ Member #
    5479
    My Garage
    2014 SQ5 & 2015 RS5
    Location
    Fort Collins Coloardo

    Kudo to you for the great write up.

  6. #6
    Established Member Two Rings stefdds's Avatar
    Join Date
    Sep 30 2014
    AZ Member #
    286317
    My Garage
    2002 Subaru WRX (many rally mods, 300hp)
    Location
    Milwaukee, Wisconsin USA

    For those of us who wrench our own cars, this is a invaluable guide. Nothing like an additional way to gain access to challenging areas! Slobo7x, you must "flip off" the Dealer every time you drive by; I love it!!!

  7. #7
    Veteran Member Three Rings
    Join Date
    Dec 26 2008
    AZ Member #
    36761
    Location
    STL

    LOL! I have a good relationship with my parts guys, I don't know anyone in service department and hopefully I never will. haha

  8. #8
    Veteran Member Four Rings ak_siberian's Avatar
    Join Date
    Jan 30 2015
    AZ Member #
    312171
    My Garage
    992C4S, T2 Touareg V8, Porsche Macan S, & Gehl turbo bobcat;
    Location
    20 miles NW Fairbanks, Alaska

    Outstanding write up!

    When my alternator acted up on the 4.2 V8 Treg most folks said drop the engine. On the V10 Treg you have no choice, but on the 4.2 V8 I managed to service it by removing the tire and wheel liner and accessed it (painfully and very slowly through there). Like you, I'm averse to dropping anything like an engine for example. :)

    Great write up and kudos for a great job!

    siberian
    The best long distance runners eat raw meat, run naked and sleep in the snow

  9. #9
    Established Member Two Rings
    Join Date
    May 10 2012
    AZ Member #
    93329
    Location
    downingtown, PA

    definitely needed this thanks. yesterday my POS S5 took a shit wont crank at all. scanned with vcds says starter relay electrical malfunction but I swapped relays around and same shit.. so next possibility was starter..

    for the record I COMPLETELY HATE MY S5.. after owning a b6, b8 a5 2.0t, and now the s5... I never recommend the b8's to people. ive had more issues with the a5 and s5 than I did with the b6.

  10. #10
    Veteran Member Three Rings
    Join Date
    Dec 26 2008
    AZ Member #
    36761
    Location
    STL

    That's a bummer man, it's not an easy car to work on for sure.
    what's the numeric code you are getting?

  11. #11
    Established Member Two Rings
    Join Date
    May 10 2012
    AZ Member #
    93329
    Location
    downingtown, PA

    Quote Originally Posted by Slobo7x View Post
    That's a bummer man, it's not an easy car to work on for sure.
    what's the numeric code you are getting?
    012424 - Starter Relay
    P3088 - 001 - Electrical Malfunction

    im in process of trying to remove starter.. this is a PITA job lol

  12. #12
    Veteran Member Three Rings
    Join Date
    Dec 26 2008
    AZ Member #
    36761
    Location
    STL

    Left you a voicemail, let me know if I can help.

  13. #13
    Registered Member One Ring
    Join Date
    Apr 05 2016
    AZ Member #
    371338
    Location
    Detroit

    Unfortunately I am having to do the same thing for my S5, and so far the instructions have been awesome! We have run into a snag at the moment, we have the starter free and able to move around but cannot seem to get out from behind engine support. Did you have to remove the engine support to remove the starter (see picture)? If not, how did you get the started out?

    [IMG]<a href="http://s1067.photobucket.com/user/jwviper97/media/Engine%20Support_zpsegxay2sm.png.html" target="_blank"><img src="http://i1067.photobucket.com/albums/u439/jwviper97/Engine%20Support_zpsegxay2sm.png" border="0" alt=" photo Engine Support_zpsegxay2sm.png"/></a>[/IMG]

  14. #14
    Registered Member One Ring
    Join Date
    Apr 05 2016
    AZ Member #
    371338
    Location
    Detroit


  15. #15
    Registered Member One Ring
    Join Date
    Apr 18 2014
    AZ Member #
    189699
    Location
    Naples, FL

    I changed my AC compressor less than a year ago. And before that it was the high pressure fuel pumps and before that vacuum leak and before that ECU problems. Yesterday my alternator gave out on alligator Alley. I have 117k on it. What should I expect to fail next? ...in your experience

  16. #16
    Veteran Member Three Rings Jeff V.'s Avatar
    Join Date
    Dec 30 2014
    AZ Member #
    306660
    My Garage
    2008 S5 6MT
    Location
    Kansas City, MO

    Quote Originally Posted by flavpope
    I have 117k on it. What should I expect to fail next? ...in your experience
    Have you had any electronic failures yet? Because it sounds like you're overdue.

    For anyone pulling the starter and/or transmission, I wanted to add this part. You can remove the cowl that closes out the plenum area behind the engine. This gives you ample room to access some of the difficult bolts. Including the top starter bolt.


    Also something I found out. You're only supposed to use the aluminum transmission bolts twice. Again, this includes the upper starter bolt. They're torque-to-yield bolts, and once they've been tightened down twice, they're supposed to be thrown in the trash. If your bolts have an X chiseled in the head, they've already been used once.

    The lower steel bolt can be reused as many times as you like.

  17. #17
    Veteran Member Four Rings
    Join Date
    Oct 16 2006
    AZ Member #
    12611
    Location
    Naperville

    I'm having the toughest time getting the upper and lower radiator hoses off. (Quick connects) Anyone have any suggestions? Also does anyone know how to get the AC condenser off? I know the are secured in by the two upper tabs but I can't get it to release on the driver side. the hard AC line gets caught up on the radiator
    Last edited by manguyen; 05-25-2017 at 07:18 AM.

  18. #18
    Veteran Member Three Rings Jeff V.'s Avatar
    Join Date
    Dec 30 2014
    AZ Member #
    306660
    My Garage
    2008 S5 6MT
    Location
    Kansas City, MO

    I pulled the upper hose off of the hard pipe. The quick disconnect seems to be jammed up. I haven't pulled the lower hose or the condenser yet.

    As best I can tell from the parts diagrams, it's just held on with a spring clip and an o-ring. It shouldn't be this difficult.

  19. #19
    Established Member Two Rings Tom Servo's Avatar
    Join Date
    Jul 20 2014
    AZ Member #
    265831
    Location
    Somewhere, South Carolina

    Quote Originally Posted by Jeff V. View Post
    I pulled the upper hose off of the hard pipe. The quick disconnect seems to be jammed up. I haven't pulled the lower hose or the condenser yet.

    As best I can tell from the parts diagrams, it's just held on with a spring clip and an o-ring. It shouldn't be this difficult.
    Unfortunately it is! I ended up having to cut through the rubber of the upper hose because the QD would not break free. Hoses had been on there since the car was built. I had already bought new hoses for when I changed out the radiator so it made it an easy choice to cut them after fighting with them for a while. The lack of leverage for a pry tool made it hard too.

    For the condenser, I ended up having to drain the A/C and remove the hard lines. However, after looking at it again, maybe a Dremel tool could be used to grind some of the plastic away that is in the way of the hard line. Also, the metal tabs on the dehydrator side (left side facing the car) are pretty easy to bend and the condenser might be flexed out enough for the hard lines to clear the plastic part of the radiator. This would be a lot better than having to re-service the A/C, however do it at your own risk.

    Aaron
    Doting Papa of a Cantankerous 2008 (meine sehr teuer Schlampe)

  20. #20
    Veteran Member Four Rings
    Join Date
    Oct 16 2006
    AZ Member #
    12611
    Location
    Naperville

    Quote Originally Posted by Jeff V. View Post
    I pulled the upper hose off of the hard pipe. The quick disconnect seems to be jammed up. I haven't pulled the lower hose or the condenser yet.

    As best I can tell from the parts diagrams, it's just held on with a spring clip and an o-ring. It shouldn't be this difficult.
    To get past the tabs on the condenser on the driver side, I took off both headlight lower brackets and the driver side rebar support. It have me enough room to life up the passenger side so that the bottoms tab on the condenser on the driver side comes free. My next problem is figuring out what the two remaining connection to the radiator and lastly the lower radiator hose.

  21. #21
    Veteran Member Three Rings
    Join Date
    Dec 26 2008
    AZ Member #
    36761
    Location
    STL

    Jeff V. Great job on that cowl removal, i only found that out after i had everything back together and had to access some coolant lines. lol

  22. #22
    Registered Member One Ring
    Join Date
    May 16 2017
    AZ Member #
    399580
    Location
    Pensacola, Fl

    I've got the same code

    Quote Originally Posted by tofast2belast View Post
    012424 - Starter Relay
    P3088 - 001 - Electrical Malfunction

    im in process of trying to remove starter.. this is a PITA job lol
    I've got the same code. Car crapped out on me Saturday and Audi can't seem to figure it out.. what ended up being your issue?

  23. #23
    Established Member Two Rings stefdds's Avatar
    Join Date
    Sep 30 2014
    AZ Member #
    286317
    My Garage
    2002 Subaru WRX (many rally mods, 300hp)
    Location
    Milwaukee, Wisconsin USA

    Jeff V. , thank you for taking the time to add that excellent idea/pic ! Wow, that should give me all kinds of access during some future catalytic converter servicing ; certainly more access options! Suddenly , that project looks a bit brighter and less intimidating. Thank you, Stefan

  24. #24
    Senior Member Two Rings Tomieg's Avatar
    Join Date
    Aug 20 2016
    AZ Member #
    378934
    Location
    SoCal

    Crud,

    I just received this error over the weekend. Anyone want to give me a hand with the repair?

    012424 - Starter Relay
    P3088 - 001 - Electrical Malfunction - Intermittent

    Thanks,
    -Tom
    JHM []S5 R.I.P.
    APR []////RS4

  25. #25
    Registered Member One Ring
    Join Date
    Apr 10 2014
    AZ Member #
    182170
    Location
    Lambertville,Mi/Toledo,Oh

    Quote Originally Posted by Tomieg View Post
    Crud,

    I just received this error over the weekend. Anyone want to give me a hand with the repair?

    012424 - Starter Relay
    P3088 - 001 - Electrical Malfunction - Intermittent

    Thanks,
    -Tom
    I have had the problem since June. Changed started didn’t fix it. Changed relays didn’t fix it. Changed motor mounts didn’t fix it. Changed clutch throwout and flywheel didn’t fix it. Changed clutch slave and master cylinder didn’t fix. Idk what to do now lol

  26. #26
    Veteran Member Four Rings
    Join Date
    Jan 10 2008
    AZ Member #
    24045
    Location
    Roy, WA

    Does not work for the 4.2 RS5. The transmission has to be removed or slid back about 3~4" in order to move the starter from behind the side engine mount. Because of the RS5's larger header design (collector tubes) you can not remove the engine mount without pulling the engine and first removing the headers. Removing the transmission is per Erwin and I can confirm that it just needs to be disconnected and moved straight back 3~4". But that does mean disconnecting the transmission linkage and driveline. You do have to remove the engine cradle which of course means front suspension & steering rack. It is a Pain.
    2003 RS6 (6Spd)
    2013 RS5 (Headers, Aluminum DSG Flywheel,JHM Stg2, etc...)
    2013 S5 (034 Stg2 & TCU)
    1974 911 (3.6ltr)
    2006 CTTS
    944T

  27. #27
    Registered Member One Ring
    Join Date
    Dec 30 2019
    AZ Member #
    532205
    Location
    Phila

    none of your photos are shown. can you please DM me ?? or email them to me [email protected]

    Thanks!!!

  28. #28
    Veteran Member Three Rings
    Join Date
    Dec 26 2008
    AZ Member #
    36761
    Location
    STL

    I cannot believe it's been 5 years almost, wow! Sorry the pictures are gone, I don't believe I have them saved anyplace either ;(

  29. #29
    Active Member One Ring
    Join Date
    Jul 11 2018
    AZ Member #
    422212
    Location
    Brooklyn, NY

    I followed your write up and it’s perfect man. Thank you so much. If anyone needs help with getting this done, lmk.

  30. #30
    Junior Member One Ring PGSteelCity92's Avatar
    Join Date
    Jun 15 2015
    AZ Member #
    337608
    My Garage
    2013 BMW x5 35i // 2006 Ford F350
    Location
    North Carolina

    Thanks so much for the write up. Just got the old starter out and new one in. Going to finish putting it together tomorrow. I did do one thing different. I skipped 16 and 17. Getting the large hose/plastic bracket and O2 sensors off were just two difficult. If anyone else is having trouble getting those underside torx bit bolts, you can remove the firewall in the wheel well that your axle passes through. Its just two bolts and you can reach the socket with some extensions up in there and get to the bolt. Not much clearance and really was only getting one click at a time, but once she started coming lose could spin her off with my fingers. Then I was able to leave all that other stuff in!

  31. #31
    Established Member Two Rings
    Join Date
    Dec 11 2006
    AZ Member #
    14104
    My Garage
    2014 S5, 1987 951
    Location
    South Carolina

    With the images long gone, can anyone clarify how you access the upper bolt on the starter?

    I am trying to change the starter on my 2014 S5 with the 3.0T and am stuck at the upper bolt

  32. #32
    Veteran Member Four Rings
    Join Date
    Jan 10 2008
    AZ Member #
    24045
    Location
    Roy, WA

    The upper bolt on the strarter is also a Bell Housing bolt. It bolts into the starter from the backside. Most likely your bottom starter bolt is Steel and all of the Bell housing bolts are Aluminum and you need to use a 12pt 18mm socket for them, and since they are Alumimum definitely don't over torque them, they are only certified by Audi to be used two times. Rare the starters fail, what are your symptoms? Car wasn't in an accident was it?
    2003 RS6 (6Spd)
    2013 RS5 (Headers, Aluminum DSG Flywheel,JHM Stg2, etc...)
    2013 S5 (034 Stg2 & TCU)
    1974 911 (3.6ltr)
    2006 CTTS
    944T

  33. #33
    Established Member Two Rings
    Join Date
    Dec 11 2006
    AZ Member #
    14104
    My Garage
    2014 S5, 1987 951
    Location
    South Carolina

    I know where the bolt is just not sure the best way to access it. Is it done through the wheel well, under the car or from up top? Do I have to disconnect anything with the exhaust?

    Symptoms are, I went to start the car and it turned over very slowly as if the battery was almost dead. Tried again and the starter began to smoke. Someone else thought the solenoid shorted out, apparently this is known to happen but not common.

  34. #34
    Veteran Member Four Rings
    Join Date
    Jan 10 2008
    AZ Member #
    24045
    Location
    Roy, WA

    Sounds like it is the starter then, just was checking to make sure it wasn't in an accident as their is a battery disconnect on one of the battery terminals that disconnects the starter in event of an accident. You will either have to get at it by removing the belly pans and get at it from underneath or pull the throttle body intake and see if you can squeeze a hand past the rear side of the cylinder head.
    2003 RS6 (6Spd)
    2013 RS5 (Headers, Aluminum DSG Flywheel,JHM Stg2, etc...)
    2013 S5 (034 Stg2 & TCU)
    1974 911 (3.6ltr)
    2006 CTTS
    944T

  35. #35
    Established Member Two Rings
    Join Date
    Dec 11 2006
    AZ Member #
    14104
    My Garage
    2014 S5, 1987 951
    Location
    South Carolina

    Definitely good advice to check the simple stuff first!

    Do you know if the ERWIN manual details the starter removal? or any other manual?

  36. #36
    Active Member One Ring
    Join Date
    Aug 29 2022
    AZ Member #
    794873
    Location
    Canada

    So this is a strange question but I am at a complete loss on this. Does anyone have any diagrams of the wiring for the starter and alternator on these? There is a wire at the back of the alternator that looks like its coming off the engine somewhere, it is reading 12.2 volts and obviously attaches to something but I am at a loss trying to locate where it goes. The car is not charging and will die after a few miles of driving (battery drains). There are two brown wires that are coming out of the loom (covered in black flexloom and have one connector at the end) with the main earth line that connects to the passenger framerail, these are connected to the alternator, they read 8volts. Is this correct? To me it looks like someone has connected the wrong wire to the b+ of the alternator but I have no diagram to go off to check. Any help would be greatly appreciated.

  37. #37
    Veteran Member Four Rings
    Join Date
    Jul 16 2018
    AZ Member #
    422473
    Location
    Atlanta

    Typical routing will be alternator B+ post (don't short that to any metal) to the starter term 30 post and then on to the TV22 term 30 junction block in the plenum chamber (ie, the box with the positive jump start post).

    alternator B+ post to alternator housing should read whatever voltage the J519 is commanding the alternator to produce, assuming the engine is running.
    alternator B+ post to positive jump start post should read 0 volts ideally, but you're likely to read some amount of voltage drop. Few tenths at the most.
    alternator housing to negative jump start post should read 0 volts ideally, but you might read some amount of voltage drop. A tenth or two maybe.

    Voltage drop increases as current flow increases, so all the above should be done with a running engine. You're not going to read any voltage drop if the alternator is not pushing current.

    The alternator grounds to the alternator housing, which grounds to the engine, which grounds to the chassis via the engine ground strap. But you don't need to bother with any of that if alternator housing to negative jump start post shows little to no voltage drop when the alternator is running. If the voltage drop is more than a tenth or two, then you have to start measuring smaller segments along the path and find the voltage drop and assess why that might be to correct it.

    Black flexloom. Don't believe Audi uses that on electrical wiring, do on optical wiring. So maybe something someone has added? Got pics?
    2009 A4 Avant 2.0T quattro Prestige, 270k miles

Bookmarks

Posting Permissions

  • You may not post new threads
  • You may not post replies
  • You may not post attachments
  • You may not edit your posts
  •  


    © 2001-2024 Audizine, Audizine.com, and Driverzines.com
    Audizine is an independently owned and operated automotive enthusiast community and news website.
    Audi and the Audi logo(s) are copyright/trademark Audi AG. Audizine is not endorsed by or affiliated with Audi AG.