Audizine - An Automotive Enthusiast Community

Page 1 of 2 12 LastLast
Results 1 to 40 of 58
  1. #1
    Active Member Four Rings drumnjuny's Avatar
    Join Date
    Jul 12 2010
    AZ Member #
    61335
    My Garage
    848 Corse, SQ5
    Location
    washington dc area

    DIY: Bumper Removal, Headlight Removal, Ecode Swap

    Guest-only advertisement. Register or Log In now!


    I AM NOT RESPONSIBLE FOR ANY DAMAGE YOU CAUSE TO YOUR OWN VEHICLE. PROCEED AT YOUR OWN RISK.
    IF YOU ARE UNCOMFORTABLE GET A PROFESSIONAL TO INSTALL THESE HEADLIGHTS.
    ECODES ARE FOR OFF ROAD USE ONLY.


    Difficulty: 2/10
    Time: 2-4 hours
    Tools Required: 1/4" Ratchets, if you are lowered - a jack, T20, T25, T30 sockets, different length extensions, 10mm extended socket, rivet removal tool (optional), phillips head, latex gloves, phillips head screwdriver, flathead to help remove harnesses


    Step 1: Remove Bumper - I used this DIY and stole some pictures for this writeup. Not all the information was 100% accurate so I decided to make my own instructions. You can follow either, they will both get the job done.

    Remove rain tray above bumper

    Push down the center of these plastic rivets until they click into place. Be careful not to press it too far in.


    Here is what it should look like after it is in place:
    NOTE: When you reinstall the rivets, you will want to push the center tab the opposite direction (see this image), slide the rivet carefully into the slot, and then push the center tab down until it clicks into place, flush.


    Then, use a rivet tool to remove all the rivets like so:


    Next, you want to slide the tray out from underneath two tabs on the top of each headlight (not pictured). After this, pull up firmly from underneath the rain tray. Here is a picture of the tabs underneath so you can get an idea.


    Detach belly pan from bumper

    Remove all Belly pan torx T25 bits at the front of the belly pan. There will be about 7 or so. Here's a picture circling a bunch of them, but really you can just look under and its easy to see which ones need removal.

    Remove Front spoiler torx bits (5x T25). There is a lip attached in the middle of the belly pan. remove all 5 of those and the lip will come down with it.

    Remove quarter turn Phillips head fasteners. there are 3 on each side, right by each wheel.

    Pull belly pan towards rear of vehicle, flexing to remove 4 tabs that are slid into the bumper. Here is a picture of those tabs:


    Once removed, you will see 4 silver T25 belly pan bolts. remove those. Now the bumper is free from the belly pan.


    Detach bumper from Fender

    Remove fender liner screws (4) - these are Easy to find and T25. Basically you want to be able to peel back the fender liner. Here is a picture, but its one of those things which is easier to just do than plan.

    Loosen 10mm nut behind fender liner. Once you peel back the fender liner you will see this nut that secures the quarter panel to the bumper. Once this is loosened, the tabs for the bumper are free to come out. You pull directly out on the edge of the bumper by the nut, and there are 3 tabs here (not pictured). pull them free when you are ready to pull the bumper. Here is a picture of the nut, but once again, if you pull back the fender liner it will be painfully obvious what you need to loosen.

    Remove top bumper bolts (T20, one per side). These bolts are right behind the grill at the top of the bumper. here is a picture of one:


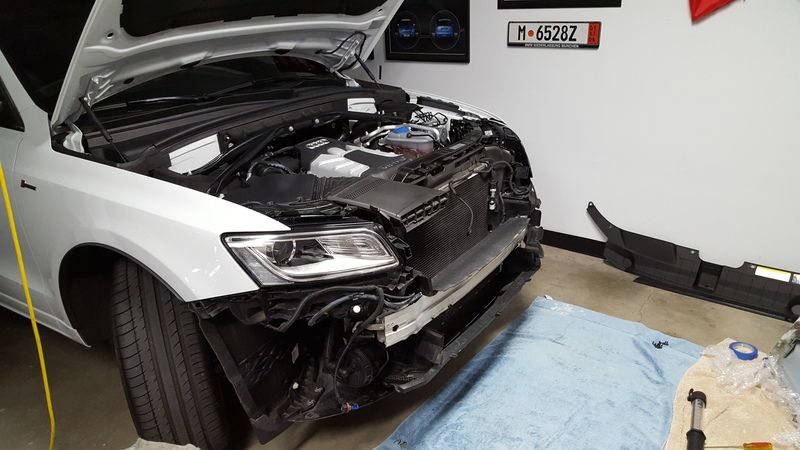
    Now its time to pull the bumper. Find something to rest the bumper on once it is off, as the connections are very short. Disconnect two harnesses connected by the homelink module at the center of the grill. Then, pull each side's tabs out, and the bumper should come free with a little effort. Remove the connection on each side to the fog light.


    Step 2: Remove headlight

    The headlight has 3 bolts, two on top and one at the rear bottom. Remove all three - These are T30.


    remove the headlight connection. There is only one plug going to it. Now, there is a weird hose thing routed to the front of the radiator (you can see the hose in the picture of the headlights a few steps below). Get that to a place where it is not restricting the headlight's movement. Try to squeeze the headlight out. if you can, excellent. I didn't want to flex it too much so I took one final step.

    Loosen the headlight tray. Remove top bolt, remove two rear facing bolts, remove side bolt, remove bolt going into crash bar. Green dot shows the bolts you must loosen from behind the tray. you may have to get creative to get to these.


    When putting the headlight tray back into place, its very important you get this piece locked into place before tightening the top bolt. It needs to slide in from the top, before you can tighten down the other tray bolts.


    Remove headlight by wiggling and angling it over the headlight tray, towards the middle of the car and spinning to get around the fender. It is a tight squeeze - be patient. The rear portion of the headlight tray has four clips that have to line up with the slots in the bottom of the headlight - this is a huge PITA when putting it back together - the smart / easy way to do it is to remove the front portion of the tray entirely, clip the headlight in, and slide the combined assembly back in. but the front part of the tray has an airbag sensor in it, which i like to avoid removing/ touching if possible, so i just kept wiggling it out of the way instead. Here is a pic of the four clips that go underneath the headlight for reference:


    Step 3: Swap electronics over

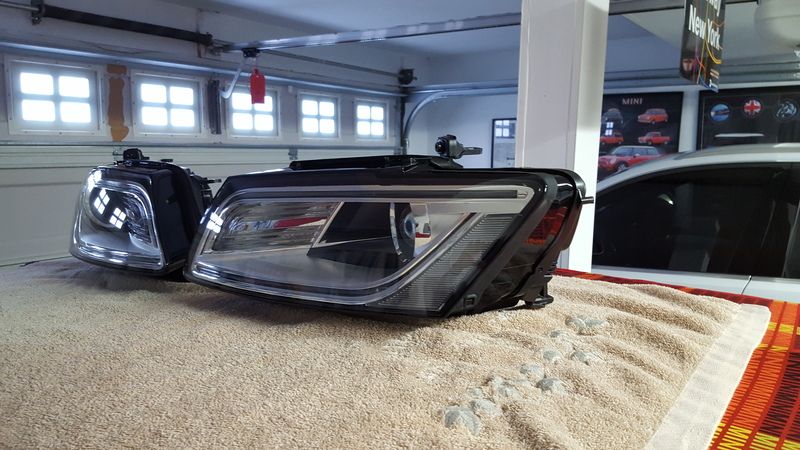
    Swap the metal things attached to your headlight over to the e-code. also swap the weird noodle appendage thingymajigger. Be careful while handling these electronics - make sure no debris gets inside the housing. IMO you should swap over to the new plastic covers that came with your ecodes - that way the gasket fits perfectly. Reusing your old gaskets may allow humidity into the headlight - bad news bears.

    This step is pretty self explanatory - T20 i think for all these. needless to say, be careful when removing the plugs. if you have to force it, you are doing something wrong.


    To remove the bulb, you must play with a circular lock that sits around the bulb. There are two tabs that allow you to manipulate the lock. Turn clockwise to unlock, then pull bulb out straight. it will come out with minimal effort. Be very careful especially while handling this bulb. it is fragile and sensitive to oils. I used a fresh set of latex gloves while swapping the bulb over - highly suggest you do as well. You can even see my 100pk box of gloves in the above picture haha.


    That's it! JK Put your car back together first. It's mostly the reverse order of how you pulled it apart, and anyone who made it this far will be able to figure that much out i think.

    A little VCDS Magic turns off the side marker bulbs, which the ecodes don't have. You can do this at any time before the install, so next time you see a friend with a cable have him do this. Likewise, if you don't do this you will have an error code in your dash until you do get to a VCDS cable but it is harmless.

    Quote Originally Posted by pwdrskr View Post
    I believe it was this:

    [09 – Cent. Elect.]
    [Coding - 07] -> [Long Coding Helper] -> Byte 10 Bit 3 - Change 1 to 0

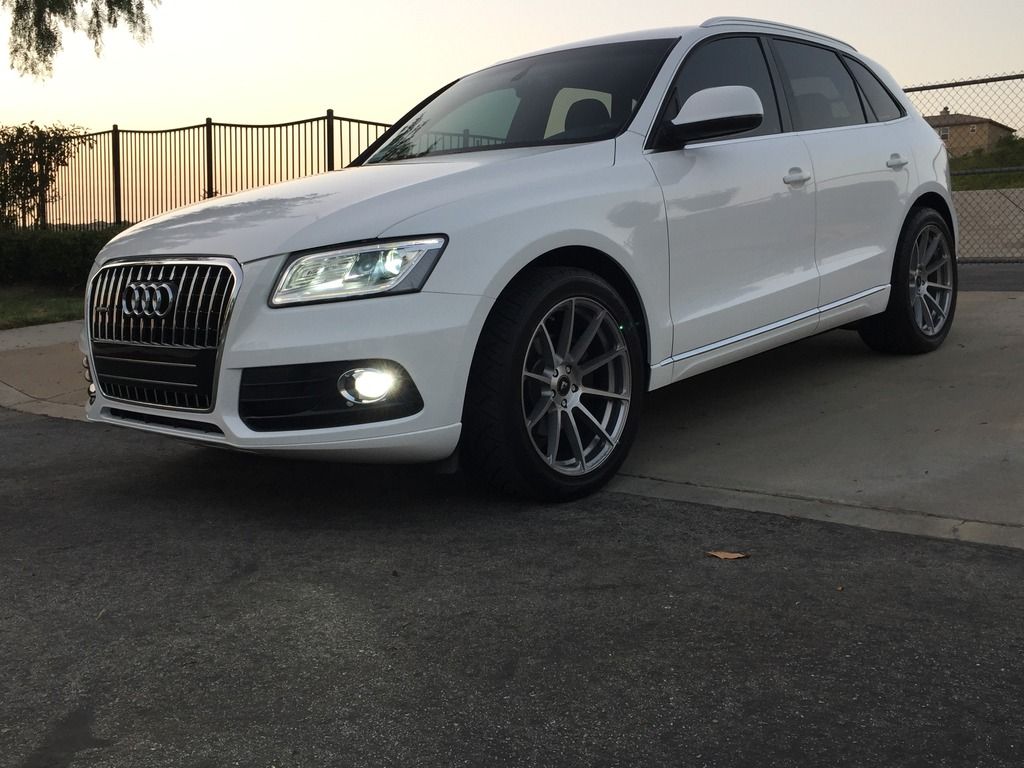
    Next, have some beers and admire the beauty of your new headlights. Here is a picture of them installed, and a picture of the light cutoff.


    Last edited by drumnjuny; 02-22-2016 at 08:48 AM.

  2. #2
    Veteran Member Four Rings riceboy22's Avatar
    Join Date
    Mar 26 2015
    AZ Member #
    322788
    My Garage
    2015 Audi SQ5, Felt F65x, Levy Electric Scooter
    Location
    New York, NY

    ...
    Current
    2015 Audi SQ5 3.0 TFSI (Build Thread | Flickr | Instagram)

    Past
    2006 Lexus IS350 | 2001 Audi S4 | 2000 Honda S2000 | 1999 Yamaha YZF-R6 | 1995 Acura Integra GS-R

  3. #3
    Veteran Member Three Rings
    Join Date
    Nov 08 2014
    AZ Member #
    293863
    My Garage
    '14 Quattro A4
    Location
    Santa Cruz

    For anyone doing this be sure to NOT touch the glass of the bulb. Greasy fingers or dirt will shorten the life of these bulbs very quickly.
    Steve

    '15 SQ Monsoon

  4. #4
    Active Member Four Rings drumnjuny's Avatar
    Join Date
    Jul 12 2010
    AZ Member #
    61335
    My Garage
    848 Corse, SQ5
    Location
    washington dc area

    Quote Originally Posted by Smittylube View Post
    For anyone doing this be sure to NOT touch the glass of the bulb. Greasy fingers or dirt will shorten the life of these bulbs very quickly.
    Whoops, forgot to mention that. Thanks!

    also added some clarification on the bulb lock.

  5. #5
    Veteran Member Three Rings yakev724's Avatar
    Join Date
    Jun 26 2014
    AZ Member #
    259526
    Location
    Brooklyn

    Well done + very nice photos! Wish this was around for when I did my FL headlight retrofit.

    Quick question - the rubber hose just hangs down once the lights are in place? (pre-FL lights didn't have them)

  6. #6
    Active Member Four Rings drumnjuny's Avatar
    Join Date
    Jul 12 2010
    AZ Member #
    61335
    My Garage
    848 Corse, SQ5
    Location
    washington dc area

    Quote Originally Posted by yakev724 View Post
    Well done + very nice photos! Wish this was around for when I did my FL headlight retrofit.

    Quick question - the rubber hose just hangs down once the lights are in place? (pre-FL lights didn't have them)
    unfortunately i didn't get a good picture of this - i will look through my photos to see if maybe i can use a different picture to show where the rubber hose is. it "clips" in so to speak, above the crash bar. At first I was having difficulty removing the headlight because it was stuck, and didn't realize that was what was holding it up. I will pop the cover off and grab a picture after work if i can't find a good one.

  7. #7
    Veteran Member Three Rings yakev724's Avatar
    Join Date
    Jun 26 2014
    AZ Member #
    259526
    Location
    Brooklyn

    Quote Originally Posted by drumnjuny View Post
    unfortunately i didn't get a good picture of this - i will look through my photos to see if maybe i can use a different picture to show where the rubber hose is. it "clips" in so to speak, above the crash bar. At first I was having difficulty removing the headlight because it was stuck, and didn't realize that was what was holding it up. I will pop the cover off and grab a picture after work if i can't find a good one.
    Thanks! I think I might not have these clips since I never had the hoses in the first place. Will have to dig around for some part nos.

    I had to replace the lower support plate and add the rear metal brackets when I did the FL retrofit. Guess I'm not finished!

  8. #8
    Active Member Four Rings drumnjuny's Avatar
    Join Date
    Jul 12 2010
    AZ Member #
    61335
    My Garage
    848 Corse, SQ5
    Location
    washington dc area

    Quote Originally Posted by yakev724 View Post
    Thanks! I think I might not have these clips since I never had the hoses in the first place. Will have to dig around for some part nos.

    I had to replace the lower support plate and add the rear metal brackets when I did the FL retrofit. Guess I'm not finished!
    NP. Yeah i saw your thread, that was very impressive work! Added label for noodle arm on the image. should have used a smaller paint brush on the image, but working with the imgur editor haha. If you scroll up you should get a good idea of where it goes. If I remember I will post a better one after work.

  9. #9
    Veteran Member Three Rings Im-AUDI-here's Avatar
    Join Date
    Jun 19 2013
    AZ Member #
    117450
    My Garage
    A bike
    Location
    Long Beach, CA

    Great job drum! Now I just need to muster up the courage to tear my car apart when my e-codes come in.
    2016 SQ5 Premium+ - Glacier White Metallic

    2013 A4 Premium - Scuba Blue - (Gone but not forgotten)

  10. #10
    Active Member Four Rings drumnjuny's Avatar
    Join Date
    Jul 12 2010
    AZ Member #
    61335
    My Garage
    848 Corse, SQ5
    Location
    washington dc area

    Quote Originally Posted by Im-AUDI-here View Post
    Great job drum! Now I just need to muster up the courage to tear my car apart when my e-codes come in.
    It's WAY easier than it seems, trust me! I ranked it difficulty 2/10 for a reason jut takes time, mostly to remove those damn belly pan bolts. Without the belly pan this process takes half as long. You'll be fine, text me if you have any questions during install, I'm always on FaceTime / Skype helping people figure things out remotely.

    I think someone else near you bought them. Maybe get together for an install party haha?

  11. #11
    Established Member Two Rings hokidachi's Avatar
    Join Date
    Jun 06 2015
    AZ Member #
    336298
    Location
    Santa Clara, CA

    Thanks for putting this together!
    So there's no re-programming needed for the non-afs? It's just a basic swap?
    2016 SQ5 - Daytona Grey

  12. #12
    Active Member Four Rings drumnjuny's Avatar
    Join Date
    Jul 12 2010
    AZ Member #
    61335
    My Garage
    848 Corse, SQ5
    Location
    washington dc area

    Shoot, forgot to add that too. LOL. You do need to code out the side markers. I actually already had done that and spaced it. Will add to the DIY tomorrow

  13. #13
    Established Member Two Rings andrios's Avatar
    Join Date
    Aug 30 2009
    AZ Member #
    47113
    Location
    IL

    Cant wait to install these badboys!!

    They came packaged really nice and are in perfect condition.

    Thanks Drumnjuny for getting us a great price!


  14. #14
    Veteran Member Three Rings rusq5's Avatar
    Join Date
    Mar 27 2015
    AZ Member #
    322984
    Location
    SF Bay Area

    Got mine headlights in the mail today. Thanks drumnjuny. DIY and a great deal with quick shipping - full service treatment!

    I'll be installing mine tomorrow, if all goes as planned. Thank you for the DIY!
    -Rusty
    2022 RS6 Deep Green/Cognac
    2019 RS3 Nardo/RS Design
    IG: @grn_rs6

  15. #15
    Veteran Member Three Rings Im-AUDI-here's Avatar
    Join Date
    Jun 19 2013
    AZ Member #
    117450
    My Garage
    A bike
    Location
    Long Beach, CA

    Having mine installed tomorrow along with the MagnaFlow exhaust. These things arrived in perfect condition all wrapped up tight. Only thing missing was the bow! Thanks again for the awesome service drum.
    2016 SQ5 Premium+ - Glacier White Metallic

    2013 A4 Premium - Scuba Blue - (Gone but not forgotten)

  16. #16
    Active Member Four Rings drumnjuny's Avatar
    Join Date
    Jul 12 2010
    AZ Member #
    61335
    My Garage
    848 Corse, SQ5
    Location
    washington dc area

    No problem guys!! Glad I could help out. everyone post up some pictures once they're installed! One day we are gonna be the flyest section by percentage of members with ecodes LOL

    Sorry it's a week late but here is a picture of where the noodle arm routes to with the headlight installed.


  17. #17
    Active Member Four Rings drumnjuny's Avatar
    Join Date
    Jul 12 2010
    AZ Member #
    61335
    My Garage
    848 Corse, SQ5
    Location
    washington dc area

    Quote Originally Posted by yakev724 View Post
    Thanks! I think I might not have these clips since I never had the hoses in the first place. Will have to dig around for some part nos.

    I had to replace the lower support plate and add the rear metal brackets when I did the FL retrofit. Guess I'm not finished!
    Attached a picture in the above post for you. To be honest when I look at the clips it's more like three plastic straight ish pieces sticking out at offsets. where u kind of snake the hose in. 1-2 zip tie would do the job A+

  18. #18
    Veteran Member Three Rings yakev724's Avatar
    Join Date
    Jun 26 2014
    AZ Member #
    259526
    Location
    Brooklyn

    Perfect - really appreciate it! I can feel good about them not getting snagged or melting on something hot.

  19. #19
    Established Member Three Rings hurricanes28's Avatar
    Join Date
    Sep 29 2015
    AZ Member #
    358703
    My Garage
    Slingshot pearl black
    Location
    Massachusetts

    Quote Originally Posted by hokidachi View Post
    Thanks for putting this together!
    So there's no re-programming needed for the non-afs? It's just a basic swap?
    Just to let you all know when you swap the headlights
    The left and right side marker generates an error
    You will have to disable this in vagcom. When I find out how I will let you all know. But if someone knows how let me know.


    Sent from my iPhone using Tapatalk

  20. #20
    Active Member Four Rings drumnjuny's Avatar
    Join Date
    Jul 12 2010
    AZ Member #
    61335
    My Garage
    848 Corse, SQ5
    Location
    washington dc area

    Quote Originally Posted by hurricanes28 View Post
    Just to let you all know when you swap the headlights
    The left and right side marker generates an error
    You will have to disable this in vagcom. When I find out how I will let you all know. But if someone knows how let me know.


    Sent from my iPhone using Tapatalk
    @hurricanes28, I have added the instructions to the DIY a few weeks ago, last step . Did those VCDS instructions help? If so that should do it. if not, i will update with the correct instructions when i get home and test it. I had already disabled them a few weeks before install so forgot to add that step originally but it is in the DIY now.

    Quote Originally Posted by pwdrskr View Post
    I believe it was this:

    [09 – Cent. Elect.]
    [Coding - 07] -> [Long Coding Helper] -> Byte 10 Bit 3 - Change 1 to 0

  21. #21
    Established Member Three Rings hurricanes28's Avatar
    Join Date
    Sep 29 2015
    AZ Member #
    358703
    My Garage
    Slingshot pearl black
    Location
    Massachusetts

    Do I uncheck bit 3 side marker lights North American region installed


    Sent from my iPhone using Tapatalk

  22. #22
    Active Member Four Rings drumnjuny's Avatar
    Join Date
    Jul 12 2010
    AZ Member #
    61335
    My Garage
    848 Corse, SQ5
    Location
    washington dc area

    Quote Originally Posted by hurricanes28 View Post
    Do I uncheck bit 3 side marker lights North American region installed


    Sent from my iPhone using Tapatalk
    did you follow the instructions i quoted? if you are in the right spot then yes uncheck that / mark it as 0.

  23. #23
    Active Member Four Rings drumnjuny's Avatar
    Join Date
    Jul 12 2010
    AZ Member #
    61335
    My Garage
    848 Corse, SQ5
    Location
    washington dc area

    Updated DIY with some helpful information on getting the headlight clipped in properly

  24. #24
    Active Member Four Rings drumnjuny's Avatar
    Join Date
    Jul 12 2010
    AZ Member #
    61335
    My Garage
    848 Corse, SQ5
    Location
    washington dc area

    Just wanted to bump this for any members messing with their headlights

  25. #25
    Veteran Member Four Rings riceboy22's Avatar
    Join Date
    Mar 26 2015
    AZ Member #
    322788
    My Garage
    2015 Audi SQ5, Felt F65x, Levy Electric Scooter
    Location
    New York, NY

    DIY: Bumper Removal, Headlight Removal, Ecode Swap

    Quote Originally Posted by drumnjuny View Post
    Just wanted to bump this for any members messing with their headlights
    I feel bad that I read through all these instructions and ended up just paying someone to do it.

    #prettylights

    Last edited by riceboy22; 05-06-2016 at 05:13 PM.
    Current
    2015 Audi SQ5 3.0 TFSI (Build Thread | Flickr | Instagram)

    Past
    2006 Lexus IS350 | 2001 Audi S4 | 2000 Honda S2000 | 1999 Yamaha YZF-R6 | 1995 Acura Integra GS-R

  26. #26
    Active Member Four Rings drumnjuny's Avatar
    Join Date
    Jul 12 2010
    AZ Member #
    61335
    My Garage
    848 Corse, SQ5
    Location
    washington dc area

    Haha hey no space to work makes it difficult! But there's about a million positives to city life

    PS holy crap they make sepang look a bajillion times better!!!


    Sent from my iPhone using Tapatalk

  27. #27
    Junior Member One Ring TTG's Avatar
    Join Date
    May 11 2016
    AZ Member #
    373177
    Location
    Seattle, WA

    I will be doing many things all at the same time and I have a feeling that SQ will be inpieices for couple of days.

    I am adding back up camera, front camera (while the front bumper is off) and E-Codes.

    This will take alot of beers and patience

    These beauties are sitting in the garage waiting for an install. Thank you drumnjuny for posting this DIY and of course for the E-Codes!

    [IMG][/IMG]

  28. #28
    Junior Member One Ring TTG's Avatar
    Join Date
    May 11 2016
    AZ Member #
    373177
    Location
    Seattle, WA

    Joined the E-Code group last night. Thanks to the write up, install was super easy. It takes nothing but time.

    Here is after the hardest part. Re-inserting the lights back to the shelf. This was beer time!

    Now, I need to install the Lamin-Xs to protect these beauties. :)

    [IMG][/IMG]

  29. #29
    Active Member Four Rings drumnjuny's Avatar
    Join Date
    Jul 12 2010
    AZ Member #
    61335
    My Garage
    848 Corse, SQ5
    Location
    washington dc area

    awesome!! congrats! they look so good on white cars too

  30. #30
    Veteran Member Four Rings DannyDeez's Avatar
    Join Date
    Sep 11 2004
    AZ Member #
    3455
    My Garage
    16 Q5
    Location
    Westchester, NY

    DIY: Bumper Removal, Headlight Removal, Ecode Swap

    Awesome write up bud! Thanks so much for putting it together!


    2016 Monsoon Gray Q5 Prem Plus, Tech, Sport, 19's (Click for thread) (Sold)
    2012 Brilliant Black S4 Prestige, 6 speed (Build) (Sold)
    2015 Brilliant Black A3 Cab (Sold)
    2006 Quartz Gray A4, 6 speed (Sold)
    2013 Phantom Black S5, 6 Speed (Sold)
    2001.5 Nogaro S4, 6 Speed (x2) (Sold)

  31. #31
    Veteran Member Four Rings tcm glx's Avatar
    Join Date
    Feb 11 2004
    AZ Member #
    214
    Location
    So Cal

    X1000..... This write up helped me get through the install by myself in about 2.5 hours. Also, AG is the way to go to get lights, got mine as promised super well wrapped.

    2013 Audi Q5 2.0T Premium Ibis White/Chesnut Brown
    2018 Audi Q7 3.0T Glacier White/Nougat Brown

  32. #32
    Registered User Four Rings
    Join Date
    Jun 25 2016
    AZ Member #
    375054
    Location
    DMV

    Glad I could help guys! Enjoy!

  33. #33
    Registered User Four Rings
    Join Date
    Jun 25 2016
    AZ Member #
    375054
    Location
    DMV

    @centowski

  34. #34
    Senior Member Three Rings noyzcij3's Avatar
    Join Date
    Sep 06 2012
    AZ Member #
    100030
    Location
    Philadelphia

    Should have read your DIY first before tackling this. Thought it was the same as the B8.5 S4 where it's not necessary to remove the bumper. Found out the hard way.

    Guess this will have to wait until the weekend.


    Sent from my iPhone using Tapatalk
    2016 Sepang S4 P+
    6MT | Black Nappa Leather | Tech Package | Carbon Inlays | Sport Diff | Vag Com Mods | Xpel Ultimate | Ecodes | BFI GS2 | Carbon Mirrors | Alu Kreuz | 034 Drivetrain Mount Inserts | Bilstein B16 RideControl | Eurocode Sway Bars and End Links | AWE Resonated Touring Exhaust 90mm | BBS CH-R | Deval Diffuser | Ecode Taillights | ECS Street Shield | 034 Subframe Mount Inserts | Carbon Imports Low Kick Spoiler | Porsche 19Z BBK

  35. #35
    Registered User Four Rings
    Join Date
    Jun 25 2016
    AZ Member #
    375054
    Location
    DMV

    @NYSpeedRacer bump

  36. #36
    Active Member One Ring
    Join Date
    Mar 15 2017
    AZ Member #
    395598
    Location
    Chicago

    are the rubber hoses for condensation 100% necessary, anything else than those and the brackets that I need?
    Thank you

  37. #37
    Registered User Four Rings
    Join Date
    Jun 25 2016
    AZ Member #
    375054
    Location
    DMV

    Quote Originally Posted by Crazybuba View Post
    are the rubber hoses for condensation 100% necessary, anything else than those and the brackets that I need?
    Thank you
    Yes, they are necessary. Not sure what all you have

  38. #38
    Registered Member One Ring
    Join Date
    Apr 08 2017
    AZ Member #
    397364
    Location
    Argentina

    First of all, thank you so much for the writeup and detailed pictures, it really helped me a lot!
    There is one problem I had and wanted to know if you could help me out with some advice.
    I was cleaning the condesation hose end and through the condensation hose, a little bit of dirt (it white colored) has come into the headlight, so I was wondering if is there was any way to clean the inside of the headlight without disassembling the headlight itself?
    I've already take out the headlight from the car.
    Thanks a lot!

  39. #39
    Veteran Member Four Rings
    Join Date
    Sep 28 2009
    AZ Member #
    48463
    Location
    suburb

    does anyone have the pics that photobucket removed?? tthanks so much!
    Audi S7 stage 3 w/srm turbos
    Audi B8 S5 stage 3 w/apr supercharger
    Audi SQ7
    Audi Q5 3.0 EPL stage 2 single pulley (gone)
    Audi Allroad 2.7 stage 3 (gone)
    Audi B5 S4 stage 3 (regrettably gone)
    Audi B8 S5 (gone)

  40. #40
    Registered User Four Rings
    Join Date
    Jun 25 2016
    AZ Member #
    375054
    Location
    DMV

    The pics from photobucket were not mine they're from another thread.

    Actually I found out much after creating this DIY that if you remove the remaining 3-4 bolts for the belly pan the whole thing slides out - no flexing needed!

    The bumper is bolted to the car underneath the car. Hidden by the belly pan. Once you remove the belly pan you will see the obvious bolts to remove.

Bookmarks

Posting Permissions

  • You may not post new threads
  • You may not post replies
  • You may not post attachments
  • You may not edit your posts
  •  


    © 2001-2024 Audizine, Audizine.com, and Driverzines.com
    Audizine is an independently owned and operated automotive enthusiast community and news website.
    Audi and the Audi logo(s) are copyright/trademark Audi AG. Audizine is not endorsed by or affiliated with Audi AG.