Audizine - An Automotive Enthusiast Community

Results 1 to 24 of 24
  1. #1
    Veteran Member Four Rings fly300kts's Avatar
    Join Date
    Oct 16 2008
    AZ Member #
    34255
    My Garage
    03 Golf GTI - 03 Golf 2.0l - 04 Golf 2.0L
    Location
    South Florida - Ft Lauderdale

    Diy: Bumper repair

    Guest-only advertisement. Register or Log In now!
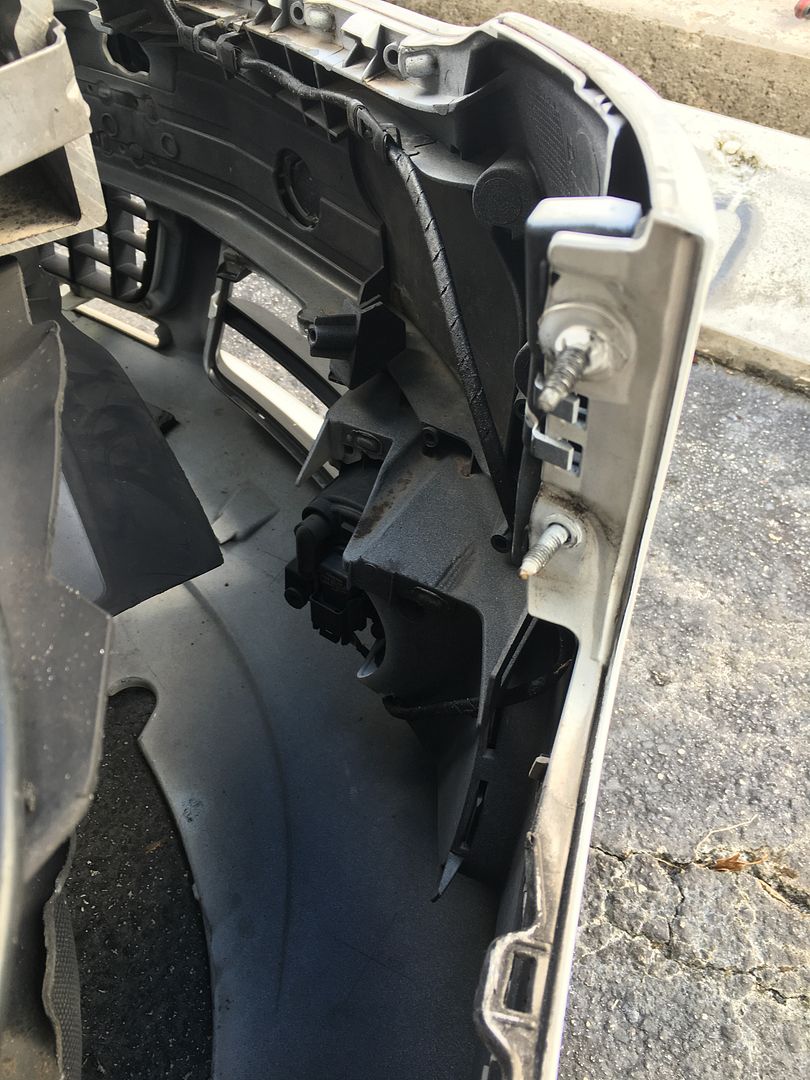
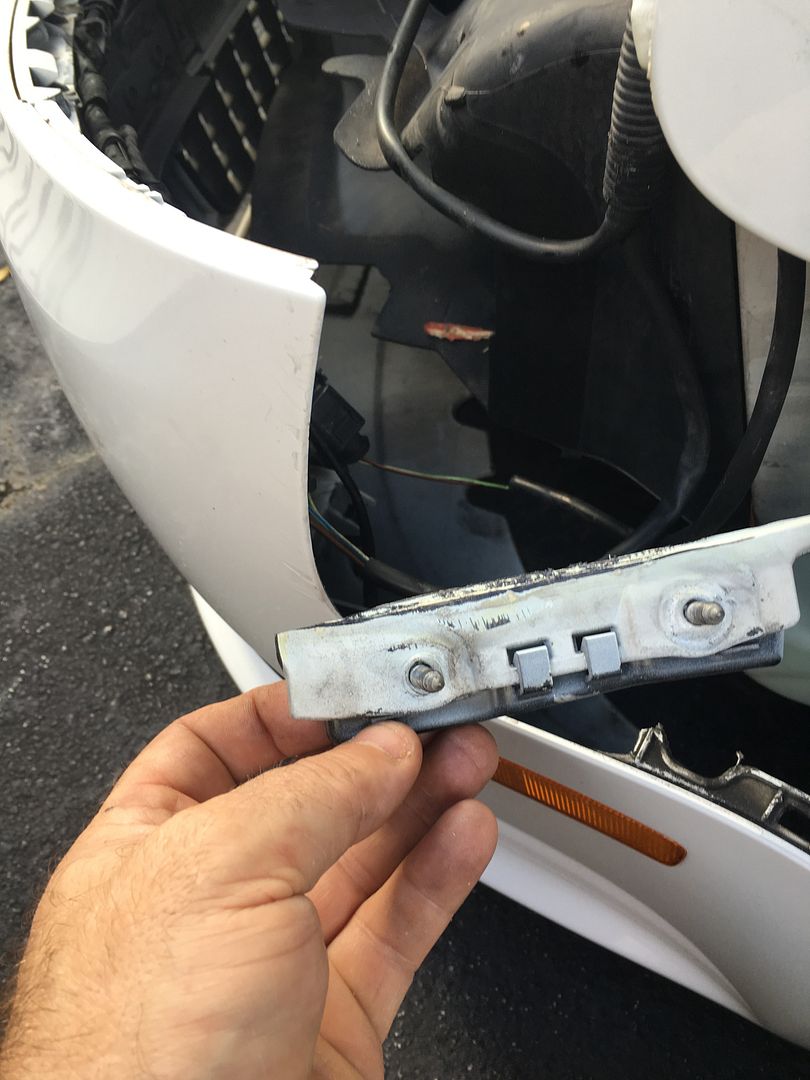
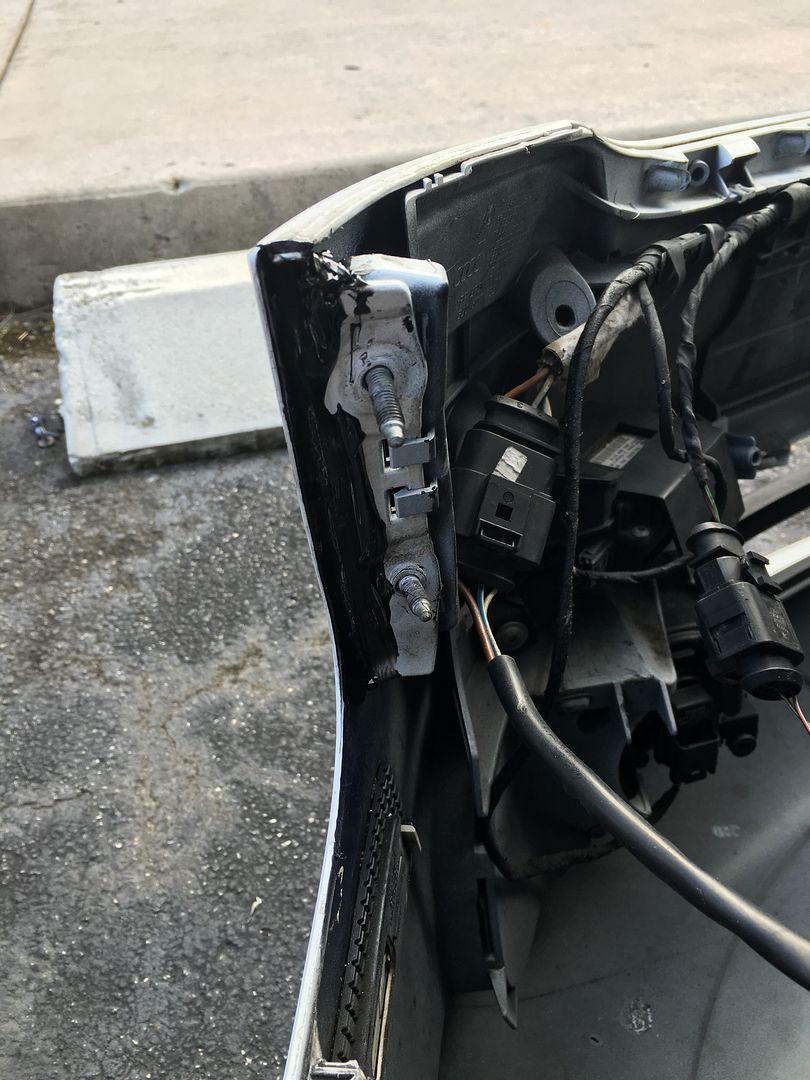
    A fellow Ziner stopped by the house today with the well known bumper broken, after backing out a parking spot while the bumper stayed stuck on the concrete stop.

    Good


    Bad


    Since this has happened to some of you in the past, I decided to make a quick DIY.

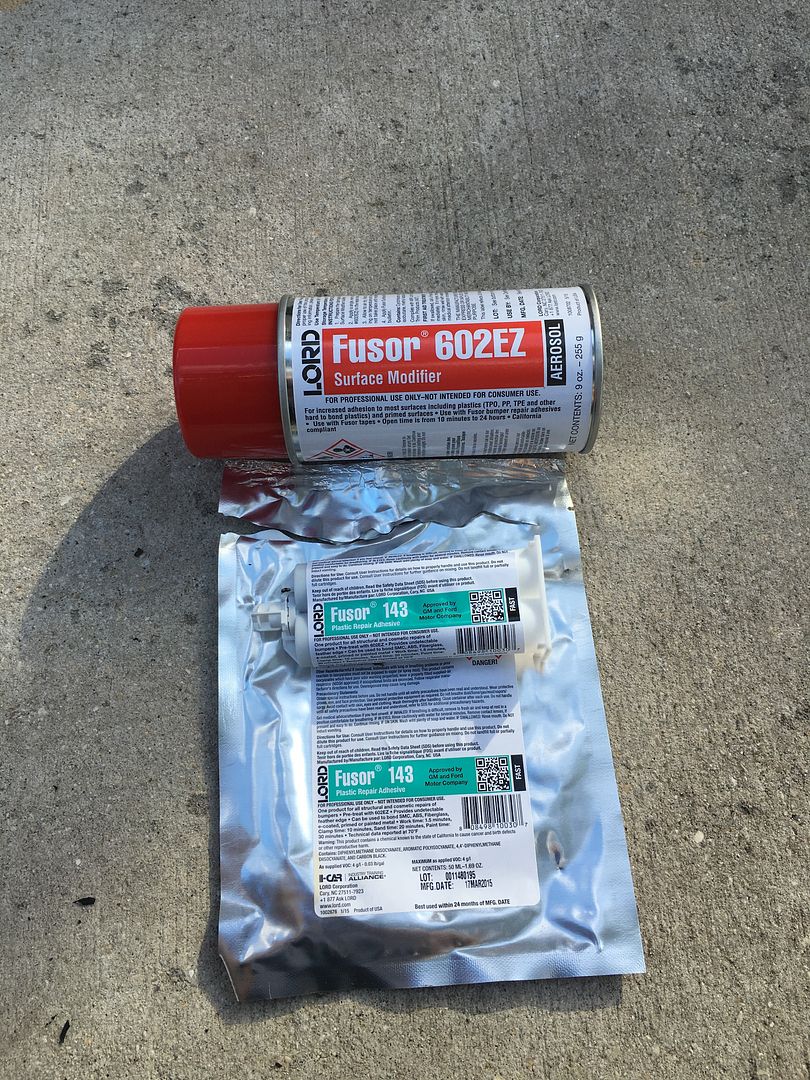
    You will need the following components:
    Fusor 143
    Fusor 602EZ (make sure to order this otherwise the 143 will not bond correctly)


    Step 1
    Remove the bumper and remove both headlights

    Step 2
    Clean the edges of the broken part and fender with alcohol. Then reinstall the broken piece on the fender using both screws.

    Step 3
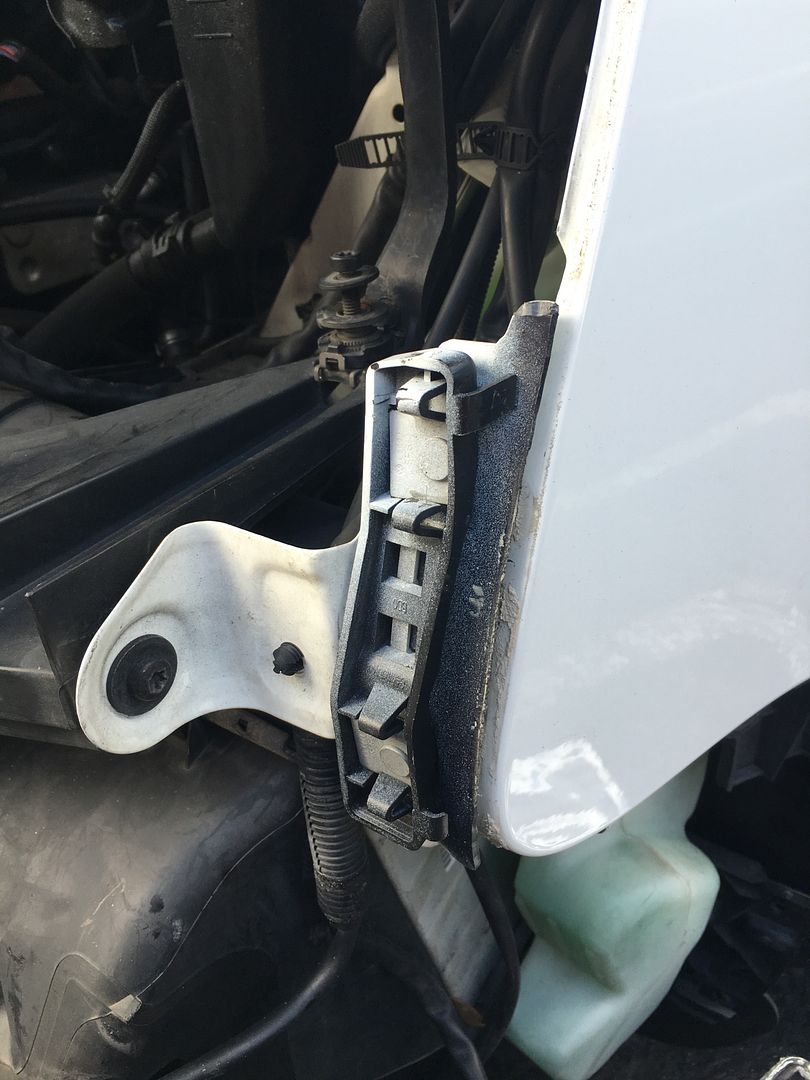
    Spray the edge of the bracket and the inner part of the fender. Don't be shy and this step is mandatory. Let dry for 5 mn.
    Reinstall the fender and make sure that with the bracket installed, the fender sits flush with the bumper.
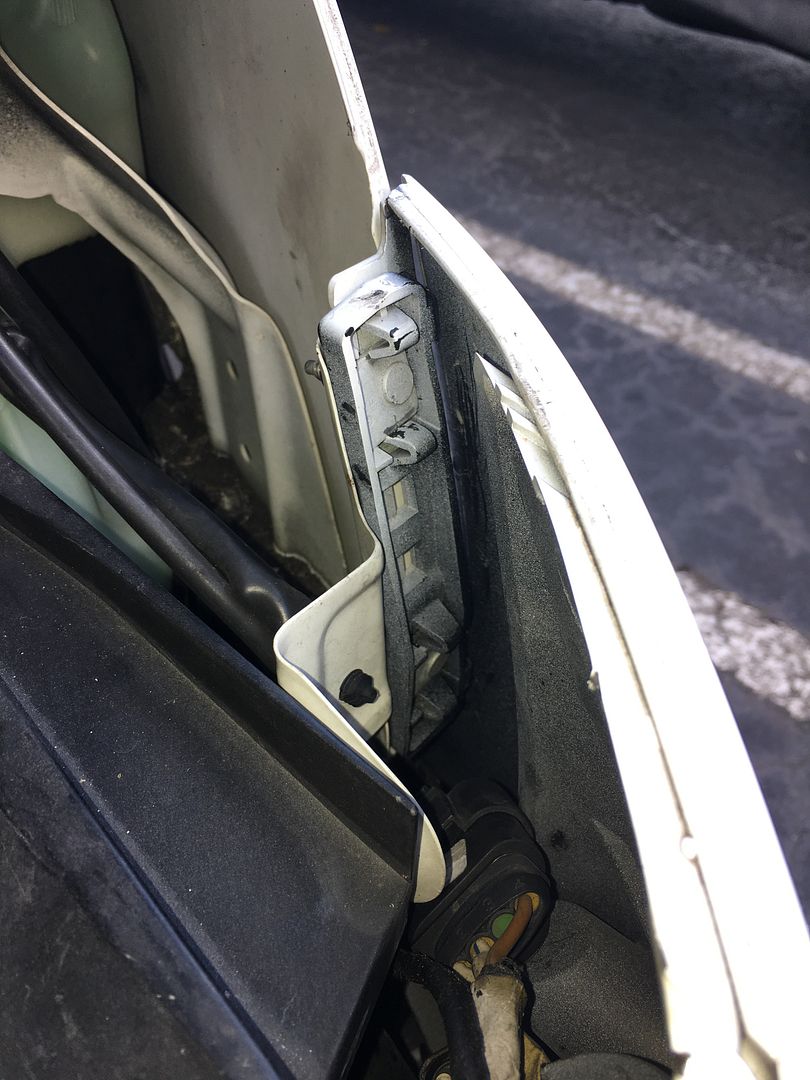

    Step 4
    Load the Fusor 143. I forgot to mention that each bag for Fusor comes with 2 mixing nozzles. Be really careful with this product: it dries almost instantly (less than 1 mn) and become hard like concrete once dry.
    While keeping the bumper side pushed in position, fill the gap between the bracket and the bumper with fusor

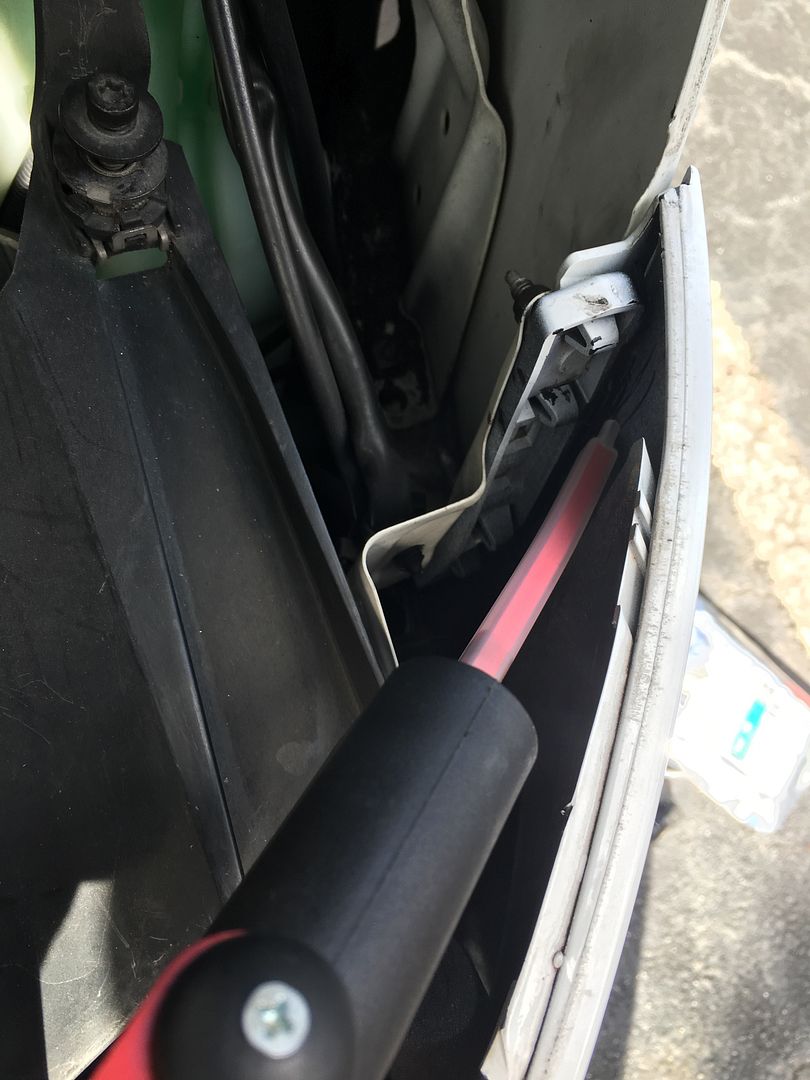
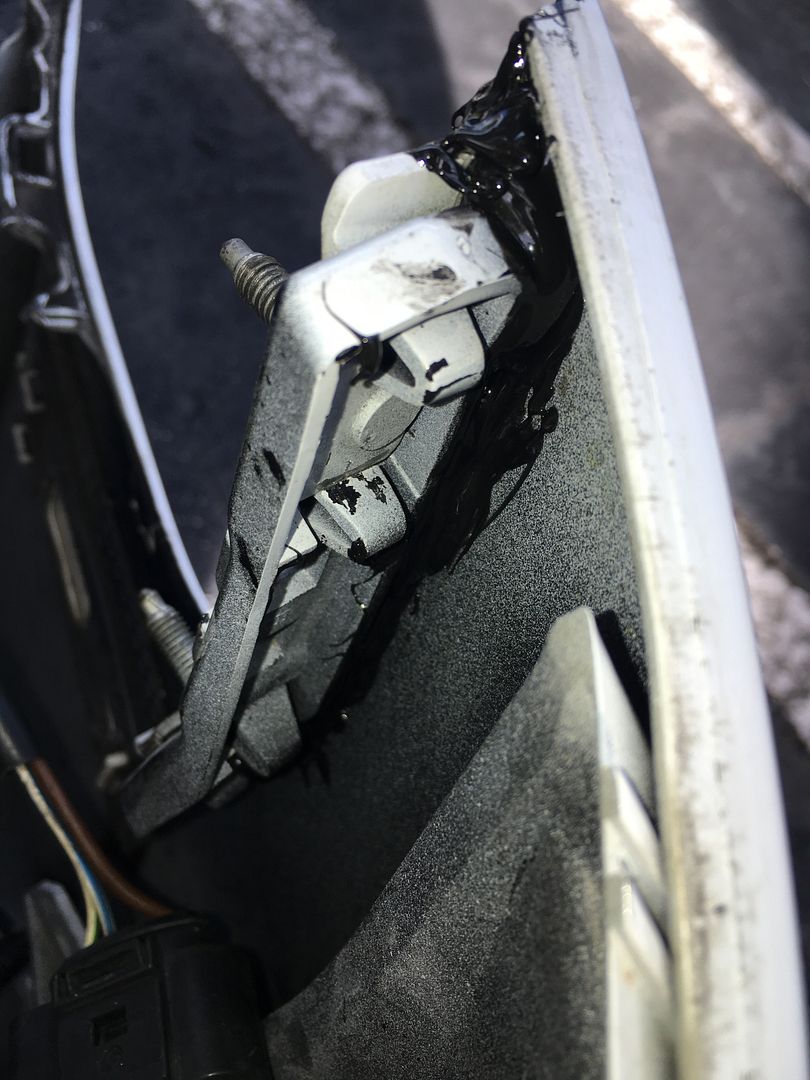


    Keep applying the same pressure for 2 mn.

    Step 5
    Remove bumper
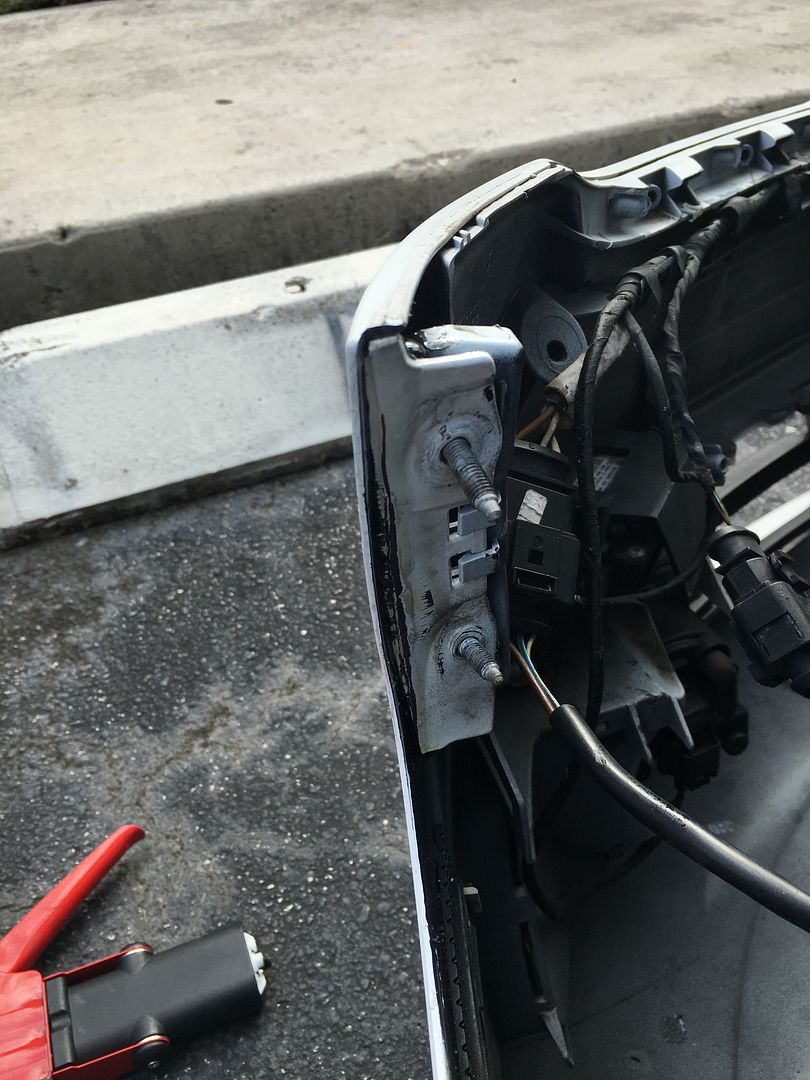


    Wear gloves for this step: using the second mixing nozzle, you are going to fill the little gap and smooth with your finger.


    Let dry for 2 mn

    Step 6

    Reinstall headlights and bumper, you are done
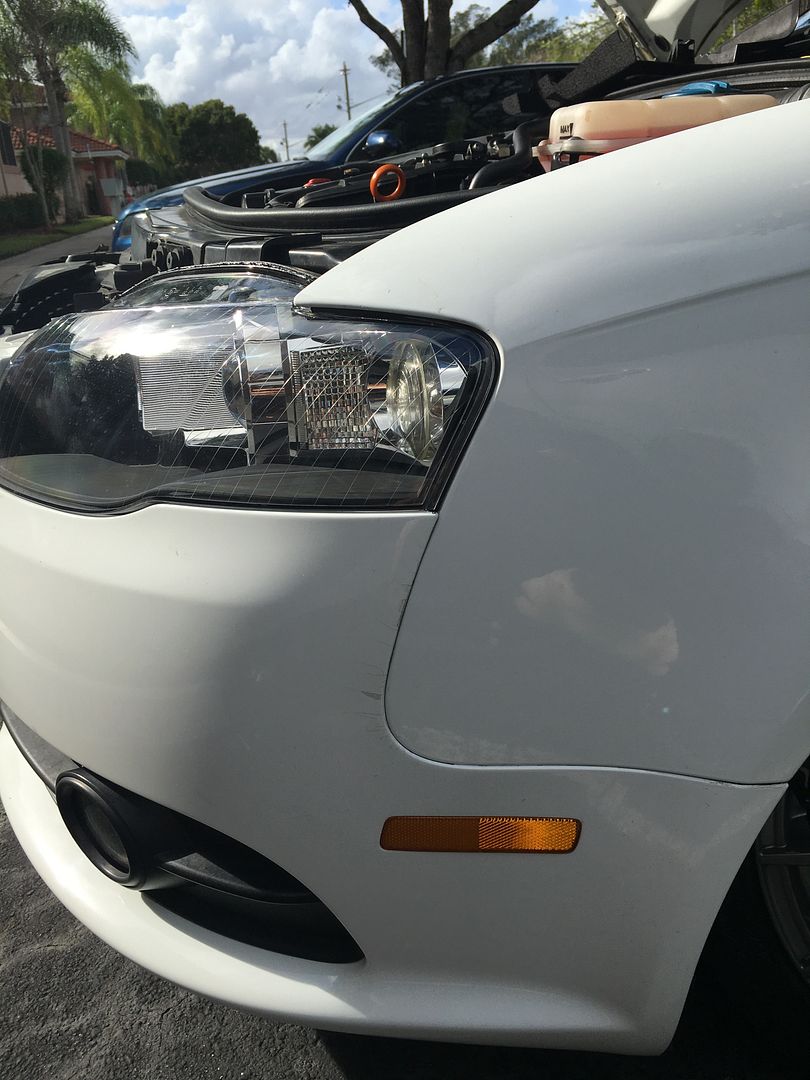


    Let me know if any question, I am around

    Phil

  2. #2
    Veteran Member Four Rings
    Join Date
    May 20 2014
    AZ Member #
    233251
    My Garage
    e92
    Location
    Denver, CO

    You have given me confidence on fusor. I have the same tear on the passenger side. I tried plastic welding which held the bumper for exactly 30 seconds.
    I am deciding between fusor or bumper latch. I have seen mec's car with good results with a latch.
    I have thought of a used bumper considering the cost of fusor, prep spray and application guns. But you know a used ocean blue bumper is not am easy thing to find.
    Thanks for the DIY. Will have to wait till this cold weather is over to do anything to the car.

  3. #3
    Veteran Member Four Rings fly300kts's Avatar
    Join Date
    Oct 16 2008
    AZ Member #
    34255
    My Garage
    03 Golf GTI - 03 Golf 2.0l - 04 Golf 2.0L
    Location
    South Florida - Ft Lauderdale


  4. #4
    Veteran Member Four Rings Copen-cisco's Avatar
    Join Date
    Sep 06 2013
    AZ Member #
    122646
    My Garage
    B7 Audi A4 Avant+ B7 Sedan and '69 912
    Location
    Dublin, CA

    Diy: Bumper repair

    This is really cool Phil. Thank you so much. I fixed mine with JD Weld and is keeping up fine so far.
    Kristian

    l Audi A4 2007 Avant l 2.0T TIP l Custom Stage 2 tune l IE HPFP l 034 HFC l 034 TIP l Rev Snub mount l 034 motor mounts l ST Coilovers l RS4 rear sway bar l Milltek Cat-back Resonated l S4 Recaro l RNS-E MKII l 19" Peelers

  5. #5
    Veteran Member Four Rings ADCS's Avatar
    Join Date
    Jan 06 2009
    AZ Member #
    37126
    Location
    Toronto

    Nice. I did a very similar approach but with 3M products.
    3M Super Fast Plastic Repair 04247 and 3M Adhesion Promoter 05907. It is holding up great.
    B6 2.7t BEL tuned by Bische
    B7 2.0t

  6. #6
    Veteran Member Four Rings dalmation53's Avatar
    Join Date
    Aug 20 2013
    AZ Member #
    121389
    Location
    Miami

    Phil so my method failed today with the florida heat hahahah dammit...it lasted quite a few 6 months total....blahhh

    Sent from my C5306 using Tapatalk
    Ivan

  7. #7
    Veteran Member Four Rings fly300kts's Avatar
    Join Date
    Oct 16 2008
    AZ Member #
    34255
    My Garage
    03 Golf GTI - 03 Golf 2.0l - 04 Golf 2.0L
    Location
    South Florida - Ft Lauderdale

    Quote Originally Posted by dalmation53 View Post
    Phil so my method failed today with the florida heat hahahah dammit...it lasted quite a few 6 months total....blahhh

    Sent from my C5306 using Tapatalk
    Not sure what was your method but you can always follow mine

    Phil

  8. #8
    Veteran Member Four Rings Okedokey's Avatar
    Join Date
    Oct 24 2015
    AZ Member #
    363505
    Location
    Perth, WA

    I did mine today, used Masterweld RR60. Shit to a blanket. http://www.waysideadhesives.com/Mast...--154_prod.php
    A4 B7 2.0T | HPFP upgrade + FMIC | BSR Stage II + exhaust + HFC | 3.0TFSI Throt. Body | RS4 fuel contr., PRV + S3 inj., G247 + DW300c | GFB DV+| 034 RSB + all arms and mounts | S4 brakes | B12 Bilstein suspension + H&R springs | RNS-E + Polk Audio PA D5000.5 - 4 x DB6502 + DB840DVC sub + Pioneer 10" sub | LEDs throughout | 19" Audi 2015 RS4 rims

    My respray thread

  9. #9
    Established Member Two Rings shahk62's Avatar
    Join Date
    Jul 14 2015
    AZ Member #
    342413
    Location
    Sydney

    Quote Originally Posted by Okedokey View Post
    I did mine today, used Masterweld RR60. Shit to a blanket. http://www.waysideadhesives.com/Mast...--154_prod.php
    Feel like helping me out?
    2005.5 B7 A4 2.0T Quattro - 034 RSB + End links, GFB DV+, 034 Snub, 034 Billet Rear Diff Carrier Mounts, BSR CAI

  10. #10
    Veteran Member Four Rings Okedokey's Avatar
    Join Date
    Oct 24 2015
    AZ Member #
    363505
    Location
    Perth, WA

    Sure, i have some left. come over.
    A4 B7 2.0T | HPFP upgrade + FMIC | BSR Stage II + exhaust + HFC | 3.0TFSI Throt. Body | RS4 fuel contr., PRV + S3 inj., G247 + DW300c | GFB DV+| 034 RSB + all arms and mounts | S4 brakes | B12 Bilstein suspension + H&R springs | RNS-E + Polk Audio PA D5000.5 - 4 x DB6502 + DB840DVC sub + Pioneer 10" sub | LEDs throughout | 19" Audi 2015 RS4 rims

    My respray thread

  11. #11
    Veteran Member Four Rings dalmation53's Avatar
    Join Date
    Aug 20 2013
    AZ Member #
    121389
    Location
    Miami

    Update. So i tried jb weld /plastic weld the one the looks like playdough mixed it in my hands and put it through out and is been like that for a month and holding on like a champ. Only cost me $4 and a six pack of stella.

    Sent from my C5306 using Tapatalk
    Ivan

  12. #12
    Senior Member Three Rings Luccatavares's Avatar
    Join Date
    Aug 15 2016
    AZ Member #
    378540
    Location
    Florida

    Do I really need the 602 EZ? I got the 143 alredy

    Sent from my SAMSUNG-SM-G935A using Tapatalk

  13. #13
    Stage 2 Banner Advertiser Four Rings Hugh@EuropaParts's Avatar
    Join Date
    Aug 22 2010
    AZ Member #
    63043
    Location
    Piscataway, NJ

    Quote Originally Posted by Luccatavares View Post
    Do I really need the 602 EZ? I got the 143 alredy

    Sent from my SAMSUNG-SM-G935A using Tapatalk
    If Phil says you need the 602 EZ... then you 110% need the 602 EZ.
    Hugh
    EuropaParts.com, Your Trusted Audi Parts Source
    Facebook: Like Us on Facebook
    Instagram: Follow Us on Instagram


  14. #14
    Senior Member Three Rings Luccatavares's Avatar
    Join Date
    Aug 15 2016
    AZ Member #
    378540
    Location
    Florida

    Quote Originally Posted by Hugh@EuropaParts View Post
    If Phil says you need the 602 EZ... then you 110% need the 602 EZ.
    Ugh! Kill me now

    Sent from my SAMSUNG-SM-G935A using Tapatalk

  15. #15
    Veteran Member Four Rings dalmation53's Avatar
    Join Date
    Aug 20 2013
    AZ Member #
    121389
    Location
    Miami

    Quote Originally Posted by Luccatavares View Post
    Ugh! Kill me now

    Sent from my SAMSUNG-SM-G935A using Tapatalk
    bruh just try my method works as well just gotta let it cure overnight. phils way is just faster.
    Ivan

  16. #16
    Senior Member Three Rings Luccatavares's Avatar
    Join Date
    Aug 15 2016
    AZ Member #
    378540
    Location
    Florida

    Quote Originally Posted by dalmation53 View Post
    bruh just try my method works as well just gotta let it cure overnight. phils way is just faster.
    Yeah I will do that!

    Sent from my SAMSUNG-SM-G935A using Tapatalk

  17. #17
    Veteran Member Four Rings
    Join Date
    Jun 15 2011
    AZ Member #
    76931
    My Garage
    08 A4 Q Stock, '58 Porsche 356A, '73 BMW 2002
    Location
    Exiled.......

    Does anyone have the Fusor 300 gun that is used with the repair epoxy? Selling?
    Also does the Fusor "glue" come with the mixing applicator nozzle.....sometimes it's in the pic (Amazon) and other times (JB Tool-where Phil linked to-it doesnt)
    Thanks

  18. #18
    Veteran Member Four Rings fly300kts's Avatar
    Join Date
    Oct 16 2008
    AZ Member #
    34255
    My Garage
    03 Golf GTI - 03 Golf 2.0l - 04 Golf 2.0L
    Location
    South Florida - Ft Lauderdale

    Quote Originally Posted by B72011 View Post
    Does anyone have the Fusor 300 gun that is used with the repair epoxy? Selling?
    Also does the Fusor "glue" come with the mixing applicator nozzle.....sometimes it's in the pic (Amazon) and other times (JB Tool-where Phil linked to-it doesnt)
    Thanks
    Yes, each fusor kit will come with 2 mixing nozzles
    I will check the gun PN tonight

    Phil

  19. #19
    Veteran Member Four Rings
    Join Date
    Jun 15 2011
    AZ Member #
    76931
    My Garage
    08 A4 Q Stock, '58 Porsche 356A, '73 BMW 2002
    Location
    Exiled.......

    Can other guns be used? Do the glue tubes come with a typical plunger like most epoxies? I think that would work...otherwise a gun I guess.

  20. #20
    Veteran Member Four Rings
    Join Date
    Jun 15 2011
    AZ Member #
    76931
    My Garage
    08 A4 Q Stock, '58 Porsche 356A, '73 BMW 2002
    Location
    Exiled.......

    Also when my girl backed up the grille and it's upper black plasting part cracked and broke....almost in half. Will this fusor product allow the broken pieces to stay together?

  21. #21
    Registered Member One Ring
    Join Date
    Aug 11 2018
    AZ Member #
    424208
    Location
    Stanchfield, Minnesota

    Quote Originally Posted by fly300kts View Post
    A fellow Ziner stopped by the house today with the well known bumper broken, after backing out a parking spot while the bumper stayed stuck on the concrete stop.

    Good


    Bad


    Since this has happened to some of you in the past, I decided to make a quick DIY.

    You will need the following components:
    Fusor 143
    Fusor 602EZ (make sure to order this otherwise the 143 will not bond correctly)


    Step 1
    Remove the bumper and remove both headlights

    Step 2
    Clean the edges of the broken part and fender with alcohol. Then reinstall the broken piece on the fender using both screws.


    Step 3
    Spray the edge of the bracket and the inner part of the fender. Don't be shy and this step is mandatory. Let dry for 5 mn.
    Reinstall the fender and make sure that with the bracket installed, the fender sits flush with the bumper.


    Step 4
    Load the Fusor 143. I forgot to mention that each bag for Fusor comes with 2 mixing nozzles. Be really careful with this product: it dries almost instantly (less than 1 mn) and become hard like concrete once dry.
    While keeping the bumper side pushed in position, fill the gap between the bracket and the bumper with fusor


    Keep applying the same pressure for 2 mn.

    Step 5
    Remove bumper


    Wear gloves for this step: using the second mixing nozzle, you are going to fill the little gap and smooth with your finger.


    Let dry for 2 mn

    Step 6

    Reinstall headlights and bumper, you are done


    Let me know if any question, I am around

    Phil
    I added a thin sheet metal bracket made from an old license plate and fitted over the two bolts and extending into the inside of the bumper cover several inches. Hopefully this reinforces the repair. Sorry, I didn't think to take photos while I was doing it.

    PLBrand

  22. #22
    Veteran Member Four Rings Willënskraft's Avatar
    Join Date
    Oct 14 2011
    AZ Member #
    82575
    My Garage
    2002 Audi A4 1.8TQ, 2007 Audi A4 2.0TQ
    Location
    Norcross, GA

    Bringing this thread back up to see for those that have used the Fusor on how well it's holding up.

    Still intact?

    Any slippage or gaps?
    "Beep beeeep bloop boop" - R2D2

  23. #23
    Veteran Member Four Rings
    Join Date
    Jun 15 2011
    AZ Member #
    76931
    My Garage
    08 A4 Q Stock, '58 Porsche 356A, '73 BMW 2002
    Location
    Exiled.......

    Reviving this --I never did the bumper as the car sat for awhile--about to try it. I am wondering if anyone knows if the fusor will work on the blk plastic that sort of covers the top of the engine compartment when you open the hood? Its probably a much different and stiffer plastic--was just wondering if anyone had a idea or info on that is the fusor would work on this stuff as well.

  24. #24
    Veteran Member Four Rings
    Join Date
    Jun 15 2011
    AZ Member #
    76931
    My Garage
    08 A4 Q Stock, '58 Porsche 356A, '73 BMW 2002
    Location
    Exiled.......

    Guess not....lol

    Will try and report back....

Bookmarks

Posting Permissions

  • You may not post new threads
  • You may not post replies
  • You may not post attachments
  • You may not edit your posts
  •  


    © 2001-2024 Audizine, Audizine.com, and Driverzines.com
    Audizine is an independently owned and operated automotive enthusiast community and news website.
    Audi and the Audi logo(s) are copyright/trademark Audi AG. Audizine is not endorsed by or affiliated with Audi AG.