Audizine - An Automotive Enthusiast Community

Page 1 of 9 123 ... LastLast
Results 1 to 40 of 330
  1. #1
    Senior Member Two Rings 4Loops's Avatar
    Join Date
    Feb 21 2013
    AZ Member #
    109977
    My Garage
    1999.5 A4 B5 4.2 Quattro, 2007 GL320 CDI
    Location
    South Central Indiana

    Cool Detailed V8 Swap: B5 A4 4.2L

    Guest-only advertisement. Register or Log In now!
    Hi Audizine,

    Long time build follower, first time build poster.

    I've started a project a couple weeks ago, swapping a 4.2L V8 into my 1999.5 A4 B5.
    Viewing other 4.2 swaps on audizine and motorgeek has inspired me to start my own swap. That, and my high-mileage 2.8 AHA V6 has been coating my engine bay with sludgy oil for some time.

    Before I start with my swap story, I'd like to mention that I have only been able to get this far with the help from these other forums. A lot of engineering/reverse engineering/finnagling/etc. has gone into these how-to's, and I appreciate all of the hard work, time, and money spent by those folks.

    While I am a good copycat of these other swap threads, I thought I'd start my own forum to provide additional detail and tips for those interested in another swap story/how-to.

    So, here'goes...

    I started on my project for one main reason: My 2.8L V6 (AHA) had been leaking oil heavily from the valve covers, upper oil pan, and other front-end places, and it was in much need of some TLC... or, a swap.
    I decided to go with a swap because although I'm sure I could rebuild my 2.8, I know I could just as easily swap another (younger) engine. -The 50% bump in power is nice too. I've been thinking of this swap for some time, but the breaking point for me was when the 2.8 started eating/leaking about a quart of oil every 3-ish weeks, and it started drinking coolant, too. My reservoir would go from the full line to the empty line in less than a month.
    The car has a bit shy of 290kmi on it, so really I'm stoked everything has been as reliable as it has. Other than replacing a front crank seal the first winter I bought it, it's been a very reliable car. Just the usual sensors to be replaced every now and then, as with any vehicle. Well, that, and the wonderful aluminum control arms that wallow out and need replaced every few years, but they're cheap on the interwebs.

    As future more frequent engine issues were imminent, I decided I'd take the plunge and follow a few forum's suggestions and try this 4.2 swap myself.
    The most useful threads to me thus far are bhusted's thread, here: http://www.audizine.com/forum/showth...-Swapped-B5-A4
    and a4v8swap's thread, here: http://www.motorgeek.com/viewtopic.php?f=6&t=50232

    Since I don't yet have permissions to post in the Projects & Builds subforum, I'm forced to start my thread here in the more general B5 A4 Tech Forum.

    I followed many suggestions provided by b5a4swaap. Please take a look at his forum to see what he recommends if you want to try this yourself.
    I started with my 1999.5 (partial face-lift) B5 A4 with the 2.8L 30V V6 (AHA) -which to my surprise and joy, is apparently a really good B5 to swap the V8 into. Apparently the 2.8 subframe is needed. I'll see why when I get to that point in the next few days. I was able to find a 2000 A6 with a 4.2L 40V belt-driven engine (engine code ART), with an auto trans. -I'm keeping the 01a 5spd manual that's in my A4. Audi used a V8 in the B5 S4 at some point, but it was chain driven at the rear to make the engine more compact. But in my opinion, and the opinion of many others, this is a pain in the rear (pun intended). I don't want to remove the engine to change the timing chain. I digress though.
    I caroused craigslist for almost 3 years before I found this A6. I looked into salvage yards and copart auto-auctions, but I've found it's an extremely good idea to have a complete A6 as your donor car. There are so many parts and pieces other than the engine that you'll need. I shied away from auto auctions (especially non-local ones) because I don't have a dealer's license and I've heard many horror stories with copart and other non-local auctions. -Stories of the car coming with missing bits and pieces, lifted with a fork lift from various places, etc.
    Furthermore, I wanted to get a complete car so that I can sell as many extra parts as I can. (I'll have to launch a thread in the for-sale forum soon)

    So, I was able to find this 2000 A6 just south of Cincinnati, north of Lexington. I live around the north side of Columbus Indiana, so that's somewhere shy of a two hour drive. I get nervous travelling so far for a car purchase because when you're there, you pressure yourself into buying sometimes just because of "how far I've come". But this one, I felt was worth it.
    As always, the pictures didn't do it justice. The A6 was just beaten to heck; it's like the guy deliberately tried to trash it and run it into stuff. But mechanically, man it was smooth. We call it Ol' Mouldy. That genius solar sunroof package that keeps the HVAC blower going all the time is a wonderful way to introduce moist air into the cabin.. a perfect way to grow some mould. Good intentions, but Audi really missed what negatives such a system would bring.
    We definitely got a taste of the Kentucky hillside though: they guy sent us off with a sample of his homemade Kentucky shine, lol. (I didn't risk blinding myself though; I politely accepted, then poured it out once I got back home).
    I thought a $1,700 investment was still worth it to me. I wish I could've found a deal as good as bhusted had: I think he said he found one for $650, but it was already wrecked, and without a transmission.
    We drove it home and titled it in my name (just a fear of the seller one day claiming that I stole their car). Probably an irrational fear, but I'm paranoid like that sometimes

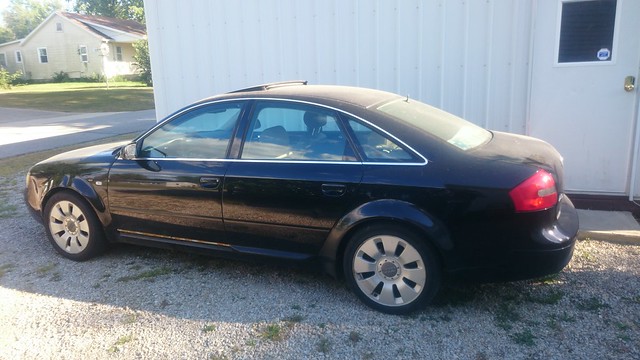
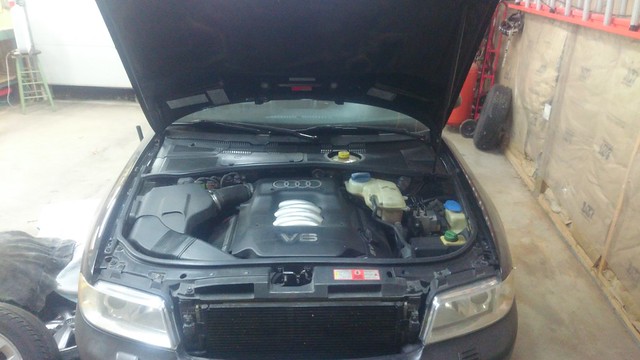
    Here's what I'm starting with:
    The A4:
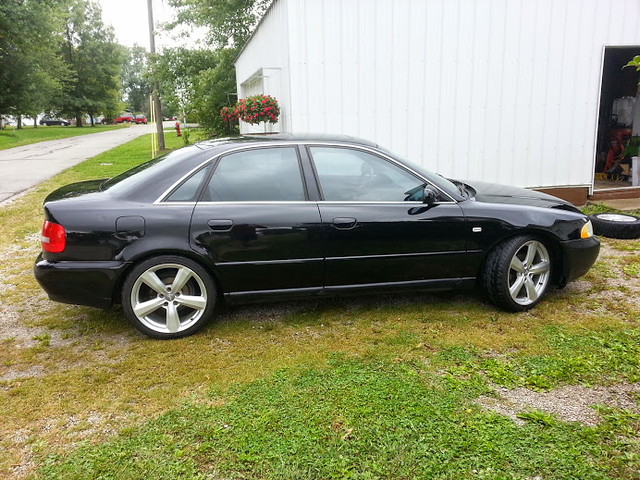
    IMG_20140913_100318

    And the A6 donor:
    DSC_0084

    In the following posts I'll mention what I did in a how-to form, provide as many pictures as I can, and note any tips or reference the other forums that helped me along the way.
    Hopefully I can provide a thorough what-I-did and how-to for the next fella out there thinking of this project. It really has gone smooth so far!

    *Edit: 2017-9-5
    I have kept net cost tracker since the beginning of this project. I'm including a link here for transparency of cost, and to help others find parts needed for their own swaps.
    Cost Tracker
    Last edited by 4Loops; 09-05-2017 at 12:26 PM.
    1999.5 A4 B5 4.2 Quattro (My V8 Swap Project)
    2002 Jetta TDI ALH
    2000 C5 A6 Partout (<--click here for link)
    2007 GL320 CDI

  2. #2
    Senior Member Two Rings 4Loops's Avatar
    Join Date
    Feb 21 2013
    AZ Member #
    109977
    My Garage
    1999.5 A4 B5 4.2 Quattro, 2007 GL320 CDI
    Location
    South Central Indiana

    Removal of the V6

    I decided to first remove the 2.8 from my A4 so that if I needed a part or tool I could order it and it would arrive by the time I had the 4.2 removed and the throttle pedal swapped. The 4.2 ART engine is a drive-by-wire engine whereas the 2.8 was a more oldschool throttle cable type.

    One last look at a clean and organized garage:
    DSC_0276

    Starting off, I set the car on jack stands (make sure to set the jacks on the frame rails and not the floorpan). I already had the car on stands because I am working on replacing brake pads, rotors, and rebuilding the calipers at the same time.
    I think it makes things easier to have the car lifted off the ground with the wheels removed, but level, so that the engine can come straight out without worrying about matching an angle and clearing the subframe.
    DSC_0275
    DSC_0278
    DSC_0279

    The bumper & bumper cover comes off by removing the lower grille inserts. The inserts have a slot you can fit a flat-head screwdriver and pry. Once those are out, I went ahead and removed the foglights too. Take care when removing these connectors. You can pry back on the connector's lip with your thumb, and then just pull on the plug to remove it. Sometimes you've got to work at it, but most times it slides right off. Key here is (or with anything) don't force it.

    To get the bumper & cover off, there's a 6mm allen bolt on each side of the bumper. They're pretty long. They're up just behind where the lower grille covers came from. Give the bumper a tug back and fourth. The bumper clips into the side of the front fender on each side. Here's a blown up picture of what's holding the bumper on:
    DSC_0357

    Once the bumper is uncliped from each side, it pulls straight off. You'll have to disconnect the washer fluid hose that goes to the headlamp washers.

    The next step is to remove the radiator mount. I don't have any pictures on this, sorry. There's probably another forum out there on this. The Chilton manual describes how to remove it. The Bentley manual definitely has it, probably a Haynes. There are three T25? bolts holding on the bumper (studs?) -not sure what to call them. Stick a long philips screw driver in one of the bolt holes on each side. When the radiator support moves forward it can rest on these screw drivers.
    There are 2 more torques bolts, one on each side, attaching the support to the front fenders, and there are 4 torques bolts, 2 on each side, on the top of the radiator mount behind the headlamps. Remove the rubber strip that goes around the front lip.
    Also remove the hood latch mechanism and set it atop the engine for now. Many of these bolts are torques bolts. Make sure to have a good set of torques sockets.
    The radiator mount can be pulled forward, but only so far. There are coolant hoses and wires that need to be removed. They all connect at a plastic holder just in front of the ABS unit. Disconnect them, but make sure to label them. They're color coded, so it probably doesn't matter though. Also drain the coolant and disconnect the coolant hoses.
    For the AC radiator, I was able to disconnect it from the radiator and bend it around (gently) and set it to the side. I am trying to avoid disconnecting the AC system so I don't have to shell out more for a charge. I also removed my AC compressor before I removed the engine and set it to the side too. I think the compressor will bolt up to the 4.2. We'll see.
    DSC_0282
    DSC_0284

    Once you have the radiator support disconnected completely, pull it off and set it aside.

    Here's my sludgy oily front lower part of the engine, thanks to leaky upper oil pan, heads, and probably the front crank seal again.
    DSC_0291

    And the Engine before it's removed:
    DSC_0326
    DSC_0296
    DSC_0285
    DSC_0287

    Now that the radiator support is off, I removed the serpentine belt (17mm socket, turn clockwise on the tensioner to release tension), alternator, and AC compressor.
    Here's a pic of the AC components laid over to the side. I was able to remove the engine without having to disconnect a single AC component. The same can't be said, though, of the 4.2 engine.
    DSC_0308

    Update 8/12/2016:
    After installation of the V8, I could not get the A/C lines to reach when trying to connect the compressor that was left connected to the car. I was able to bend them a tad to get them to work, but it got in the way of the front crossmember, which I used. If the front crossmember is not used, this may work just fine. This is what bhusted did, but he did not use the front crossmember. I chose to use it, so I had to disconnect the A/C system, and I'm going with a custom flexible A/C line method. You can see how I did this later in the thread. That said, it might be a good idea for anyone else doing this swap to have their refrigerant drained first.

    I disconnected and labeled as many vacuum lines as I could, struggled to disconnect the accelerator cable (you'll have to remove the stack on top first), and Disconnect everything from the firewall and lay it on top of the engine. Something I noticed: you can disconnect them all, but remove the whole plastic holder from the firewall to keep everything organized. You'll have to disconnect the cruise control actuator to get to the throttle cable.
    DSC_0311
    DSC_0312

    I also broke almost every SAI (Secondary Air Injection) line there was. These things get so brittle over time. I think when I put the whole thing back together I'm going to do an SAI delete, and fake out the sensors so the ECM thinks everything is normal.
    DSC_0344

    Don't forget to disconnect the radiator hoses going into the firewall for the heater-core, and the power steering. I forgot; it made removing the engine a head scratcher, finding out what keeps pulling it back in the bay.
    DSC_0337
    DSC_0341

    Lastly, (If I'm not forgetting anything), disconnect the fuel inlet and return, put a baggy with a rubber band around it to keep debris from getting in. I didn't bother bleeding the system. The A4 was sitting so long there was no pressure to worry about. When I removed these lines from the V8, -I just drove it in the garage, so it had pressure.. I simply disconnected them with a rag around the connection. It didn't have high pressure, just a bit leaked out.

    Get yourself an engine hoist and use the eyelets on each head. I was able to use some heavy-duty u-bolts to fit through the holes. They're pretty wide, so a normal hook just wouldn't do.
    DSC_0328

    Remove the Starter, the 8? bolts holding the transmission to the engine, and remove the nuts holding on the motor mounts. There's more than one way to remove the mounts. I removed mine from the body, keeping attached to the engine. It might be easier to do this the other way, though. Also, remove the ground cable going from the passenger side (right side of the car) to the engine. This is something else that was keeping the engine in.
    Just remember to remove slow and carefully so nothing gets pulled or damaged.
    DSC_0348
    DSC_0347

    Then its out!
    DSC_0349
    DSC_0356

    That was definitely a chore; it took some time (about 2-3 days my-speed working pace) but it was pretty straight forward. I think labeling and documenting along the way will help me put it back together.

    A post on the Clutch/Flywheel setup and the 4.2/A6 teardown is to follow..

    Edit 8/12/2016:
    I realized I did not mention to remove the hood latch assembly and the throttle cable (if your B5 is a DBC setup). Where the cable runs through the firewall there is a securing piece that must be turned to the left. It is a triangular locking piece:
    DSC_2167
    DSC_2166
    Firewall

    And there's a little trick to getting the cable removed from the false firewall. There's a locking clip that must be removed, then it'll pop right out.
    DSC_2163
    These picture are from much later on in the build where I was replacing the "gaskets" to fill the holes. So I cut the throttle cable and removed these pieces to reinstall.
    Last edited by 4Loops; 07-23-2019 at 11:39 AM.
    1999.5 A4 B5 4.2 Quattro (My V8 Swap Project)
    2002 Jetta TDI ALH
    2000 C5 A6 Partout (<--click here for link)
    2007 GL320 CDI

  3. #3
    Senior Member Two Rings 4Loops's Avatar
    Join Date
    Feb 21 2013
    AZ Member #
    109977
    My Garage
    1999.5 A4 B5 4.2 Quattro, 2007 GL320 CDI
    Location
    South Central Indiana

    Clutch and Flywheel

    Next, I decided to remove the clutch and flywheel from the V6. I wanted to have the flywheel off and have it either machined or order a new one while I'm working on some other things to minimize any wait.
    Sorry, I didn't take a pic of the old clutch still attached to the engine. But getting it off was challenging. They're 6mm allen bolts, but mine were waaay sloppy, like a 6.5mm (if there is such a thing) would fit better. I got three out with the allen wrench, but three others stripped. (6 total) Nollywood provided an excellent workaround for this: use a 12mm 12point socket and bash it on. He said it works every time for him, and it worked for me too! Only issue is removing the bolt from the socket once extracted.

    This is easier if you use a TDC locking tool, it'll lock the crankshaft in place so you can remove these clutch and flywheel bolts easier. The engine needs to be rotated to TDC. It's at TDC when the camshaft sprocket plates' larger holes are facing inward toward each other. The TDC locking tool port (or a bolt or dowel) can be on the left (driver side) of the engine.
    DSC_0390
    DSC_0389
    DSC_0387

    Once the Clutch is out of the way, you can remove the flywheel. The flywheel bolts are a triple-square head. Not Torques. Not Allen. Triple square. The same bolt head's the door mounts use. If you try to mash something else on there you can cause a major headache. I started to learn the hard way when working with a door that used this type.
    DSC_0382

    The flywheel off:
    DSC_0386

    I thought I'd try and reuse the flywheel that came off. (The 2.8 flywheel must be used on the 4.2 engine). It's a dual mass flywheel, but I've heard of others being able to resurface it. Most shops won't touch it and declare DMFs to be a wear part that should be replaced. But I looked into it still, found a place in town that was willing to work with it, and got a quote. The quote was ~$120, which I thought seemed fair from other's reports on this. But I decided to hold off and think about it critically for a minute.
    My flywheel didn't feel too worn. It had a little more play than I saw "good" ones had on youtube videos of new or good DMFs. I'm sure it could be done, but I thought it smart to not let my cheap self overrule my wise self, as I usually do. Why polish a turd when I can get a new one for $300? So that's what I did. Got me a new one, a LUK DMF023 from Rock Auto for $297.68 after shipping. A lot of places were asking anywhere between $400 to $800! Yeikes!
    DMFPNG

    Also ordered myself a South Bend Stage 1 clutch for the 2.8 engine (because the clutch must match the flywheel and the flywheel is going to be used on the 4.2).
    K70007-HD-DMF from THMotorsports.com, think I got a bit of a deal for $399 shipped.
    I decided to get the cheapest clutch I could find (from a reputable company) that could handle the torque output of the engine.
    Through some research, I found that the 4.2's peak torque output is 325 ft lbs (from Audi's self study programme 217). It's good to mate a clutch to an engine that is just a little above that spec. Too much over, and it'll change how the clutch feels quite a bit, and puts more pressure on your clutch pedal & actuator. I was also looking at a Spec SA241 Stage 1 Clutch Kit, rated for 323 ft lbs, but I thought this cutting things too close. It was cheaper, but I was afraid it wouldn't hold in the long run. They have a Stage 2 clutch Spec SA242 Stage 2 Clutch rated for 367 ft lbs, but this cost more than the South Bend Stage 1 clutch, and it was rated a bit higher than I thought necessary. So I thought the porridge was just right with the South Bend clutch. I've seen this clutch used for this swap before on other forums, so that made me comfortable too.

    I have the clutch, still waiting on the flywheel as I ordered it just a couple of days ago. When I get the flywheel in, I'll start pulling the engine out.
    Right now, I'm working on removing the harness for the drive-by-wire accelerator pedal from the A6.

    Update 8/12/2016:
    I realized I forgot to include the replacement of the throwout bearing.
    The old:
    DSC_0350
    DSC_0485

    The removal (just gently pull at the bottom of the arm, no need to pry the spring off like I was trying in the photo):
    DSC_0486

    The pivot, inside the casing:
    DSC_0487

    The comparison:
    DSC_0488
    DSC_0490

    Throwout bearing reinstalled:
    DSC_0491
    Last edited by 4Loops; 08-12-2016 at 12:22 PM.
    1999.5 A4 B5 4.2 Quattro (My V8 Swap Project)
    2002 Jetta TDI ALH
    2000 C5 A6 Partout (<--click here for link)
    2007 GL320 CDI

  4. #4
    Veteran Member Four Rings GOODBYNAAIR's Avatar
    Join Date
    Nov 17 2011
    AZ Member #
    84082
    My Garage
    1973 MG Midget, 1995 F150 302 v8, 2007 A4 Avant 3.2 v6, 2014 Odyssey EX-L
    Location
    Fredneck Maryland

    Awesome these v8 swaps are always sweet to see come together. Enjoy the swap then enjoy that sweet v8 exhaust note. 👍

    Sent from my SM-T560NU using Tapatalk
    SOLD the GOINHAM A4 ---> GT2860 Project

  5. #5
    Senior Member Two Rings 4Loops's Avatar
    Join Date
    Feb 21 2013
    AZ Member #
    109977
    My Garage
    1999.5 A4 B5 4.2 Quattro, 2007 GL320 CDI
    Location
    South Central Indiana

    It should be fun! Got to drive my buddies' 06 GTO Friday.. Going to love some power like that.. Well, closer to that ;-)

    BTW, anyone put in an engine and have a tough time with the last half inch of gap? I made sure the Trans shaft bearing that is in the flywheel is the right size and fits.. But it's getting soo close to fitting completely but not going in that last half inch. I made sure it's aligned right.. I can insert the bell housing bolts and they all line up, doesn't seem to be any angle between the engine and the transmission. The Trans splines shaft is even slid into the flywheel. I'm not sure if I'm catching on that little bearing though.
    One thought: do I need to remove the slave cylinder to free any resistance? I'm also wondering if the throw out bearing is being pushed out and pushing against the fins on the pressure plate.. If I remove the slave cylinder will that get rid of the springyness that's holding the clutch release lever out? I'm thinking that little pressure is pushing against the pressure plate and not allowing the engine to easily slide in. I'm too afraid to just tighten the main bolts down even if everything seems aligned right..
    Any clues/experiences?
    Last edited by 4Loops; 12-15-2017 at 07:44 AM. Reason: typos

  6. #6
    Veteran Member Four Rings Nollywood's Avatar
    Join Date
    Nov 03 2011
    AZ Member #
    83391
    My Garage
    ‘07 B7 RS4 Avant, 10 SEAT Exeo ST, ‘13 3R9 400-R
    Location
    All Over!

    ^^^ I responded to the same query you posted in Bhusted's thread. I also asked some questions, but I haven't heard back from you.
    2007 Audi RS4 Avant B7 - Misano Red Pearl Effect
    2007 Audi RS4 Saloon B7 - Sprint Blue
    2013 SEAT Exeo ST - Project 3R9 400-R
    2010 SEAT Exeo ST - Project 3R9 420-S
    1986 Type 85 Audi 90 quattro

  7. #7
    Senior Member Two Rings 4Loops's Avatar
    Join Date
    Feb 21 2013
    AZ Member #
    109977
    My Garage
    1999.5 A4 B5 4.2 Quattro, 2007 GL320 CDI
    Location
    South Central Indiana

    Yea, I should've posted that initial question here.. since it's my build thread and all, and I keep hijacking Bhusted's thread. Trying to get better at that
    I posted a reply there just 'cause the conversation was already started. I guess you can't un-pop popcorn, or unscramble an egg.. as it's said...
    I'll have to post my troubles and findings here when I've figured it out.
    1999.5 A4 B5 4.2 Quattro (My V8 Swap Project)
    2002 Jetta TDI ALH
    2000 C5 A6 Partout (<--click here for link)
    2007 GL320 CDI

  8. #8
    Senior Member Two Rings 4Loops's Avatar
    Join Date
    Feb 21 2013
    AZ Member #
    109977
    My Garage
    1999.5 A4 B5 4.2 Quattro, 2007 GL320 CDI
    Location
    South Central Indiana

    Removing the V8 from the the A6

    Ok, I'll try to start posting more of my story here, instead of on bhusted's forum!

    So it's been a little while since I provided an update on my work. I've gotten pretty far with this project, so I should make sure I keep documenting along the way.
    So here's a post on how I removed the V8 from the A6.

    I started off by getting the car into the garage and tearing apart the front end. Bumper cover & bumper, and radiator support. The bumper & cover comes off a little different than it does with the A4. On the A4 there were the clips on the sides of the bumper and you could pull in just the right way to free the bumper from those clips. Easy stuff. The A6 however is a little more difficult. There's screws holding the sides of the bumper cover to the front quarter panels. The Bentley manual says there are only 2 flange nuts on each side. Nope, there are actually 3 on each side. Well, at least on this A6.
    Front Bumper Cover
    They all can be accessed without too much trouble. I couldn't get a good enough picture of these worth posting. Pretty easy to find, though. 10mm iirc.

    DSC_0358

    The radiator support removed almost as easily as the support did on the A4. I had to disconnect the trans fluid lines to the radiator, and the only way to remove the AC radiator was to disconnect the system. On the A4 the inlet and outlet were on the same side. With the A6 they were on opposite sides. So I had to disconnect the AC system. Not like I was going to use it anyway, and it didn't even have a charge when I bought it.

    I made sure to remove all the same stuff that was required for removing the other engine: vacuum hoses, coolant hoses, ground cables, fuel lines, etc. This time I tried to be a little more clever and keep the harness on the engine and remove the connectors from the firewall. So I was able to keep (more or less) a pretty complete engine harness attached to the engine. I removed the ECM and freed the connectors from the ECM plenum box and folded the complete harness over top the engine so it stays as one neat package.

    The Engine was now ready (I thought) to remove. Before I removed the bell housing bolts I decided I'd attach the engine hoist. I was able to reuse the same u-bolts to attach to the eyelets of the heads on this engine as I used to attach to the V6. The problem with it this time was that the fuel rail was in the way, and if I didn't remove it first it would be bent and mangled by the suspended weight of the engine. This was happening on the front and rear lift eyelets.
    DSC_0496

    So the fuel rail had to go, with some caution. The fuel injectors have a clip that must be removed, and the rail is bolted down to the intake manifold. Remove the clips, and then ever so very gently tug upwards on the rail to remove it. Word of the wise here, have a bunch of water buckets at the ready... just in case. Even though I removed the fuel lines, there was still quite a bit of fuel in the rail that kept gushing out. The rail holds quite a bit of fuel that soaks everything. I got some water and towels to soak up the fuel as quickly as I could, but I left the project for a while to air out after I did this. When my rail came out, some of the injectors stayed on the rail and some of them stayed in the manifold. Just be careful not to break them. I think they're a bit on the pricey side to replace.
    That brings up another thought/question... I wonder if it's a good idea to just replace these. The engine has a bit above 100kmi (young to me). I wonder if they could even be cleaned up a little. I'm sure they don't spray like new.
    But, after I removed the fuel rail, I could connect the hoist to the lift eyelets without hitting or damaging anything else.
    DSC_0498

    Removing the bellhousing bolts was a bit tough. I had to have various extensions, using a 16mm socket (short and long) and an 8mm allen to remove some along the bottom. There are 9 in total. The toughest one to get was the bottom center. I could not get a socket or a hex extension in there, so I had to break out grandpa's old box end wrenches to help out. Fortunately his 5/8" wrench (which is just a little tighter than a 16mm, but still fits (well, actually better/tighter) worked for this job. His wrenches had enough of a bend on it to clear the subframe. In hindsight, I might've been able to lift the engine a bit to access that bolt, but the angled wrench worked well enough. I didn't have a set of offset wrenches, so luckily this worked out. No ratcheting wrenches will fit either -too tight of a fit. Only a regular thin box end wrench worked here.
    DSC_0462

    I'm liking some of the detail of the Bentley manuals, but they are a FAR cry from complete. I could find the NA V6 and Biturbo V6 bell housing bolt pattern, but the manual did not have a pattern for the NA V8. Why? I haven't the slightest clue why there would be so much detail on one or two engines, but nothing on another. I did find that the actual bolt pattern of this V8 matches the diagram for the Biturbo V6 bolt pattern. I can't vouch for the bolt lengths, but the pattern matched up to what this diagram shows, even the location of the dowels.
    This is the bolt pattern, looking at it as if you were looking from the front of the car to the rear:
    4.2 and 2.7 bolt pattern

    The exhaust bolts gave me a lot of trouble on this removal too. On the A4, they came off super easy. On this A6, they were a bear. Some PB blaster overnight helped a bunch though.
    After those were removed, it was time to unbolt the motor mounts and remove the engine. This was a tough job. I had to wiggle and manhandle that thing to break it free. In the end it was laying under it, sticking a wrench through one of the openings and prying slightly (slightly -as not to crack anything aluminum). That broke it free. It came out pretty easy the rest of the way.
    DSC_0506
    DSC_0510

    After some looking around, I think the proper way of removing would've been to remove the starter to access the torque converter bolts, and unbolt the torque converter from the flex plate. I think I read that this was the easier way. My way worked though, probably caused myself more trouble than necessary though
    Next thing to do was to remove the torque converter and flex plate and install the flywheel and clutch.
    1999.5 A4 B5 4.2 Quattro (My V8 Swap Project)
    2002 Jetta TDI ALH
    2000 C5 A6 Partout (<--click here for link)
    2007 GL320 CDI

  9. #9
    Senior Member Two Rings 4Loops's Avatar
    Join Date
    Feb 21 2013
    AZ Member #
    109977
    My Garage
    1999.5 A4 B5 4.2 Quattro, 2007 GL320 CDI
    Location
    South Central Indiana

    Installing Flywheel, Clutch, and mating V8 to A4

    Now that the V8 was removed and sitting on its own, and after about a week of interruptions, I was able to start work on it again.
    My new LUK DMF023 flywheel (the 30V V6 one) came in, and so did my South Bend Stage 1 clutch. It was time to put 'em on. But first the torque converter and flex plate had to come out of the way. It took me a good day or so to figure out how to remove the torque converter (again, first timer here -lots I've learned!)
    The starter had to be removed first to allow access to the three bolts holding the torque converter to the flex plate.
    DSC_0536

    There are three T55 torx bolts holding the torque converter to the flex plate. The torx set I had went up to 50. I was fortunate to find a T55 at Home Depot for a couple bucks.
    The first one came off pretty easily because I had a crank locking tool to lock the engine at TDC, exposing one of these torque converter bolts. The other two were a bit more challenging. I had a buddy torque on the bolt to loosen it while I muscled the converter to stay in place. Funny how when you're done with something like that you realize you could've used a breaker bar and a (15/16th works) socket on the front crank bolt to hold it in place too... but ah well
    This also might've been easier if I had removed these bolts while the engine was still mated to the transmission. Now I'll never know.
    DSC_0539

    After the torque converter was removed, next were the 8 main bolts, the thin spacer, the flex plate, and the thick spacer.
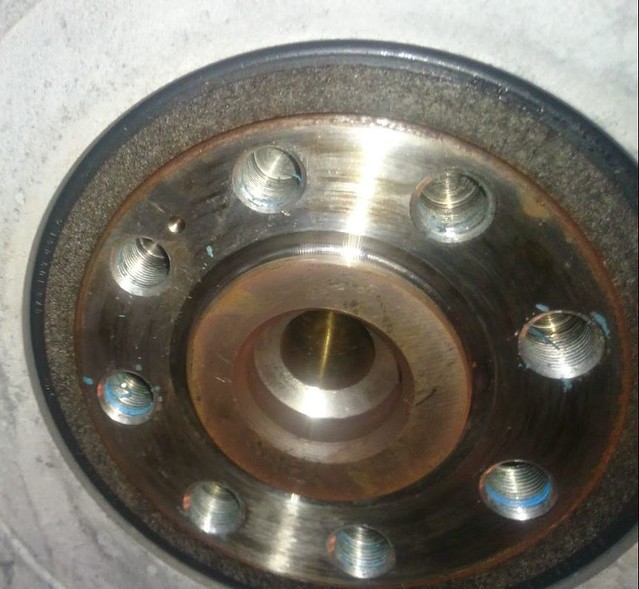
    Then the rear of the crank was visible:
    Closeup Crank Rear

    Also something important: The flywheel bolts and the pressure plate bolts are both stretch fit bolts. If you're installing a new flywheel (especially) and pressure plate you should get new bolts. I got mine from (surprisingly) ECS tuning. They've always got awesome looking stuff, but usually for a premium price. I got to hand it to these guys this time.. I couldn't beat the price anywhere else. They had an assembled kit of 8 flywheel bolts and 6 pressure plate bolts of the correct length for only $29.60 + $8.29 shipping = $37.89. These were for the 30V V6 flywheel setup, ECS part #N90705901KT2.

    I then marked where the flex plate's sync pulse was located (the missing 2 teeth on the tone wheel). This position was marked at about the 2:30 mark, facing the rear of the engine:
    DSC_0549

    When I put on the flywheel I tried to put the sync pulse in the same place, but was forced to put it in the 4 o'clock position, because I've found that one of the gaps between bolt to bolt is slightly wider than all the rest.
    I don't have a great picture of this, thought I was taking pictures of everything along the way, but I found a closeup that shows this. Look really close..
    Flywheel Position

    I guess this is Audi trying to help me to not screw things up.. but then why is the sync pulse in a different location?
    Is the pulse used by the ECM for only sensing speed? Are the cam sensors the only sensors responsible for determining position?
    Does the position matter, but I have to make sure I use the manual ECM file that would expect the crank sync pulse to be in this location?

    There was absolutely no other position the flywheel could fit. So either that's the way it must be, or I got an oopsiedasie from LUK.

    Any thoughts on this one?

    As I mentioned, I should've been asking these questions as I was at that point, because I've actually got the engine mated to the transmission already. I guess if it were absolutely necessary I could redo this.

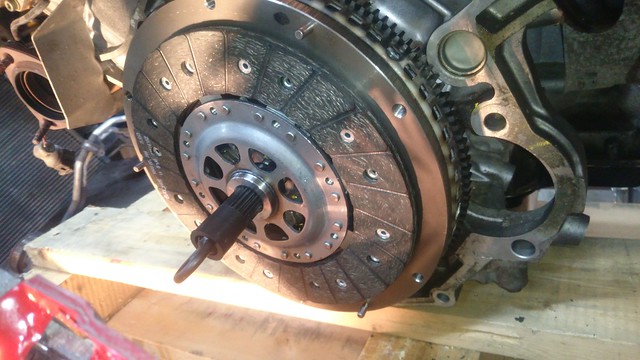
    Also I should mention that I did not put that small spacer that I removed from the front of the flex plate behind my flywheel before I put the flywheel on. Everyone else I've chatted with said they had to use this spacer behind their flywheel to give the flywheel enough clearance from the back of the engine. Those who have done this said they had to because the flywheel was locked in place because it was hitting the back of the engine. However, I could still hand-crank my engine over without the thin spacer installed behind the flywheel. Now I'm wondering if I should've put it on just because. At this point, since I could crank the engine over, and it looked to me that the flywheel had as much clearance as the flex plate had, I decided to install the clutch and put the engine into the A4 and mate it to the 5spd manual.
    DSC_0560
    DSC_0563

    Torque specs as per Bentley, and the majority of the forums I've researched:
    Flywheel bolts (x8): 60Nm (44ftlb) + 180deg (for dual mass flywheel -which I have), or, + 90deg for single mass flywheel.
    Pressure Plate: 22Nm (16ftlb), tightening in stages, diagonally like you would torque wheel bolts to spec.
    Torque specs from the Haynes book I have agrees with the Flywheel bolts, only accounts for the dual mass flywheel though. It lists the same torque specs for the pressure plate as the Flywheel bolts are. Waaaay tighter! Waaaay too tight! I've seen some poor fellas out there who tried this torque and snapped the bolts! Stick with 22Nm (16ftlb). I went ahead and put just a tad of locktite on the pressure plate bolts just to make me feel better. But as hard as they were to remove, I've been told this isn't necessary. I'm not sure if this was a bad idea, but at least I know they're going anywhere on their own!

    Before I placed the engine in, I had to remove dowels from the transmission and the other engine. Neither of the dowels stayed in the 4.2 engine. Removing them without beating them up badly was tough. Fortunately I had four to pick from, and thankfully I only screwed up two of them, and the other two I was able to reshape. I was able to get these out by clamping on the side of it somewhere with some small vice grips (not the whole circumference -that'll turn it into an oval), and tap on the vice grips with a hammer. The dowel started turning as I pulled, and I was able to get these out without too much damage. They just need a little polishing up in the vice. I used a hammer to tap them back into the dowel holes in the 4.2.
    DSC_0566
    DSC_0567

    Installing the engine was a chore. I had to make absolutely sure the angle and the height were matched up properly. I probably installed and removed it (slid it over the transmission shaft) 10-12 times. I was having terrible trouble with the last 1/2 inch. It would get this close and wouldn't go any further. I couldn't figure out why.
    I had it aligned top to bottom and left to right seemingly spot on, but it was still not going in. I was even able to start installing bolts to ensure a proper alignment. I was really close, but not close enough to where the dowels were touching yet. I think the transmission shaft must've been hitting the pilot bearing's rollers that's inside the flywheel. Maybe I just didn't have it aligned 100% perfect. Although I had bolts in to help with alignment, I was sure not to just force it in with the bolts.. nothing good ever comes from forcing things.
    A friend and I worked on trying to get this engine in for about 3-4 hours and called it quits for that day.
    DSC_0574

    A couple of days later he was over again and we decided to try it again. We were prepared to remove the whole darn thing and inspect super close for what could be hanging us up. But before we did we decided to give it one last hurrah. He was standing at the front of the engine, and I was underneath. He wiggled the engine side to side slightly, and I tried to grab the front bottom lip of the oil pan and pull toward the back of the car, wiggling and vibrating it that way. Low and behold it started sliding in! It wasn't a "plop" into place by any means, but we did not have to force it in; it did slide in. So that made me feel good that everything seemed to fit.
    I was able to give it another hand crank test and I was able to rotate the engine through 2 or 3 revolutions. So it seems like everything is free. I think when it comes time to turn the engine over with the starter, I will have fuelling shut off and I'll go ahead and remove the spark plugs. I'll just want to see how well the engine cranks -not- by hand. I'm hoping that I don't hear a grinding sound of the flywheel just slightly rubbing the back of the engine. It makes me a bit nervous that I have a lot of folks out there that say they had to use a flywheel spacer and mine rotates without one. I'd really feel better if I heard of some success stories of those who didn't use this spacer. We'll see. I'll just take it slow and careful.

    So next on my list was to get the engine sitting on the mounts and install the drive by wire accelerator pedal. Later will be figuring out wiring, a radiator, and replacing wear components like the water pump, timing belt, timing belt tensioner, and replacing the valve cover gaskets and the adjustable cam chain tensioner pads. Lots done, lots to do!
    Last edited by 4Loops; 12-31-2015 at 11:43 AM. Reason: typos
    1999.5 A4 B5 4.2 Quattro (My V8 Swap Project)
    2002 Jetta TDI ALH
    2000 C5 A6 Partout (<--click here for link)
    2007 GL320 CDI

  10. #10
    Senior Member Two Rings 4Loops's Avatar
    Join Date
    Feb 21 2013
    AZ Member #
    109977
    My Garage
    1999.5 A4 B5 4.2 Quattro, 2007 GL320 CDI
    Location
    South Central Indiana

    Setting the V8 on its mounts

    So I got a majority of the work done to the accelerator pedal assembly before I even put the V8 into the A4, but for the sake of thread subject continuity, I'll discuss that after I show what had to be done to get the engine sitting properly on its mounts...

    Now that the engine was mated to the transmission, I thought we'd lower the engine onto the mounts. I thought I'd use the mounts that were on the A6/V8 originally. We started noticing that the engine was wanting to mount much further forward than where the engine mount perches were. It just wouldn't work. A little more searching around and I realized I was supposed to use the engine mount perches from the A6 too!

    Here's the difference between the engine mount perches. The A4 2.8 setup makes a 90degree angle. The A6 4.2 setup makes a ~135degree angle, pointing further forward.
    DSC_0595

    In order to remove the perches, the front sway bar must be removed first. (careful, that thing's heavier than it looks!)

    With the correct perches installed, I tried to lower the engine on the mounts from the A6/4.2 setup. That ain't gonna happen. Waay too short. Even with spacer washers; just way too short. The bottom of the oil pan hits the top of the subframe. So I had the thought: I'll use the mounts from the A4/2.8 setup. those are a bit taller. Here's by how much, measured:
    DSC_0613
    Also to mention, even if I decided to go with the mounts from the A4/2.8 setup, I'd have to get new ones. Both look like the one in the picture. Almost completely separated.

    A6/4.2 mount: (83mm tall)
    DSC_0608
    DSC_0610

    A4/2.8 mount: (96mm tall)
    DSC_0605
    DSC_0607

    Even when I tried to put the A4/2.8 (96cm tall) mounts in place, they were still just a bit too short.
    DSC_0620

    The bottom of the oil plan still hit the top of the subframe.
    DSC_0600
    DSC_0617

    I could probably use enough spacer washers to make this work, but why? The mounts won't be seated properly on either the mount perch or the engine surfaces, and this just raises the center of gravity for the car as a whole. Not by much, but some. It seemed proper for me to remove the subframe and notch out the middle so that the engine would fit. I'll have to reenforce it so it doesn't taco or bend in some bumpy high speed cornering situation. So I lifted the engine back up a couple of inches and went back to work removing the subframe. The A6 4.2 subframe cannot be used on the A4 for those who are wondering. The A6 subframe is wider and it only has the lower rear control arm mounting holes for the wider track. The A4 needs the smaller track setting. So off comes the subframe and off comes the middle section:
    DSC_0625
    DSC_0628

    Marking for cutting: I think I'll leave half of the holes open, not sure yet:
    DSC_0633

    After the cut:
    DSC_0641
    DSC_0638
    DSC_0642

    I've now got to weld a panel to the top, I'm thinking of running one down the middle vertically (from right to left side) to add rigidity, then weld on a top plate.
    I don't have a welder (at least this week!), We're at the inlaws for Christmas break: I've brought the subframe down just in case his welder would do. Looking into it, it might do the job, but it's an arc (stick) welder, and it'd be tough to find an electrode small enough to not burn through such thin metal. So, one more excuse to justify a mig welder purchase!
    I've got this to work on and I'll have exhaust work to do. Mig seems to be the way to go. Plus I can use it on a metal porch rail for the house sometime soon.
    I was thinking of a Hobart 140. I was almost tempted to go the Harbor Freight (cheap junk for those who don't know the store) Chicago Electric route.. but I've screwed around with too much crap already and don't want to deal with the trouble. For something like this I'd rather spend a bit more and get a quality welder.

    So since I'm looking for a welder and staying with the inlaws this week, this portion of the thread will have to take a pause. I can give an update on what I've done with the accelerator DBW swap and wiring changes to accommodate the DBW and other wiring changes.

    Soooo much wiring to figure out!
    DSC_0676
    Last edited by 4Loops; 07-06-2016 at 09:59 AM.
    1999.5 A4 B5 4.2 Quattro (My V8 Swap Project)
    2002 Jetta TDI ALH
    2000 C5 A6 Partout (<--click here for link)
    2007 GL320 CDI

  11. #11
    Veteran Member Four Rings bhusted's Avatar
    Join Date
    Sep 11 2011
    AZ Member #
    81119
    My Garage
    B5 A4 4.2L V8
    Location
    Kirkland, WA

    It seems that you've already moved past it, but the reason that the "home" position on the flywheel is different from the flex plate is the location of the sensor in the bell-housing. The sensor in the auto is in a different spot from the one in the manual, so the "home" position must move as well.
    | B5 4.2L V8 Quattro | Tein S-Tech | O.Z. Ultraleggera 18x8 | Stabila Course 22mm rear swaybar | Agency Power WRX swaybar links | S4 front brakes | A8 rear brakes | FX-R HID projector retrofit | Fog projector retrofit | RS4 Grill |Aero wipers |

  12. #12
    Senior Member Two Rings 4Loops's Avatar
    Join Date
    Feb 21 2013
    AZ Member #
    109977
    My Garage
    1999.5 A4 B5 4.2 Quattro, 2007 GL320 CDI
    Location
    South Central Indiana

    DBW Accelerator Pedal Swap

    The accelerator pedal for the 4.2 V8 is electronic, a two potentiometer, 6 wire setup. The accelerator pedal for my '99.5 A4 uses an oldschool mechanical throttle cable setup. The 2000 & 2001 A4s look like they're already using a DBW accelerator. If only I had a later model B5! It's not too hard to switch over, but not exactly fun. Unfortunately, it isn't as simple as switching just the accelerator pedal. The pedals mount to the pedal bracket in different ways. The cable type clips in, the drive by wire type screws in. Here's what I mean, cable type on the right, DBW type on the left:
    DSC_0447

    I tried to remove (and install.. why did I forget how much "fun" this was to remove?) the accelerator pedal from the bracket while the bracket was still installed under the dash. Tough stuff, I don't recommend that! Instead, what I think would be easier would be to remove the pedal bracket with the accelerator pedal still attached. Less work is always a good thing.
    But since I went the hard way for some reason, I had to use multiple extensions to get to the three bolts holding it on. Especially the top right one.

    For starters here, the lower dash (knee/kick?) and foot panel had to be removed. Be sure to not yank at the OBD2 port when the foot panel is removed. I had to use a small flat head screw driver to insert and pry out the screw covers on the knee panel beneath the steering wheel. I managed to do this without scuffing up the vinyl. I should probably invest in a set of those plastic dash/trim tools made for this. I also disconnected all cabling going to the pedal sensors.

    If you're a contortionist, this is the job for you. Otherwise, laying on your back in the footwell in a cramped position with your lower half of your body overextended for an hour just isn't fun. It helped to raise and push back the seat as far as it would go. When I was removing the pedal bracket from the A6 the steering column was in my way and frustration took over. I decided to remove the 4 bolts holding it in, clipped the harness that goes to the column, and ripped that thing out of there. Soo much more room! I had to adapt my behavior once working in my A4 again. Don't want to screw anything up there!

    The accelerator pedal bracket is held in by one bolt going upwards into the steering column, two bolts that come through the firewall (that are actually the bolts that secure the power booster), and two dowels.
    DSC_0447

    There's a pin that links the clutch pedal to the actuator piston that must be removed. It's a strange locking pin, but easy to remove:
    DSC_0439

    The brake piston must also be unscrewed from the brake pedal. The clutch and brake pedal's main pivot pin had to be removed to get the pedal bracket out of the A4. The clutch pedal goes over top of the steering column and would make removal with this still in super difficult or impossible. The pin has clips on both sides, but if the clip is removed on the clutch side, the clutch pedal can slide off to be removed.
    DSC_0437

    Removing the power booster bolts that clamp the power booster to the pedal bracket through the firewall is a bit difficult as space is limited.
    I had to first remove the brake fluid reservoir. That allowed me access to the bottom bolt more easily. I don't know if this is absolutely necessary, but my reservoir was already empty because I was also doing brake work. The bolt is a T45 torx, but I couldn't fit a ratchet in there, so I had to use a wrench over the socket to make this work:
    DSC_0470
    DSC_0431
    DSC_0404

    Once the bolts were loosed and removed as far back as they would come, I was able to bend the power booster around a bit to free the pedal bracket. Removal of the bracket was pretty much the same on each vehicle, only difference was a clutch pedal on the A4's bracket.

    Once on the bench, the longer pin had to be removed from the A4's pedal bracket and placed into the new DBW pedal bracket -to accommodate the clutch pedal.
    DBW pedal bracket, removing the shorter pin:
    DSC_0446

    The A4's cable type pedal bracket, with long pin already removed. Note that the clutch depressed switch also needs to be removed from this bracket and placed on the DBW bracket:
    DSC_0448

    Here's the DBW pedal bracket with the longer pin installed, and the clutch depressed switch going on. I matched the old position, just showing where that old position was in this picture. I figured that'd be a good start. It might have to be adjusted later:
    DSC_0449

    I swapped over the clutch-released switch, and the brake switches, but I'll have to change those to what the new engine wants. From what I've read the clutch switch on the A4 is a normally open switch, and the V8 wants a normally closed switch. I'll figure this out and give details on the hows and whys as I'm going through wiring.

    I'm finishing the wiring up for the addition of the white T15 connector to the ECM in the A4. I'm not sure if I'll post that now or wait to verify once back at the car and I can see if I'm missing anything. I've got a pretty hefty ECM/Vehicle wiring diagram started. I'll want to continue that to verify all ECM to engine sensors & actuators before its time to crank this thing over.

    One thing I also noticed: while I was removing the subframe earlier I saw that I have a ripped CV boot. I'm not sure if I should just go ahead and replace both the fronts while I got this thing apart. If one's cracked I'm sure the other can't be far behind.
    DSC_0451
    1999.5 A4 B5 4.2 Quattro (My V8 Swap Project)
    2002 Jetta TDI ALH
    2000 C5 A6 Partout (<--click here for link)
    2007 GL320 CDI

  13. #13
    Senior Member Two Rings 4Loops's Avatar
    Join Date
    Feb 21 2013
    AZ Member #
    109977
    My Garage
    1999.5 A4 B5 4.2 Quattro, 2007 GL320 CDI
    Location
    South Central Indiana

    Quote Originally Posted by bhusted View Post
    It seems that you've already moved past it, but the reason that the "home" position on the flywheel is different from the flex plate is the location of the sensor in the bell-housing. The sensor in the auto is in a different spot from the one in the manual, so the "home" position must move as well.
    Thanks Bhusted! I don't know why I didn't think of this as a possibility!
    1999.5 A4 B5 4.2 Quattro (My V8 Swap Project)
    2002 Jetta TDI ALH
    2000 C5 A6 Partout (<--click here for link)
    2007 GL320 CDI

  14. #14
    Senior Member Three Rings wolfe2118's Avatar
    Join Date
    Apr 09 2012
    AZ Member #
    91530
    Location
    Fort Wayne, IN.

    I found it was more comfortable to just remove the front seat and lay on the floor. That also gave me a chance to clean the carpet while it was out. I think it only took 5 min to pull it out.

  15. #15
    Senior Member Two Rings
    Join Date
    Dec 24 2010
    AZ Member #
    68631
    My Garage
    2001 A4 4.2 v8 swap, MR2 Turbo, CBR1000rr
    Location
    Columbus, Ohio

    great build man!! i am not too far behind you on my swap, i just got my harness and ECU back from Daz utilizing his bad ass take on the Euro S6 file. i just need to finish up putting cams and chain tensioners back in then motor is ready to go in. look forward to following your progress!

  16. #16
    Senior Member Two Rings 4Loops's Avatar
    Join Date
    Feb 21 2013
    AZ Member #
    109977
    My Garage
    1999.5 A4 B5 4.2 Quattro, 2007 GL320 CDI
    Location
    South Central Indiana

    Thanks Spinnin!

    What ECM are you using with this file? My original ECM is from the '00 A6 with automatic trans. I bought a ME7.1.1 ECM 4D0907560AE. According to ddillenger at this post.

    "The ideal A6 ME7.1.1 ecu is 4D0907560AE. That's from a 2001 so it's a hybrid CAN-Bus ecu that can still accept non CAN signals as well. Do not get a 2002-up, as you'll have issues getting the ecu a VSS signal."

    I still have to flash my ECM for manual trans. From my research I'm pretty sure the Euro S6 file needs the 4D0907560AE ME7.1.1 ECM. Is that the one you used?

    I'm interested to see what information you've been reading on flashing the ECM. I'd like to try this myself, mostly because I want to learn some new things along the way. I work with & test ECM calibrations for a living, but that's not on Audi/Bosch ECMs. I'm sure it'll be a bit different, but it shouldn't be too hard, right?? (note, I might look back on this statement with amusement in the future lol)

    I bought a valve cover kit and a set of cam timing chain tensioner pads to replace. I haven't cracked either cover open yet, but I'm sure the pads need replacing, and the cover seals are leaking a tad. I'll paint my covers while off. I'm planning on doing this work after I have the engine bolted to the mounts and the mounts bolted to the subframe that I still have to weld back together.

    Do you have a build thread too? I'm always excited to see how others are getting along with their b54.2 projects!

    One last question for you: did you have SAI and/or EGR deleted from the calibration?
    Rear O2 sensors?
    I'm still planning on running cats because I can't stand the smell otherwise -that and there is a tiny tad of treehugger in me, but to each his own. I'm not sure at this point if the O2 sensors are used to regulate cat performance, or just to measure performance. I'm thinking it's the latter of the two, but I'll have to figure this out sometime soon.

    @wolfe:
    This probably would've been a good idea for me to do also, especially after all the rewiring to the cruise control stalk. A lot of sitting in strange overextended positions to see what I was doing there. It sure would've made things easier, but I think I'm about done with most of the wiring under the dash. Just the brake switch(es) and the clutch switch to connect up now. Got the cruise control switch and the accelerator pedal wiring completed last night. That stuff takes soo much longer than what it should!
    1999.5 A4 B5 4.2 Quattro (My V8 Swap Project)
    2002 Jetta TDI ALH
    2000 C5 A6 Partout (<--click here for link)
    2007 GL320 CDI

  17. #17
    Senior Member Two Rings
    Join Date
    Dec 24 2010
    AZ Member #
    68631
    My Garage
    2001 A4 4.2 v8 swap, MR2 Turbo, CBR1000rr
    Location
    Columbus, Ohio

    my donor motor/trans is from a 2000, per Daz, i purchased an 01 ECU and setup the harness to work with the 01 ecu.

    i have a build thread, but its been a while since ive updated, as physical progress has been slow.

    SAI and EGR are deleted in ecu and plugged on motor, 2nd 02 are there but its setup so i wont get a light for it.


    does anyone one else have info on weather or not the subframe has to be cut to clear oil pan? ive seen some able to do it without clearance issues. i am using the 034 billet C5 V8 mounts

  18. #18
    Veteran Member Four Rings Nollywood's Avatar
    Join Date
    Nov 03 2011
    AZ Member #
    83391
    My Garage
    ‘07 B7 RS4 Avant, 10 SEAT Exeo ST, ‘13 3R9 400-R
    Location
    All Over!

    Quote Originally Posted by spinnin_four View Post
    does anyone one else have info on weather or not the subframe has to be cut to clear oil pan? ive seen some able to do it without clearance issues. i am using the 034 billet C5 V8 mounts
    It depends.

    With my early 32V swaps, I just ground the webbing off the rear of the oil pan.

    With my early 40V swap, nothing was cut or ground. This was a B2 90 Quattro though.

    With my current 40V swap, I had to remove quite a large section of the subframe to clear the oil pan. This is because I'm running a late 40V from a 2005 A8 D3. This shares its block with the C5 RS6, so the oil pan is much deeper and wider to match the block. I am running aluminium billet Motorsport mounts by Vibratechnics.

    Does YOUR subframe require notching to run a C5 V8 motor? I would say no. It's worth noting V8 mounts (both stock and the rest) ARE shorter than B5 ones. I have no idea what your aluminium mounts were modelled upon, but IF they are V8 specific, you are most likely to run into oil pan / subframe clearance issues. I would replace them with stock B5 or aluminium billet items which ARE B5 specific (taller).
    2007 Audi RS4 Avant B7 - Misano Red Pearl Effect
    2007 Audi RS4 Saloon B7 - Sprint Blue
    2013 SEAT Exeo ST - Project 3R9 400-R
    2010 SEAT Exeo ST - Project 3R9 420-S
    1986 Type 85 Audi 90 quattro

  19. #19
    Senior Member Two Rings 4Loops's Avatar
    Join Date
    Feb 21 2013
    AZ Member #
    109977
    My Garage
    1999.5 A4 B5 4.2 Quattro, 2007 GL320 CDI
    Location
    South Central Indiana

    @spinnin:
    Looks like I have the same ECM. I might have to seek out this Daz to see what I can do to flash this file.
    I found your build, I'll have to browse through that. Man, you've got that thing slammed down!
    So you still have your downstream 02 sensors, but coded out. Does that mean you still have your cats? Any reason why you kept them there if they've been coded out? Just to plug a hole? Is the calibration still looking for a load on these pins?

    I was reading a lot of information on the subframe clearance issue before I decided to notch mine. I saw some that looked like they said they didn't have to. As I captured in one of my above posts, the B5 mount is about a centimeter taller than the A6 4.2 mount. I tried using the B5 mounts but they were still too short. I would've had to add a ton of washers to fill that space properly. I thought I could've made it work if I ordered taller mounts, but that just raises everything and I thought that might not be good for handling, and to me, it just didn't seem "right" to do that. That, and it's just more parts that will nickle and dime me. I am using the 2.8 subframe though, since you're coming from a 1.8 setup I can't really voice an experience there.
    1999.5 A4 B5 4.2 Quattro (My V8 Swap Project)
    2002 Jetta TDI ALH
    2000 C5 A6 Partout (<--click here for link)
    2007 GL320 CDI

  20. #20
    Veteran Member Four Rings bhusted's Avatar
    Join Date
    Sep 11 2011
    AZ Member #
    81119
    My Garage
    B5 A4 4.2L V8
    Location
    Kirkland, WA

    Quote Originally Posted by 4Loops View Post
    I bought a valve cover kit and a set of cam timing chain tensioner pads to replace. I haven't cracked either cover open yet, but I'm sure the pads need replacing, and the cover seals are leaking a tad. I'll paint my covers while off. I'm planning on doing this work after I have the engine bolted to the mounts and the mounts bolted to the subframe that I still have to weld back together.
    I originally painted my valve covers and even after all of the prep work a year later they looked like ass. I wanted to powdercoat the valve covers, but not have to take the car off the road for an extended period of time, so I found another set of valve covers for cheap and sent them out to be coated. I swapped in the replacements and still have to the others sitting in a box. If you or anyone else is interested in a pair of valve covers for a 40v, let me know and I'll sell them for what I got the others for so you can send them out to be coated.
    | B5 4.2L V8 Quattro | Tein S-Tech | O.Z. Ultraleggera 18x8 | Stabila Course 22mm rear swaybar | Agency Power WRX swaybar links | S4 front brakes | A8 rear brakes | FX-R HID projector retrofit | Fog projector retrofit | RS4 Grill |Aero wipers |

  21. #21
    Senior Member Two Rings 4Loops's Avatar
    Join Date
    Feb 21 2013
    AZ Member #
    109977
    My Garage
    1999.5 A4 B5 4.2 Quattro, 2007 GL320 CDI
    Location
    South Central Indiana

    Man, even with high temp paint? Then my extra can of caliper paint is going to get more shelf-time I suppose.
    I guess I'll have to look into the powder coating thing. Never had that done to anything before. Probably should get started on that while I'm in the midst of my wiring extravaganza.

    Say, bhusted, I've started to wonder again now that spinnin brought the subject up.. and since I had to notch my subframe to get the engine to not hit it.
    What did you do with your subframe situation? I don't remember seeing this addressed in your build thread. Did you just use the subframe from the A6? If so, since that subframe only has the lower rear control arm mount holes for the wider track, did you just follow through and setup for the wider track? Or did you stick with the 2.8 subframe? If so there, how did you get the oil pan to clear it?
    1999.5 A4 B5 4.2 Quattro (My V8 Swap Project)
    2002 Jetta TDI ALH
    2000 C5 A6 Partout (<--click here for link)
    2007 GL320 CDI

  22. #22
    Senior Member Two Rings 4Loops's Avatar
    Join Date
    Feb 21 2013
    AZ Member #
    109977
    My Garage
    1999.5 A4 B5 4.2 Quattro, 2007 GL320 CDI
    Location
    South Central Indiana

    Quote Originally Posted by tinytim View Post
    As you know I am in the middle of my B5 A4 4.2 swap also. I was told that if you dont code for manual you will experience everything you are describing. Mainly the high idle situation. Here is a link to the manual files... there is also some maf scaling and injector mapping changes associated with the manual trans file. They are also in that link.

    http://nefariousmotorsports.com/foru...33462#msg33462

    A big issues is going to be your ME7.1 ecu... the ME7.1.1 is what you want, but that may require changing the whole engine harness.
    Bhusted, tinytim, ddillinger, Is this file still available? I tried clicking on the link and the site says its missing or I'm not authorized. I have the 2001 4D0907560AE ECM sitting on the bench; I figure its too cold outside to do work on the car comfortably, I might try flashing this file in. I hope it still exists!
    From what I've read, this modified file will work on the ART engine and changes the transmission to manual. Am I correct in thinking it deletes SAI also? Maybe Rear 02 sensors? EGR delete? I don't think it defeats the immo, right? The diode trick is still required, I'm assuming?

    I'm poking around nefmoto currently, trying to learn as much as I can there.
    I also remember ddillinger responding in this thread saying that was his file and that it is not the same one on nefmoto? I can't even find a modified file on nefmoto, only an original file. So it seems like I need a source for this magical file of ddillinger's that everyone seems to be using.. Any source for that?

    Otherwise, I guess I'll be forced to learn how to use TunerProRT and nefmotoME7flasher.

    Any ideas? -Thanks!
    1999.5 A4 B5 4.2 Quattro (My V8 Swap Project)
    2002 Jetta TDI ALH
    2000 C5 A6 Partout (<--click here for link)
    2007 GL320 CDI

  23. #23
    Veteran Member Four Rings bhusted's Avatar
    Join Date
    Sep 11 2011
    AZ Member #
    81119
    My Garage
    B5 A4 4.2L V8
    Location
    Kirkland, WA

    Quote Originally Posted by 4Loops View Post
    Man, even with high temp paint? Then my extra can of caliper paint is going to get more shelf-time I suppose.
    I guess I'll have to look into the powder coating thing. Never had that done to anything before. Probably should get started on that while I'm in the midst of my wiring extravaganza.

    Say, bhusted, I've started to wonder again now that spinnin brought the subject up.. and since I had to notch my subframe to get the engine to not hit it.
    What did you do with your subframe situation? I don't remember seeing this addressed in your build thread. Did you just use the subframe from the A6? If so, since that subframe only has the lower rear control arm mount holes for the wider track, did you just follow through and setup for the wider track? Or did you stick with the 2.8 subframe? If so there, how did you get the oil pan to clear it?
    I used VHT's engine paint on my valve covers and had terrible results. I just wanted to give you a heads-up on that. Looked good for about a year and then went to shit.

    I used the stock 30v subframe and didn't have any clearance issues with the center of the subframe. Not sure how that turned out with other having this problem with the same parts. For the ECU, I ended up buying a ME7.1.1 ECU and sending it to ddillinger for the programming. He did a great job for what I thought was a reasonable price. In that file, he removed the rear O2, SAI, and the immobilizer. The immobilizer still requires the diode to power the ECU in the car though.
    | B5 4.2L V8 Quattro | Tein S-Tech | O.Z. Ultraleggera 18x8 | Stabila Course 22mm rear swaybar | Agency Power WRX swaybar links | S4 front brakes | A8 rear brakes | FX-R HID projector retrofit | Fog projector retrofit | RS4 Grill |Aero wipers |

  24. #24
    Senior Member Two Rings 4Loops's Avatar
    Join Date
    Feb 21 2013
    AZ Member #
    109977
    My Garage
    1999.5 A4 B5 4.2 Quattro, 2007 GL320 CDI
    Location
    South Central Indiana

    Modifying the 2.8 Subframe

    Its been a while since I've posted. Much work has been completed and many breaks were taken over January because its hard to be motivated to work out in the blistering cold. Even with a heated garage, an hour and a half of time after work is just long enough to get the space heated by the time it's time to quit for the day. So progress has been slow, but it's moving.

    I spent much of early January re-teaching myself to weld with a MIG. It's been ~15 years since I've done any real welding, so I thought I'd get myself familiar with it again. As mentioned in an earlier post I was thinking of going with the Hobart 140. After much deliberation, that's what I went with. I figured I'd get a lot out of it over a lifetime, and it can be passed down.
    My first welds were atrocious. After 3 or 4 they got better, but that was practicing with sections of overlap welds. I found it a lot more difficult in welding the actual subframe. I hadn't much experience with angled welds (going down/up instead of across on a level surface). So all that said, I'm a bit embarrassed by some of my welds, but I feel I at least had proper penetration and a good weld. Even though it didn't look too pretty. I went ahead and ground some of the ugly sections to make it look better and so it doesn't have a million little crevasses that could help rust start.

    I think I should correct a comment I made in Post #10. I said the a6 4.2 subframe won't fit. I think I may be mistaken there. I thought I saw in one thread recently where it was mentioned that subframe could be used. But the comment about the lower control arm holes still applies. It looks like although you could use the A6 subframe, you would have to change your suspension setup to account for the wider track setting. I just rebuilt my brake calipers, and decided to still use those as to not waste my time and money on those, and keep my steel uprights and current suspension setup. I don't know what's the better way here. I decided to modify my A4 2.8 subframe, but I might suggest to the next guy trying this swap to just try the 4.2 subframe and switch out the suspension components and go with a wider track. Work involved-wise.. it might be one of those "six of one, half a dozen of another" situations.

    Anyway, here's my work on the subframe:

    Cutting Cardboard to fill shape:
    DSC_0824 - Copy
    DSC_0826 - Copy

    Cardboard template used to cut 14ga hot rolled steel, then laid that in place and hammered it somewhat in place:
    DSC_0827 - Copy
    DSC_0828

    Had to brush off surrounding paint:
    DSC_0832

    Initial tack welds:
    DSC_0835

    First stretch of weld. Not super proud of it, but it'll hold. Doesn't look absolutely awful I thought. That's a matter of your opinion, too:
    DSC_0838 - Copy

    A longer stretch. I did take a little pride in this one. I thought it was pretty good.
    DSC_0850 - Copy

    The weld doesn't continue in that last picture because I ran out of sample wire. Had to buy another roll. I stuck with flux core wire and didn't go gas yet. I'm was having a harder time with the larger roll once installed. There's so much mass to move that the welder would constantly oscillate in speed. It would pull, the roll would pull, then rotate, then spin a bit and not give constant tension on the wire before it went into the feeder. I tried varying the wire tension, how tight the reel was pressed on the axle, nothing seemed to really help. I'll have to figure this out in the future. But for the remainder of my welds on this subframe, I thought I'd just deal with it. It wasn't oscillating too badly at one point, and I could keep a steady puddle flow. After finishing some welds, and going back over most spots, I had some gnarly looking spots. I chose to ground those down to lessen chances of rust and to lessen my risk of being bashed too badly for my poor (but getting better!) welding skills, after posting these images here for all in a public forum.
    DSC_0852

    Then I had to deal with these cutouts I got a little too ambitious with. I should've gone with more of a slope instead of a straight line down. A slope is a structurally better solution than a bunch of right angles.
    DSC_0855
    DSC_0857

    I got to the cardboard pieces again, made some templates, used those to cut some metal triangles, put them in place and had a not-so-fun time welding them on. Lesson learned: I really need to practice my vertical welds. I burnt through a couple of times because I wasn't moving fast enough, but was able to save them. Doing all that created some nasty looking weld-warts, but again: ugly, but functional. I had to keep telling myself that!
    After all the welding was done, I thought about annealing the whole area, but since it was late, I thought I better not get a hunk of metal all red and hot in the garage, then call it quits and go to bed, wondering if the garage would catch fire. So even the next day, I was too excited to just get it finished, so I Rustoleum primered it and Rustoleum painted it. Probably primer wasn't needed if I was spraying the Rustoleum paint, but I thought it wouldn't hurt. I had a lot of grease and rusty spots to clean up first though. The leaky engine had coated most all of this thing with oil and prevented rust most places, but in small crevasses it allowed water to pool up and stick around I think. So some rust-busting had to be done there. Wasn't anything too serious, just surface stuff.
    DSC_0864
    DSC_0865
    DSC_0866
    DSC_0867
    DSC_0869
    DSC_0870

    After a day of letting it dry, I reinstalled it under the car. I was able to use the shorter A6 mounts, and the engine sat down on them perfectly. Loads of room now. Probably could've went with a bit of a curved top, but I think it'll still be strong enough. I'm also using the B5 Panzer skid-plate, too. So I'm sure that'll help its strength by a good amount:
    DSC_0886
    DSC_0890
    DSC_0892

    I could even fit most of my hand through the tightest spot:
    DSC_0895
    DSC_0894
    DSC_0896
    DSC_0898
    DSC_0901

    Once it was all set in place though, with the front two mounts sitting fully in place, and the transmission mounts sitting in their place on the subframe, I noticed that I still have a bit of an angle to the engine. It's leaning back ever-so-slightly:
    DSC_0871
    DSC_0873

    I'm not sure if I'm going to worry at all about this. If I do, I think I might just raise the transmission mounts slightly with some kind of spacer setup. I don't really feel like throwing more coin down for shorter motor mounts, and I'm kind of intrigued by the A6 hydraulic mounts. I'm a bit excited to see if I can actually notice them doing anything. Probably not, as that's their job, to dampen vibration. I guess I have a little more to learn about them. I think its an actuator that adjusts the stiffness of the mount. I suppose I could try starting and revving the engine with them connected and then with them disconnected. Maybe then I'd feel a difference. Doesn't really matter though. My main goal with mounts is to reuse these to save money, and they don't look degraded, so I should be fine going this route I'm thinking.
    I just have to figure out a way to fabricate a front torque mount bracket for the front-bank 1 (USA passenger) side of the engine soon:
    DSC_0877

    I've also made a ton of wiring changes and connected the clutch and brake pedal sensors, cruise control, and some other connections.
    I'll have to share my updates on the wiring in my next post.
    I've also been working on a wiring excel-workbook. I've found that this is going to be hard to make a general help document for others wanting to do this swap. It seems that even within one year, there are many wiring amendments made, and the vehicle can be in the split-year section for one component wiring diagram, but in the early year section for another component wiring diagram. It was a head-scratcher to say the least.
    1999.5 A4 B5 4.2 Quattro (My V8 Swap Project)
    2002 Jetta TDI ALH
    2000 C5 A6 Partout (<--click here for link)
    2007 GL320 CDI

  25. #25
    Senior Member Two Rings 4Loops's Avatar
    Join Date
    Feb 21 2013
    AZ Member #
    109977
    My Garage
    1999.5 A4 B5 4.2 Quattro, 2007 GL320 CDI
    Location
    South Central Indiana

    Flywheel Spacer

    Ok, so the whole flywheel spacer dilemma has honestly been keeping me awake at night and a bit on edge. I had some questions before about the need for this small 1mm spacer in between the crank and the flywheel. Initially I didn't know about this requirement, and put the flywheel to the crank without it. I got in a bit of a hurry the first time and did not check to see if the engine would crank over by hand before installing the engine into the car. After the arduous time mating the engine to the transmission as detailed in my previous posts, I at least thought of it then, to see if the engine would turn. It seemed to take a bit more pressure than I thought, with a breaker bar on the front crank bolt, at first. But then it started to turn, and I thought maybe I was just being a worrywart. I could crank it over by hand through a couple revolutions. It did seem to have a normal feel for rotating an engine still; it did take a bit of force, but there are 8 pistons covered in rings grabbing and not wanting to budge easy. So it did seem pretty normal after the first rotation. But that started getting to me: was it part of my imagination that I thought I had to put a good amount of "umph" behind the first turn to break it free, or was it because of something?
    After Christmas and holiday stuff passed, and after I just finished up my subframe, this started to bother me all the more. I didn't want to put everything together around a questionable setup. I didn't want that sinking gut feeling that I was driving a ticking time-bomb every time I went out to drive.
    So in my best interest, and against my will to not redo work, I thought it very wise to just take the engine out, take the flywheel off, just to see if I could find any evidence of rubbing going on.

    AND MAN, ITS A GOOD THING I DID.....

    This is what I found:
    DSC_0977
    DSC_0975
    DSC_0974
    DSC_0973
    DSC_0980
    DSC_0982

    So basically, my flywheel was touching the back of the engine. I don't know what that part (housing?) is called that is bolted on to the block to hold the crank seal in place, but that's the part of the engine that it was hitting.

    But on the bright side, I dodged a big bullet!!!

    Something else I noticed: It's not possible for the flywheel to make contact with the rear crank seal. The seal is recessed enough it won't be touched. The only thing that the flywheel will rub is that back housing as shown.
    DSC_0987

    Lessons learned: YOU MUST USE THE 1MM SPACER. Either that, or mk1 rabbit gti mentioned that an aasco flywheel will work without this shim:
    http://www.audizine.com/forum/showth...1#post11288533
    But I bought a replacement LUK flywheel, so I'm stuck with needing the shim method.

    DSC_0988
    DSC_0990
    DSC_0991
    DSC_0993

    This is a really old and terrible caliper I got from my Father-in-law. But it does the trick. Careful examination of the measurement is ~40 thousandths of an inch, which googling the math yeilds 1mm = 39.3701 thousandths. Looks like this is a 1mm spacer.
    DSC_0993

    It's really tricky to get the spacer to stay where you want it while trying to install the flywheel:
    DSC_0996
    BTW, I decided to keep the bushing in since it doesn't really get in the way:
    DSC_0999
    DSC_1002

    But I ended up aligning it correctly and getting all the bolts in and hand-snugged down.
    But before I continue... another something concerns me..
    And maybe you gurus can advise me on this one..

    Can I reuse my flywheel bolts? They have been torqued down once, so I'm sure they're stretched. But they haven't seen any real mileage yet.

    Would I be safe to reuse these, or should I bite the bullet and order another set of flywheel bolts???
    1999.5 A4 B5 4.2 Quattro (My V8 Swap Project)
    2002 Jetta TDI ALH
    2000 C5 A6 Partout (<--click here for link)
    2007 GL320 CDI

  26. #26
    Senior Member Two Rings 4Loops's Avatar
    Join Date
    Feb 21 2013
    AZ Member #
    109977
    My Garage
    1999.5 A4 B5 4.2 Quattro, 2007 GL320 CDI
    Location
    South Central Indiana

    Also another question:
    I'll be getting around to fitting exhaust sometime soon. The old header flange bolts were so rusty we couldn't reuse them, so we just cut most of those off.
    Where do I get another 6 of these?:
    DSC_1003
    DSC_1004

    Anyone have a part number to reference? All I'm finding online are the stud type, like are used in the V6's manifolds.
    1999.5 A4 B5 4.2 Quattro (My V8 Swap Project)
    2002 Jetta TDI ALH
    2000 C5 A6 Partout (<--click here for link)
    2007 GL320 CDI

  27. #27
    Senior Member Three Rings
    Join Date
    Mar 29 2012
    AZ Member #
    90865
    My Garage
    1997 Audi A4 V6 Quattro
    Location
    Lynnwood, WA

    Try looking into vagcat.com and go through their 'part catalog'.


    Sent from my iPhone using Tapatalk

  28. #28
    Established Member Two Rings
    Join Date
    Mar 25 2015
    AZ Member #
    322589
    Location
    Finland

    Nice to see your progress on your swap. Also it is interesting to see how others do these things, when I ´m in the middle of my own swap ;)

    I had the same problem with my oem flywheel. I assembled it first without that spacer and noticed that the engine wouldn´t turn at all. Luckily I had that spacer and with that everything was fine. I decided to take a risk and reused those flywheel bolts. Maybe not the smartest thing to do, but didn´t want to buy new bolts.

    Those header bolts looks pretty much same than mine did. I bought new bolts (N010 345 11) and nuts (N911 308 01) from a local dealership. Those "anti-twist devices" was in good condition so I just took them apart from those old bolts. Partnumber for those is 4D0 253 089A if you need new ones.

  29. #29
    Veteran Member Four Rings bhusted's Avatar
    Join Date
    Sep 11 2011
    AZ Member #
    81119
    My Garage
    B5 A4 4.2L V8
    Location
    Kirkland, WA

    ^yup. I just replaced the bolts and reused the retainer pieces.
    | B5 4.2L V8 Quattro | Tein S-Tech | O.Z. Ultraleggera 18x8 | Stabila Course 22mm rear swaybar | Agency Power WRX swaybar links | S4 front brakes | A8 rear brakes | FX-R HID projector retrofit | Fog projector retrofit | RS4 Grill |Aero wipers |

  30. #30
    Senior Member Two Rings 4Loops's Avatar
    Join Date
    Feb 21 2013
    AZ Member #
    109977
    My Garage
    1999.5 A4 B5 4.2 Quattro, 2007 GL320 CDI
    Location
    South Central Indiana

    Wow, I never heard of VAGCat before. I created an account to see the diagrams and part numbers, and although I had to take a little different mindset in order to navigate around, It surely listed these parts!
    Thanks T.Hell for the numbers. They match what I saw in VAGCat too. Except for the nut, which VAGCat shows as N90200201. So it looks like both will work. I'm sure there's a bunch of others that will work, as long as they pinch and can withstand the heat. So I'll keep looking for the part numbers that you mentioned in your post.

    I wish I had been more gentle removing the retainers. In order to get some of the bolts out, I had to mangle the retainers a bit, and I thought I could get another set of 30 cent retainers. Why do these things cost so much!?
    It's hard to find a cheap set. ECS has a set for $93.01, https://www.ecstuning.com/Audi-C5_A6...All/ES2580182/
    The cheapest I can find these parts is for $51.48 with $10.42 shipping = $61.90. That's a lot of dough for some nuts and bolts! (VWPartsDept.com)
    Perhaps I can get these cheaper at the dealership? Usually I'd think no, but this is the best I'm coming up with!

    Thanks for the help King, T.Hell.

    Anyone else reused Flywheel Bolts (new, but stretched, then reinstalled) and then accumulated some miles? I don't think you have yours running yet, right T.Hell?
    1999.5 A4 B5 4.2 Quattro (My V8 Swap Project)
    2002 Jetta TDI ALH
    2000 C5 A6 Partout (<--click here for link)
    2007 GL320 CDI

  31. #31
    Senior Member Two Rings 4Loops's Avatar
    Join Date
    Feb 21 2013
    AZ Member #
    109977
    My Garage
    1999.5 A4 B5 4.2 Quattro, 2007 GL320 CDI
    Location
    South Central Indiana

    What do you think about these working?:
    http://www.summitracing.com/parts/stg-8950b
    They're a bit generic, but they might just do the trick, and for ~$20 less than the cheapest OEM components I can find..
    1999.5 A4 B5 4.2 Quattro (My V8 Swap Project)
    2002 Jetta TDI ALH
    2000 C5 A6 Partout (<--click here for link)
    2007 GL320 CDI

  32. #32
    Established Member Two Rings
    Join Date
    Mar 25 2015
    AZ Member #
    322589
    Location
    Finland

    Yes, my car is not running yet. But I'm hoping that those flywheel bolts holds up.

    Those header bolts seems to be pretty basic M8x45 hexacon bolts, so I'm pretty sure that at least they can be found cheaper from some where else than a dealership.

    Partsbase.org is also quite good place to search those partnumbers.

  33. #33
    Senior Member Two Rings 4Loops's Avatar
    Join Date
    Feb 21 2013
    AZ Member #
    109977
    My Garage
    1999.5 A4 B5 4.2 Quattro, 2007 GL320 CDI
    Location
    South Central Indiana

    I'm still looking for these collector nuts/bolts/&retainers. It's the retainers that I find ridiculously priced. All they're doing is keeping the bolt in place when you're tightening the nut on, right? Since the nut is a locking nut, I don't think the retainer serves any purpose other than for ease of installation & removal. Someone correct me if I'm wrong on this one, but this seems right.

    Since that's most likely the case, maybe I'll just skip the retainers and just have more of a "fun" time tightening the collector bolts/nuts together. Six times $7.92 (the cheapest I can find this retainer) = $47.92 seems.. um.. Way much, I think is the correct term here?
    I think saving 50 bucks is worth some extra struggle to hold the bolt in place while I tighten the nut.

    The nuts are cheap @ $0.60 a piece, and the bolts are pretty cheap @ $3.36 a piece at audihendersonparts.com
    http://audihendersonparts.com/oempar...N01034511.html
    http://audihendersonparts.com/oempar...N91130801.html
    Doing that will bring my total to just above $30 for just the nuts and bolts plus shipping. Not bad for OEM hardware I suppose.
    1999.5 A4 B5 4.2 Quattro (My V8 Swap Project)
    2002 Jetta TDI ALH
    2000 C5 A6 Partout (<--click here for link)
    2007 GL320 CDI

  34. #34
    Veteran Member Four Rings bhusted's Avatar
    Join Date
    Sep 11 2011
    AZ Member #
    81119
    My Garage
    B5 A4 4.2L V8
    Location
    Kirkland, WA

    The retainers for me were just stamped pieces of stainless. I swapped out the rusty bolts for some stainless bolts and nuts from my local hardware store. The new bolts dropped into the retainers once I had removed the rusty bolt.
    | B5 4.2L V8 Quattro | Tein S-Tech | O.Z. Ultraleggera 18x8 | Stabila Course 22mm rear swaybar | Agency Power WRX swaybar links | S4 front brakes | A8 rear brakes | FX-R HID projector retrofit | Fog projector retrofit | RS4 Grill |Aero wipers |

  35. #35
    Veteran Member Four Rings Nollywood's Avatar
    Join Date
    Nov 03 2011
    AZ Member #
    83391
    My Garage
    ‘07 B7 RS4 Avant, 10 SEAT Exeo ST, ‘13 3R9 400-R
    Location
    All Over!

    I would advise you bite the bullet, and buy those retainers.

    You may well get the nuts tightened with new hardware, less the retainers. Now consider what a shitty job it could turn out to be a year later, if you need to either pull the downpipes for engine work or for some other reason. I bet you'd be cursing Audi then, when in actual fact the hardware to make this job easier existed.

    Still, it's your call. I know I would not leave them out, because I'll be looking further ahead, where there could be issues long term.
    2007 Audi RS4 Avant B7 - Misano Red Pearl Effect
    2007 Audi RS4 Saloon B7 - Sprint Blue
    2013 SEAT Exeo ST - Project 3R9 400-R
    2010 SEAT Exeo ST - Project 3R9 420-S
    1986 Type 85 Audi 90 quattro

  36. #36
    Senior Member Two Rings 4Loops's Avatar
    Join Date
    Feb 21 2013
    AZ Member #
    109977
    My Garage
    1999.5 A4 B5 4.2 Quattro, 2007 GL320 CDI
    Location
    South Central Indiana

    Yeah, I'll try to find something that can hold them into place. I still have a few good retainers left over I can try to extract the old rusty bolts from. I'm sure I can come up with a cheaper retainer solution.

    In other news, I found that my intake swirl flaps were stuck, so I tried pulling off the front bushings/races/carriers whatever they're called, following this thread:
    http://forums.quattroworld.com/a8/msgs/44689.phtml

    Stupid things were really on there, and even with 2 hours of delicate work, I sheared one and mushroomed out the others shaft like a rivnut would. Stupid brittle magnesium. Why couldn't they just use aluminum or plastic with a metal bushing?

    Anyway, I can't find just the bushing, only a whole repair kit, for a stupid ridiculous insane amount. Like paying $200 for a pair of socks -stupid expensive.


    Anyone know where I can find just the bushing carrier? Maybe an aluminum one?
    It'll surely be impossible to find a pic-n-pull with an engine with this part anywhere near me.

    Sent from my D6603 using Tapatalk
    Last edited by 4Loops; 02-13-2016 at 07:38 AM.
    1999.5 A4 B5 4.2 Quattro (My V8 Swap Project)
    2002 Jetta TDI ALH
    2000 C5 A6 Partout (<--click here for link)
    2007 GL320 CDI

  37. #37
    Senior Member Two Rings 4Loops's Avatar
    Join Date
    Feb 21 2013
    AZ Member #
    109977
    My Garage
    1999.5 A4 B5 4.2 Quattro, 2007 GL320 CDI
    Location
    South Central Indiana

    Just a little update..
    Since I can't find that darn front swirl flap bushing anywhere for a reasonable price, I'm just making my own.

    I got myself a better dial caliper and drew it up in TinkerCAD and have ordered a couple through 3Dhubs.com, from a guy/hub named Garth.
    https://www.3dhubs.com/seattle/hubs/garth
    I got 2 printed out of high temp plastic for $23.

    We'll see how they fit when they come in. I had one ordered at +1% and the other at +2% to account for slight shrinkage with the annealing process (heating up in the oven to a specified temp for an hour). I'll see which fits best, or if I need to make adjustments and make another order. Hopefully I'll get it right on the first time, but there's no way of knowing how much it will shrink. Yay prototyping!
    swirl_flap_front_bushing

    Once I get them in and make sure I don't have to make any other adjustments, I'll post the cad drawing up for the rest of the 4.2 community.

    Edit 6/22/2017: I did not end up going this route, and instead found a complete intake from a D3 A8 that will do the trick. If you would like to continue this route yourself, here is a link to the CAD drawing. It still will need a bit of development and tweaking, but it surely can be made to work! I can only hope someone finds this, improves on it, and then gets alibaba or some dirt-cheap producer to make a million of these things for ~20 bucks a piece!
    https://www.tinkercad.com/things/5Z2...-front-bushing
    Last edited by 4Loops; 06-22-2017 at 09:49 AM.
    1999.5 A4 B5 4.2 Quattro (My V8 Swap Project)
    2002 Jetta TDI ALH
    2000 C5 A6 Partout (<--click here for link)
    2007 GL320 CDI

  38. #38
    Established Member Two Rings
    Join Date
    Mar 25 2015
    AZ Member #
    322589
    Location
    Finland

    Thats awesome if that 3D part works. And I don't know why it wouldn't. Real prototype stuff... :D

    I too managed to break the other bushing when I was pulling it out, but fortunately I was able to screw it back on and still do its job.

  39. #39
    Senior Member Two Rings 4Loops's Avatar
    Join Date
    Feb 21 2013
    AZ Member #
    109977
    My Garage
    1999.5 A4 B5 4.2 Quattro, 2007 GL320 CDI
    Location
    South Central Indiana

    Oil Cooler Pipe Replacement

    As I was browsing around other build forums, I saw many recommended changing the oil cooler pipe, as it is made of plastic and it breaks. There is an aftermarket pipe made of aluminum available from a couple of places.
    I got mine off of ebay for $27.50. I thought that it seemed a little much for just a simple aluminum pipe, but it is in such low demand, and the ones that I've seen are machined and not cast. Still though, the cost of the aluminum pipe is worth at least my time of never having to do this again. I could probably find another cheap plastic one, but it'd break after a few years too.

    Here's the aluminum replacement pipe for the oil cooler:
    DSC_1005
    Aluminum Audi oil cooler pipe for 4.2L V8 Engine A8, A6, RS6, Phaeton

    And here's the plastic pipe I removed, which was broken -as many say they do:
    DSC_1014
    DSC_1022

    And a bit still stuck in the block:
    DSC_1012

    Just a couple tips for removal of the oil cooler: You must remove the pipe going into it, there's a bolt on the oil cooler, and a bolt hidden behind the exhaust manifold:
    DSC_1006
    DSC_1007

    I decided to keep the gasket that was there. Mainly because I didn't have a replacement, secondly because I thought it would still hold fine. I hope this doesn't come back to bite me later:
    DSC_1018

    I also found that the alignment dowel was damaged from initial installation or from previous work. I decided to just shave the little nubbin off and reinstall:
    DSC_1026

    I'm glad I found that this could be an issue. It was on mine, and I'd probably recommend replacing this while you're there.
    1999.5 A4 B5 4.2 Quattro (My V8 Swap Project)
    2002 Jetta TDI ALH
    2000 C5 A6 Partout (<--click here for link)
    2007 GL320 CDI

  40. #40
    Senior Member Two Rings 4Loops's Avatar
    Join Date
    Feb 21 2013
    AZ Member #
    109977
    My Garage
    1999.5 A4 B5 4.2 Quattro, 2007 GL320 CDI
    Location
    South Central Indiana

    Axle, Hub, and Bearing Replacement

    While I had the engine out to install the spacer between the flywheel and the crank -as detailed in post #25, I noticed that my inner CV boot was torn (left side of the car, US driver-side). I was going to try to replace the boot, but noticed the outer boot was starting to crack and dry-rot a bit too, so I thought it wise to replace the whole axle. I replaced it with a remanufactured A1Cardone axle. It wasn't too expensive, ~$70. There were cheaper ones out there, but I started looking at reviews and where/how they were manufactured and I thought I'd lean toward quality since it didn't cost too much more than the cheapest axles out there.

    I did run into a problem though: My hub bolt was really frozen on there! My allen socket started stripping the bolt head. I thought I could either spend 2-3 hours trying to drill the head off the bolt, and ruin an expensive large bit, or I could just get my angle grinder out and a cutting disc and go to town on the bolt head (and unfortunately the hub too):
    DSC_1188
    DSC_1191

    I was able to remove the hub by fitting back in the wheel bolts and tightening them down until they hit the upright, pushing the hub off. (Don't worry, I'm not reusing these wheel bolts )
    DSC_1189
    DSC_1192

    Then I was able to use my wheel bearing press kit for a second time, this kit might actually start to pay off! -I got this last year to replace the hub bearing on the Jetta.
    DSC_1193

    Looks like it was actually a good thing I had to replace the bearing. Although I don't recall hearing any deep waah-waah-waah sounds while driving, I did find that the outer race had some pitting going on:
    DSC_1205

    And the inner hub faces had some big time groovin' goin on:
    DSC_1209

    This tells me I should probably do the bearing on the right side of the car, too at some point. It's probably in the same condition.

    I pressed my new bearing back into the upright, and grabbed my new hub. I started looking at how the hub was shaped while walking from the bench to the car, and noticed how one side of the hub is a larger diameter. Oh NO! I thought! I hope I didn't install that thing backwards! -Because it is just that way, the hub has an inner diameter that is smaller toward the inside of the car, and a larger diameter toward the outside. I had a 50-50 chance that I got it right. Upon closer inspection, it appeared chance sometimes works in my favor. I installed it correctly. Another example of not thinking while doing.. But I'm glad I didn't have to risk damaging it just to swap it around.
    Here's how the bearing should look when installed, with the larger inner diameter race facing outwards:
    DSC_1195
    DSC_1198

    Once installed:
    DSC_1200
    DSC_1201
    DSC_1202

    After all this madness was corrected, I was able to slide in my axle and bolt it into place pretty easily.
    I'll have to note that I need to still tighten the hub bolt to spec once I have the brake calipers reinstalled and/or the car sitting on its wheels.
    1999.5 A4 B5 4.2 Quattro (My V8 Swap Project)
    2002 Jetta TDI ALH
    2000 C5 A6 Partout (<--click here for link)
    2007 GL320 CDI

Page 1 of 9 123 ... LastLast


Bookmarks

Posting Permissions

  • You may not post new threads
  • You may not post replies
  • You may not post attachments
  • You may not edit your posts
  •  


    © 2001-2024 Audizine, Audizine.com, and Driverzines.com
    Audizine is an independently owned and operated automotive enthusiast community and news website.
    Audi and the Audi logo(s) are copyright/trademark Audi AG. Audizine is not endorsed by or affiliated with Audi AG.