Audizine - An Automotive Enthusiast Community

Page 3 of 5 FirstFirst 12345 LastLast
Results 81 to 120 of 178
  1. #81
    Veteran Member Four Rings
    Join Date
    Nov 13 2009
    AZ Member #
    50649
    Location
    the OC, SOCAL

    Guest-only advertisement. Register or Log In now!
    so you don't have your car yet or are you talking about the homelink unit?

  2. #82
    Active Member Two Rings
    Join Date
    Sep 17 2015
    AZ Member #
    356232
    Location
    Austin, TX

    Well, the HomeLink module from Europrice just came in the mail today.

    Here are some pictures: https://goo.gl/photos/BJf3EfkScev7ahwi9

    I will probably try to do the install over the weekend. One thing I noticed so far is that the cable comes with two connectors for hooking up the homelink module to the car but per the label on the cable you are only supposed to use one or the other but the information on the label is vague. It reads "USE THIS SIDE WITH "HIGH" VERSION OF OVERHEAD CONSOLE". What the heck does "HIGH" mean?
    Last edited by six.machete; 03-16-2016 at 07:53 AM.
    2015 S3 Prestige | Sepang Blue | Pinnacle 30 Tint | Suntek PPF |

  3. #83
    Senior Member Two Rings JonnyQ's Avatar
    Join Date
    Sep 15 2006
    AZ Member #
    11343
    My Garage
    2003 A4 3.0 quattro 6spd
    Location
    Long Island, NY

    Typically 'high' will refer to highline. Are there 2 types of overhead consoles in A3s, one having more features than another?

    I am actually interested in this for a Golf R as it also does not have Homelink available either. Would you be able to post some dimensions of the button unit? And also a pic of the back of the button unit? So I could see how I may fit it? Can the buttons be separated from bezel?

    It looks almost like the Brandmotion unit..perhaps Audi licenses it. The Audi buttons look nicer though IMO


    Quote Originally Posted by six.machete View Post
    Well, the HomeLink module from Europrice just came in the mail today.

    I don't know how to insert pictures. The best I can do is to share a link to my google photos: https://goo.gl/photos/WcsFLYZn1ngAj7jSA

    I will probably try to do the install over the weekend. One thing I noticed so far is that the cable comes with two connectors for hooking up the homelink module to the car but per the label on the cable you are only supposed to use one or the other but the information on the label is vague. It reads "USE THIS SIDE WITH "HIGH" VERSION OF OVERHEAD CONSOLE". What the heck does "HIGH" mean?

  4. #84
    Veteran Member Four Rings
    Join Date
    Nov 13 2009
    AZ Member #
    50649
    Location
    the OC, SOCAL

    thanks for the pics guys.
    i hope you guys can teach us the main hard part. how to cut the overhead properly.
    also when i tested it by taking out the overhead panel i couldnt figure out how to take out the white section. i was only able to pop out the black section.

  5. #85
    Active Member Two Rings
    Join Date
    Sep 17 2015
    AZ Member #
    356232
    Location
    Austin, TX

    Quote Originally Posted by JonnyQ View Post
    Typically 'high' will refer to highline. Are there 2 types of overhead consoles in A3s, one having more features than another?

    I am actually interested in this for a Golf R as it also does not have Homelink available either. Would you be able to post some dimensions of the button unit? And also a pic of the back of the button unit? So I could see how I may fit it? Can the buttons be separated from bezel?

    It looks almost like the Brandmotion unit..perhaps Audi licenses it. The Audi buttons look nicer though IMO
    I added a few more pics to the above link with a ruler as background.
    2015 S3 Prestige | Sepang Blue | Pinnacle 30 Tint | Suntek PPF |

  6. #86
    Active Member Two Rings
    Join Date
    Nov 16 2013
    AZ Member #
    130441
    Location
    doe

    Quote Originally Posted by six.machete View Post
    Well, the HomeLink module from Europrice just came in the mail today.

    I don't know how to insert pictures. The best I can do is to share a link to my google photos: https://goo.gl/photos/WcsFLYZn1ngAj7jSA

    I will probably try to do the install over the weekend. One thing I noticed so far is that the cable comes with two connectors for hooking up the homelink module to the car but per the label on the cable you are only supposed to use one or the other but the information on the label is vague. It reads "USE THIS SIDE WITH "HIGH" VERSION OF OVERHEAD CONSOLE". What the heck does "HIGH" mean?
    mine is on the way too. I will probably find an audi specialist to install mine. but I am curious to see your result and whether its very difficult to do.

  7. #87
    Established Member Two Rings ECP's Avatar
    Join Date
    Oct 13 2014
    AZ Member #
    288561

    I'm curious what the harness plugs into. Assuming somewhere with in the over head light area

  8. #88
    Veteran Member Four Rings
    Join Date
    Nov 13 2009
    AZ Member #
    50649
    Location
    the OC, SOCAL

    Quote Originally Posted by ECP View Post
    I'm curious what the harness plugs into. Assuming somewhere with in the over head light area
    the t-harness plugs between the overhead light harness and the power. I would like to see the step by step installation too.

  9. #89
    Veteran Member Four Rings
    Join Date
    Nov 13 2009
    AZ Member #
    50649
    Location
    the OC, SOCAL

    I got another quote from another dealership and they wanted:

    homelink part = $350
    labor = 610

    total = $960

    I'm thinking the tool should be about $500.

  10. #90
    Established Member Two Rings ECP's Avatar
    Join Date
    Oct 13 2014
    AZ Member #
    288561

    Quote Originally Posted by 949 View Post
    I got another quote from another dealership and they wanted:

    homelink part = $350
    labor = 610

    total = $960

    I'm thinking the tool should be about $500.
    What tool is needed?

  11. #91
    Veteran Member Four Rings
    Join Date
    Nov 13 2009
    AZ Member #
    50649
    Location
    the OC, SOCAL

    the cutting tool. you will need to do a clean cut in the headliner up top next to the the buttons for the light. it keeps the hole your making straight and lined up so that it doesn't make the cut look like you did it free hand.

    this tool has been mentioned before in this thread.

  12. #92
    Established Member Two Rings ECP's Avatar
    Join Date
    Oct 13 2014
    AZ Member #
    288561

    Quote Originally Posted by 949 View Post
    the cutting tool. you will need to do a clean cut in the headliner up top next to the the buttons for the light. it keeps the hole your making straight and lined up so that it doesn't make the cut look like you did it free hand.

    this tool has been mentioned before in this thread.
    Thank you for the info. Curious what took looks like now

  13. #93
    Established Member Two Rings ECP's Avatar
    Join Date
    Oct 13 2014
    AZ Member #
    288561

    Any pics, part number for this tool? I have a buddy who works at Audi and will look into this if I can find out some more info

  14. #94
    Senior Member Two Rings
    Join Date
    Jan 23 2011
    AZ Member #
    69872
    Location
    Planet Earth

    My concern would be the headliner sagging after a few years around the cut if you don't know what you are doing. VAG cars have crap glue and tend to sag anyways over time.

  15. #95
    Veteran Member Three Rings
    Join Date
    Aug 06 2012
    AZ Member #
    98202
    Location
    san diego

    yeah but can't you tell that they really, really, REALLY, REEEEEEEEEEEEEEEEEAAAAAAAAAAALLLLLLLY want a homelink?

    at this point these guys are willing to sacrifice their first born child to the Homelink gods...

  16. #96
    Veteran Member Four Rings
    Join Date
    Nov 13 2009
    AZ Member #
    50649
    Location
    the OC, SOCAL

    Quote Originally Posted by ECP View Post
    Any pics, part number for this tool? I have a buddy who works at Audi and will look into this if I can find out some more info
    oh wow. I cant even get the tool number. I called around town and also audi usa. no one is willing to help.

    tell your friend the tool can bee seen on their installation online manual. from there he will need to help us out as everyone at audi here doesn't know and doesn't care to help out. they have the tool but wont help find it for me to buy one.

  17. #97
    Established Member Two Rings ECP's Avatar
    Join Date
    Oct 13 2014
    AZ Member #
    288561

    Quote Originally Posted by 949 View Post
    oh wow. I cant even get the tool number. I called around town and also audi usa. no one is willing to help.

    tell your friend the tool can bee seen on their installation online manual. from there he will need to help us out as everyone at audi here doesn't know and doesn't care to help out. they have the tool but wont help find it for me to buy one.
    Thanks, on it

  18. #98
    Junior Member Two Rings
    Join Date
    Aug 30 2014
    AZ Member #
    279016
    My Garage
    Wife's 2022 Volvo XC40
    Location
    United States

    The Fast, Cheap and Easy Option

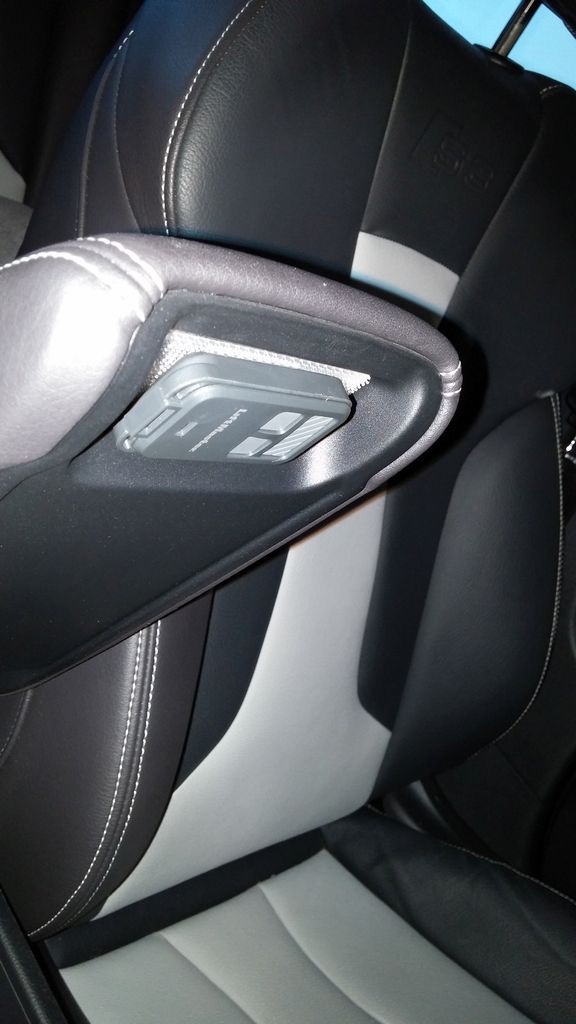
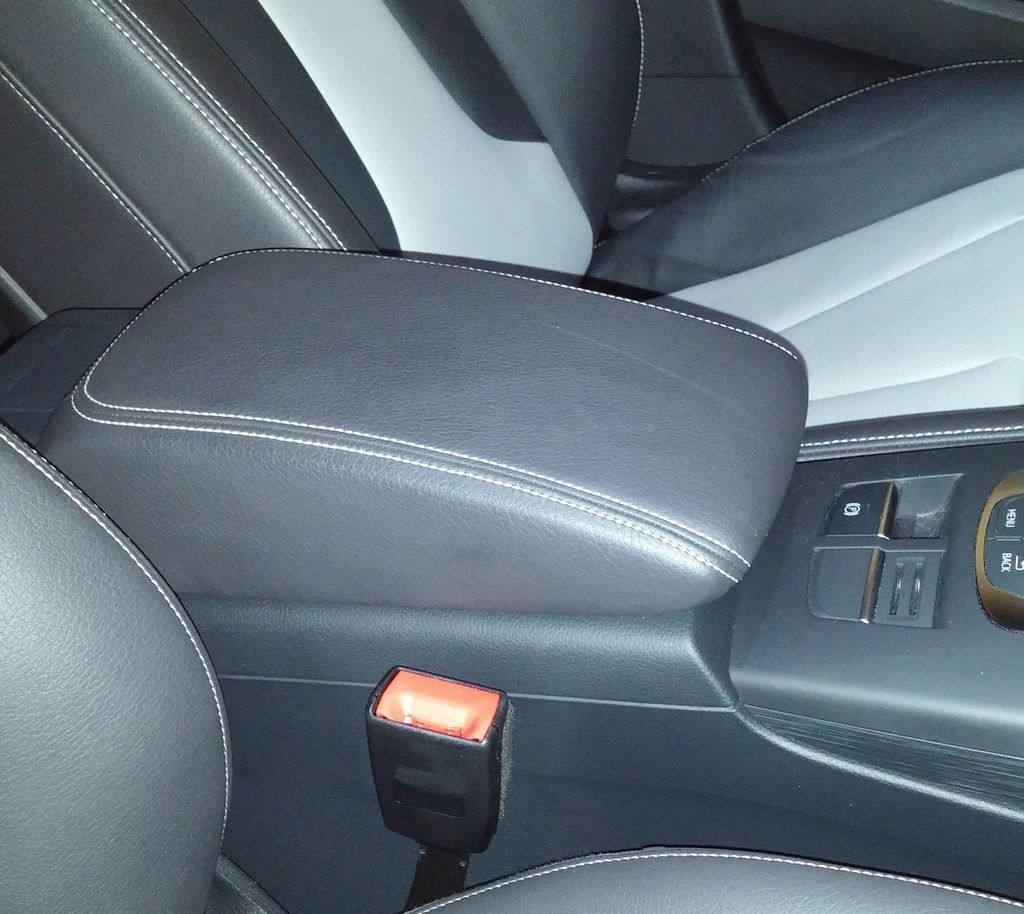
    If you only use the homelink to open your garage doors, you may want to consider an option like this. This mini-remote is $23.00 on Amazon. When the armrest is slid forward (as I prefer it anyhow), the buttons fall readily to my index finger and are easily distinguishable by shape and position. It's actually much easier than lifting your arm and peering at homelink buttons up in the headliner.


    2015 S3: Glacier White over Black/Titanium w/ Prestige/Adv Tech/19" Sport Pkg

  19. #99
    Active Member Two Rings
    Join Date
    Nov 16 2013
    AZ Member #
    130441
    Location
    doe

    Quote Originally Posted by six.machete View Post
    Well, the HomeLink module from Europrice just came in the mail today.

    I don't know how to insert pictures. The best I can do is to share a link to my google photos: https://goo.gl/photos/WcsFLYZn1ngAj7jSA

    I will probably try to do the install over the weekend. One thing I noticed so far is that the cable comes with two connectors for hooking up the homelink module to the car but per the label on the cable you are only supposed to use one or the other but the information on the label is vague. It reads "USE THIS SIDE WITH "HIGH" VERSION OF OVERHEAD CONSOLE". What the heck does "HIGH" mean?
    odd or funny, dont know which, read the documentation or what I could see of it in your pics and its by.... gentex, the same company that makes homelink units for other audi/vw cars.

  20. #100
    Active Member Two Rings
    Join Date
    Nov 02 2014
    AZ Member #
    292631
    My Garage
    2016 Audi Q3, 2015 Audi S3, 2015 Lexus RC F, 2015 GMC Yukon XL Denali, 2010 Camaro SS
    Location
    NJ

    bump to the thread... any of you guys complete your install - waiting patiently... :-)

  21. #101
    Established Member Two Rings ECP's Avatar
    Join Date
    Oct 13 2014
    AZ Member #
    288561

    homelink for the 2015 s3's

    A buddy cut it free handed and came out perfect! Let me know if anyone in the NJ area is looking for someone to install.


    What was used for reference to remove the overhead pieces

    Last edited by ECP; 10-24-2015 at 12:16 PM.

  22. #102
    Veteran Member Four Rings
    Join Date
    Nov 13 2009
    AZ Member #
    50649
    Location
    the OC, SOCAL

    it looks great.

    did you guys take pics of the work and make a diy to help us on here?
    especially the cutting process.

  23. #103
    Established Member Two Rings ECP's Avatar
    Join Date
    Oct 13 2014
    AZ Member #
    288561

    Quote Originally Posted by 949 View Post
    it looks great.

    did you guys take pics of the work and make a diy to help us on here?
    especially the cutting process.
    Sadly I did not, I walked away. I couldn't watch him cut it. I do know that once the over head assembly is removed, the inner locking piece literally just sits in one spot. He took a pen and made the outline then made the cut. It was done and over with in mins. We also installed power folding mirrors so I was busy working on the drivers door trim

  24. #104
    Senior Member Two Rings gaogi's Avatar
    Join Date
    May 08 2005
    AZ Member #
    6409
    My Garage
    2008 S4 Avant 6MT
    Location
    Irvine, CA

    Interested in learning more about the power folding mirror install. How complicated was the retrofit?


    Sent from my iPad using Tapatalk
    2024 Glacier White RS3
    B6 ('02) -> C6 ('06) -> B7 ('08) -> MK6 ('11) -> 8V ('15) -> 8Y ('24)

  25. #105
    Veteran Member Four Rings
    Join Date
    Nov 13 2009
    AZ Member #
    50649
    Location
    the OC, SOCAL

    when dropping the overhead, are there any screws to take out?

  26. #106
    Established Member Two Rings ECP's Avatar
    Join Date
    Oct 13 2014
    AZ Member #
    288561

    Quote Originally Posted by gaogi View Post
    Interested in learning more about the power folding mirror install. How complicated was the retrofit?


    Sent from my iPad using Tapatalk
    Procedure is straight forward. Remove door panel, remove speaker and reach up to remove the 2 clips for the mirror harness then unbolt mirror. Swap over the outer cover and glass then reverse procedure for install. You'll need vcds to code, over all it was an hr max for the mirror swapping.

    Quote Originally Posted by 949 View Post
    when dropping the overhead, are there any screws to take out?
    No screws, all clips

  27. #107
    Veteran Member Four Rings
    Join Date
    Nov 13 2009
    AZ Member #
    50649
    Location
    the OC, SOCAL

    how many clips are there and where are the locations?

    thanks

  28. #108
    Senior Member Two Rings gaogi's Avatar
    Join Date
    May 08 2005
    AZ Member #
    6409
    My Garage
    2008 S4 Avant 6MT
    Location
    Irvine, CA

    ECS has a good guide. You don't need to separate the outer panel though, it can come of add one piece.

    http://bd8ba3c866c8cbc330ab-7b26c6f3...ghting_Kit.pdf

    Sent from my LG-D851 using Tapatalk
    2024 Glacier White RS3
    B6 ('02) -> C6 ('06) -> B7 ('08) -> MK6 ('11) -> 8V ('15) -> 8Y ('24)

  29. #109
    Established Member Two Rings ECP's Avatar
    Join Date
    Oct 13 2014
    AZ Member #
    288561

    Quote Originally Posted by 949 View Post
    how many clips are there and where are the locations?

    thanks
    One big clip towards the windshield. Just need to get a good grab of the panel and give it a good tug

    Here's some close up pics


  30. #110
    Active Member Two Rings
    Join Date
    Nov 16 2013
    AZ Member #
    130441
    Location
    doe

    so the audi oem unit is a straight plug and play install aside from the headliner cut? my salesman thought the power was coming from a panel near the steering wheel. I told him the power comes from the overhead that feeds the mirror so I would like confirmation.

  31. #111
    Established Member Two Rings ECP's Avatar
    Join Date
    Oct 13 2014
    AZ Member #
    288561

    Quote Originally Posted by OneOfOne View Post
    so the audi oem unit is a straight plug and play install aside from the headliner cut? my salesman thought the power was coming from a panel near the steering wheel. I told him the power comes from the overhead that feeds the mirror so I would like confirmation.
    Straight plug and play. Seems the dealers aren't educated on homelink, at least the ones around me.

    Order it and install yourself

  32. #112
    Stage 2 Banner Advertiser Four Rings
    Join Date
    Aug 07 2008
    AZ Member #
    31696
    Location
    Dallas, TX

    Quote Originally Posted by OneOfOne View Post
    so the audi oem unit is a straight plug and play install aside from the headliner cut? my salesman thought the power was coming from a panel near the steering wheel. I told him the power comes from the overhead that feeds the mirror so I would like confirmation.
    Power comes from the overhead lighting console.

    Quote Originally Posted by ECP View Post
    Straight plug and play. Seems the dealers aren't educated on homelink, at least the ones around me.

    Order it and install yourself
    I've spoken to a few dealerships/service dept's to see who was familiar with the installation, nobody has a clue from what I've seen. The installation isn't hard if you are willing to free-hand cut the headliner.

    Cheers,
    Alexander van Gerbig
    www.europrice.us
    [email protected]


  33. #113
    Established Member Two Rings ECP's Avatar
    Join Date
    Oct 13 2014
    AZ Member #
    288561

    Quote Originally Posted by Alex@Europrice View Post
    Power comes from the overhead lighting console.


    I've spoken to a few dealerships/service dept's to see who was familiar with the installation, nobody has a clue from what I've seen. The installation isn't hard if you are willing to free-hand cut the headliner.

    Cheers,
    Thank you for your service during my purchase, absolutely amazing to deal with.

  34. #114
    Active Member Two Rings
    Join Date
    Sep 17 2015
    AZ Member #
    356232
    Location
    Austin, TX

    I finally had some time to install the Homelink module, well sorta...

    Here are some photos: https://goo.gl/photos/BJf3EfkScev7ahwi9

    Tools:
    1. Exacto knife or similar and replacement blades.
    2. Small flat screwdriver to unlock some of the connectors inside the overhead console.
    3. Small plastic tool or similar to remove the black part of the overhead console.
    4. A file folder and some scotch tape to make a template of the homelink.
    5. Patience.
    6. Beer (optional)

    Steps:
    1. Remove the overhead console (the black part)
    This one is easy, just pull from the back gently. I used a plastic tool but you could probably use your fingers.

    2. Remove the white section of the overhead console.
    This took me some time to figure out because it is firmly attached so I was looking for screws but it is only secured with 3 metal clips. I just pulled straight down by sticking my fingers in the openings on each side of the sunroof switch. The clips are holding the back of the console. The front is held by two tongues. Once the back comes down the front slides out.

    3. Then I proceeded to disconnect the white part from all the connectors. Most of them you can remove with just your fingers. At least one you need a small screwdriver to push the pin in to pull it out.

    4. From a file folder, I made a template of the faceplate of the homelink so I could present it and determine where I needed to cut. I used the photos from the internet as a reference. Although it appears you have some room to move left or right (closer or away from the windshield) you definitely do not have much room to play. the thickness of the homelink module prevents you from installing it any closer to the windshield. Mine ended up like 1/8" from touching the inside of the roof.

    5. I taped the template onto the headliner and went at it using the exacto knife. I made a small hole thinking I could work my way towards the final opening, this was a mistake. The headliner is made out of fiberglass and the blade got dull in no time, furthermore making a hole in the center just removes rigidity to the whole thing making further cuts more difficult. Oh well, live and learn. After a few tries the faceplate went in with no problems.

    6. I thought the order of installation was, faceplate in, then install bracket to secure the faceplate, then install the module, well nope. There is no room to install the module with the faceplate installed; the roof is right there. So you have to present the bracket in the hole from the inside along with the module, then push the faceplate in, BUT BUT first make sure the right connector is plugged in the module (you have one labeled "high" and my console says "high" on the inside). I thought I had done this but I plugged in the wrong cable into the module and there's almost no room to unplug it and once the homelink module is installed there's no way you can remove it. So this is where I'm stuck. I did not dare to power up the whole thing to see if it would work on the fear that I would fry the whole thing. So I will try unplugging the connector using a paper clip and a telescopic mirror and some patiente.

    11/4/15: After an hour or so, I managed to disconnect the wrong cable (the non-high) from the homelink module using an "Oral Care Kit", yeap you heard that right. Using the hook and the mirror from the kit I managed to unclip the connector, pull it out and guide the new connector into the module until it clicked. Put everything back together, programmed the buttons and it worked the first time.

    Tip: After I reinstalled the white section of the console I noticed how the metal clips on the sides were holding the console in place. I suggest being careful when removing the white section as these clips could bend outwards instead of flexing inwards when pulling down on the console.
    Last edited by six.machete; 11-12-2015 at 05:58 PM.
    2015 S3 Prestige | Sepang Blue | Pinnacle 30 Tint | Suntek PPF |

  35. #115
    Stage 2 Banner Advertiser Four Rings
    Join Date
    Aug 07 2008
    AZ Member #
    31696
    Location
    Dallas, TX

    Quote Originally Posted by ECP View Post
    Thank you for your service during my purchase, absolutely amazing to deal with.
    Thank you for your kind words.

    six.machete- You can manually enter photos by using this tag [IMG] URL of your photo [/IMG]. You can also click the icon that looks like a picture (left of the film icon) and then enter the URL there and the forum will create your tags for you.

    Cheers,
    Alexander van Gerbig
    www.europrice.us
    [email protected]


  36. #116
    Active Member Two Rings
    Join Date
    Nov 16 2013
    AZ Member #
    130441
    Location
    doe

    my car is at the dealership. it arrived wedneday. I am going to send the pics to the salesman to give to the tech along with the written instructions. hopefully they can install it in time for my pickup on monday. thanks a lot contributors!

  37. #117
    Active Member Two Rings
    Join Date
    Nov 16 2013
    AZ Member #
    130441
    Location
    doe

    SUCCESS! the install went without a hitch. it works like a charm. thanks europrice.

  38. #118
    Stage 2 Banner Advertiser Four Rings
    Join Date
    Aug 07 2008
    AZ Member #
    31696
    Location
    Dallas, TX

    Quote Originally Posted by OneOfOne View Post
    SUCCESS! the install went without a hitch. it works like a charm. thanks europrice.
    Glad to hear! You're welcome and if you need anything else just let me know any time.

    Cheers,
    Alexander van Gerbig
    www.europrice.us
    [email protected]


  39. #119
    Active Member One Ring
    Join Date
    Nov 12 2015
    AZ Member #
    364341
    Location
    Dallas

    Hey what happened to your photos???

  40. #120
    Active Member One Ring
    Join Date
    Nov 12 2015
    AZ Member #
    364341
    Location
    Dallas

    Hey, what happened to the photo link for installation?

Bookmarks

Posting Permissions

  • You may not post new threads
  • You may not post replies
  • You may not post attachments
  • You may not edit your posts
  •  


    © 2001-2025 Audizine, Audizine.com, and Driverzines.com
    Audizine is an independently owned and operated automotive enthusiast community and news website.
    Audi and the Audi logo(s) are copyright/trademark Audi AG. Audizine is not endorsed by or affiliated with Audi AG.