Audizine - An Automotive Enthusiast Community

Page 2 of 4 FirstFirst 1234 LastLast
Results 41 to 80 of 127
  1. #41
    Senior Member Four Rings
    Join Date
    Feb 13 2015
    AZ Member #
    315101
    Location
    Albany NY

    Guest-only advertisement. Register or Log In now!
    Anyone have a part number for this o-ring? I don't believe this one is in this Timing Chain FAQ..

  2. #42
    Veteran Member Four Rings gcoy's Avatar
    Join Date
    Apr 06 2009
    AZ Member #
    40835
    My Garage
    2005 B6 S4 6mt Avant & 2001 B5 S4 6mt Avant (Sold) & 2007 VW Passat 3.6 4Mo wagon
    Location
    Boise Id

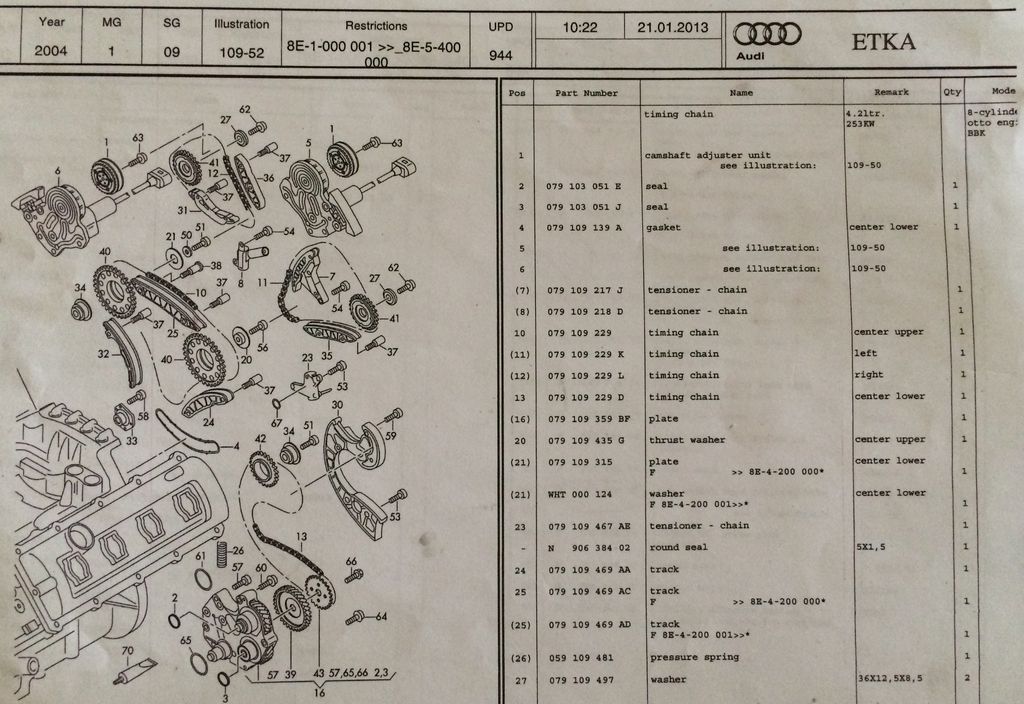
    I just dug through my paper work & this is what I found.

    [IMG][/IMG]

    [IMG][/IMG]

    In the second pic, the seal #67 is listed under part #23 as #N 906 384 02

    I looked at my parts list that I ordered when I did this job. I did not order this seal.
    I went out to the garage and looked at my old timing parts and there was no seal on the old tensioner.
    I must have reused this seal.

    I hope this helps....

  3. #43
    Senior Member Three Rings FormulaElement's Avatar
    Join Date
    Jul 02 2013
    AZ Member #
    118216
    Location
    406, MT

    I re-used the old seal and put a very little amount of sealant on it. I actually did that with all of tensioners.

    I used Reinzosil on everything that i needed to seal and its worked perfect. Definitely recommend it over the OEM Loctite stuff

  4. #44
    Senior Member Four Rings
    Join Date
    Feb 13 2015
    AZ Member #
    315101
    Location
    Albany NY

    Quote Originally Posted by gcoy View Post
    I just dug through my paper work & this is what I found.

    [IMG][/IMG]

    [IMG][/IMG]

    In the second pic, the seal #67 is listed under part #23 as #N 906 384 02

    I looked at my parts list that I ordered when I did this job. I did not order this seal.
    I went out to the garage and looked at my old timing parts and there was no seal on the old tensioner.
    I must have reused this seal.

    I hope this helps....
    Awesome post! Thanks Sir!

  5. #45
    Veteran Member Four Rings SlickFix's Avatar
    Join Date
    Nov 11 2010
    AZ Member #
    66868
    Location
    Rochester, MN

    This thread keeps getting better and better. Thanks to all of the contributors!

    A couple questions:

    - Is most everyone using the Bentley guide for this job? I don't have it yet, only because it isn't supported on Windows 7.

    - Where does one get a copy of ETKA? Is a torrent the only realistic way without spending thousands of dollars?

    If you'd rather PM me regarding ETKA, I understand and appreciate it.
    His: 2012 Moonlight Blue Metallic S5 Prestige
    Hers: 2014 Lava Gray Metallic Q5 2.0T
    Son's: 2005.5 Imola Yellow B7 S4 4.2 Sedan
    19" B8 S5 Peelers

  6. #46
    Veteran Member Four Rings badger.'s Avatar
    Join Date
    Mar 31 2014
    AZ Member #
    168335
    My Garage
    '18 RS3 | '05 S4 Avant
    Location
    KY

    Quote Originally Posted by VR6OhMy View Post
    Anyone have a part number for this o-ring? I don't believe this one is in this Timing Chain FAQ..
    It's not in the Timing FAQ or any of JHMs kits from as much as I can tell, unless it is preinstalled on the new tensioner.. Maybe Jake can chime in on the degree of necessity of this and/or why it isn't in the kits if the stuff from gcoy says to replace it? I didn't. I can't see it causing catastrophic failure immediately but I don't know the long term ramifications of lacking that oring.


    Quote Originally Posted by gcoy View Post
    I just dug through my paper work & this is what I found.
    I looked at my parts list that I ordered when I did this job. I did not order this seal.
    I went out to the garage and looked at my old timing parts and there was no seal on the old tensioner.
    I must have reused this seal.

    I hope this helps....

    Did you actually re-use it or remember re-using it? I wonder if anyone else that has done the timing work has missed this one. I'd be curious to hear. Either way, I hope to fire it up tomorrow if I can find a store open that sells power steering fluid. I thought I had enough but I don't think I do. Engine is back in. Piggies are done. Just some electrical plugs, coolant lines, and the front end need to go back together.
    '18 RS3 Glacier White: DS1 Stg 2 | Wagner EVO1 IC | 034 4" Turbo Inlet | 034 4" Intake
    '05 S4 Avant Brilliant Red: JHM Tune | JHMv1 Headers | Fast Intentions Catback | Ported IM & Spacers | JHM LWCP | JHM ATF Cooler | Thor Skid Plate | Koni Yellows | Apikol Rear Diff | JHM LW Rotors | AudioQ 1200D w/Dual 10" CVRs
  7. #47
    Veteran Member Four Rings badger.'s Avatar
    Join Date
    Mar 31 2014
    AZ Member #
    168335
    My Garage
    '18 RS3 | '05 S4 Avant
    Location
    KY

    Quote Originally Posted by SlickFix View Post
    This thread keeps getting better and better. Thanks to all of the contributors!

    A couple questions:

    - Is most everyone using the Bentley guide for this job? I don't have it yet, only because it isn't supported on Windows 7.

    - Where does one get a copy of ETKA? Is a torrent the only realistic way without spending thousands of dollars?

    If you'd rather PM me regarding ETKA, I understand and appreciate it.

    I bought the Bentley, it is useful for torque specs and some diagrams. Some of it is confusing. It is written assuming you have all the little Audi/VW tools. I'd say overall it was well worth it.

    I got it running on windows 7 using Virtual PC - XP mode (free download if you have win 7 pro/ultimate maybe?)

    Also once you activate there is an online version, which is just as good if not better (because you can print/save pdf much easier than through virtual PC) I've just been using that, works great. Keep the laptop in the garage with me for quick reference.
    '18 RS3 Glacier White: DS1 Stg 2 | Wagner EVO1 IC | 034 4" Turbo Inlet | 034 4" Intake
    '05 S4 Avant Brilliant Red: JHM Tune | JHMv1 Headers | Fast Intentions Catback | Ported IM & Spacers | JHM LWCP | JHM ATF Cooler | Thor Skid Plate | Koni Yellows | Apikol Rear Diff | JHM LW Rotors | AudioQ 1200D w/Dual 10" CVRs

  8. #48
    Active Member Two Rings Foot's Avatar
    Join Date
    Oct 13 2010
    AZ Member #
    65616
    My Garage
    1991 Audi V8 quattro 5 speed
    Location
    Bellevue, NE

    Quote Originally Posted by badger. View Post
    I did not transfer this other circular o-ring. Nothing has mentioned it! This is the first I've heard. What are the consequences? I am ready to put the engine back in tomorrow morning and really not going to pull it all apart again.
    My guess is that you'll have an internal oil leak that causes that tentioner to bounce a bit with the chain (just like in your video), but since the new RS4 chain guide is metal on that chain maybe it'll survive. I totally understand why you don't want to open it up again. Maybe lots of people don't put it in since it's not in the JHM kit? I'd like to hear what Jake says too. Or maybe that o-ring fails and breaks that stupid guide everybody's been talking about. lol Let us know if it has any start up rattle.

    I had broken chain guide and bad mechanical adjusters and bad oil check valves. My engine had terrible chain rattle on start up and warm start too. It now has no rattle (I also replaced the oil check valves and mechanical adjusters)


    wobbled out adjuster:


    So if you have rattle and I don't ...it may be that little o-ring.
    2004 Audi S4 6 speed Nogaro Blue
    1991 Audi V8 quattro 5 speed Pearl White

  9. #49
    Senior Member Three Rings FormulaElement's Avatar
    Join Date
    Jul 02 2013
    AZ Member #
    118216
    Location
    406, MT

    Mine still has a cold rattle (a second) using that o-ring and sealant on the tensioners with new check valves... I can live with it since i have the peace of mind at this point. The only other causes for the rattle are a oil pump not running at 100% or the oil type/weight. I will try different oils now, i did before but none helped the rattle. My guide was broken in half though.

    If you forgot the o-ring i highly doubt that it will cause any problems. But it's still strange that JHM doesn't include it in their kit when that chain/guide are the most prone to breaking. Maybe they don't think it's needed with the metal guide or its hard to source?

  10. #50
    Veteran Member Three Rings
    Join Date
    Feb 18 2014
    AZ Member #
    146977
    Location
    Arizona

    interesting info about these o-rings, and great thread! my understanding is that the tensioners are hydraulically pressurized with engine oil, and that one cause of startup rattle is from a lack of sufficient oil pressure inside the tensioners? I wonder if this o-ring goes around the oil port, and if not installing it could cause problems where the tensioner doesn't reach the proper internal oil pressure and/or loses pressure too quickly/easily? maybe that could explain why some people still have the rattle after doing the timing chain work?

  11. #51
    Veteran Member Four Rings SlickFix's Avatar
    Join Date
    Nov 11 2010
    AZ Member #
    66868
    Location
    Rochester, MN

    Quote Originally Posted by badger. View Post
    Also once you activate there is an online version, which is just as good if not better (because you can print/save pdf much easier than through virtual PC) I've just been using that, works great. Keep the laptop in the garage with me for quick reference.
    I did not know that! That's great news, and has removed any last doubt about purchasing.
    His: 2012 Moonlight Blue Metallic S5 Prestige
    Hers: 2014 Lava Gray Metallic Q5 2.0T
    Son's: 2005.5 Imola Yellow B7 S4 4.2 Sedan
    19" B8 S5 Peelers

  12. #52
    Veteran Member Four Rings Slow4's Avatar
    Join Date
    Dec 02 2007
    AZ Member #
    23048
    My Garage
    2020 Ford PIU, 2017 D675R
    Location
    DC/MD/(VA)

    Finally Doing Timing with 164k on the Clock!

    When we did my refresh, the seal in question was re-used. I don't recall it being on my list of items I purchased via GAP.
    2015 B8 SQ5
    Click Here
    ---
    Past
    2001 B5 S4 | 2005 B6 S4 AVANT | 2013 Allroad P+ | 2013 B8.5 A4 P+


  13. #53
    Veteran Member Four Rings badger.'s Avatar
    Join Date
    Mar 31 2014
    AZ Member #
    168335
    My Garage
    '18 RS3 | '05 S4 Avant
    Location
    KY

    Quote Originally Posted by 2004B6S4 View Post
    interesting info about these o-rings, and great thread! my understanding is that the tensioners are hydraulically pressurized with engine oil, and that one cause of startup rattle is from a lack of sufficient oil pressure inside the tensioners? I wonder if this o-ring goes around the oil port, and if not installing it could cause problems where the tensioner doesn't reach the proper internal oil pressure and/or loses pressure too quickly/easily? maybe that could explain why some people still have the rattle after doing the timing chain work?
    This is similar to my line of thinking. But hard to say. It has to cover an oil port on the block otherwise it would serve no purpose. But the oring in there is fairly deformed/flat. Is the new one so flat? Idk


    '18 RS3 Glacier White: DS1 Stg 2 | Wagner EVO1 IC | 034 4" Turbo Inlet | 034 4" Intake
    '05 S4 Avant Brilliant Red: JHM Tune | JHMv1 Headers | Fast Intentions Catback | Ported IM & Spacers | JHM LWCP | JHM ATF Cooler | Thor Skid Plate | Koni Yellows | Apikol Rear Diff | JHM LW Rotors | AudioQ 1200D w/Dual 10" CVRs

  14. #54
    Veteran Member Four Rings BCsniper's Avatar
    Join Date
    Jan 29 2010
    AZ Member #
    54160
    My Garage
    B6 S4 6MT Avant, B6 3.0 Avant 6MT (for sale), C5 A6 2.8
    Location
    north ga

    Quote Originally Posted by badger. View Post
    It's not in the Timing FAQ or any of JHMs kits from as much as I can tell, unless it is preinstalled on the new tensioner.. Maybe Jake can chime in on the degree of necessity of this and/or why it isn't in the kits if the stuff from gcoy says to replace it?
    it's definitely not pre-installed on the new tensioner. I had to pull the o-ring off the old one and transfer it to the new one. I saw that my instructions said to replace it. First thing I thought when I read it was how JHM says "includes all bolts, o-rings, and seals needed to do the job".


    Also JHM includes another seal that goes from the accessory gear to the power steering pump. Is anybody really replacing this?

    Getting to that piece means removing that whole gear-drive assembly out which also includes another seal and a few more o-rings that would need to be replaced. Why even include this one seal that nobody is going to use? And if you are going to include it, why not supply the other seal and 3 o-rings that would be needed just to get to it?


    also, sorry if this is a dumb question but where do the two o-rings go that are in the center of the JHM kit?


  15. #55
    Veteran Member Four Rings Slow4's Avatar
    Join Date
    Dec 02 2007
    AZ Member #
    23048
    My Garage
    2020 Ford PIU, 2017 D675R
    Location
    DC/MD/(VA)

    Finally Doing Timing with 164k on the Clock!

    Quote Originally Posted by BCsniper View Post

    also, sorry if this is a dumb question but where do the two o-rings go that are in the center of the JHM kit?

    Maybe they're suppose to be the diamond cut washers that are suppose to go between the adjusters? I'll have to ask Jimmy but that was something I NEEDED to order extra.

    I don't remember if he used them or not; I was probably too busy messing around with the cylinder heads.
    2015 B8 SQ5
    Click Here
    ---
    Past
    2001 B5 S4 | 2005 B6 S4 AVANT | 2013 Allroad P+ | 2013 B8.5 A4 P+


  16. #56
    Veteran Member Four Rings badger.'s Avatar
    Join Date
    Mar 31 2014
    AZ Member #
    168335
    My Garage
    '18 RS3 | '05 S4 Avant
    Location
    KY

    Ok ready for next round of pictures..

    Replaced that damn green o-ring! Only set me back about a day.


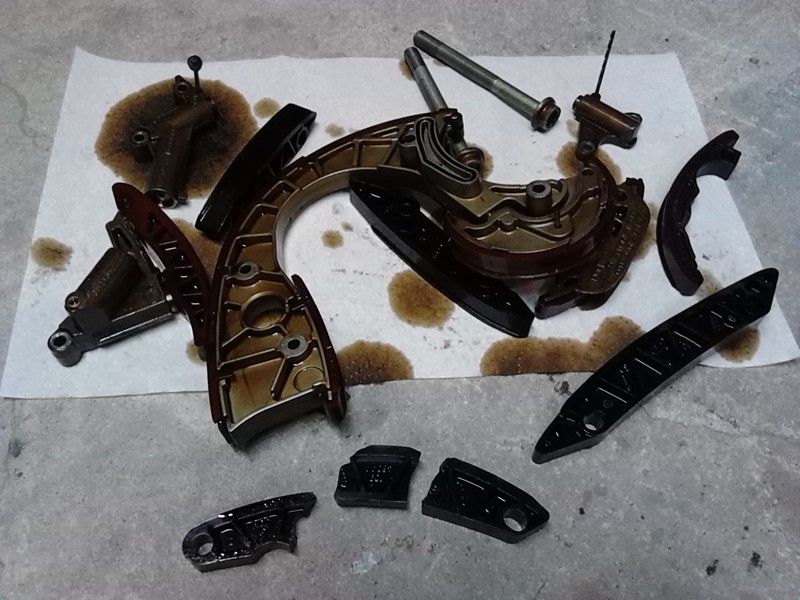
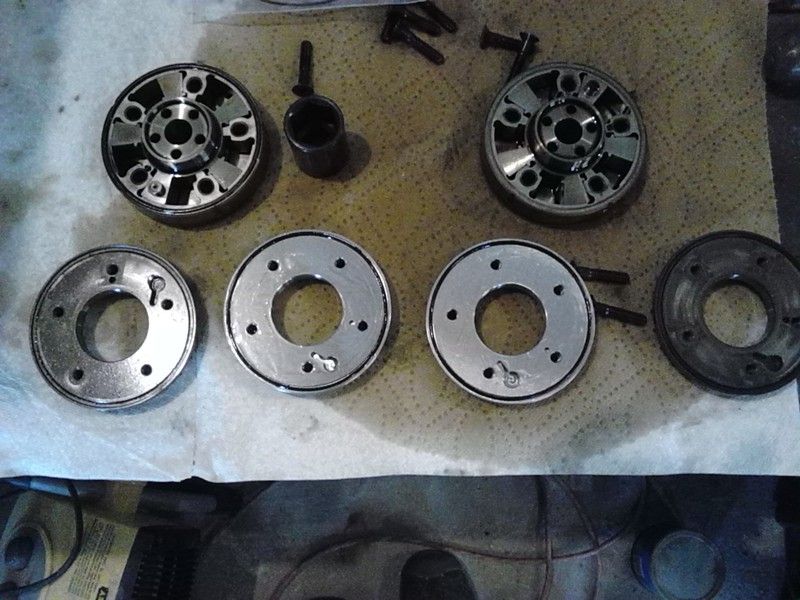
    Both Mechanical Adjusters actually looked very, very good for being stock as far as I can tell. Very minor wallowing of the pin holes.


    I got new ones in the JHM kit so I replaced them anyways. Diassembling the old:


    Old vs New:


    Another bone to pick on this JHM kit... the new tiny pin spacers (white pieces) that slide along the backside anbd allow oil behind the pin were both too big. I lost the old ones when I popped the adjusters apart (little things went flying to god knows where) so I couldn't reuse the old ones. I had to sand down the new ones with sandpaper around the circumference to reduce the diameter enough to where they could slide in and out.


    Shot of top cylinder timing cover ready to go back on:


    Here is that damned crank shim I didn't realize was there at first. It only fits over the crank end one way, the bolts are all slightly offset. Marking it before removal would save some time realigning.


    With the shim off the rear seal goes in much easier. With some silicone lube I used the plastic piece it came shipped with at first to get it partially in placed, then it tapped on fairly readily with a small block of wood and a hammer. I just worked my way around.


    For all you folks questioning my choice of words earlier, the tip trans does not have a "flywheel". This is the "drive plate" I mentioned earlier. The torque converter bolts to those 3 bolts around the perimeter through the starter hole once the trans is back on.


    I also did my valley pan gasket. Lots of cleaning!


    Shout out to my beautiful wife who let me spend money on parts and hasn't gotten too mad at me for living in the garage the last week. She even came to visit once!


    Valve cover gaskets were very brittle and stuck on. Those center caps are a job to get off. I had to tap all around with a putty knife then pry out with a flat screwdriver.


    Before it started raining (I'm by Louisville, decided to catch on fire and flood out this week, been insane)


    Piggie pipes before and after:


    Last question, can I mix these two coolants?
    "Pentofrost ++" and "Pentofrost SF?"
    http://i.imgur.com/6KNVnlu.jpg
    http://i.imgur.com/6xSTbI3.jpg


    Today I need to get the rest of the electrical & coolant connections back on, then get the whole front end on. Hopefully can fire her up tonight!? I need to get busy. Happy Easter!
    '18 RS3 Glacier White: DS1 Stg 2 | Wagner EVO1 IC | 034 4" Turbo Inlet | 034 4" Intake
    '05 S4 Avant Brilliant Red: JHM Tune | JHMv1 Headers | Fast Intentions Catback | Ported IM & Spacers | JHM LWCP | JHM ATF Cooler | Thor Skid Plate | Koni Yellows | Apikol Rear Diff | JHM LW Rotors | AudioQ 1200D w/Dual 10" CVRs

  17. #57
    Veteran Member Four Rings Slow4's Avatar
    Join Date
    Dec 02 2007
    AZ Member #
    23048
    My Garage
    2020 Ford PIU, 2017 D675R
    Location
    DC/MD/(VA)

    Finally Doing Timing with 164k on the Clock!

    I don't think that white spacers are suppose to move in and out, it's just used as a base for the spring and pin.

    Reference my pic:


    Note how my spacer just sits on the sprocket with the back facing up? The spring is suppose to fit on the spacer so when oil gets injected, it pushes the pin (iirc).

    Pic of spring and spacer in upper right on top of adjuster backing:

    2015 B8 SQ5
    Click Here
    ---
    Past
    2001 B5 S4 | 2005 B6 S4 AVANT | 2013 Allroad P+ | 2013 B8.5 A4 P+


  18. #58
    Veteran Member Four Rings gcoy's Avatar
    Join Date
    Apr 06 2009
    AZ Member #
    40835
    My Garage
    2005 B6 S4 6mt Avant & 2001 B5 S4 6mt Avant (Sold) & 2007 VW Passat 3.6 4Mo wagon
    Location
    Boise Id

    Quote Originally Posted by BCsniper View Post


    also, sorry if this is a dumb question but where do the two o-rings go that are in the center of the JHM kit?

    BC, I believe you are referring to #14 The Hydraulic Controller Seals ??

    [IMG][/IMG]

  19. #59
    Veteran Member Four Rings gcoy's Avatar
    Join Date
    Apr 06 2009
    AZ Member #
    40835
    My Garage
    2005 B6 S4 6mt Avant & 2001 B5 S4 6mt Avant (Sold) & 2007 VW Passat 3.6 4Mo wagon
    Location
    Boise Id

    Quote Originally Posted by VR6OhMy View Post
    Anyone have a part number for this o-ring? I don't believe this one is in this Timing Chain FAQ..
    I just added this link to the Timing Chain FAQ

  20. #60
    Established Member Two Rings
    Join Date
    Apr 04 2015
    AZ Member #
    324994
    Location
    Salem, Oregon

    Nice thread....impressed. I just bought the oil retention valve kit from ECS. I am nervous about pulling the Intake. Not for the difficulty of the work just at the possibility of breaking something. lots of hoses and connections to pull apart and things get brittle over time.

  21. #61
    Veteran Member Four Rings BCsniper's Avatar
    Join Date
    Jan 29 2010
    AZ Member #
    54160
    My Garage
    B6 S4 6MT Avant, B6 3.0 Avant 6MT (for sale), C5 A6 2.8
    Location
    north ga

    Quote Originally Posted by gcoy View Post
    BC, I believe you are referring to #14 The Hydraulic Controller Seals ??

    [IMG][/IMG]
    #14 are actually 2 of the other seals that JHM does include. I've already replaced those. The 2 I'm talking about ate very thin...like o-rings just with a larger diameter


    Also, I had the same issue with that small plastic spacer. Mine is in there tight as hell right now and I hope that's okay because the mech adjusters have already been torqued

  22. #62
    Veteran Member Four Rings badger.'s Avatar
    Join Date
    Mar 31 2014
    AZ Member #
    168335
    My Garage
    '18 RS3 | '05 S4 Avant
    Location
    KY

    Quote Originally Posted by BCsniper View Post
    #14 are actually 2 of the other seals that JHM does include. I've already replaced those. The 2 I'm talking about ate very thin...like o-rings just with a larger diameter


    Also, I had the same issue with that small plastic spacer. Mine is in there tight as hell right now and I hope that's okay because the mech adjusters have already been torqued

    I think the two center o-rings are the rear coolant crossover line o-rings. At least that is what I used them for.

    P/N: N90989503
    round seal o-ring 30x2.5

    Maybe this will help someone. I made this for cross reference before ordering parts. I think it is accurate. Far right two columns correspond with the #s on the JHM kit pic. Red is Intermediate Kit, Blue is parts in Full Plus Kit


    '18 RS3 Glacier White: DS1 Stg 2 | Wagner EVO1 IC | 034 4" Turbo Inlet | 034 4" Intake
    '05 S4 Avant Brilliant Red: JHM Tune | JHMv1 Headers | Fast Intentions Catback | Ported IM & Spacers | JHM LWCP | JHM ATF Cooler | Thor Skid Plate | Koni Yellows | Apikol Rear Diff | JHM LW Rotors | AudioQ 1200D w/Dual 10" CVRs

  23. #63
    Veteran Member Four Rings badger.'s Avatar
    Join Date
    Mar 31 2014
    AZ Member #
    168335
    My Garage
    '18 RS3 | '05 S4 Avant
    Location
    KY

    Quote Originally Posted by Slow4 View Post
    I don't think that white spacers are suppose to move in and out, it's just used as a base for the spring and pin.

    Reference my pic:


    Note how my spacer just sits on the sprocket with the back facing up? The spring is suppose to fit on the spacer so when oil gets injected, it pushes the pin (iirc).

    Pic of spring and spacer in upper right on top of adjuster backing:

    I couldn't even get the new ones to snap in at all. Tried for about 10 minutes. The new ones could "float"inside the pin shaft hole. The spring would keep it pressed against the backside once the unit is together, so as long as you got it seated inside the pin hole I think it would be alright.
    '18 RS3 Glacier White: DS1 Stg 2 | Wagner EVO1 IC | 034 4" Turbo Inlet | 034 4" Intake
    '05 S4 Avant Brilliant Red: JHM Tune | JHMv1 Headers | Fast Intentions Catback | Ported IM & Spacers | JHM LWCP | JHM ATF Cooler | Thor Skid Plate | Koni Yellows | Apikol Rear Diff | JHM LW Rotors | AudioQ 1200D w/Dual 10" CVRs

  24. #64
    Veteran Member Four Rings Slow4's Avatar
    Join Date
    Dec 02 2007
    AZ Member #
    23048
    My Garage
    2020 Ford PIU, 2017 D675R
    Location
    DC/MD/(VA)

    Quote Originally Posted by badger. View Post
    I couldn't even get the new ones to snap in at all. Tried for about 10 minutes. The new ones could "float"inside the pin shaft hole. The spring would keep it pressed against the backside once the unit is together, so as long as you got it seated inside the pin hole I think it would be alright.
    Ah, I see what you mean. I thought you had the spacer moving in and out of the hole as your rotated the sprocket...
    2015 B8 SQ5
    Click Here
    ---
    Past
    2001 B5 S4 | 2005 B6 S4 AVANT | 2013 Allroad P+ | 2013 B8.5 A4 P+


  25. #65
    Established Member Two Rings kavitzy's Avatar
    Join Date
    Dec 16 2012
    AZ Member #
    105926
    Location
    Fargo, ND

    Quote Originally Posted by badger. View Post
    What are the consequences?
    Haha I never did it and I have about 10k on it with no rattle.
    JHM you should include some instructions where those gaskets go because I even made a post to this forum and no one had a clue at the time.
    2004 S4 - JHM Fly/Clutch Stage 3, Milltek full catted, 19" V710, JHM 93 tune, JHM intake, JHM LWCP, JHM Trio

  26. #66
    Active Member Two Rings Foot's Avatar
    Join Date
    Oct 13 2010
    AZ Member #
    65616
    My Garage
    1991 Audi V8 quattro 5 speed
    Location
    Bellevue, NE

    Quote Originally Posted by BCsniper View Post
    it's definitely not pre-installed on the new tensioner. I had to pull the o-ring off the old one and transfer it to the new one. I saw that my instructions said to replace it. First thing I thought when I read it was how JHM says "includes all bolts, o-rings, and seals needed to do the job".


    Also JHM includes another seal that goes from the accessory gear to the power steering pump. Is anybody really replacing this?

    Getting to that piece means removing that whole gear-drive assembly out which also includes another seal and a few more o-rings that would need to be replaced. Why even include this one seal that nobody is going to use? And if you are going to include it, why not supply the other seal and 3 o-rings that would be needed just to get to it?


    also, sorry if this is a dumb question but where do the two o-rings go that are in the center of the JHM kit?

    2004 Audi S4 6 speed Nogaro Blue
    1991 Audi V8 quattro 5 speed Pearl White

  27. #67
    Veteran Member Four Rings badger.'s Avatar
    Join Date
    Mar 31 2014
    AZ Member #
    168335
    My Garage
    '18 RS3 | '05 S4 Avant
    Location
    KY

    I didn't replace the oil pump shaft seal that came with the kit. Didn't even pull that gear unit out.
    '18 RS3 Glacier White: DS1 Stg 2 | Wagner EVO1 IC | 034 4" Turbo Inlet | 034 4" Intake
    '05 S4 Avant Brilliant Red: JHM Tune | JHMv1 Headers | Fast Intentions Catback | Ported IM & Spacers | JHM LWCP | JHM ATF Cooler | Thor Skid Plate | Koni Yellows | Apikol Rear Diff | JHM LW Rotors | AudioQ 1200D w/Dual 10" CVRs

  28. #68
    Senior Member Three Rings FormulaElement's Avatar
    Join Date
    Jul 02 2013
    AZ Member #
    118216
    Location
    406, MT

    Quote Originally Posted by badger. View Post
    I didn't replace the oil pump shaft seal that came with the kit. Didn't even pull that gear unit out.
    It's really for the power steering gear. Mine looked like it was leaking a little bit and it was super easy to do in the scope of things. Took around 20 minutes. Figured it was worth getting out of the way.

    The white part that allows oil to go into the mechanical adjusters is supposed to be hard to get in as its a interference fit. If it's not snug it may wear down in time because of all the friction caused from moving, plastic isn't the strongest material. When its jammed in there in one spot only the tip of it will wear off.

  29. #69
    Veteran Member Four Rings badger.'s Avatar
    Join Date
    Mar 31 2014
    AZ Member #
    168335
    My Garage
    '18 RS3 | '05 S4 Avant
    Location
    KY

    She fired up last night!! No rattle


    Have to get the weather stripping back on and the splash shields re-installed then get her off the jack stands before taking a drive. Can't wait!!

    Before starting I did 3 engine prime runs (crank for 20-30 seconds with plugs out and fuel pump fuse out), checking fluids and letting it cool 2-3 minutes between each time.

    Then started it up! I only ran it for a few seconds in this vid (the very first start) since the power steering fluid is so finicky and needs topped off a few times after that system is drained.

    In other news, I got the new Tip trans cooler from JHM installed. Did a little writeup in that thread:
    http://www.audizine.com/forum/showth...1#post10631551

    Been a long week. My hands are a little sore!
    '18 RS3 Glacier White: DS1 Stg 2 | Wagner EVO1 IC | 034 4" Turbo Inlet | 034 4" Intake
    '05 S4 Avant Brilliant Red: JHM Tune | JHMv1 Headers | Fast Intentions Catback | Ported IM & Spacers | JHM LWCP | JHM ATF Cooler | Thor Skid Plate | Koni Yellows | Apikol Rear Diff | JHM LW Rotors | AudioQ 1200D w/Dual 10" CVRs

  30. #70
    Established Member Two Rings
    Join Date
    Apr 04 2015
    AZ Member #
    324994
    Location
    Salem, Oregon

    Congrats....nice job. You have inspired me to tackle the oil retention valves and do the intake spacers.

  31. #71
    Veteran Member Four Rings Slow4's Avatar
    Join Date
    Dec 02 2007
    AZ Member #
    23048
    My Garage
    2020 Ford PIU, 2017 D675R
    Location
    DC/MD/(VA)

    Good work Sir!
    2015 B8 SQ5
    Click Here
    ---
    Past
    2001 B5 S4 | 2005 B6 S4 AVANT | 2013 Allroad P+ | 2013 B8.5 A4 P+


  32. #72
    Veteran Member Four Rings TarlCabot's Avatar
    Join Date
    Feb 18 2013
    AZ Member #
    109786
    My Garage
    Can of Whoop @ss!!!
    Location
    Upstate, SC

    Wow... great job bet that sounds is soo sweet, once all your hard earned time and money involved in that job, now finish her up and go enjoy that beast

    If anybody needs/wants to rent or buy the tools to do this yourself, i have mine back in and ready to ship... give me a PM
    PAST 2004 Audi S4 4.2L 2006 Audi S4 4.2L 25th #167
    2015 Audi B8.5 A4 2.0T P+ S-line JHM K04-R Turbo 3" HFC/Downpipe FMIC Stage 3 K04 ECU and Stage 2 ZF8 TCU tunes ECS-Luft-Technik CIA/Air Scoop/Silicone Intake Tract GFB DV Bilstein Sport Struts/Shocks H&R Sport Springs 034motorsport Catch Can Kit D/L Control Arms/Bushing Rear Sway Bar with Front/Rear End Links 15mm-F/20mm-R Spacers Bullet Nose Studs/Nuts RS4 Honeycomb Mesh Front/Fog Light Grilles

  33. #73
    Active Member Two Rings Foot's Avatar
    Join Date
    Oct 13 2010
    AZ Member #
    65616
    My Garage
    1991 Audi V8 quattro 5 speed
    Location
    Bellevue, NE

    Sounds good. Nice work. That didn't have any chain rattle either.
    2004 Audi S4 6 speed Nogaro Blue
    1991 Audi V8 quattro 5 speed Pearl White

  34. #74
    Senior Member Two Rings
    Join Date
    Apr 23 2009
    AZ Member #
    41590
    Location
    East Coast

    Quote Originally Posted by BCsniper View Post
    Great Job Man! And While that stand looks sketchy I bet it's nice to have everything up higher to work on.


    I'm still in the middle of working on my car as well. Mine's going pretty slow since I've been spending more time in bed with the GF watching tv/movies instead of late nights in the garage like I had thought initially.


    No broken guides here. Everything on mine looked in great shape. Cam Adj. Sprockets even looked nearly new:

    What mileage?

  35. #75
    Veteran Member Four Rings gcoy's Avatar
    Join Date
    Apr 06 2009
    AZ Member #
    40835
    My Garage
    2005 B6 S4 6mt Avant & 2001 B5 S4 6mt Avant (Sold) & 2007 VW Passat 3.6 4Mo wagon
    Location
    Boise Id

    Nice work!!! That's a big job in one week. You will smile Everytime you start your car :)

  36. #76
    Veteran Member Four Rings badger.'s Avatar
    Join Date
    Mar 31 2014
    AZ Member #
    168335
    My Garage
    '18 RS3 | '05 S4 Avant
    Location
    KY

    Got about 30 miles on her today. No rattle in maybe 10 starts. No leaks that I can see. I'm cautiously optimistic everything is good to go. Piggies and relocated O2 sensors haven't thrown a code, so hopefully I did that right.
    Feels good

    Still need to find a way to top off my trans fluid. I couldn't get the fill bolt out, it started to buckle the trans pan when I was pulling on it. The last shop that filled it must've impacted that sucker on there Is there any other way to add fluid? I was thinking of maybe popping a line off the new cooler and just pumping some in with a hand pump into the return line?
    '18 RS3 Glacier White: DS1 Stg 2 | Wagner EVO1 IC | 034 4" Turbo Inlet | 034 4" Intake
    '05 S4 Avant Brilliant Red: JHM Tune | JHMv1 Headers | Fast Intentions Catback | Ported IM & Spacers | JHM LWCP | JHM ATF Cooler | Thor Skid Plate | Koni Yellows | Apikol Rear Diff | JHM LW Rotors | AudioQ 1200D w/Dual 10" CVRs

  37. #77
    Veteran Member Three Rings SprintBlueWorld's Avatar
    Join Date
    Sep 16 2013
    AZ Member #
    123267
    My Garage
    08 Hemi Big Horn, 08 Honda civic, 08 Audi S4 Cab MT6
    Location
    Pa

    Awesome work! Congrats on the return of your S4 and gracious thanks for your contribution to the community with this nitty gritty nuts bolts and seals thread.
    Oem RS4 Reps, RS4 Pedals, KN Air Filter, JHM 93 tune, JHM Intake Spacers, Rear Stoptech Slots & SS Brake lines, JHM 6-Rib Pullys, 034 Snubby Bracket, Dimple/ECS Oil & Diff Magnetic Drain plugs, Apikol Diff Mount, 034 Carrier Mount Inserts, Corsa RSC Cat-Back, 034 Sway Bar & End Links, Piggies in a Blanket, Front JHM LW Rotors, Hawk HPS pads, 13mm Spacers

  38. #78
    Veteran Member Four Rings Lucca M's Avatar
    Join Date
    Jan 17 2014
    AZ Member #
    139266
    My Garage
    Past Bmw M3 coupe Euro 1998
    Location
    New Jersey

    good job buddy! glad she is back on the road ! and your idea bout pumping fluid into return lines sounds good.
    2004 Black RS FAUX B6
    JHM LWFW, Stage 4 Clutch, Short Throw Trio, IM Spacers, JHM 91,
    034 Street Density Engine, Transmission, Snub Mount & Zero Tolerance Bracket, Rear Diff Inserts,
    PowerFlex Diff insert, Custom 2.75'' Akropovic exhaust, Cross Drilled/Slotted Rotors,
    Rns-E, B7 steering wheel, Schmidt VN Line 3 piece 19x10, Airlift Performance Suspension, Recaro Sport Seats, Ecodes and many many more...

    Insta: luccamentone

  39. #79
    Established Member Two Rings jmcdermott's Avatar
    Join Date
    Jul 21 2014
    AZ Member #
    266084
    Location
    Canal Winchester, Ohio

    How do you like the piggies so far?

  40. #80
    Senior Member Three Rings FormulaElement's Avatar
    Join Date
    Jul 02 2013
    AZ Member #
    118216
    Location
    406, MT

    Quote Originally Posted by badger. View Post
    Got about 30 miles on her today. No rattle in maybe 10 starts. No leaks that I can see. I'm cautiously optimistic everything is good to go. Piggies and relocated O2 sensors haven't thrown a code, so hopefully I did that right.
    Feels good

    Still need to find a way to top off my trans fluid. I couldn't get the fill bolt out, it started to buckle the trans pan when I was pulling on it. The last shop that filled it must've impacted that sucker on there Is there any other way to add fluid? I was thinking of maybe popping a line off the new cooler and just pumping some in with a hand pump into the return line?
    Congrats on getting it running with no leaks and rattles!

    I believe the transmission fill plug is on the side of the transmission housing near the back. The one on the trans pan is the drain plug. Be sure to follow the Audi filling procedures when doing this. Pretty much you turn the car on and keep adding fluid. You'll know its full when the trans fluid temp is around 40˚C (VCDS required) and fluid keeps coming out of the drain plug.

    You will need a hand pump.
    Last edited by FormulaElement; 04-07-2015 at 08:20 AM.

Tags for this Thread

Bookmarks

Posting Permissions

  • You may not post new threads
  • You may not post replies
  • You may not post attachments
  • You may not edit your posts
  •  


    © 2001-2025 Audizine, Audizine.com, and Driverzines.com
    Audizine is an independently owned and operated automotive enthusiast community and news website.
    Audi and the Audi logo(s) are copyright/trademark Audi AG. Audizine is not endorsed by or affiliated with Audi AG.