


Okay guys, there has been a lot of requests lately for a VAG-COM DIY. The purpose of this DIY is to walk you through the steps to do several VAG modifications.
So far we have the following:
- Disable amber corner lights
- Disable NAV & Phone warning messages while entering data at speed
- Disable Seatbelt Chime
- Enable Adaptive brake lights
- Enable Automatic Gear selection shown in DIS
- Enable Double Disarm Beep
- Enable Hidden menu in MMI
- Enable Import CDs to MMI's HD
- Enable Independent Fogs control with high beams
- Enable Lap Timer
- Enable Remote Operation windows&sunroof
- Enable TPMS
- Enable VIM on MMI
- Set Audi parking system - Switch OFF Speed
- Adjust LED Brightness
- Beep on lock
- Adjust bluetooth microphone sensitivity
- Enable Auxiliary ventilation
- Enable Drivers Memory Seat
- Increase radio play time after car is turned off
- Enable coming home/leaving home function DRL
- Tail lights on with front DRLs
- Change the Adaptive Cruise Control Preset distance
- Enable power trunk to close from key fob
- Disable start/stop
Equipment Required:
Laptop with Vag-Com software
Vag-Com Cable
Many people get very intimidated and uneasy about messing around with the car settings on the computer. The most important thing to know is that everything you do in this DIY CAN BE UNDONE. There is no reason to get nervous, you will not do any damage to your car. Simply follow the instructions and you will be fine.
I am doing all of this via Ross-Tech Vag-Com with USA factory settings. If you are outside the USA the stored values might vary. Also, other conventional vag-com units can be purchased to do these modifications. The process is probably somewhat the same.
Step 1: Hooking up the Vag-Com
First step is to plug in your Vag-Com to the OBD-2 port. It is the purple connector located right behind the hood latch under the steering wheel. Once you have plugged it in, connect it to your laptop device.
Make sure you are running the most recent version of Ross-Tech's software. You will most likely be prompted if you are not.
***HAVE YOUR KEY IN THE IGNITION TURNED ON ACCESSORY MODE (hit the start button once). VCDS WILL NOT WORK IF THS IS NOT DONE***
Step 2: Let the fun begin!
Start VCDS
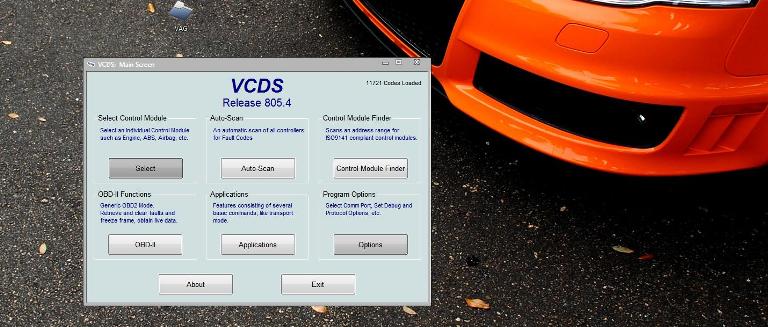
First thing you want to do is to make sure the VAG-COM is properly connected to your car. Click OPTIONS in the bottom right corner.
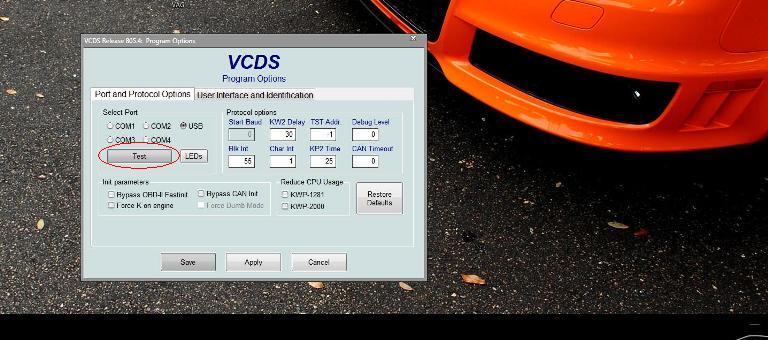
You will now be taken to the Program Options menu. Under Port and Protocol Options select TEST as shown below.
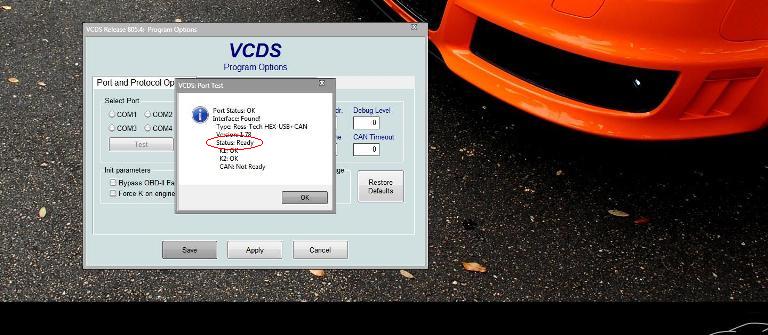
After you hit test the program will test the connection between the Vag-Com and the cars computer. After a few seconds you will get a screen shown below. Make sure the Status reads READY.
Hit SAVE and return to the make screen.
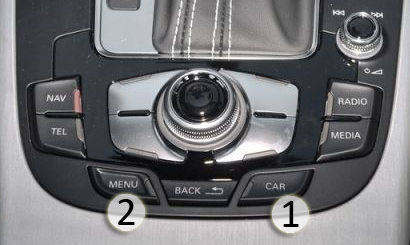
To access the hidden menu, hold down Car and Menu together for 5 seconds
To reset the MMI 3G+, press Menu, Big Knob, and Top Right Soft Button simultaneously

Use this hidden menu at your own risk.
Caution: Keep away from the "Bootloader"
Okay so this is a compilation from other forums trying to place everything together so that when people try to do vag com mods to your car you will feel more at ease and know the ones that work.
*Suggestion: Print this and check off the mods you've activated and store it with your owner's manual - Will come handy when you need to re-do the coding after an ECU flash.
Here's the list I've compiled so far:
- Disable amber corner lights
- Disable NAV & Phone warning messages while entering data at speed
- Disable Seatbelt Chime
- Enable Adaptive brake lights
- Enable Automatic Gear selection shown in DIS
- Enable Double Disarm Beep
- Enable Hidden menu in MMI
- Enable Import CDs to MMI's HD
- Enable Independent Fogs control with high beams
- Enable Lap Timer
- Enable Remote Operation windows&sunroof
- Enable TPMS
- Enable VIM on MMI
- Set Audi parking system - Switch OFF Speed
- Adjust LED Brightness
- Beep on lock
- Adjust bluetooth microphone sensitivity
- Enable Auxiliary ventilation
- Enable Drivers Memory Seat
- Increase radio play time after car is turned off
- Enable coming home/leaving home function DRL
- Tail lights on with front DRLs
- Change the Adaptive Cruise Control Preset distance
- Enable power trunk to close from key fob
Audi A6/A7 & S6/S7 C7
VCDS (VAG-COM) codes
________________________________________
Disable amber corner lights
[09 Cent. Elect.] [Coding - 07] -> Long Coding Helper -> Byte 10
Submodule 0
Bit 3 - Set to 0 to disable amber side markers (U.S. vehicles)
________________________________________
Disable NAV & Phone warning messages while entering data at speed
[5F - Information Electr.] -> Adaptation -> Set channel 2 & 3 to 250
________________________________________
Disable Seatbelt Chime
[17 - Instruments] [Coding - 07] -> Long Coding Helper -> Byte 0
Bit 2-4 Seat Belt Warning inactive
________________________________________
Enable Adaptive brake lights
[46 - Comfort System] [Coding - 07] -> Long Coding Helper -> Byte 8
Bit 0 Emergency Brake Flashing via Turn Lights active (1 = active)
Bit 1 Emergency Brake Flashing via Brake Lights active (1 = active)
________________________________________
Enable Automatic Gear selection shown in DIS
[02 Auto Trans] [Adaptation 10]
Select Single Gear Display from top channel drop down menu
Select D on/S on from New value drop down menu
________________________________________
Enable Double Disarm Beep
[46 - Central Conv.] [Adaptation - 10] -> Channel 63
Add 4
________________________________________
Enable Hidden menu in MMI
[5F - Information Electr.]
[Adaptation - 10] -> Channel 6
change 0 to 1
Use this hidden menu at your own risk.
Caution: Keep away from the "Bootloader"
________________________________________
Enable Import CDs to MMI's HD
[Hidden menu]
Main/Diagnose/Settings
Import Media
Set to 4 of 4 "Copy/Ripping"
________________________________________
Enable Independent Fogs control with high beams
[09 Cent. Elect.] [Coding - 07] -> Long Coding Helper -> Byte 4
Bit 1 (Front) Uncheck the box or change :Bit 1 to 0
Bit 2 (Rear) Uncheck the box or change :Bit 2 to 0
________________________________________
Enable Lap Timer Shown in HUD- also enables shift light
[17 - Instruments] [Coding - 07] -> Long Coding Helper -> Byte 1
Bit 3 - Check the box for "Lap Timer active"
______________________________________
Enable Remote Operation Windows and Sunroof
[46 - Cent. Conv.] [Coding - 07] -> [Long Coding Helper] Byte 2
Bit 2 - Set to 1
______________________________________
Enable TPMS
* You need the 1AT ABS unit check your stickers (1AS does not work)
[Hidden menu] [car] [cardevicelist] [RDK] Enable
[Hidden menu] [car] [carmenuoperation] [Tires Air Pressure Control] Set to 5
[03 - ABS Brakes]
[Security Access - 16] (probably with login code: 61378)
[Coding - 07] -> Long Coding Helper -> Byte 1
Bit 3 - Tire Pressure Monitoring (PR-7K6) active (1 = active)
The TPMS need to be enabled in the Instrument Cluster:
[17 - Instruments]
[Coding - 07] -> Long Coding Helper -> Byte 4
Bit 0 - Tire Pressure Monitoring (TPMS) installed (1 = active)
Reset MMI
________________________________________
Enable VIM on MMI
[5F - Information Electr.] [Advanced ID - 1A] Note 1st Serial number
[Security Access] Enter Digits 6, 13, 10, 14, 11 of the 1st Serial number
[Adaptation - 10] -> Channel 48
Set to 255
Reset MMI
________________________________________
Set Audi parking system - Switch OFF Speed
[10 - Park/Steer Assist] [Adaptation - 10] -> Channel 23
Set to 20 (max value in km/h)
________________________________________
Adjust LED brightness
[09 Cent. Elect.] [Security Access - 16] (enter security code. One of the default codes is- 20113)
[Adaptation - 10] -> Channel 3
Set between 5 and 100
________________________________________
BEEP ON LOCK Chirp the alarm siren briefly when the alarm activates (ie all doors are closed and the car is locked)
[Select]
[46-Central Conv.]
[Coding - 07]
[Long Coding Helper]
Click on byte 1 and in bit 2 you'll see the selectable option: "Anti-Theft-System: Horn Confirmation active"
Check this option
[Do It!]
________________________________________
Adjust bluetooth microphone sensitivity
Hidden menu
Diagnose
Settings
Mic sensiblity - choose -6db/0db/+6db
________________________________________
Enable Auxiliary ventilation
http://www.audienthusiasts.com/VagCom_AuxVent.html
[5F - Information Electr.] [Coding - 07] -> Long Coding Helper -> Byte 6
Bit 1 Set to 1
[Hidden menu] [car] [cardevicelist] [Auxiliary heating] Enable
[08 - Auto HVAC] [Coding - 07] -> Long Coding Helper -> Byte 1
Bit 3 Set to 1
Bit 4 Set to 1
________________________________________
Enable Drivers Memory Seat
36: Seat Mem - 07 Coding - Long Coding Helper - change Byte 2, bit 0, to 1
Seat memory will be there however greyed out in MMI
Press and hold down unlock button on key fob for 5 seconds for the windows to come down
Press and hold down lock button on key fob for 5 seconds for the windows to go back up
In MMI, Seat Adjustment you are now able to find Driver's seat, you can set Key memory on/off. Set it "on" for both keys separately.
________________________________________
Increase radio play time after car is turned off
In the Hidden Menu:
From the main screen select 'onofftimer', set 'Standby delay'. The maximum value is 30 minutes.
________________________________________
Enable coming home/leaving home function DRL
[Select]
[09 Central electric]
[Coding - 07]
[Long coding helper]
Click on byte 6 and disable bit 4
Leaves the low beams off when unlocking the car and just have the DRLs on when its dark outside, similar to some other Audis. Much cleaner look.
________________________________________
Tail lights on with front DRLs
[Select]
[09-Central Electric]
[Coding - 07]
[Long Coding Helper]
Click on byte 2 and enable bit 7
Turns on rear tail lights DRLs during the day, for a more aggressive look.
________________________________________
Change the Adaptive Cruise Control Preset distance
[Select]
[13 Distance Regulation]
[Adaptation - 10] --> channel 7
Change from 0 to 1
Reboot MMI
Will now have an option in your MMI under Car --> Driver assistance --> Adaptive Cruise Control to set which of the 4 preset distances your car will default to when you activate your ACC.
________________________________________
Disable rear side markers in US vehicles
[Select]
[46-Central Convenience]
[Security Access] enter 16017
[Adaptation - 10] --> channel 209 for left rear side marker
Document your existing number should you need to re-enable rear side markers later
Change existing number to 0
Channel 210 for right rear side marker
Document your existing number should you need to re-enable rear side markers later
Change existing number to 32
________________________________________
Turn off parking brake when in park mode
[Select]
[53-Parking Brake]
[Adaptation - 10]
Click the drop down channel menu
Select the "Automatic parking brake for selector lever position P"
Change to Not Activated
__________________________________________
Disable/memorize/invert Start & Stop:
- module 09-Cent. Elec.
- enter Security Code (20113)
- Adaptation on Channel 34:
subtract 4 to the value --> Start&Stop always disabled
add 32 to the value --> memorize last status (the Start & Stop status at engine startup will be the one at last engine shutdown)
- test & save
In addition of these values, if you add 64 to the value, the Start & Stop button light will be reversed: off if Start & Stop is disabled, and on if Start & Stop is enabled
__________________________________________

Again, I take no credit for this information, most of the above is available on these forums and specialty websites as well as Ross-Tech's support pages. I only wanted to group all the info of the pertinant VCDS mods to our s6/s7.
Any extra ones I will gladly add
Huge thanks to TunTap below is information he compiled
how to lower you car 17mm
I finally accomplished lowering the S6 with VCDS. Some said it can't be done, but it most definitely worked for me. It should be entirely reversible in case you decide to revert the settings. All research was done through Google and playing around with software settings, none of this information was provided by Audi or Audi dealers. This method is an alternative to Lowering Links (which are great if you don't have the electronic tools/would rather go the mechanical route), or H&R lowering module (which is also great, and allows for on-the fly adjustments vs. having to mess with car systems).
I figured that since all the tools and information required to do this have already been made public on the internet, it is just matter of time until someone posts a step-by-step guide, so here it is.
DISCLAIMER: I am not responsible for anything that these changes may cause, or if your car breaks, or if dealership finds out and denies your warranty if something goes wrong... Try this at your own risk.
0) Set your car to "Auto" mode (not dynamic, comfort, etc.). Make sure car is on level ground. Close doors. If any doors are opened during the procedure, it will be interrupted. Make sure your car is NOT in a towing or tire changing mode.
1) Load up VCDS, go to Module 34 - Level Control
2) Go to "10 - Adaptation", take note of 4 values titled as "Body height front left wheel house edge" - mine were set to around 384 from factory.
3) Take the values you noted above, and ADD your desired drop in millimeters (mm) to each value, write it down... So if your left front wheel was 384.5, your new value will be 401.5. Repeat for the other wheels. It is not critical to be 100% precise here, rounding the values is fine. Note that maximum Audi-approved drop is 17mm from what I've gathered. You can go lower, but if you go lower, you're also affecting other systems, such as cameras, adaptive cruise, etc., so be careful.
Technically, if you want this procedure to be done properly, instead of taking existing values, you will measure all 4 wheels after completion of the step 7, and then add your drop value if desired. Suspension height values are measured from the center of the wheel to the edge of the fender.
4) Go to Security Access, enter code provided on the following website, under VCDS section, item #3 (I'm not posting this directly to avoid spreading sensitive data, although it's been posted on other forums in past) http://www.stemei.de/pages/coding/au...ng-des-aas.php
5) You should get a message stating that security code has been accepted - if you don't, something failed, stop doing what you're doing
6) Go to 04 - Basic Settings
*** IMPORTANT: Whatever you do, DO NOT select "Reset All Adaptations" - this is not undoable, and will require a visit to the dealer. ***
7) Select "Activate Level Control", hit "Go", wait for it to complete (should only take a second, until it says "not running").
8) Select "Delete Calibration For Level Control", hit "Go", wait for it to complete, your car will throw a fault code and you will see an error message stating Air Suspension Malfunction - this is normal.
7) Select "Start Up to Reference Level", hit "Go". This step will take about a minute, and your car will go up/down during the process (you'll hear hissing noises). Wait for it to complete, until it says "not running".
9) Select "Go Back", go to "10 - Adaptation" on the previous screen.
10) Next you will need to enter new adaptation values for all 4 wheels. Select "Body height front left wheel house edge", then enter new adaptation value, and hit "Do it", then repeat for the other 3 wheels. I did it in the order the menu was arranged (FL, RL, FR, RR) - not sure if the order matters, but just in case. Each time you enter a value, you should get a message stating that it has been accepted.
11) After you're done entering adaptation for all 4 wheels, select "Go Back", and return to "04 - Basic Settings" again.
12) In basic settings, select "Calibrate Level Control" and hit go, it will take a few seconds. Wait for it to say "not running". If you get an error during this step, you either missed a step, or something went horribly wrong.
13) Select "Activate Level Control", hit "Go"
14) You're done, now go to "02 - Fault Codes" and Reset codes.
If this did or didn't work - please share your experience with the rest of us here
Printable version
https://onedrive.live.com/?authkey=%...AACCDFFF88F25F


 Reply With Quote


Bookmarks