Audizine - An Automotive Enthusiast Community

Page 2 of 4 FirstFirst 1234 LastLast
Results 41 to 80 of 145
  1. #41
    Active Member Two Rings
    Join Date
    Apr 27 2011
    AZ Member #
    74690
    Location
    NJ

    Guest-only advertisement. Register or Log In now!
    Quote Originally Posted by Nison_Li View Post
    thanks
    did you put your paddles on yet?
    Nison,

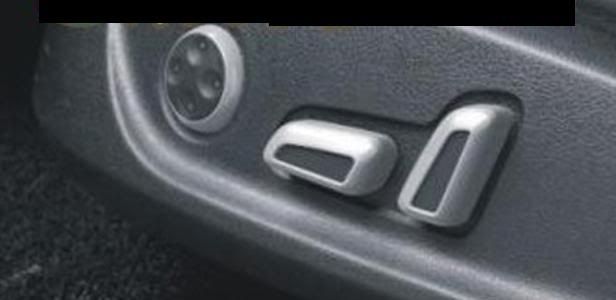
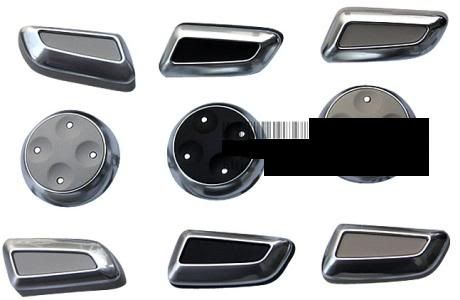
    Yep installed them. Subtle change, but I like it.

  2. #42
    Senior Member Three Rings keeva381's Avatar
    Join Date
    Mar 24 2011
    AZ Member #
    72858
    Location
    Charlotte, NC

    Just placed my order from Bernardi Honda for the driver side switches and then 1 for each door. Total came to $199 shipped! Thanks for the great find.

  3. #43
    Veteran Member Four Rings DavidB8's Avatar
    Join Date
    Nov 06 2009
    AZ Member #
    50351
    Location
    Oakville, ON, Canada

    Yeah that's one on my list as well. Not something I would have done before but now that I have the new trim with the silver edges I think the interior trim needs a little more to finish it off.
    I've also found some replacement seat switches that are black in the center and chrome on the edges so I think they will make it onto my car as well.
    Reaching Me:Please don't ask me questions on the forum or send me private messages as it may be a while before I respond.
    If you need something email me directly at [email protected] I don't frequent this forum very often.
    www.audienthusiasts.com

  4. #44
    Senior Member Three Rings keeva381's Avatar
    Join Date
    Mar 24 2011
    AZ Member #
    72858
    Location
    Charlotte, NC

    1) Yes the panels just snap off below the door handle and you have access.
    Just having trouble it looks as if the panels are all connected and integrated into the door. Do I just take a screwdriver and start trying to snap the window button panel portion back so that it frees up? I'm too nervous about starting from the top since I'll probably end up bending the plastic. If if it's just trial and error I'll proceed but wanted to check with the experts!

    Where it looks like I should be able to get in....although I know it will damage it:


    This is where I think David you're telling me to start? Looks all connected around the whole door handle, but just pry back and pop out?


  5. #45
    Veteran Member Four Rings DavidB8's Avatar
    Join Date
    Nov 06 2009
    AZ Member #
    50351
    Location
    Oakville, ON, Canada

    If you go to my website I have a few different projects that how to take it off. Including this one http://www.audienthusiasts.com/Proje...rLighting.html
    Reaching Me:Please don't ask me questions on the forum or send me private messages as it may be a while before I respond.
    If you need something email me directly at [email protected] I don't frequent this forum very often.
    www.audienthusiasts.com

  6. #46
    Senior Member Three Rings keeva381's Avatar
    Join Date
    Mar 24 2011
    AZ Member #
    72858
    Location
    Charlotte, NC

    If you go to my website I have a few different projects that how to take it off. Including this one http://www.audienthusiasts.com/Proje...rLighting.html
    Didn't even think of that...perfect. Thanks again David.

  7. #47
    Senior Member Three Rings keeva381's Avatar
    Join Date
    Mar 24 2011
    AZ Member #
    72858
    Location
    Charlotte, NC

    INSTALLED!

    Just a quick note on each of the doors....I ONLY had to take out the bottom portion of the door handle. See a pic from David's site:


    Then I just worked on getting the actual "switches" out.

    On the driver side door I was very careful to work it out (there are 4 clips that hold it in place). I used a very small flat screwdriver and was able to work it out, while pushing down on the actual switches. Then as they mentioned you have to switch out each of the switches (driver side door only).

    On all other doors, I pretty much only undid the 2 clips facing me, and then just pushed the switch out (you have to push pretty hard). It snapped the other side of the switch, but doesn't matter since that is what you're replacing. It's only the driver side door you have to be very careful with.

    Hope that helps! Love the look thanks again guys.

  8. #48
    Registered Member One Ring
    Join Date
    Oct 02 2010
    AZ Member #
    65146
    Location
    Singapore

    Hi guys,

    I personally has not done below mod (of changing power seat switches) but I think it will compliment the 'door switch' upgrade well .

    The part number indicated is 8P0 853 374 E01C and it should contain 6pcs for both seats. Apparently there are three color to choose from but not sure about the corresponding part number though.


    By the way is there a chrome trim switch for the rear boot release button to complete the look, any kind bro to advise on the part number if available.


  9. #49
    Veteran Member Four Rings Dasquade's Avatar
    Join Date
    Sep 07 2010
    AZ Member #
    63764
    Location
    Belgium

    At first i was like "Meh" but thansk to Davids door trim post (thanks for reminding me how nice that small metal bezel on the trims are), i'm now at "Damn, would look great".
    I'm not really a carbon fiber fan (my car isn't fast enough for it :p ) but i do like the piano black trims that also have the metal bezel on them.
    They are pretty hard to find, but i might have found a solution.
    Anyway, thanks for the info and test fitting.
    S6 C7 avant '13 estoril | ceramics | DS1 OTS stage 2 | Lightvan | Milltek non-res X pipe | TS1 | 034 trans-diff mount | CETE ASC-EVC | FL tails & dynamic signals | Thermo ZO catless DP | SRM a2a | BC Forged 20" HCA162S | custom spoiler sideskirts | Maxton front lip & diffuser | Armor heatshield mani-turbo-dp | B&O led tweets (repli) | Forge boost hoses | FIS mmi gauges | R8GT steeringwheel | alcantara interior | SRM inlets | R8 exclusive seats | JXD driveshaft | Tial WG

  10. #50
    Veteran Member Four Rings Dasquade's Avatar
    Join Date
    Sep 07 2010
    AZ Member #
    63764
    Location
    Belgium

    Sorry to remove the dust for this topic, but i just did my install and wanted to share a small DIY for those who are interested.

    Firstly i want to repost the partnumber again. I might be mistaken but audi guru DavidB8 pointed out to me that the A8 drivers panel switches are a direct switch compaired to the A7 one where you need to swap the knobs of.
    4H0-959-851-D-5PR A8 drivers switch panel OR 4G0-959-851-5PR A7 drivers switch panel that needs s-know swapping
    4H0-959-855-A-5PR passagers knob (3)
    4F0-959-565-A-5PR mirror switch

    My DIY report :
    Let me first say that removing the armrest covers is basicly identical on all 4 doors, although they are slightly different in shape.

    The drivers side:

    With the help of a screwdriver inserted in the hole on the left buttom side corner and while pulling it away from the door. I noticed it helps a bit if you press with your other hand a bit at the back side of the plastic so you loosen it easier of the pins.

    This is a picture borrowed from DavidB8 showing the big pin location and the smaller subpins, but i noticed there were a few more at the starting point. Never the less, it took some force to detach it from the main clip.

    Result after you loosen the corner.

    With the help of a small blade (not sure how it is called in english) i was able to pop off the cover top side pretty easy out the pins. The buttom ones released pretty easy with your hand by pushing it first upwards, then away form the door.

    The window switches:
    So i decided to buy the A8 switches, big thanks to DavidB8 for pointing it out. Those are identical to the A7 ones, but have the same window lock button. So this panel is a direct swap and you don't need to individually replace the buttons onto your stock panel.

    The switch panel is locked in place with 4 pins. Maybe a word of advice, DO NOT use a small screwdriver to push those pins inwards. They are pretty fragile and i broke 2 at my first attempt (passengiers switch, see later).

    Again with the small blade, push it between the panel and the mounting socket. Now push the pounting socket plate away from the pin and slightly push out your switch panel. Go to the next pin...and next.
    After the last one it should drop out without damage. Pull the plug and swap it with your new panel and push it back in the socket.

    The mirror switch:
    *Eventhough if you don't have electronic folding mirrors, you can use the switch partnumber posted by earlier in the topic. Tested everything, and no issues. My plug even already had all 4 pins wired.

    Although it isn't really a must, i decided to replace it anyway. Imho it fits the rest of the mat black switches, but i had the plan to use the stock mirror switch for my subwoofer volume knob that will be build into the MMI controle panel. The knob is in the same style as the stock MMI volume knob.
    Anyway, it is mounted with 3 pins.


    Same as with the windowswitch panel, the small blade pops it out in no time.

    The passengier side(s):

    That switch is mounted with 4 pins, again the blade makes it easy.

    As mentioned earlier, the result of trying to release it by pushing the pins with small screwdriver. DO NOT do that :) .


    I didn't take any BEFORE pictures but here are some AFTER pictures in combination with my piano black trims.
    *Temp picture to show what it looks like with the stock mirror knob.

    *All new, very happy with the result. Fits the piano black trims nicely imho.


    Passengier side, small difference over stock but it is the subtile accent that makes it worth it.


    Partly failed picture, but wanted to show it ambient color. Fits perfect with the other instrument ambient light.


    Conclusie:
    If you have +-100€ to burn, do it. Imho it is a must have mod if you like details. This is how the S-line interier package should have been!
    I'm very pleased with the upgrade.

    Plug&play over the entire line. I didn't time it but took me 5-10minutes per door. But like always when working on car parts in plastiek, take your time but often it takes some force to release stuff.
    Last edited by Dasquade; 09-29-2011 at 09:09 AM.
    S6 C7 avant '13 estoril | ceramics | DS1 OTS stage 2 | Lightvan | Milltek non-res X pipe | TS1 | 034 trans-diff mount | CETE ASC-EVC | FL tails & dynamic signals | Thermo ZO catless DP | SRM a2a | BC Forged 20" HCA162S | custom spoiler sideskirts | Maxton front lip & diffuser | Armor heatshield mani-turbo-dp | B&O led tweets (repli) | Forge boost hoses | FIS mmi gauges | R8GT steeringwheel | alcantara interior | SRM inlets | R8 exclusive seats | JXD driveshaft | Tial WG

  11. #51
    Veteran Member Four Rings DavidB8's Avatar
    Join Date
    Nov 06 2009
    AZ Member #
    50351
    Location
    Oakville, ON, Canada

    Glad I was able to help. Sorry to the rest of the group for not posting the switch information for the straight swap. I got mine some time ago but it sat in Europe waiting for me to get all my little parts together before it shipped. I would have posted after I actually got it in hand but glad someone else was able to use the information and get it up here.
    Reaching Me:Please don't ask me questions on the forum or send me private messages as it may be a while before I respond.
    If you need something email me directly at [email protected] I don't frequent this forum very often.
    www.audienthusiasts.com

  12. #52
    Veteran Member Four Rings Dasquade's Avatar
    Join Date
    Sep 07 2010
    AZ Member #
    63764
    Location
    Belgium

    No problem David, again thanks for pointing out! Already 2 others (dutch audi owners) made use of the info.
    By the way, feel free to use what every picture if you decide to make your own DIY for AudiEnthusiasts.com.
    It might give you some extra modding time.
    Still looking forward how yours will look with the carbon fiber trim set. I hope you keep us updated on it.

    Don't think it was needed, but here is a side by side picture A8 vs A4
    S6 C7 avant '13 estoril | ceramics | DS1 OTS stage 2 | Lightvan | Milltek non-res X pipe | TS1 | 034 trans-diff mount | CETE ASC-EVC | FL tails & dynamic signals | Thermo ZO catless DP | SRM a2a | BC Forged 20" HCA162S | custom spoiler sideskirts | Maxton front lip & diffuser | Armor heatshield mani-turbo-dp | B&O led tweets (repli) | Forge boost hoses | FIS mmi gauges | R8GT steeringwheel | alcantara interior | SRM inlets | R8 exclusive seats | JXD driveshaft | Tial WG

  13. #53
    Active Member Two Rings johnnycondo72's Avatar
    Join Date
    Apr 16 2011
    AZ Member #
    74118
    My Garage
    2011 AUDI Q5 Sport w/ Offroad Pack + 1969 XW GT HO Falcon
    Location
    Perth, Western Australia

    Does anyone know if these style of chrome switches are available for the trunk / boot release button on the drivers door?
    Garage:
    2008 AUDI A4 B8 S Custom
    2011 AUDI Q5 S line w/ Off-road Pack
    1969 XW GT HO Falcon

  14. #54
    Veteran Member Four Rings DavidB8's Avatar
    Join Date
    Nov 06 2009
    AZ Member #
    50351
    Location
    Oakville, ON, Canada

    Yep.. Only just. The new A5 switches have just been listed which has the trunk. I just had one ordered so I should know soon if it can be bought. Mind you I'm getting mine out of Germany so ordering one here could take 6-8 weeks on a special order. Seems to be the way with new parts on a new release vehicle.
    Reaching Me:Please don't ask me questions on the forum or send me private messages as it may be a while before I respond.
    If you need something email me directly at [email protected] I don't frequent this forum very often.
    www.audienthusiasts.com

  15. #55
    Veteran Member Four Rings
    Join Date
    Mar 05 2009
    AZ Member #
    39491
    Location
    Earth

    Quote Originally Posted by DavidB8 View Post
    Yep.. Only just. The new A5 switches have just been listed which has the trunk. I just had one ordered so I should know soon if it can be bought. Mind you I'm getting mine out of Germany so ordering one here could take 6-8 weeks on a special order. Seems to be the way with new parts on a new release vehicle.
    any news on the matching boot switch yet? Do you have a part no.? ....I could give it a try through Neil and see how quickly he could get it.
    My other home is an AIRSTREAM.

  16. #56
    Active Member Two Rings
    Join Date
    Mar 13 2011
    AZ Member #
    72307
    Location
    MH, India

    Just did the swap today, really easy and I'm a DIY noob, still. Do guide us on the part number of the boot release switch.

  17. #57
    Active Member Two Rings johnnycondo72's Avatar
    Join Date
    Apr 16 2011
    AZ Member #
    74118
    My Garage
    2011 AUDI Q5 Sport w/ Offroad Pack + 1969 XW GT HO Falcon
    Location
    Perth, Western Australia

    I Installed the complete set of chrome window switches for all 4 doors and the trunk / boot switch a couple of days ago .... took me about 20mins in total.

    Part number for the trunk / boot switch - 8K0 959 831 B V10
    Garage:
    2008 AUDI A4 B8 S Custom
    2011 AUDI Q5 S line w/ Off-road Pack
    1969 XW GT HO Falcon

  18. #58
    Active Member Two Rings
    Join Date
    Mar 13 2011
    AZ Member #
    72307
    Location
    MH, India

    How difficult is the boot switch install? I'm guessing one would have to pry off the boot switch surround to gain access. Thanks for the part number.

    There are chrome/silver volume and MMI knobs too, if anyone's looking for more silver touches.

  19. #59
    Veteran Member Four Rings Dasquade's Avatar
    Join Date
    Sep 07 2010
    AZ Member #
    63764
    Location
    Belgium

    Just posting this as a possible warning...
    From motortalk.de:
    Apperently the facelift A4 door switches have a different finish (black) then the A8/A7 switches.
    Picture say more then words


    I haven't looked it up but i think the volume knob isn't a plug and play item but part of the full MMI panel (as it works differently: volume + next/previous).
    Volume: 8R0 = 24 059 528 €
    Menu: 8R0 059 528 A = 24 €
    S6 C7 avant '13 estoril | ceramics | DS1 OTS stage 2 | Lightvan | Milltek non-res X pipe | TS1 | 034 trans-diff mount | CETE ASC-EVC | FL tails & dynamic signals | Thermo ZO catless DP | SRM a2a | BC Forged 20" HCA162S | custom spoiler sideskirts | Maxton front lip & diffuser | Armor heatshield mani-turbo-dp | B&O led tweets (repli) | Forge boost hoses | FIS mmi gauges | R8GT steeringwheel | alcantara interior | SRM inlets | R8 exclusive seats | JXD driveshaft | Tial WG

  20. #60
    Veteran Member Four Rings maga4's Avatar
    Join Date
    Aug 12 2011
    AZ Member #
    79683
    Location
    Olathe, Kansas

    Quote Originally Posted by Dasquade View Post
    Just posting this as a possible warning...
    From motortalk.de:
    Apperently the facelift A4 door switches have a different finish (black) then the A8/A7 switches.
    Picture say more then words

    I haven't looked it up but i think the volume knob isn't a plug and play item but part of the full MMI panel (as it works differently: volume + next/previous).

    Thanks for posting. Definately prefer the one on the right, pretty sure that is the current one right? This is definately a fun winter mod!
    2010 A6 3.0T Prestige, Quartz/Black
    35% Tint, VCDS, Hardwired V1, LED Interior/License Plate, Chipwerke Pro, WeatherTech
    -
    Previous: 2011 A4 P+, APR Stage 2, 35% Tint, Eibach Pro-Kit, VCDS, Gloss Black Grille, Fogs,
    LED Interior/License Plate Lights, Short Shifter, BFI Catch Can, V1, Rieger Lip Replica, FRT's FMIC, aFe Filter

  21. #61
    Veteran Member Four Rings phatAvant's Avatar
    Join Date
    Oct 17 2004
    AZ Member #
    3825
    My Garage
    B8 Avant S-line +
    Location
    Marbella

    The left one looks cheap to me for some reason.
    '11 A4 []S-line Avant TDI

    Gone but not forgotten:
    '03 ///M3 Coupe OEM CSL - '03 Mini Cooper 'ViruS' Limited Edition - '05 A3 SPORTBACK 2.0T Quattro []S-line - '03 B6 A4 AVANT TDI FULL OETTINGER

  22. #62
    Veteran Member Four Rings hender's Avatar
    Join Date
    Sep 13 2009
    AZ Member #
    47691
    My Garage
    2010 A4 2.0T
    Location
    Mississauga, Ontario

    flash probably, lol
    Canadian 2009 - 2011 A4 owners burning oil: www.a4b8oil.ca , sign up to help us get your repair costs back. Hold Audi accountable!

    sweet multi-spoke stock 17"s | 20% tint | dropstop | few scratches where I closed the garage door on the bumper | 4x4 ride height | matte black hood | di-noc CF interior trim | plasti-dipped parts | pirated vag-com | 50lbs of sound equipment | couple of small stone chips on the hood | APR stg 1 | RS-Mesh Grille

  23. #63
    Veteran Member Four Rings Dasquade's Avatar
    Join Date
    Sep 07 2010
    AZ Member #
    63764
    Location
    Belgium

    I dought it. Both switches look highlighted the same. It comes apperently with a different finish of black. My switches (A7 code if not mistaken and A8 multiple switch panel) are like the right one, flat surface.
    Anyway, just wanted to show it as i found it on motortalk in their facelift retrofit topic.
    S6 C7 avant '13 estoril | ceramics | DS1 OTS stage 2 | Lightvan | Milltek non-res X pipe | TS1 | 034 trans-diff mount | CETE ASC-EVC | FL tails & dynamic signals | Thermo ZO catless DP | SRM a2a | BC Forged 20" HCA162S | custom spoiler sideskirts | Maxton front lip & diffuser | Armor heatshield mani-turbo-dp | B&O led tweets (repli) | Forge boost hoses | FIS mmi gauges | R8GT steeringwheel | alcantara interior | SRM inlets | R8 exclusive seats | JXD driveshaft | Tial WG

  24. #64
    Established Member Two Rings jacksat's Avatar
    Join Date
    Sep 06 2011
    AZ Member #
    80867
    Location
    Oostende

    Here a german ebaylink where you can find switches at reasonable prices.
    Don't know the shipping rates to US.

    http://www.ebay.de/sch/i.html?_from=...All-Categories

  25. #65
    Veteran Member Four Rings DavidB8's Avatar
    Join Date
    Nov 06 2009
    AZ Member #
    50351
    Location
    Oakville, ON, Canada

    I just got my trunk switch :D

    Set is now complete, Mirror, Windows, Trunk and seats for now.
    Reaching Me:Please don't ask me questions on the forum or send me private messages as it may be a while before I respond.
    If you need something email me directly at [email protected] I don't frequent this forum very often.
    www.audienthusiasts.com

  26. #66
    Veteran Member Four Rings Greg Nelson's Avatar
    Join Date
    Apr 07 2007
    AZ Member #
    17064
    My Garage
    B6 A4 3.0 (Wife's Ride)
    Location
    Mountain View, CA

    Quote Originally Posted by jacksat View Post
    Here a german ebaylink where you can find switches at reasonable prices.
    Don't know the shipping rates to US.

    http://www.ebay.de/sch/i.html?_from=...All-Categories
    Very few eBay.de sellers will ship to US, some won't even ship to UK.
    do email, run through Google translate and send to seller.
    2009 3.2L Sedan BB/Beige. VMR V710 Gunmetal 19" Rims. Exterior Chrome Trim painted Quartz Grey. LED ROW tail lights. KW V1. H&R RSB. StopTech PosiQuiet Pads, Painted Calipers. HOEN Xenon Match Fog Lamps. Fog Grilles converted to S-Line look. Stone Guards. FCA Rear Diffuser. LED interior lights, cup holder lights & door pocket lights. RS4 Pedals. Remus Mufflers.

  27. #67
    Senior Member Two Rings wpg2.0T's Avatar
    Join Date
    Dec 17 2007
    AZ Member #
    23430
    My Garage
    2011 B8 Avant S-Line. Garnet Red.
    Location
    Winnipeg, MB. Canada

    Quote Originally Posted by des_me View Post
    Hi guys,

    I personally has not done below mod (of changing power seat switches) but I think it will compliment the 'door switch' upgrade well .

    The part number indicated is 8P0 853 374 E01C and it should contain 6pcs for both seats. Apparently there are three color to choose from but not sure about the corresponding part number though.
    Are these actual switch replacements or covers for the existing seat controls?

    See this set from http://www.parts4euro.com/DCShop/pro...oducts_id=1444

    Thanks.

  28. #68
    Veteran Member Four Rings DavidB8's Avatar
    Join Date
    Nov 06 2009
    AZ Member #
    50351
    Location
    Oakville, ON, Canada

    Quote Originally Posted by johnnycondo72 View Post
    I Installed the complete set of chrome window switches for all 4 doors and the trunk / boot switch a couple of days ago .... took me about 20mins in total.

    Part number for the trunk / boot switch - 8K0 959 831 B V10
    Did you do the trunk switch from the front or did you remove the panel? I found the clip pretty tight even with access from the rear of the panel.

    Quote Originally Posted by wpg2.0T View Post
    Are these actual switch replacements or covers for the existing seat controls?

    See this set from http://www.parts4euro.com/DCShop/pro...oducts_id=1444

    Thanks.
    DAMN!! That's a lot of money for seat switch covers.. I'm not charging enough I don't think.
    Reaching Me:Please don't ask me questions on the forum or send me private messages as it may be a while before I respond.
    If you need something email me directly at [email protected] I don't frequent this forum very often.
    www.audienthusiasts.com

  29. #69
    Veteran Member Four Rings MiracleWhips's Avatar
    Join Date
    Jun 02 2009
    AZ Member #
    43229
    Location
    San Francisco

    Every part number worked for me except the boot switch? (genuinevwparts.com)

    What model does this come from?
    APR II+ / STaSIS 23mm RARB / AWE FMIC & Exhaust / Eurocode IP / Carbonio / 034 HFC & TIP / 20% Tint / S5 Mirrors / Rotiform MIAs 19x8.5 / Hankook 255/35 / H&R Avant Sport Springs / RS6 Pedals / Hoen Fogs /Stoneguards / ecodes / A4L Fog grills

  30. #70
    Veteran Member Four Rings DavidB8's Avatar
    Join Date
    Nov 06 2009
    AZ Member #
    50351
    Location
    Oakville, ON, Canada

    Comes from the new facelift S5.
    Reaching Me:Please don't ask me questions on the forum or send me private messages as it may be a while before I respond.
    If you need something email me directly at [email protected] I don't frequent this forum very often.
    www.audienthusiasts.com

  31. #71
    Active Member Two Rings johnnycondo72's Avatar
    Join Date
    Apr 16 2011
    AZ Member #
    74118
    My Garage
    2011 AUDI Q5 Sport w/ Offroad Pack + 1969 XW GT HO Falcon
    Location
    Perth, Western Australia

    [QUOTE=DavidB8;7043953]Did you do the trunk switch from the front or did you remove the panel? I found the clip pretty tight even with access from the rear of the panel.

    I just removed the door card but didn't disconnect any of the wiring or even the inner door handle cable and placed the door card on a box and leverage the trunk switch from the inside of the trim. I used a very small flat blade screwdriver and once the 2 outer clips of the switch were out I just pushed the switch out with my finger .... worked a treat for me.
    Garage:
    2008 AUDI A4 B8 S Custom
    2011 AUDI Q5 S line w/ Off-road Pack
    1969 XW GT HO Falcon

  32. #72
    Veteran Member Four Rings Ryan_T's Avatar
    Join Date
    May 11 2009
    AZ Member #
    42370
    My Garage
    09 A4 2.0T
    Location
    T.O - Canada

    Very nice work. Now if you can just get the aluminum MMI buttons from the RS5, it'd look complete.
    Ryan - flickr

  33. #73
    Active Member Two Rings
    Join Date
    Mar 13 2011
    AZ Member #
    72307
    Location
    MH, India

    Quote Originally Posted by des_me View Post

    Anyone have any idea how these are to be installed, do they just clip off/on or do I need to fiddle with the panels under the seat too. I'm totally clueless.

    Any help appreciated.

  34. #74
    Stage 2 Banner Advertiser Four Rings ECS Tuning-Audi's Avatar
    Join Date
    Oct 02 2006
    AZ Member #
    70746
    Location
    Wadsworth,OH

    WOW that looks great! Any interest if we were to put a "kit" together so you could have everything you need to do the retro fit?

    Jason

  35. #75
    Veteran Member Four Rings maga4's Avatar
    Join Date
    Aug 12 2011
    AZ Member #
    79683
    Location
    Olathe, Kansas

    Quote Originally Posted by ECS Tuning-Audi View Post
    WOW that looks great! Any interest if we were to put a "kit" together so you could have everything you need to do the retro fit?

    Jason
    I would say absolutely so long as it is pretty close in price to just ordering individually. Thanks for the thought!
    2010 A6 3.0T Prestige, Quartz/Black
    35% Tint, VCDS, Hardwired V1, LED Interior/License Plate, Chipwerke Pro, WeatherTech
    -
    Previous: 2011 A4 P+, APR Stage 2, 35% Tint, Eibach Pro-Kit, VCDS, Gloss Black Grille, Fogs,
    LED Interior/License Plate Lights, Short Shifter, BFI Catch Can, V1, Rieger Lip Replica, FRT's FMIC, aFe Filter

  36. #76
    Stage 2 Banner Advertiser Four Rings ECS Tuning-Audi's Avatar
    Join Date
    Oct 02 2006
    AZ Member #
    70746
    Location
    Wadsworth,OH

    Quote Originally Posted by maga4 View Post
    I would say absolutely so long as it is pretty close in price to just ordering individually. Thanks for the thought!
    Usually when we make "kits" we price them so you save over getting each piece individually

    Jason

  37. #77
    Veteran Member Four Rings MiracleWhips's Avatar
    Join Date
    Jun 02 2009
    AZ Member #
    43229
    Location
    San Francisco

    Quote Originally Posted by ECS Tuning-Audi View Post
    WOW that looks great! Any interest if we were to put a "kit" together so you could have everything you need to do the retro fit?

    Jason
    Absolutely yes.

    What all would the kit include?

    Door switches
    Mirror knob
    Trunk Switch

    There is also
    MMI Knob
    Seat adjustments controls
    Last edited by MiracleWhips; 11-30-2011 at 02:21 PM.
    APR II+ / STaSIS 23mm RARB / AWE FMIC & Exhaust / Eurocode IP / Carbonio / 034 HFC & TIP / 20% Tint / S5 Mirrors / Rotiform MIAs 19x8.5 / Hankook 255/35 / H&R Avant Sport Springs / RS6 Pedals / Hoen Fogs /Stoneguards / ecodes / A4L Fog grills

  38. #78
    Stage 2 Banner Advertiser Four Rings ECS Tuning-Audi's Avatar
    Join Date
    Oct 02 2006
    AZ Member #
    70746
    Location
    Wadsworth,OH

    We could honestly do whatever you guys wanted. I'm all ears, I've already got an e-mail started generating the idea.

    Jason

  39. #79
    Veteran Member Four Rings maga4's Avatar
    Join Date
    Aug 12 2011
    AZ Member #
    79683
    Location
    Olathe, Kansas

    Quote Originally Posted by ECS Tuning-Audi View Post
    Usually when we make "kits" we price them so you save over getting each piece individually

    Jason
    Even better!

    I would say definitely the mirror switch, trunk, and windows. I would also be good with the seat controls. My nav/mmi knob is already the aluminum look though? Any way to get the mmi buttons from the facelift yet (dont know if they are aluminum on different models)?

    Easier to order and organize plus cheaper = win in my book!
    2010 A6 3.0T Prestige, Quartz/Black
    35% Tint, VCDS, Hardwired V1, LED Interior/License Plate, Chipwerke Pro, WeatherTech
    -
    Previous: 2011 A4 P+, APR Stage 2, 35% Tint, Eibach Pro-Kit, VCDS, Gloss Black Grille, Fogs,
    LED Interior/License Plate Lights, Short Shifter, BFI Catch Can, V1, Rieger Lip Replica, FRT's FMIC, aFe Filter

  40. #80
    Veteran Member Four Rings
    Join Date
    Mar 05 2009
    AZ Member #
    39491
    Location
    Earth

    Quote Originally Posted by maga4 View Post
    Even better!

    I would say definitely the mirror switch, trunk, and windows. I would also be good with the seat controls. My nav/mmi knob is already the aluminum look though? Any way to get the mmi buttons from the facelift yet (dont know if they are aluminum on different models)?

    Easier to order and organize plus cheaper = win in my book!
    I believe they are only aluminum on the RS5.
    My other home is an AIRSTREAM.

Bookmarks

Posting Permissions

  • You may not post new threads
  • You may not post replies
  • You may not post attachments
  • You may not edit your posts
  •  


    © 2001-2025 Audizine, Audizine.com, and Driverzines.com
    Audizine is an independently owned and operated automotive enthusiast community and news website.
    Audi and the Audi logo(s) are copyright/trademark Audi AG. Audizine is not endorsed by or affiliated with Audi AG.