Audizine - An Automotive Enthusiast Community

Page 1 of 2 12 LastLast
Results 1 to 40 of 59
  1. #1
    Senior Member Two Rings dkky996's Avatar
    Join Date
    Jul 04 2010
    AZ Member #
    61024
    My Garage
    2008 Porsche RS60 Spyder, 2008 Mercedes Benz CLS550
    Location
    Louisville

    DIY: Front Bumper, Front Grille and Front Splitter

    Guest-only advertisement. Register or Log In now!
    I know the removal of the front bumper has been covered many times citing to the DIY thread in the a5oc forum but I figured I post one specific to b8 S4/A4. Also there were several members wanted to know how to remove the front splitter. Couple days ago I also posted how to remove the rear bumper since I couldn't find it in this forum.

    You do not need to lift the front end of the car or remove the wheels to take out the front bumper. Just turn the wheel all the way to one side.


    There are two #25 torx bolts and a plastic clip on each side of the wheel well that hold the wheel liner. Remove the two torx bolts and the plastic clips on each side.


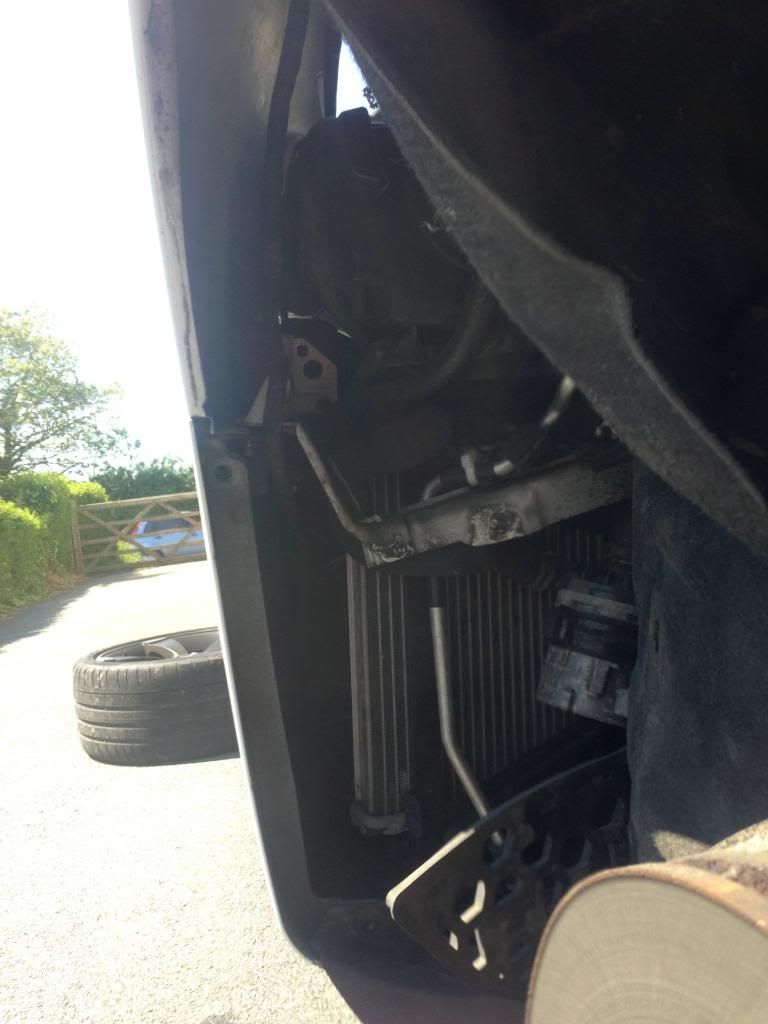
    Pull back the wheel liner and you'll see towards the front of the car a black 10mm bolt.


    You'll need a long extension to reach this bolt. Remove the 10mm bolts from each side.


    Open the hood and you'll see a plastic cover with 4 #27 torx bolts. Remove the bolts and take off the cover.

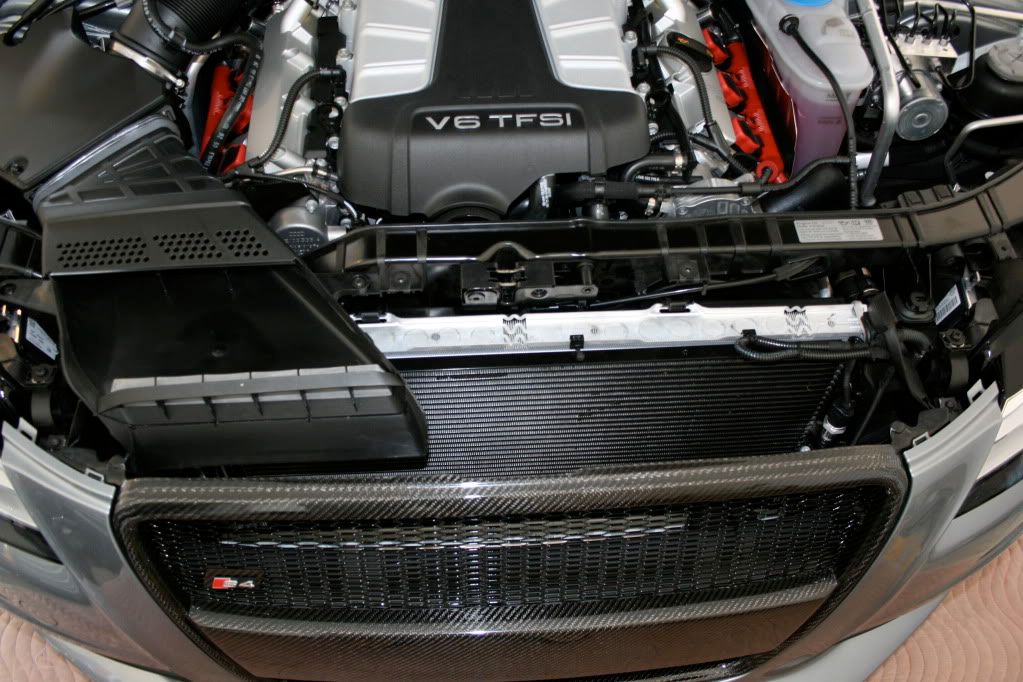

    Now under the bumper, there are three #25 torx bolts and two quick release screws. Remove the torx bolts and the quick release screws.


    There are two more #25 torx bolt that hold the grille, remove the torx bolts and all the fasteners that hold the front bumper has been removed.


    Grab the edge of the bumper where it meets the wheel well and pull on each side.
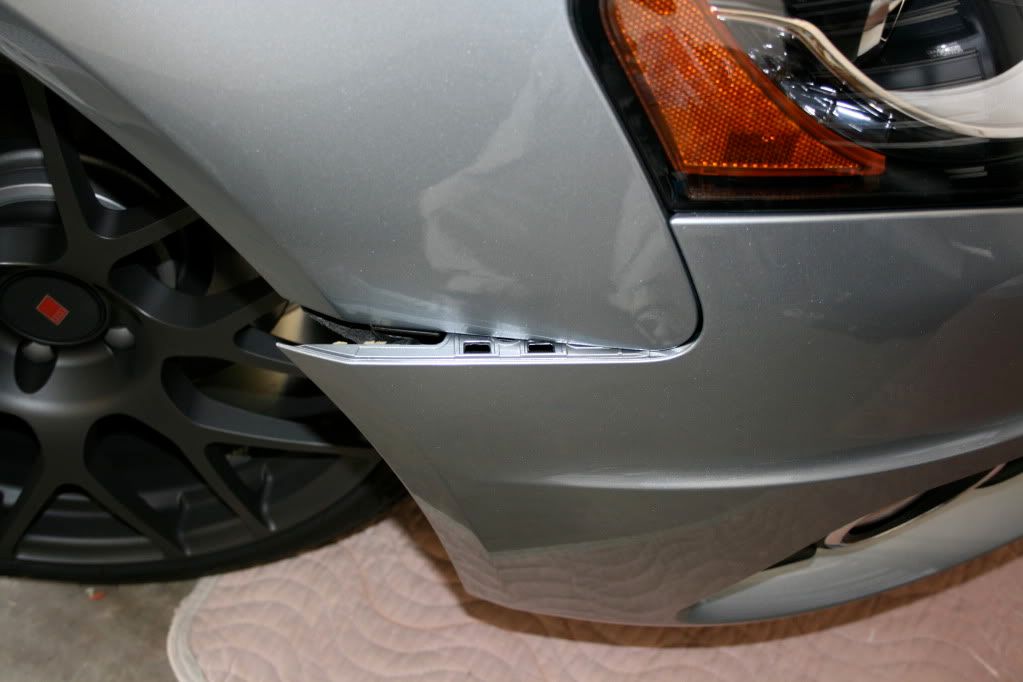

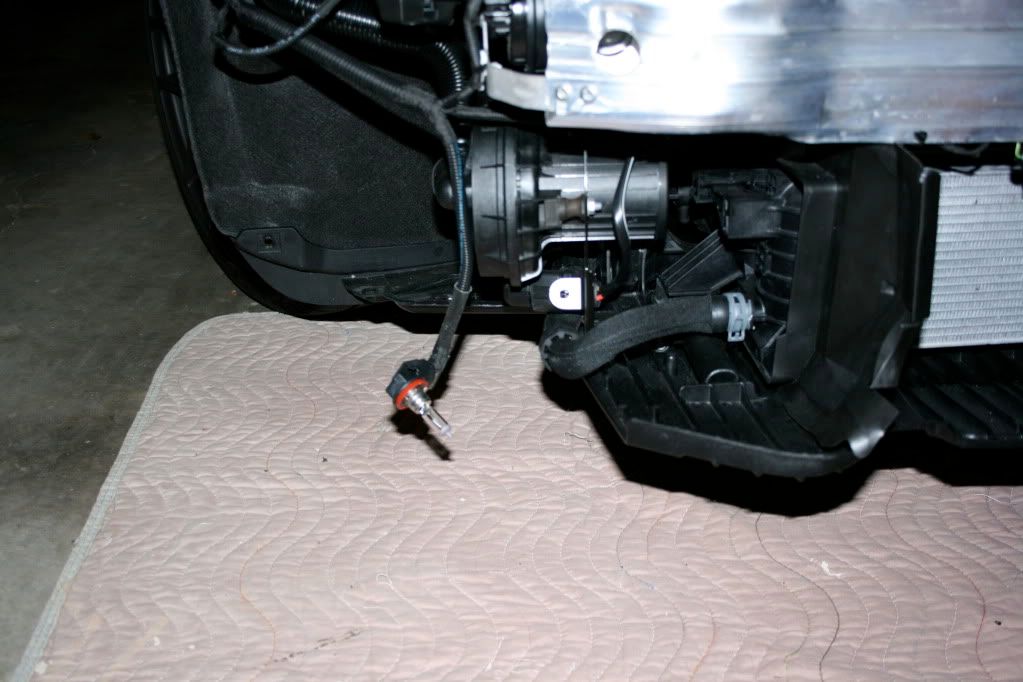
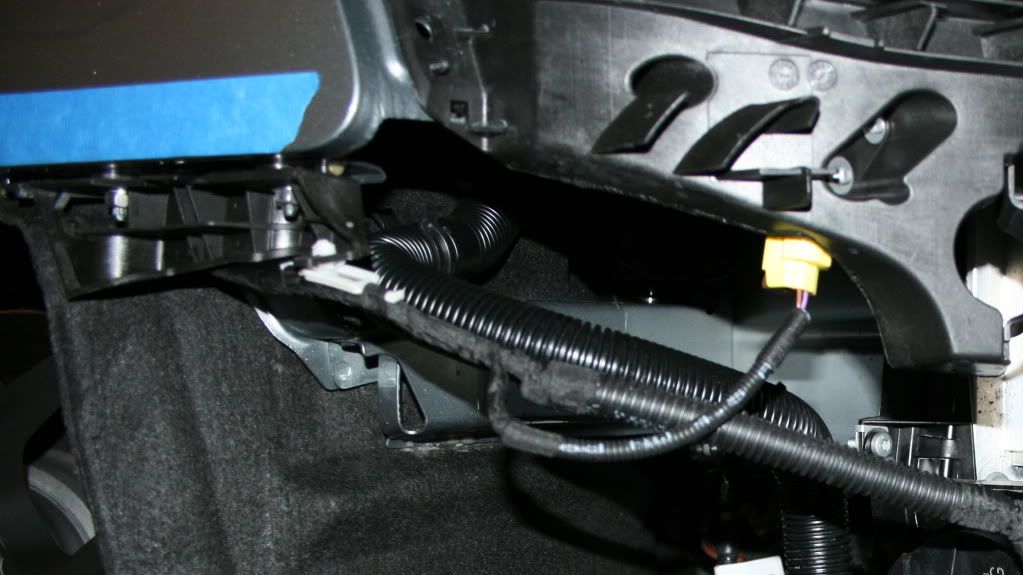
    The bumper should now come off. Disconnect the Homelink and the drivers/fog lights.


    The bumper is now off.

  2. #2
    Registered User Four Rings primetime's Avatar
    Join Date
    Mar 05 2010
    AZ Member #
    55572
    My Garage
    4 four ring cars and 1 P-car...
    Location
    USA

    Nice... thanks for sharing.... How is it going back together? Does it line up pretty easily? Can you please take some closeup of the heat exchanger, the input and outputs of it, the pump if you can find it and lines.... Also is there clearance side to side and up and down? Lastly can you measure the heat exchanger? Thanks in advance.... Ron

  3. #3
    Senior Member Two Rings dkky996's Avatar
    Join Date
    Jul 04 2010
    AZ Member #
    61024
    My Garage
    2008 Porsche RS60 Spyder, 2008 Mercedes Benz CLS550
    Location
    Louisville

    Removing the Grille and Front Splitter

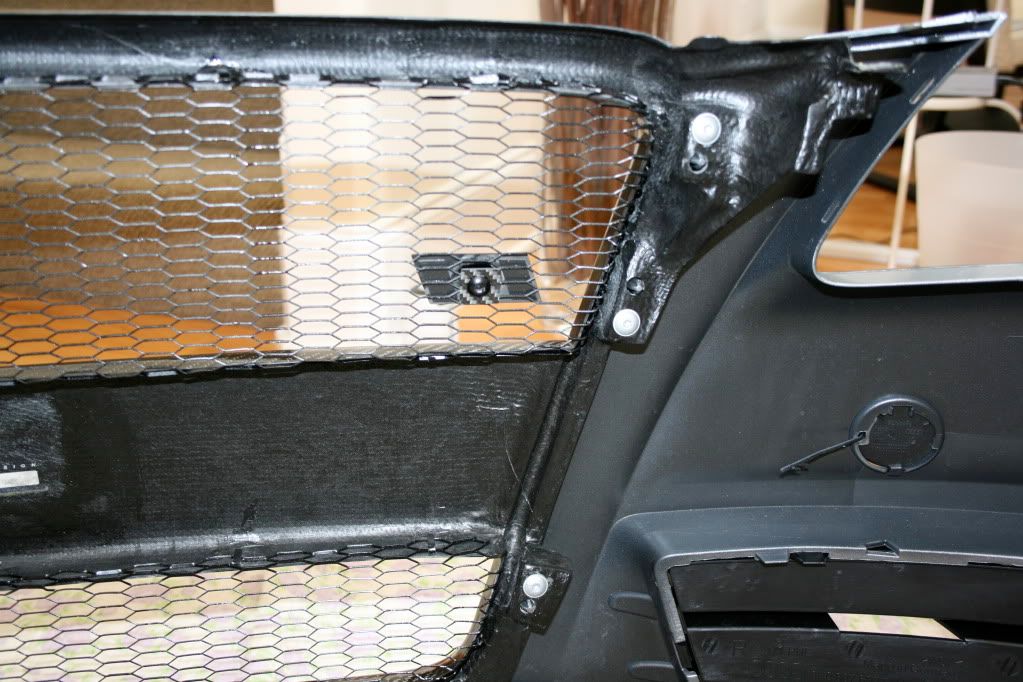
    Once the front bumper has been removed, on the back side of the bumper, there are six #25 torx bolts, three on each side of the grille. There are three more #25 torx bolts toward the bottom of the bumper (I have an after market grille, but the removal process is exactly the same with OEM).


    Remove all the torx bolts and the grille is held on by several tabs. Just pull lightly and the grille should come right off.


    Towards the bottom of the bumper there are four #25 torx bolts and three plastic expansion tabs that hold the front splitter. Remove the the four torx bolts and the plastic tabs and the front splitter pulls out.


  4. #4
    Veteran Member Four Rings wwhan's Avatar
    Join Date
    Mar 26 2010
    AZ Member #
    56662
    Location
    US

    Thank you, very nice pictorial. Just in time since my black grille will be here in a couple of weeks.

    Only thing I am worried about is aligning back all the bumper cover edges properly, with only one person.
    2019 RS5 Sportback

  5. #5
    Veteran Member Four Rings akasch's Avatar
    Join Date
    Jan 30 2008
    AZ Member #
    24728
    Location
    Santa Clara, CA

    Awesome post. Can you take the splitter off without removing the bumper?

  6. #6
    Active Member Four Rings Okan509's Avatar
    Join Date
    Sep 30 2009
    AZ Member #
    48590
    Location
    b

    Quote Originally Posted by wwhan View Post
    Thank you, very nice pictorial. Just in time since my black grille will be here in a couple of weeks.

    Only thing I am worried about is aligning back all the bumper cover edges properly, with only one person.
    It's not too bad at all - I've done it a few times now - I also have a DIY for bumper removal

  7. #7
    Senior Member Two Rings dkky996's Avatar
    Join Date
    Jul 04 2010
    AZ Member #
    61024
    My Garage
    2008 Porsche RS60 Spyder, 2008 Mercedes Benz CLS550
    Location
    Louisville

    Quote Originally Posted by primetime View Post
    Nice... thanks for sharing.... How is it going back together? Does it line up pretty easily? Can you please take some closeup of the heat exchanger, the input and outputs of it, the pump if you can find it and lines.... Also is there clearance side to side and up and down? Lastly can you measure the heat exchanger? Thanks in advance.... Ron
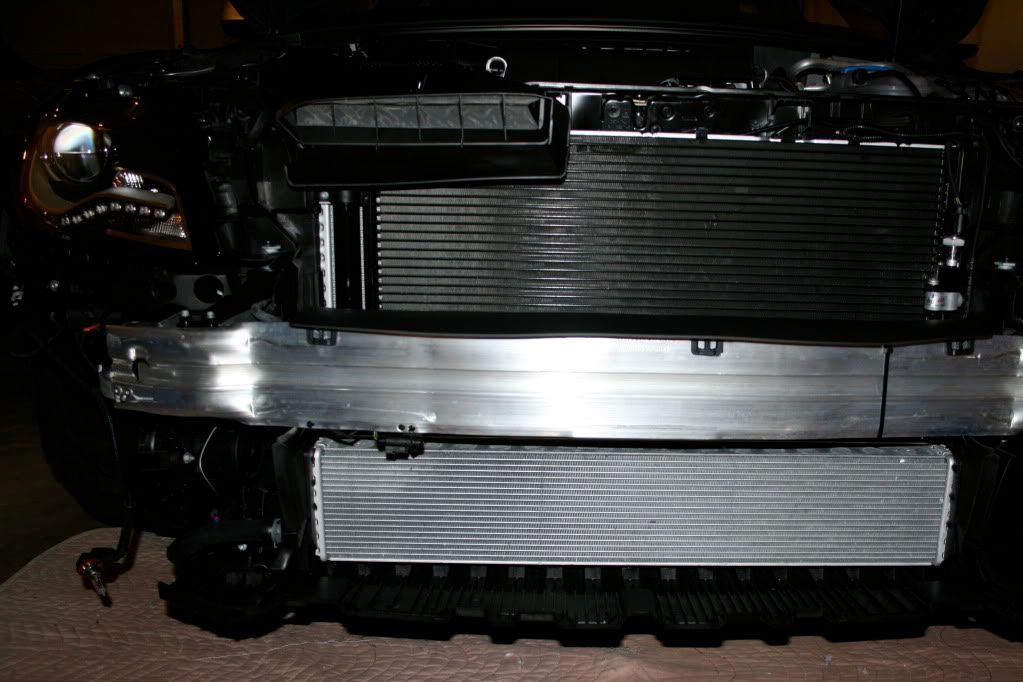
    Hey primetime, putting the bumper back is really easy. First just line up around the head light area and everywhere else fits right in. Its a one man job, I've taken off the front bumper about five or six times now. It takes me about 10 min to put the bumper on. There isn't much you can see even after you remove the front bumper. I took pics of what I can see. I assume the heat exchanger is the bottom rad, right?


    No idea where the pump is... sorry.

  8. #8
    Senior Member Two Rings dkky996's Avatar
    Join Date
    Jul 04 2010
    AZ Member #
    61024
    My Garage
    2008 Porsche RS60 Spyder, 2008 Mercedes Benz CLS550
    Location
    Louisville

    Quote Originally Posted by akasch View Post
    Awesome post. Can you take the splitter off without removing the bumper?
    You have to get to the four torx bolts on the back side of the bumper. It is possible that you can squeeze in between the lower part of the grille and the splitter to get the bolts out but it would be a PITA.

  9. #9
    Senior Member Two Rings dkky996's Avatar
    Join Date
    Jul 04 2010
    AZ Member #
    61024
    My Garage
    2008 Porsche RS60 Spyder, 2008 Mercedes Benz CLS550
    Location
    Louisville

    Quote Originally Posted by Okan509 View Post
    It's not too bad at all - I've done it a few times now - I also have a DIY for bumper removal
    Crap, sorry didn't mean to duplicate threads. Did a search a while back and couldn't find a DIY for front bumper for b8 s4/a4 on this forum.

  10. #10
    Registered User Four Rings primetime's Avatar
    Join Date
    Mar 05 2010
    AZ Member #
    55572
    My Garage
    4 four ring cars and 1 P-car...
    Location
    USA

    Thanks... Yes the lower "radiator" is the heat exchanger for the blower... I would like to add a larger one.... Looks like there will be some fab work... will take off late fall and see.... If I do it I will document.... Thanks again....

  11. #11
    Senior Member Two Rings dkky996's Avatar
    Join Date
    Jul 04 2010
    AZ Member #
    61024
    My Garage
    2008 Porsche RS60 Spyder, 2008 Mercedes Benz CLS550
    Location
    Louisville

    Quote Originally Posted by primetime View Post
    Thanks... Yes the lower "radiator" is the heat exchanger for the blower... I would like to add a larger one.... Looks like there will be some fab work... will take off late fall and see.... If I do it I will document.... Thanks again....
    BTW the dimensions are 29"x5.5"x2" Sounds like a serious hp mod... Yeah keep us posted!

  12. #12
    Veteran Member Four Rings wwhan's Avatar
    Join Date
    Mar 26 2010
    AZ Member #
    56662
    Location
    US

    2019 RS5 Sportback

  13. #13
    Registered User Four Rings primetime's Avatar
    Join Date
    Mar 05 2010
    AZ Member #
    55572
    My Garage
    4 four ring cars and 1 P-car...
    Location
    USA

    Quote Originally Posted by dkky996 View Post
    BTW the dimensions are 29"x5.5"x2" Sounds like a serious hp mod... Yeah keep us posted!
    Thank you... I'll keep the board posted.... many plans for the winter....

    Quote Originally Posted by wwhan View Post
    Maybe... I really need to see what there is to work with, looks like there is room up and down(inch or so) but not much side to side..... also location of inputs for the heat exchanger are a constraint... will see....

  14. #14
    Active Member Four Rings Okan509's Avatar
    Join Date
    Sep 30 2009
    AZ Member #
    48590
    Location
    b

    Quote Originally Posted by dkky996 View Post
    Crap, sorry didn't mean to duplicate threads. Did a search a while back and couldn't find a DIY for front bumper for b8 s4/a4 on this forum.
    There is no such thing as too many DIY threads man! You all helping everyone else - and specifically those with an S-line/S4

    Link to my thread: http://www.audizine.com/forum/showth...er-Removal-DIY

  15. #15
    Senior Member Two Rings dkky996's Avatar
    Join Date
    Jul 04 2010
    AZ Member #
    61024
    My Garage
    2008 Porsche RS60 Spyder, 2008 Mercedes Benz CLS550
    Location
    Louisville

    Quote Originally Posted by Okan509 View Post
    There is no such thing as too many DIY threads man! You all helping everyone else - and specifically those with an S-line/S4

    Link to my thread: http://www.audizine.com/forum/showth...er-Removal-DIY
    Just read through your thread and the bit regarding the plastic clip on the wheel well was pretty funny. BTW, you have much better pic of where the 10mm bolt is that holds the bumper. Couldn't get my damn camera to focus in there to get a good shot.

    For everyone else reading this thread, the plastic clip is removable. One side of the clip bend upwards and the clip slides out.

  16. #16
    Veteran Member Four Rings Voltrons_Head's Avatar
    Join Date
    Sep 14 2009
    AZ Member #
    47745
    Location
    Philly

    Good job Dkky!

    I'm going to order the black grille once ecstuning gets it back in stock. I'll definitely refer back to this thread as soon as I get it. Thanks.

  17. #17
    Veteran Member Four Rings NWS4Guy's Avatar
    Join Date
    Sep 29 2009
    AZ Member #
    48541
    My Garage
    2015 Range Rover Evoque 2010 Audi S4
    Location
    Seattle, WA

    Quote Originally Posted by dkky996 View Post
    No idea where the pump is... sorry.
    Pump is electric and over on the driver's side, ECU controls it.
    Like a surgeon with a scalpel, my S4 is a precision instrument, with which I carve and dissect my way through traffic.

    2010 S4 Prem+, Quartz Gray, S-tronic, Sport Diff, B&O, Nav, Gray Birch
    StopTech ST-60 BBK - Stratmosphere intake - APR v2.2 Stage 2 w/pulley + exhaust, v2 Coolant System
    Alu-Kreuz, Apikol rear diff mount, 034 transmission mount

  18. #18
    Established Member Two Rings
    Join Date
    Nov 02 2010
    AZ Member #
    66513
    Location
    Vancouver, BC

    Question regarding the re-installation of the bumper. In the picture below, you can see the two square notches cut out of the bumper, where the top of the bumper meets the bottom of the fender. Are there some sort of posts, pins, clips, etc. that these notches lock onto?

    Reason I ask is because after I re-install the bumper, on the passenger side, the bumper can be fairly easily pulled out (looking exactly like the pic below). I'm thinking that the holes are there to lock onto a pin or something to prevent the bumper from being able to move outwards. I can pull the bumper out even though the two nuts (on the vertical bolts) that hold this part of the bumper in place are fully tightened up. This only happens on passenger side, the driver's side is fine.

    <apologies if seeing twice, i posted question on A4 forum too>


  19. #19
    Senior Member Two Rings dkky996's Avatar
    Join Date
    Jul 04 2010
    AZ Member #
    61024
    My Garage
    2008 Porsche RS60 Spyder, 2008 Mercedes Benz CLS550
    Location
    Louisville

    Quote Originally Posted by Zral View Post
    Question regarding the re-installation of the bumper. In the picture below, you can see the two square notches cut out of the bumper, where the top of the bumper meets the bottom of the fender. Are there some sort of posts, pins, clips, etc. that these notches lock onto?

    Reason I ask is because after I re-install the bumper, on the passenger side, the bumper can be fairly easily pulled out (looking exactly like the pic below). I'm thinking that the holes are there to lock onto a pin or something to prevent the bumper from being able to move outwards. I can pull the bumper out even though the two nuts (on the vertical bolts) that hold this part of the bumper in place are fully tightened up. This only happens on passenger side, the driver's side is fine.

    <apologies if seeing twice, i posted question on A4 forum too>

    The bumper should "snap" in on the side and should be fairly tight as long as the vertical bolts haven't been loosened. If the side of the bumper can be pulled out without resistance and the bolts in the back are tight, you might want to take off the bumper and check the mechanism that the side of the bumper snaps into.

  20. #20
    Established Member Two Rings
    Join Date
    Nov 02 2010
    AZ Member #
    66513
    Location
    Vancouver, BC

    Quote Originally Posted by dkky996 View Post
    The bumper should "snap" in on the side and should be fairly tight as long as the vertical bolts haven't been loosened. If the side of the bumper can be pulled out without resistance and the bolts in the back are tight, you might want to take off the bumper and check the mechanism that the side of the bumper snaps into.
    So it sounds like the nuts should be fairly tight on the vertical bolts and *then* push the bumper into place and snap in? I had the nuts fairly loose and was holding them bumper in place, and then tightening the nuts. Maybe that what the problem was.

  21. #21
    Senior Member Two Rings dkky996's Avatar
    Join Date
    Jul 04 2010
    AZ Member #
    61024
    My Garage
    2008 Porsche RS60 Spyder, 2008 Mercedes Benz CLS550
    Location
    Louisville

    Quote Originally Posted by Zral View Post
    So it sounds like the nuts should be fairly tight on the vertical bolts and *then* push the bumper into place and snap in? I had the nuts fairly loose and was holding them bumper in place, and then tightening the nuts. Maybe that what the problem was.
    As you can see, there is a black plastic piece that moves up and down by turning the two nuts on the bottom. The black plastic piece has two tabs that matches the two openings on the bumper.


    If you tighten it too much, you won't be able to snap the bumper in and will just tear up the bumper tabs. Tighten it just enough to push in the side of the bumper with some resistance and snap into place.

  22. #22
    Veteran Member Three Rings csaudis4's Avatar
    Join Date
    May 10 2010
    AZ Member #
    58834
    Location
    SoCal

    Quote Originally Posted by Zral View Post
    So it sounds like the nuts should be fairly tight on the vertical bolts and *then* push the bumper into place and snap in? I had the nuts fairly loose and was holding them bumper in place, and then tightening the nuts. Maybe that what the problem was.
    I can't remember what's holding the side of the bumper. But I do know that when I was doing my bumper, I put it back, snapped everything back and it was fairly tight already. Actually, I'm still running the car right now w/o those two bolts behind the wheel well. The upper part of the bumper should just tuck itself pretty tight without any bolts, and the lower area will be secured by those screws under the car.
    2010 Ibis|Magma & CF|6MT|Prestige|Sport Diff|B&O|Drive Assist
    Past PC Gunmetal OEM rims, Strat SSK, WeatherTech Junk
    Now 20% sides, 80% ceramic, Lamin-X head/tail, PPF, S/C emblem, Aries 3D, RS4 pedals, VMR V701GM, APR StgII+, EC Shifter, EC AK, oCarbon, Roc-Euro Intake, 034 Trans Mount, RED Start/Stop, Ti-Carbon Reflector, Audi Hold Assist
    Future Rear Sway, B8.5 Wheel
    New Home 6/10/2016

  23. #23
    Veteran Member Four Rings Highlander1010's Avatar
    Join Date
    Apr 05 2011
    AZ Member #
    73491
    Location
    Pacific Northwest

    Quote Originally Posted by dkky996 View Post
    Once the front bumper has been removed, on the back side of the bumper, there are six #25 torx bolts, three on each side of the grille. There are three more #25 torx bolts toward the bottom of the bumper (I have an after market grille, but the removal process is exactly the same with OEM).
    Where did you mount the homelink & other piece off the back of your grille on the new aftermarket grille? I'm doing the same install next weekend and just saw those 2 electrical parts there. Perhaps 3M tape to the back of the grille, or something else?

  24. #24
    Veteran Member Four Rings Dasquade's Avatar
    Join Date
    Sep 07 2010
    AZ Member #
    63764
    Location
    Belgium

    I don't have the osir grill but RS5. It also didn't came with a homelink mount. Anyway i just used a L shaped aluminium bar (cutted to fit the sensor height etc), painted it black and glued it onto the grill with Tec7. Mount and sensor stay in place very good. But if you plan to NOT use the audi rings on the grill (where i glued the mount on) i'm not sure where to mount it then as there isn't enough room to place it on the horizontal (plate) filler because that nearly hits the cars reinforced bar.
    In worst case, like dkky996 did it i think, tire wrap it on the side. Shouldn't give problems.
    S6 C7 avant '13 estoril | ceramics | DS1 OTS stage 2 | Lightvan | Milltek non-res X pipe | TS1 | 034 trans-diff mount | CETE ASC-EVC | FL tails & dynamic signals | Thermo ZO catless DP | SRM a2a | BC Forged 20" HCA162S | custom spoiler sideskirts | Maxton front lip & diffuser | Armor heatshield mani-turbo-dp | B&O led tweets (repli) | Forge boost hoses | FIS mmi gauges | R8GT steeringwheel | alcantara interior | SRM inlets | R8 exclusive seats | JXD driveshaft | Tial WG

  25. #25
    Established Member Two Rings
    Join Date
    Nov 01 2010
    AZ Member #
    66472
    Location
    Brooklyn, NY

    IDK why this isn't stickied... the forum management here SUCKS.

  26. #26
    Veteran Member Four Rings wwhan's Avatar
    Join Date
    Mar 26 2010
    AZ Member #
    56662
    Location
    US

    Quote Originally Posted by 180Custom View Post
    IDK why this isn't stickied... the forum management here SUCKS.
    Well this seems more useful, than the stickied "Audi FSI Engine Carbon Build-up Thread for B8 S4", which seems not so relevant to the 3.0T
    2019 RS5 Sportback

  27. #27
    Senior Member Two Rings dkky996's Avatar
    Join Date
    Jul 04 2010
    AZ Member #
    61024
    My Garage
    2008 Porsche RS60 Spyder, 2008 Mercedes Benz CLS550
    Location
    Louisville

    Quote Originally Posted by Highlander1010 View Post
    Where did you mount the homelink & other piece off the back of your grille on the new aftermarket grille? I'm doing the same install next weekend and just saw those 2 electrical parts there. Perhaps 3M tape to the back of the grille, or something else?
    If you check out post #7 in the 3rd pic down, you'll see I have a black zip tie showing on the right hand side of the metal bumper support. On the back side of the metal bumper support, I stuck the homelink module with acrylic double sided tape and just to be on the safe side I put a zip tie. You have to remove a one of the tabs that holds the homelink wire so it can be rerouted to the back of the bumper. Let me know if you have any other questions.

  28. #28
    Veteran Member Four Rings Highlander1010's Avatar
    Join Date
    Apr 05 2011
    AZ Member #
    73491
    Location
    Pacific Northwest

    That makes good sense to me. What did you do with your temperature sensor?

  29. #29
    Senior Member Two Rings rx7ven's Avatar
    Join Date
    May 14 2010
    AZ Member #
    59002
    My Garage
    2007 Mazda Miata
    Location
    San Francisco

    i noticed you got the osir front grill. i was planning to get that too but i was wondering if the audi badge just fits into the new grill? or will i need to buy that adapter that osir has on their site? also did you have to do anything special to put on the s4 badge onto the osir grill?
    1988 10th Anniversary RX7 (sold)
    2005 Mazda 6 (Totaled)
    2007 Mazda Miata
    2011 Imola Yellow S4

  30. #30
    Registered Member One Ring
    Join Date
    Apr 26 2011
    AZ Member #
    74650
    Location
    Bay Area

    Anyone have an answer to the question above?

  31. #31
    Veteran Member Four Rings phillips2024's Avatar
    Join Date
    Mar 03 2011
    AZ Member #
    71787
    Location
    Southern NH

    nice grill :)

    i mounted the homelink to the underside of the ram air setup. 3m tape worked fine
    2017 Audi S8+ | 2021 Audi RSQ8 | 2021 Cadillac Escalade Sport Platinum | 2007 Porsche Turbo
    2021 Sea Ray 350 SLX | 2020 Polaris Ranger Crew XP1000 | 2022 Polaris Indy VR1 850/650

  32. #32
    Active Member One Ring netta.nick's Avatar
    Join Date
    Jul 26 2012
    AZ Member #
    97547
    Location
    New Jersey

    Thanks for the help!!

  33. #33
    Veteran Member Three Rings
    Join Date
    May 20 2012
    AZ Member #
    93822
    Location
    Chicago, IL

    Printed.

  34. #34
    Veteran Member Three Rings
    Join Date
    Apr 30 2010
    AZ Member #
    58386
    Location
    San Diego

    Will be using this later.
    2011 Audi S4 | 6MT | Ibis/Black Silk Nappa | Nav l B&O | Sport Diff | Carbon Inlays | H&R l Strat Intake l Strat SS l Alu Kreuz l AWE Exhaust l AG M510 20x10 et35 l GIAC Stg II l DTM Lip l Eurocode Diff Mounts l SS Clutch Line

  35. #35
    Senior Member Two Rings mikeh14's Avatar
    Join Date
    Apr 30 2012
    AZ Member #
    92788
    Location
    San Diego, CA

    Used this guide yesterday to take apart my grill and do some plasti-dipping. One thing I noticed, I didn't really need to release the plastic tabs on the inner fender liner.. managed to get to the bolt without it. Also, those quick release screws on the bottom, not sure if I put them back in properly...
    2012 Phantom Black S4: S-Tronic - Sports Diff | AccuAir B8 Sport Kit | AWE Intake | AWE Exhaust | GIAC Stage 2 v2 | GIAC DSG Tune | AWE Pulley | AG M580 20x10 Brushed Candy Apple Red | StopTech 380mm BBK | Deval Carbon Diffuser | RS Grill | Red supercharged badges | 15% tint

  36. #36
    Veteran Member Four Rings phillips2024's Avatar
    Join Date
    Mar 03 2011
    AZ Member #
    71787
    Location
    Southern NH

    Quote Originally Posted by mikeh14 View Post
    Used this guide yesterday to take apart my grill and do some plasti-dipping. One thing I noticed, I didn't really need to release the plastic tabs on the inner fender liner.. managed to get to the bolt without it. Also, those quick release screws on the bottom, not sure if I put them back in properly...
    just an FYI for next time. You do not need to take your grill off to plastidip it. You can still leave it on to plastidip the silver metal behind the grill as well
    2017 Audi S8+ | 2021 Audi RSQ8 | 2021 Cadillac Escalade Sport Platinum | 2007 Porsche Turbo
    2021 Sea Ray 350 SLX | 2020 Polaris Ranger Crew XP1000 | 2022 Polaris Indy VR1 850/650

  37. #37
    Senior Member Two Rings mikeh14's Avatar
    Join Date
    Apr 30 2012
    AZ Member #
    92788
    Location
    San Diego, CA

    Quote Originally Posted by phillips2024 View Post
    just an FYI for next time. You do not need to take your grill off to plastidip it. You can still leave it on to plastidip the silver metal behind the grill as well
    Yeah, I just wanted to incase I get a new grill in the future. Practice for taking the bumper off and apart :)
    2012 Phantom Black S4: S-Tronic - Sports Diff | AccuAir B8 Sport Kit | AWE Intake | AWE Exhaust | GIAC Stage 2 v2 | GIAC DSG Tune | AWE Pulley | AG M580 20x10 Brushed Candy Apple Red | StopTech 380mm BBK | Deval Carbon Diffuser | RS Grill | Red supercharged badges | 15% tint

  38. #38
    Veteran Member Four Rings phillips2024's Avatar
    Join Date
    Mar 03 2011
    AZ Member #
    71787
    Location
    Southern NH

    Quote Originally Posted by mikeh14 View Post
    Yeah, I just wanted to incase I get a new grill in the future. Practice for taking the bumper off and apart :)
    good move. cut 2 hours off your time aha
    2017 Audi S8+ | 2021 Audi RSQ8 | 2021 Cadillac Escalade Sport Platinum | 2007 Porsche Turbo
    2021 Sea Ray 350 SLX | 2020 Polaris Ranger Crew XP1000 | 2022 Polaris Indy VR1 850/650

  39. #39
    Veteran Member Three Rings S4charged's Avatar
    Join Date
    Oct 11 2012
    AZ Member #
    102046
    Location
    West Covina, CA

    How long did it take you guys the first time to remove the bumper simply to install the Rs4 grill? Thinking of doing this tonight after work :)

    EDIT: got her done :)

    What are you guys doing with your thermostats though?
    Last edited by S4charged; 11-14-2012 at 07:29 AM.
    Ibis White - 6MT
    APR Stage 2+ / Eurocode Headers / End Links / Sway Bars / Alu Kruez / Short Shifter /
    Milltek RESONATED. Carbon Tips / Stratmosphere Intake / H&R SS / RS4 Grill / VAG Mods --- SOLD

    2016 Prius 4

    2018 RS3 Nardo Grey - Dynamic Plus / Technology / RS Design / Black optics / Carbon Inlays - APR Stage 1

  40. #40
    Senior Member Two Rings
    Join Date
    Nov 17 2012
    AZ Member #
    104246
    Location
    Guernsey

    Here is another picture showing the location of the 10mm bolt, I found it much easier to access these bolts by just removing the headlights and using a 10mm wrench.

    This is with my head in place of the front wheel looking forwards to the front of the car.

    Last edited by FiftyPence; 05-26-2013 at 09:39 AM.
    Current
    Audi R8 V10+ DSG in Ibis White, blk lthr interior - Tubi Style exhaust
    Audi SQ5 in Glacier White
    My YouTube Channel

Tags for this Thread

Bookmarks

Posting Permissions

  • You may not post new threads
  • You may not post replies
  • You may not post attachments
  • You may not edit your posts
  •  


    © 2001-2024 Audizine, Audizine.com, and Driverzines.com
    Audizine is an independently owned and operated automotive enthusiast community and news website.
    Audi and the Audi logo(s) are copyright/trademark Audi AG. Audizine is not endorsed by or affiliated with Audi AG.