Audizine - An Automotive Enthusiast Community

Results 1 to 23 of 23
  1. #1
    Established Member Two Rings
    Join Date
    Jul 05 2015
    AZ Member #
    340642
    Location
    CT, USA

    How to remove lower timing chain cover? 2.0T

    Guest-only advertisement. Register or Log In now!
    Hello all,

    I'm about do some investigative work and possibly replace my timing chain and tensioner. (2009 2.0T CAEB) I'm wondering how to remove the vibration damper pulley so that I can remove the lower chain cover.

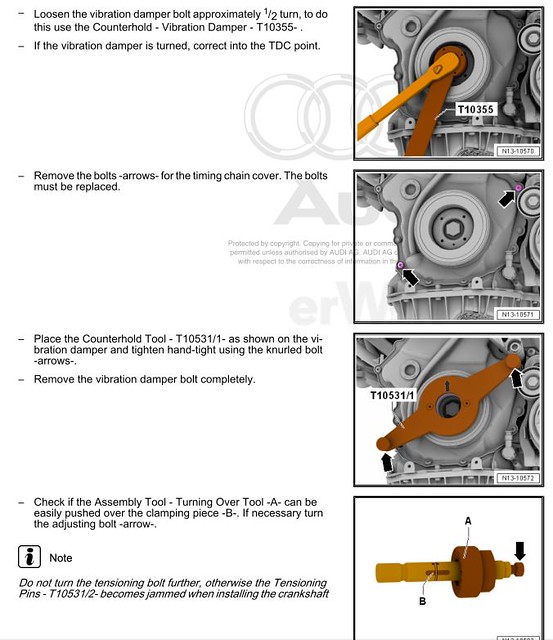
    I downloaded my manuals from Erwin.audi. They seem to say that I need a strange (and expensive) tool T10531/1 to hold the gear and crankshaft in place while the bolt and pulley are removed. It seems quite complex.

    The tool kit that I got does not have this part, but has a "T10368 Timing Chain Cover Press Piece" Can this work too? My manuals don't mention this tool so I'm not sure how it's supposed to be used. Has anyone done this?

  2. #2
    Veteran Member Four Rings
    Join Date
    Sep 24 2014
    AZ Member #
    284729
    My Garage
    2015 Audi Q3 Quattro, 2017 Corvette M7 Grand Sport, 2017 Audi SQ5, 2019 Porsche Macan, 24 Jetta GLI
    Location
    Central NJ

    1) The crank holding tool is nothing exotic...need something to hold the crank while you apply a lot of torque to loosen the center bolt.
    2) Then remove the pulley, and immediately re-install the center bolt with a large washer/spacer so that the timing can't skip (there are two chain drives behind the bolt that are only held in proper alignment if they remain clamped together.)
    3) Remove lower timing chain cover bolts, then pry off the lower timing chain cover (it is basically glued-on with a gasket goop). Most likely you will bend the sheetmetal cover prying it off : Buy a new cover.
    4) Zip tie the timing chains so that they can't skip teeth when you remove the tensioner.
    5) Replace the tensioner, then pull the release pin on it (not sure if it is a pin or a clip)
    6) Remove zip ties.
    7) Install new lower timing cover (with a new crank seal) using the VW specified anerobic sealing goop (search for the part number, here or VWVORTEX.COM)
    8) Remove the center bolt and the added washer/spacer, then immediately install the crank pulley and install the center bolt (no washer), and tighten using the holding tool to counter the tightening torque.

  3. #3
    Established Member Two Rings
    Join Date
    Jul 05 2015
    AZ Member #
    340642
    Location
    CT, USA

    Ok thanks,

    I should have explained, the T10531/1 tool isn't the big bar that holds the crank while you loosen the bolt. It looks like this:


    But from what you say, it sounds like it should be doable without it, and just use the press washer. Thanks. One reason I'm opening all this up is to check and see if the dealer messed up my timing. How would I know if the chain sprocket behind the pulley was allowed to slip previously? Is it safe to remove it, look at the back of it to make sure the teeth were lining up properly, and then put it back on how it was? Or should it never be allowed to move?

  4. #4
    Veteran Member Four Rings
    Join Date
    Sep 24 2014
    AZ Member #
    284729
    My Garage
    2015 Audi Q3 Quattro, 2017 Corvette M7 Grand Sport, 2017 Audi SQ5, 2019 Porsche Macan, 24 Jetta GLI
    Location
    Central NJ

    http://forums.vwvortex.com/showthrea...nsioner-Update

    Not sure what that tool (above post) is for???

  5. #5
    Veteran Member Three Rings
    Join Date
    Jun 26 2009
    AZ Member #
    44247
    Location
    Bremerton WA

    Good timing, I am about to do this job this weekend, if my parts come in. I may have to make a crank pulley holder if I can't source one in time.
    VMR 710's, APR software, Eurocode HFC

  6. #6
    Established Member Two Rings
    Join Date
    Jul 05 2015
    AZ Member #
    340642
    Location
    CT, USA

    Ok, I've seen that link. It seems to leave out the part about holding the sprocket onto the crankshaft while the pulley is off. It looks like he removed his completely. And just for an FYI, here's just the first 2 pages showing where that tool goes... it goes on for a couple more. I was hoping all of that wasn't necessary.


  7. #7
    Veteran Member Four Rings
    Join Date
    Sep 24 2014
    AZ Member #
    284729
    My Garage
    2015 Audi Q3 Quattro, 2017 Corvette M7 Grand Sport, 2017 Audi SQ5, 2019 Porsche Macan, 24 Jetta GLI
    Location
    Central NJ

    It looks like VW/Audi had to develop a tool to absolutely prevent the possibility of the timing chain drive sprockets to slip timing alignment teeth, which can happen when the center bolt is loosened. The timing sprockets are a weird design on this engine, the interlocking teeth on the faces of the sprockets and the end of the crankshaft, and are only held together (in correct timing) by the axial force of the center bolt clamping the crank pulley to the face of the sprockets, to the face of the crankshaft. Even if you are careful, valve spring tension on the camshafts can cause a few degrees of camshaft rotation "pop", thru the chain, causing the sprocket to rotate when the center bolt is removed (without this T10531 tool). The tool works because it ("Counter Hold Tool")temporarily clamps the crank pulley against the block when the center bolt is removed, and then the clamping force is provided by the "Installing Tool", before the "Counter Hold" tool is removed with the crank pulley.

    To be 100% safe, I think you need this tool to do this job.

    Not sure how you can check for the correct timing/alignment, if you suspect it is "off". There might be some timing marks on the camshaft sprockets (at the head), and a timing mark on the bottom crank end, and bottom sprockets. Read the factory service manual for the procedure to remove and replace the camshafts, that should indicate how to align them properly. Shitty if your dealer messed this up.

  8. #8
    Veteran Member Three Rings
    Join Date
    Jun 26 2009
    AZ Member #
    44247
    Location
    Bremerton WA

    I believe this is why you have to have the crank pulley at the TDC timing mark. This is help prevent valve springs from applying pressure on the cam surfaces and trying to go out of time. From what I've seen interlocking teeth on the crankshaft and timing gear do have "double tooth" or wide spot (sort of like the wide space on a spline shaft)to ensure positive timing. I plan on having the upper cover off as well to see the cam alignment and I want to check my cam bridge while there for the screen failure issue. This is what I've seen from parts drawings, I have yet to actually see this in person yet so verify any of it.

    Edit. thanks S4 for the link in Post 4, inside that is a another link to how the job went wrong that is worth its weight in gold. I will definitely pick up the fancy washer tool. https://vw.snapon.com/SpecialToolsDe...at_Name=Engine I
    Last edited by van462; 07-28-2015 at 05:15 PM.
    VMR 710's, APR software, Eurocode HFC

  9. #9
    Established Member Two Rings
    Join Date
    Jul 05 2015
    AZ Member #
    340642
    Location
    CT, USA

    Ok understood, thanks for the insight S4'ed. I'll look into how to properly align the sprockets if they are removed. (it seems like there has to be a way to verify it. But if it was easy, why all the stress on making absolutely sure that the sprockets don't move? -I wonder)

    Van- I'm doing much of the same stuff,

    Dealer said my head and cams are toast and need to be replaced,
    Figured I'll look into it myself, I'm getting an occasional stumble and camshaft position sensor code, I'm wondering if a loose chain could be the culprit.

    -try to verify the timing
    -possibly replace chains and tensioners
    -possibly replace bearing bridge (after checking the screen)
    -possibly replace cam follower on fuel pump
    (all this depends on how bad the level of horror is that I find inside)

  10. #10
    Veteran Member Three Rings
    Join Date
    Jun 26 2009
    AZ Member #
    44247
    Location
    Bremerton WA

    You may not have the cam follower problem. The CAEB motor has a roller on the exhaust cam vs the cam follower button on the intake cam the previous FSI 2.0 had. I haven't heard of any problems with the roller/cam.
    VMR 710's, APR software, Eurocode HFC

  11. #11
    Established Member Two Rings
    Join Date
    Jul 05 2015
    AZ Member #
    340642
    Location
    CT, USA

    Ah great to hear, an indy shop told me that this could be a problem. Maybe he was thinking of the previous iteration.

  12. #12
    Veteran Member Four Rings
    Join Date
    Sep 24 2014
    AZ Member #
    284729
    My Garage
    2015 Audi Q3 Quattro, 2017 Corvette M7 Grand Sport, 2017 Audi SQ5, 2019 Porsche Macan, 24 Jetta GLI
    Location
    Central NJ

    [QUOTE=van462;10928386]I believe this is why you have to have the crank pulley at the TDC timing mark. This is help prevent valve springs from applying pressure on the cam surfaces and trying to go out of time "

    Having it at TDC does not eliminate the tendency for valve spring pressure on a cam lobe from rotating a cam and the sprocket out of alignment (when the crank pulley center bolt is removed) ; Even at TDC, at least one of the cam followers is going up a cam lobe slope. There really isn't any crankshaft position that results in none of the cam lobe ramps having valve spring pressure on it.

  13. #13
    Established Member Two Rings
    Join Date
    Jul 05 2015
    AZ Member #
    340642
    Location
    CT, USA

    probably a stupid question, I forgot to take note before dismantling. What direction does the crankshaft rotate while the engine is running? Clockwise when looking at it from the front of the car?

  14. #14
    Veteran Member Four Rings
    Join Date
    Sep 24 2014
    AZ Member #
    284729
    My Garage
    2015 Audi Q3 Quattro, 2017 Corvette M7 Grand Sport, 2017 Audi SQ5, 2019 Porsche Macan, 24 Jetta GLI
    Location
    Central NJ

    Clockwise when looking at the crankshaft from the front of the car....

  15. #15
    Established Member Two Rings
    Join Date
    Jul 05 2015
    AZ Member #
    340642
    Location
    CT, USA

    Hopefully the last of my simple questions, what sealants have people used for the lower timing chain cover and the cam cover?

    Permatex ultra black comes up when I use their product selector.
    http://www.permatex.com/products-2/p...r-82180-detail

    But I recall seeing somewhere that the Anerobic gasket maker was necessary for one of those

  16. #16
    Veteran Member Three Rings
    Join Date
    Jun 26 2009
    AZ Member #
    44247
    Location
    Bremerton WA

    I ordered permatex anaerobic 51813. http://www.permatex.com/products-2/p...t-maker-detail Loctite 515 or 518 also should work. How did your upper timing chain cover gasket look when it came off?
    VMR 710's, APR software, Eurocode HFC

  17. #17
    Established Member Two Rings
    Join Date
    Jul 05 2015
    AZ Member #
    340642
    Location
    CT, USA

    It seems to look okay, I might replace it anyway since a new one is only $11. You used that sealant for both the lower cover and the cam cover right?

  18. #18
    Veteran Member Three Rings
    Join Date
    Jun 26 2009
    AZ Member #
    44247
    Location
    Bremerton WA

    Haven't started mine yet. My parts should be in today, minus the one crankshaft tool, which likely won't get here until mid next week.
    VMR 710's, APR software, Eurocode HFC

  19. #19
    Veteran Member Four Rings
    Join Date
    Sep 24 2014
    AZ Member #
    284729
    My Garage
    2015 Audi Q3 Quattro, 2017 Corvette M7 Grand Sport, 2017 Audi SQ5, 2019 Porsche Macan, 24 Jetta GLI
    Location
    Central NJ

    I would get the VW specified gasket stuff from the dealer. The part numbers are in the Service Manual.

  20. #20
    Established Member Two Rings
    Join Date
    Jul 05 2015
    AZ Member #
    340642
    Location
    CT, USA

    Unfortunately my service manual doesn't list any part numbers. When it refers to the sealant, it says to consult the parts catalog for part numbers. Audi's parts website doesn't come up with anything when you type in sealant or silicone.

    ECS has this crazy expensive one

    http://www.ecstuning.com/News/Audi_2...kets/ES463634/

    A few places seem to list this one as acceptable:

    http://www.ecstuning.com/Search/Site...alant/ES11836/

  21. #21
    Veteran Member Four Rings
    Join Date
    Sep 24 2014
    AZ Member #
    284729
    My Garage
    2015 Audi Q3 Quattro, 2017 Corvette M7 Grand Sport, 2017 Audi SQ5, 2019 Porsche Macan, 24 Jetta GLI
    Location
    Central NJ

    D 154 103 A1
    Above is the VW specified sealant, this is the expensive stuff that ECS tuning sells. The cheaper stuff might be the same..who knows...

  22. #22
    Veteran Member Four Rings jfo's Avatar
    Join Date
    Nov 17 2010
    AZ Member #
    67149
    Location
    Courtenay, BC, Canada

    FWIW...Last year I replaced the cam cover on an older Volvo, using a regular anaerobic sealer(non Audi). It was a Permatex product at a reasonable price from a local auto parts supplier. It's an aluminum cam cover on an aluminum block and has worked as expected...no leaks. It would seem that there is nothing unusual about sealing the cam cover to the block on the A4 engine, or the chain cover to the block.
    2011 A4 Avant

  23. #23
    Veteran Member Three Rings DoItAllGarage's Avatar
    Join Date
    Oct 29 2013
    AZ Member #
    127509
    Location
    WA to ID

    Here are some pics that may help. I would still use the audi tool to be on the safe side. Permatex Ultra Copper RTV will work just fine. http://lovetodiyandmore.com/page8.php?category=19

Bookmarks

Posting Permissions

  • You may not post new threads
  • You may not post replies
  • You may not post attachments
  • You may not edit your posts
  •  


    © 2001-2025 Audizine, Audizine.com, and Driverzines.com
    Audizine is an independently owned and operated automotive enthusiast community and news website.
    Audi and the Audi logo(s) are copyright/trademark Audi AG. Audizine is not endorsed by or affiliated with Audi AG.