Audizine - An Automotive Enthusiast Community

Page 2 of 19 FirstFirst 123412 ... LastLast
Results 41 to 80 of 739
  1. #41
    Veteran Member Four Rings a4darkness's Avatar
    Join Date
    Dec 01 2007
    AZ Member #
    23015
    Location
    San Jose CA

    Guest-only advertisement. Register or Log In now!
    < adds to list >

    Quote Originally Posted by AvantJunkie View Post
    The brass T would definitely be the smart way to go to avoid the same thing happening down the road. I had literally just replaced all of my vacuum lines and check valves one month prior to this T fitting cracking, therefore I was scratching my head when I got the rough idle and vac leak code. I ended up finding it on accident when I reached under the intake mani and it broke in two in my hand.
    Props man.
    Last edited by a4darkness; 09-16-2010 at 07:47 PM.

  2. #42
    Veteran Member Four Rings a4darkness's Avatar
    Join Date
    Dec 01 2007
    AZ Member #
    23015
    Location
    San Jose CA

    Quote Originally Posted by tapA4 View Post
    hah I hate to quote all of this.... but the grey that you "omitted" is that #67? I'm looking at the topical view and the behind view of the pictures and have seemed to confuse my self...

    Dude, ask away... that's why I started this thread. Well, that and I needed to figure out what I'm looking at.

    I thought the same at least three times so I went back to the car and shot a bunch of pics at different angles to be certain I was both tracing the paths correctly and matching the part numbers up right. Check this out...


  3. #43
    Veteran Member Four Rings a4darkness's Avatar
    Join Date
    Dec 01 2007
    AZ Member #
    23015
    Location
    San Jose CA

    Well, how ya like them apples. Good lookin out alfalfa. Nixing these suckers from the list as well.

    Quote Originally Posted by alfalfa164 View Post
    I remember having problems with the fuel line hose clamps a while back. They would tend to loosen after 5-10k (I'm guessing due to vibration?). Happened more than once. Ended up switching back to the standard type, but probably could have gotten around the problem by using a bit of loctite.

  4. #44
    Senior Member Four Rings spector's Avatar
    Join Date
    Sep 08 2009
    AZ Member #
    47478
    Location
    SE

    "I'm omitting #24 and #67 from this portion of the project as well as this gray valve (dead center in the pic below). It's located just over to the left of the cluster yet still behind the engine."

    you also mentioned omitting the gray valve as well.. I can't even find that gray valve on the diagram! It looks there is another line off the valve cover next to part 13 (the y-shaped elbow hose / breather hose) but that part is not shown on the ETKA diagram. wtf?!

  5. #45
    Veteran Member Four Rings a4darkness's Avatar
    Join Date
    Dec 01 2007
    AZ Member #
    23015
    Location
    San Jose CA

    Yup, you got it. Mysterious valve is mysterious. It's not in the ETKA illustrations pertaining to the vac system (meaning it's likely for something else). I keep going through other illustrations trying to find something visually related yet efforts thus far have been futile.

    < shakes fist >

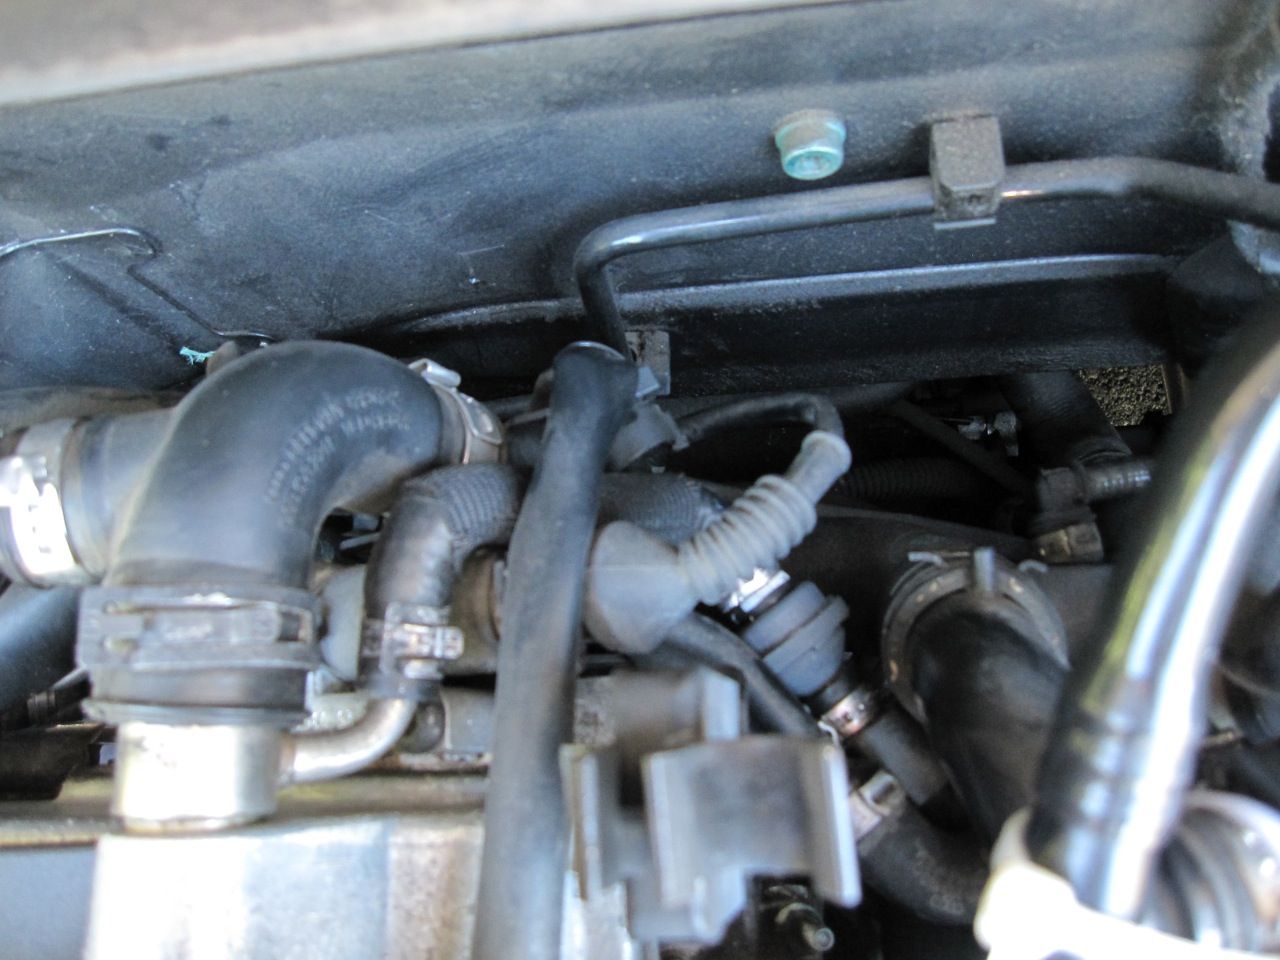
    Like you mentioned, the mysterious gray valve shown (located to the far left of the DebacleCluster) is connected to the small metal tube coming off the back of the valve cover seen here:


    From there it runs down underneath the engine somewhere? I haven't spent a good amount of time chasing it quite yet, but I will figure it out and get it I.D.-ed and tagged appropriately. Till then, it's the WTF Check Valve.

    Quote Originally Posted by spector View Post
    "I'm omitting #24 and #67 from this portion of the project as well as this gray valve (dead center in the pic below). It's located just over to the left of the cluster yet still behind the engine."

    you also mentioned omitting the gray valve as well.. I can't even find that gray valve on the diagram! It looks there is another line off the valve cover next to part 13 (the y-shaped elbow hose / breather hose) but that part is not shown on the ETKA diagram. wtf?!

  6. #46
    Veteran Member Four Rings a4darkness's Avatar
    Join Date
    Dec 01 2007
    AZ Member #
    23015
    Location
    San Jose CA

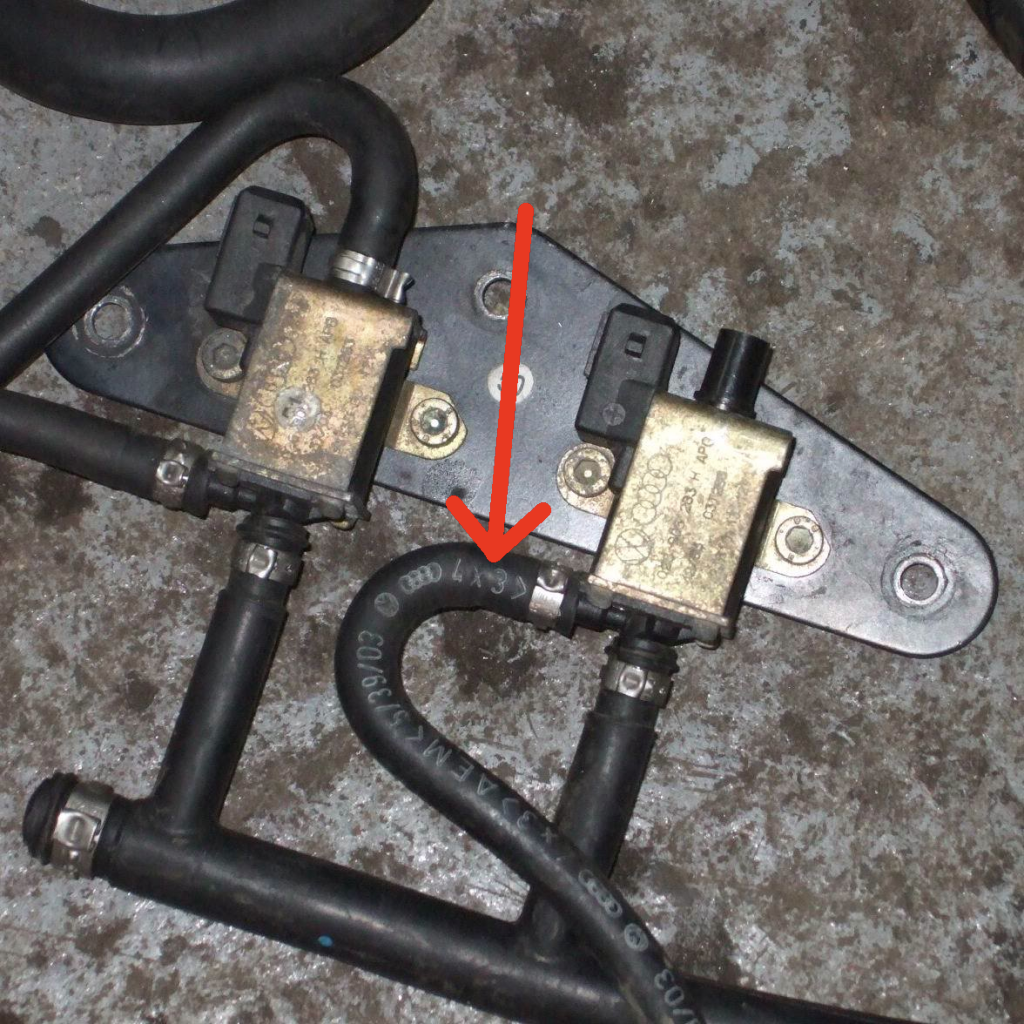
    Another pic from a related thread showing the valve again, but this time in black. I'm starting to think there is not really anything particularly special about this valve and it's just an older one (as at some point Audi switched over to the two-color valves).


  7. #47
    Senior Member Four Rings spector's Avatar
    Join Date
    Sep 08 2009
    AZ Member #
    47478
    Location
    SE

    Part number 50 *is* a different valve, but that's in a previous picture.

    It is wider in diameter than every other check valve in the car. I actually just yanked it off of my car today. It was a pain in the ass to get to, and the dealer charges $40 something for it. Not cool. The check valve is in bad shape, but it DOES only go one way (though it vibrates a LOT when i blow through it) so I can't tell if that's the culprit. The hoses on either side of it were in pretty bad shape too and were cracked, but not all the way through ** only on the surface. You may want to add that to list of things (I assume you'll turn this into a how to/FAQ) that there is ONE check valve that is different than the rest and there is a also a three-way check valve (but we know about that already).

  8. #48
    Senior Member Four Rings spector's Avatar
    Join Date
    Sep 08 2009
    AZ Member #
    47478
    Location
    SE

    Ok, a few things. First, I think I found your WTF check valve. Look at the ETKA diagram below. Notice that free-floating hose part up top that SAYS it goes to the prv ** but hte PRV (pancake valve) is a two-port valve only. There is not another connection:


    What do you think? From the diagram, it looks like it goes and connects the bleeder valve under the intake manifold.

    OK, next, it's probably worth checking the revision on your PRV (pancake valve). I replaced mine today, which was revision A:


    Nothing came through the hole, but that can't be good. And I don't think any 7 year old vac components are worth keeping...

    OK, next, comes part #67, which is different than all the other check valves. There are actually THREE kinds of check valve on our car: the normal "two-way" check valves (though they should only blow air one way), the single (1) three-way check valve (part #22 in the diagrams), which is near the suction jet pump, and finally, #67, which is a wider diameter check valve than the rest. I pulled it off today, and it looked pretty bad, though the air still flowed through properly. I've marked it up to provide some context:


    The diameter of this hose is quite a bit more than the rest of the normal vac hose, check it out:


    It looks like it's 3/8" ID:


    The check valve is noticeably wider than the other 5-6 check valves in the engine.

    Finally, I replaced the vac hose that runs from the n112 to what I believe is the SAI (metal canister beneath the pancake valve that attaches to the engine? Someone please tell me if that's the correct part.) I showed it here, measured, in case anyone wants to replace it. It takes basic 1/8" vac hose though, nothing special. It is 18" unfolded.


    I think next will be figuring out the best way to replace all the vac components UNDER the manifold. I understand that you pretty much have to buy the whole thing as one unit, since it all comes off together. The dealership quoted me at about $150 (which isn't too bad...) for everything under the manifold vac-wise. I spent that much today just on a PRV, Suction jet pump, and that giant-ass check valve.

  9. #49
    Veteran Member Four Rings a4darkness's Avatar
    Join Date
    Dec 01 2007
    AZ Member #
    23015
    Location
    San Jose CA

    So far I've now seen gray, black and the gray/black check valves all over the engine. So unless there's some definitive evidence showing some difference in the valves (aside of the one 3 way check) they all look the same right now. Oh, and yes... there will be corresponding how-to / WTF / FAQs all up in this.

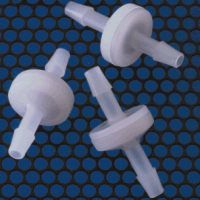
    That said, I've just done some very extensive searching on AZ, QW, AW, Vortex/Fourtitude and a few other sites concerning check valves for any related vehicle / engine. Specifically, I was looking for answers surrounding the use of US Plastics' valves (aka USP). Apparently, they've been widely used for some time now. And I've not found any reports of degradation via heat. While some have run the 3/16 (4.8mm), most all use the 1/4 (6.4mm) in Kynar which is supposedly more resistant to temps and chemicals (ex: oil). So, I'm gonna try those out and see how they work:

    1/4" Kynar® Standard Check Valves
    Item #: 64174
    http://www.usplastic.com/catalog/ite...2234&catid=489


    Quote Originally Posted by spector View Post
    Part number 50 *is* a different valve, but that's in a previous picture.

    It is wider in diameter than every other check valve in the car. I actually just yanked it off of my car today. It was a pain in the ass to get to, and the dealer charges $40 something for it. Not cool. The check valve is in bad shape, but it DOES only go one way (though it vibrates a LOT when i blow through it) so I can't tell if that's the culprit. The hoses on either side of it were in pretty bad shape too and were cracked, but not all the way through ** only on the surface. You may want to add that to list of things (I assume you'll turn this into a how to/FAQ) that there is ONE check valve that is different than the rest and there is a also a three-way check valve (but we know about that already).

  10. #50
    Senior Member Four Rings spector's Avatar
    Join Date
    Sep 08 2009
    AZ Member #
    47478
    Location
    SE

    Quote Originally Posted by a4darkness View Post
    So far I've now seen gray, black and the gray/black check valves all over the engine. So unless there's some definitive evidence showing some difference in the valves (aside of the one 3 way check) they all look the same right now.
    Except for that one which is wider, that comes off the hose which is connected bottom of the Suction Jet pump ** #67 in my diagram and two of the ones you posted above as well.

  11. #51
    Veteran Member Four Rings a4darkness's Avatar
    Join Date
    Dec 01 2007
    AZ Member #
    23015
    Location
    San Jose CA

    Hang on man... let me study what you've posted. ;-)

    I had the window open for some time and just typed in it, posted and it refreshed AFTER your large post. So, it's outta order.

  12. #52
    Senior Member Four Rings spector's Avatar
    Join Date
    Sep 08 2009
    AZ Member #
    47478
    Location
    SE

    Quote Originally Posted by a4darkness View Post
    Hang on man... let me study what you've posted. ;-)

    I had the window open for some time and just typed in it, posted and it refreshed AFTER your large post. So, it's outta order.
    I figured, dude. No worries. Feel free to use what I've posted,I'd like to help you out with this if possible. This has been bugging me for a long time and I hate that the answer to noobs on the forum has been "oh, just yank all that shit out". A comprehensive guide to replacing would be much better, IMO.

  13. #53
    Veteran Member Four Rings a4darkness's Avatar
    Join Date
    Dec 01 2007
    AZ Member #
    23015
    Location
    San Jose CA

    It should be noted that I have a 2003 and am referencing 03 ETKA accordingly.

    Quote Originally Posted by spector View Post
    I think I found your WTF check valve. Notice that free-floating hose part up top that SAYS it goes to the prv ** but hte PRV (pancake valve) is a two-port valve only. From the diagram, it looks like it goes and connects the bleeder valve under the intake manifold.
    I think you're right. Was able to source the illustration you've referenced but unfortunately it does not specify anything pertaining to the valve. Also checked all linked illustrations. My guess is that there's yet another illustration (which I just searched extensively for but could not find) or this was a change from the original design and is not listed in ETKA. For now, I'm leaving it be and staying the course to address the immediate needs in my engine bay.


    Quote Originally Posted by spector View Post
    it's probably worth checking the revision on your PRV (pancake valve). I replaced mine today, which was revision A. And I don't think any 7 year old vac components are worth keeping...
    Excellent call. Mine however is just that... version A. And no, they are not.

    Quote Originally Posted by spector View Post
    next, comes part #67, which is different than all the other check valves. There are actually THREE kinds of check valve on our car: the normal "two-way" check valves (though they should only blow air one way), the single (1) three-way check valve (part #22 in the diagrams), which is near the suction jet pump, and finally, #67, which is a wider diameter check valve than the rest.
    I suspect #67 (aka large check valve) might be the same as our mystery WTF check valve. Two Way vs Three Way pertains to how many openings the valve has (not the direction of airflow).

    Quote Originally Posted by spector View Post
    The diameter of this hose is quite a bit more than the rest of the normal vac hose...
    Yes, well aware thank you. I am not swapping in vac line sized hose for any of these hoses / components.

    Quote Originally Posted by spector View Post
    Finally, I replaced the vac hose...next will be figuring out...replace all the vac components UNDER the manifold...dealership quoted me at about $150...spent that much today just on a PRV, Suction jet pump, and that giant-ass check valve.
    I'll be detailing vac-line replacement around the engine as well. Perhaps ordering the components online will save you some money, will post where I order each piece from shortly... I can pretty much guarantee it'll be far less than what you spent at the dealership.

    Okay, back on track.
    Last edited by a4darkness; 09-19-2010 at 12:25 AM.
  14. #54
    Veteran Member Four Rings a4darkness's Avatar
    Join Date
    Dec 01 2007
    AZ Member #
    23015
    Location
    San Jose CA

    Quote Originally Posted by a4darkness View Post
    I suspect #67 (aka large check valve) might be the same as our mystery WTF check valve.
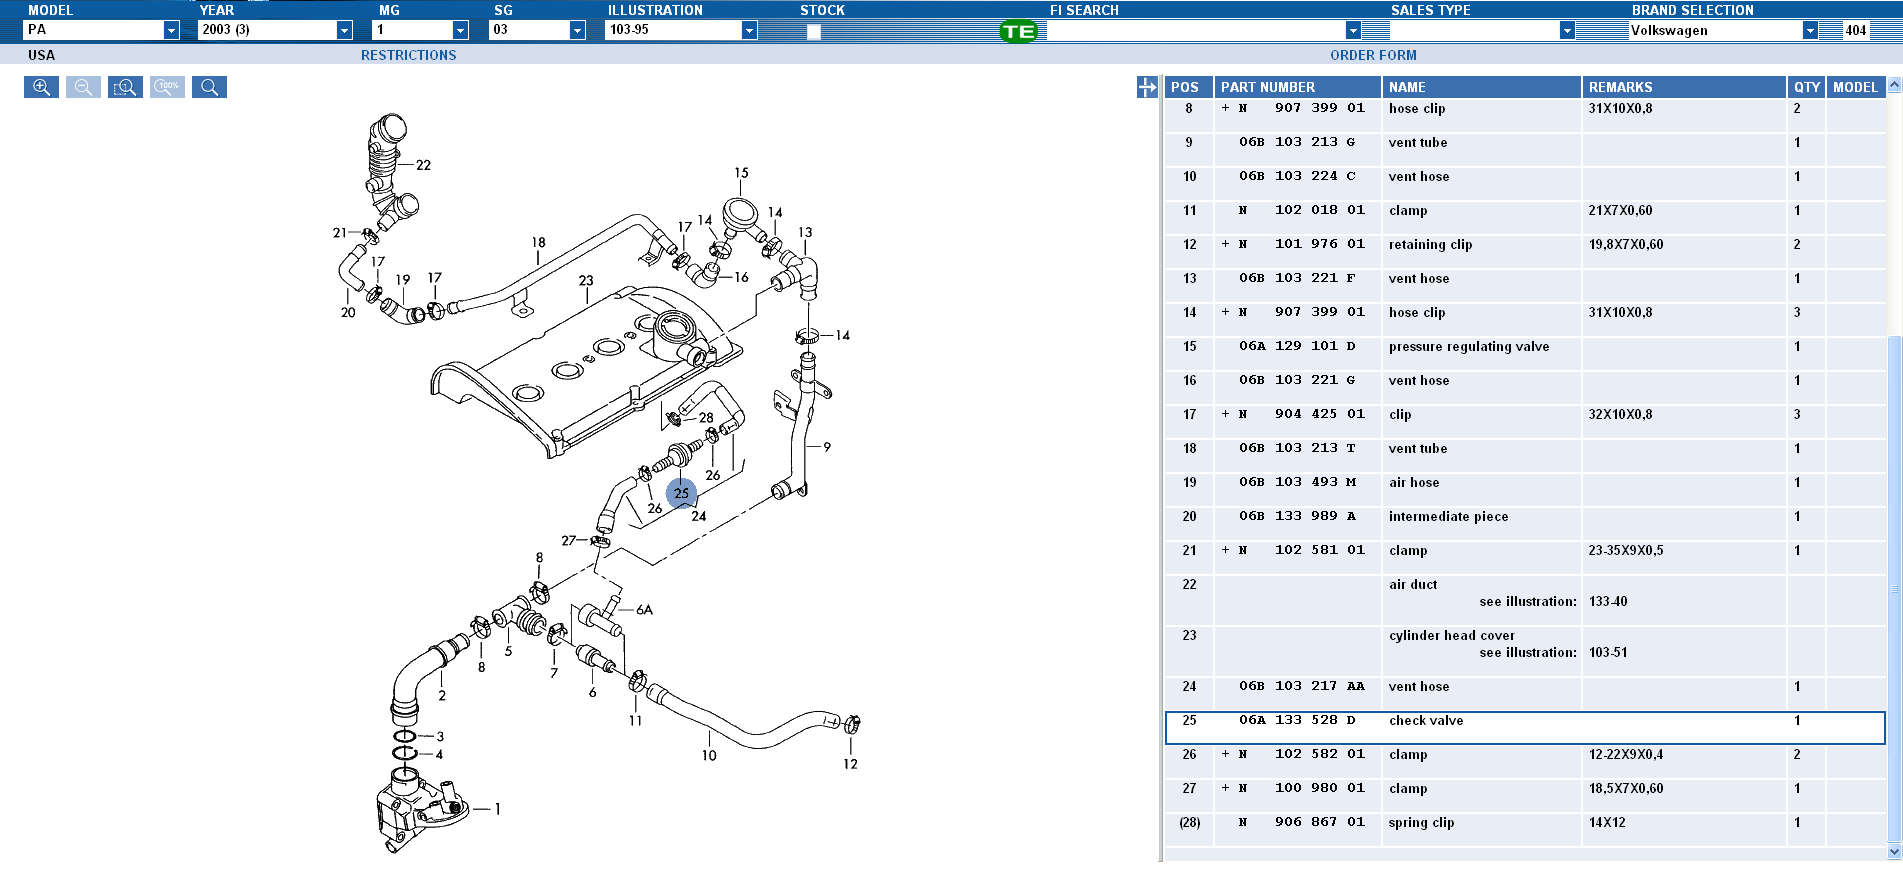
    Was putting together my list and decided to test out this theory. Started searching for just the part # for #67, 06A 133 528 D, and came across a failure on a Passat Board. It referenced the ETKA and strangely enough... there's our missing hoses. So I pulled it up in ETKA and sure enough... check out the number!


    So, the WTF Check Valve will be replaced with 06A 133 528 D aka the Large Check Valve.

    Just realized something... the check valves attached to the 3.5mm vac line are smaller/standard (#50) while the others connected to the crankcase are larger (#67). Good point of reference.
    Last edited by a4darkness; 09-19-2010 at 01:13 AM.

  15. #55
    Established Member Two Rings
    Join Date
    Dec 03 2008
    AZ Member #
    35939
    Location
    Orlando, FL

    Excellent idea.
    I searched hi and low and all I found was "take everything out" threads. It's not what I wanted. I had to do a piece by piece search under the hood like everyone does. If I had a template like this one, it would have been not only easier, but cheaper. Good job.
    BTW, here is some info on the material those check valves are made of:
    "Kynar® PVDF injection molding and extrusion grades are commonly used to handle harsh chemicals for long periods of time. Kynar® PVDF is chemically resistant to halogens (chlorine, bromine, fluorine, iodine) and strong acids even at high temperatures. As a wire jacketing, Kynar® can be irradiated and used to continuous temperatures up to 175°C and is popular for being inherently flame resistant."
    Hope this helps.

  16. #56
    Veteran Member Four Rings a4darkness's Avatar
    Join Date
    Dec 01 2007
    AZ Member #
    23015
    Location
    San Jose CA

    Very good point. I was concerned about this as well... but came across a thread on AW discussing the temp thresholds of these check valves. It was concluded that since the valves are made of Polypropylene Copolymer and have a Kynar coating the temp threshold would be around 320 deg. Obviously there are parts of our engines that can exceed this but the OEM checks are not made of anything special so figured it was worth noting.

    But more so than this, there have been more than a few ppl on different boards who've used them sans issue. I've not come across one post making mention to them melting... only people expressing concern that they might. Bottom line, the feedback has been, "I've been using them for X amount of time w/no problems." That was what convinced me to try em.

    Who knows, maybe they won't work and I'll be posting pics of US Plastic check valve smores in a few weeks! Guess we'll have to wait and see. Would be great to confirm a solid alternative.

  17. #57
    Senior Member Two Rings WhiteA4's Avatar
    Join Date
    Feb 29 2008
    AZ Member #
    25874
    Location
    South Texas

    Great info.. Thanks

  18. #58
    Senior Member Four Rings spector's Avatar
    Join Date
    Sep 08 2009
    AZ Member #
    47478
    Location
    SE

    Quote Originally Posted by a4darkness View Post
    Was putting together my list and decided to test out this theory. Started searching for just the part # for #67, 06A 133 528 D, and came across a failure on a Passat Board. It referenced the ETKA and strangely enough... there's our missing hoses. So I pulled it up in ETKA and sure enough... check out the number!


    So, the WTF Check Valve will be replaced with 06A 133 528 D aka the Large Check Valve.

    Just realized something... the check valves attached to the 3.5mm vac line are smaller/standard (#50) while the others connected to the crankcase are larger (#67). Good point of reference.
    I can confirm that the WTF check valve absolutely is the large check valve. I will tell you right now it is a PAIN in the ass to get to. You have about two inches to work in, and god help you if you have those one-time clamps on there. I probably spent an hour yesterday trying to pull that thing out. It is easier to work in if you have the elbow breather hose removed and the suction jet pump held out of the way.

  19. #59
    Senior Member Four Rings spector's Avatar
    Join Date
    Sep 08 2009
    AZ Member #
    47478
    Location
    SE

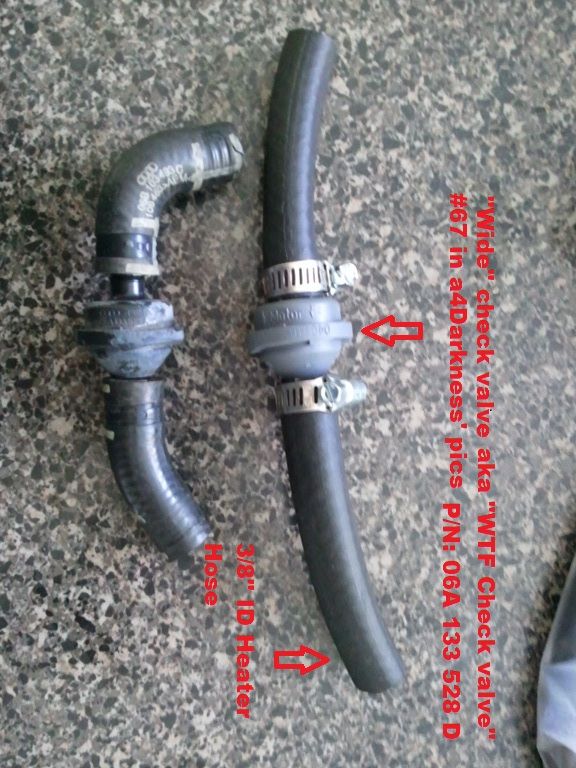
    Ok, here is the old wide check valve (aka WTF valve) next to it's replacement, connected with some 3/8" ID Heater hose:


  20. #60
    Veteran Member Four Rings A4 Moda's Avatar
    Join Date
    Jun 11 2005
    AZ Member #
    6844
    My Garage
    2003 Audi A4 1.8TFSM
    Location
    SoCAL- City of Industry

    absolutely great post. This should have been a first in the AZ archvies. Took only 8.5 years for somebody to come up with it. But better late than never.

    My question is, how would one know which direction the flow of air travels?

    It's great that we know what to replace and how, but a check valve in the wrong direction will be detrimental to whatever system one is trying to fix.
    Any insight on this?

    Thanks
    Eurocode TINY Turbo GT71R Eliminator:: REVO Tuning::
    2003 1.8T
    Eliminator||Carbonio V2||ATP EXhaust Manifold ||Neuspeed TIP (Eurocode)||JOE P MBC @ 22PSI B9- Timing 5||Custom 3" Exhaust||Mangaflow Mufflers|| Revo||Reiger||Boser hood||S4 Bixenon Ecodes||LED Tails||Eibach Coilovers||
  21. #61
    Senior Member Four Rings spector's Avatar
    Join Date
    Sep 08 2009
    AZ Member #
    47478
    Location
    SE

    Quote Originally Posted by A4 Moda View Post
    absolutely great post. This should have been a first in the AZ archvies. Took only 8.5 years for somebody to come up with it. But better late than never.

    My question is, how would one know which direction the flow of air travels?

    It's great that we know what to replace and how, but a check valve in the wrong direction will be detrimental to whatever system one is trying to fix.
    Any insight on this?

    Thanks
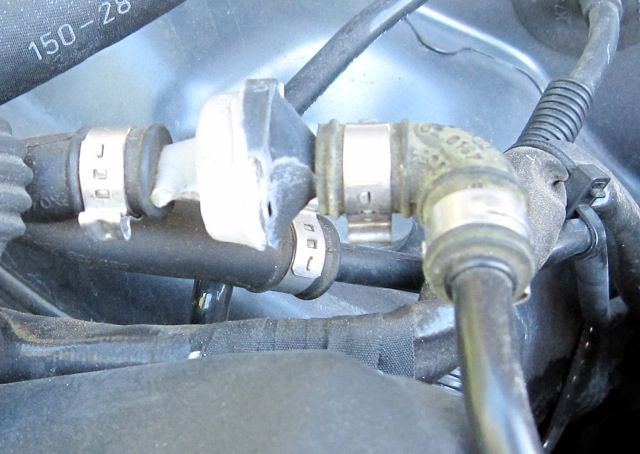
    the check valves actually have arrows on them that point towards where it should flow, and I believe they are all supposed to go TOWARDS the motor, but I could be mistaken. As long as you are just replacing the normal ones, then just put the new ones in the same direction. It helps that they are shaped like little arrows, which go in the direction that the air flows. The larger, more triangular end goes towards the air flow, if that helps.

  22. #62
    Veteran Member Four Rings a4darkness's Avatar
    Join Date
    Dec 01 2007
    AZ Member #
    23015
    Location
    San Jose CA

    Quote Originally Posted by spector View Post
    Ok, here is the old wide check valve (aka WTF valve) next to it's replacement, connected with some 3/8" ID Heater hose
    Woah woah! I had no idea you were planning on swapping in heater hose for the OEM components, that's stellar man. Now I understand why you were measuring the hose vs the vac line (cause I was like ummm, yeah the vac line is smaller than the other stuff, lol... makes so much more sense now).

    If you've sized it to fit for the hoses off the WTF valve, it can likely be used for many of the other components. I was planning on posting a spec parts list today, but I'll alter it to reflect pieces that *could* be swapped w/heater hose. Nice work Keenan, you might have just seriously changed the course of this project in an overwhelming positive manner. (Side note, nice blog too. Was getting some fitness tips last nite.)

    Questions:
    * Is there anything special or particular about the heater hose or is just standard 3/4 heater hose?
    * Do you believe it will be appropriate for the 90deg bend pieces such as the one pictured below?


    The 90deg bend hoses are really inexpensive so I'm not concerned about cost for those, more so about air flow. Eh?

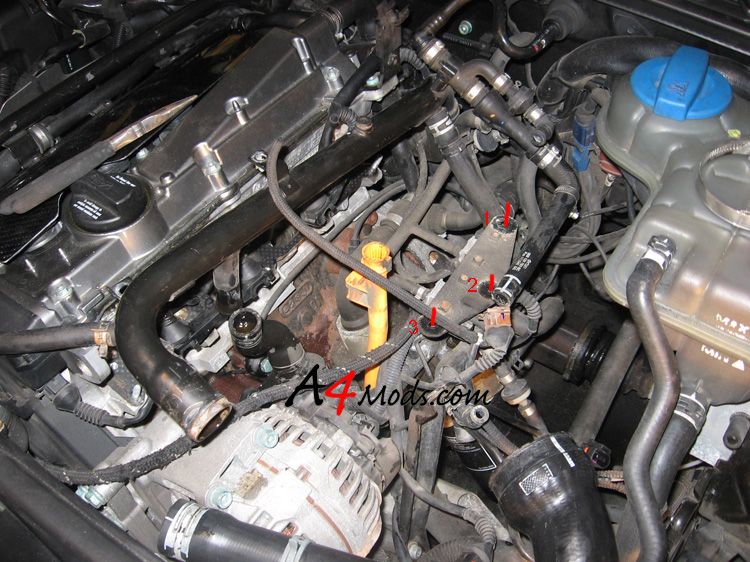
    After quickly going over some of my engine shots, I'm thinking that this 3/8" ID HH could easily be applied to other areas of the engine as well. Probably just have to go section by section and measure. See here:


    Thoughts?

  23. #63
    Veteran Member Four Rings a4darkness's Avatar
    Join Date
    Dec 01 2007
    AZ Member #
    23015
    Location
    San Jose CA

    Quote Originally Posted by A4 Moda View Post
    absolutely great post. This should have been a first in the AZ archvies. Took only 8.5 years for somebody to come up with it. But better late than never
    Thanks Mods. Vac Line replacement on my old B5 was the first serious work I ever did on a car (besides stereo installs and whatnot)... which turned out to be not so serious. Since then, it's always baffled me why no one had ever done this considering that boost / vac leaks are arguably the #1 source of problems for us. Seemed like a pretty good idea.

    Quote Originally Posted by A4 Moda View Post
    My question is... any insight on this?
    Quote Originally Posted by spector View Post
    the check valves actually have arrows on them that point towards where it should flow, and I believe they are all supposed to go TOWARDS the motor, but I could be mistaken. As long as you are just replacing the normal ones, then just put the new ones in the same direction. It helps that they are shaped like little arrows, which go in the direction that the air flows. The larger, more triangular end goes towards the air flow, if that helps.
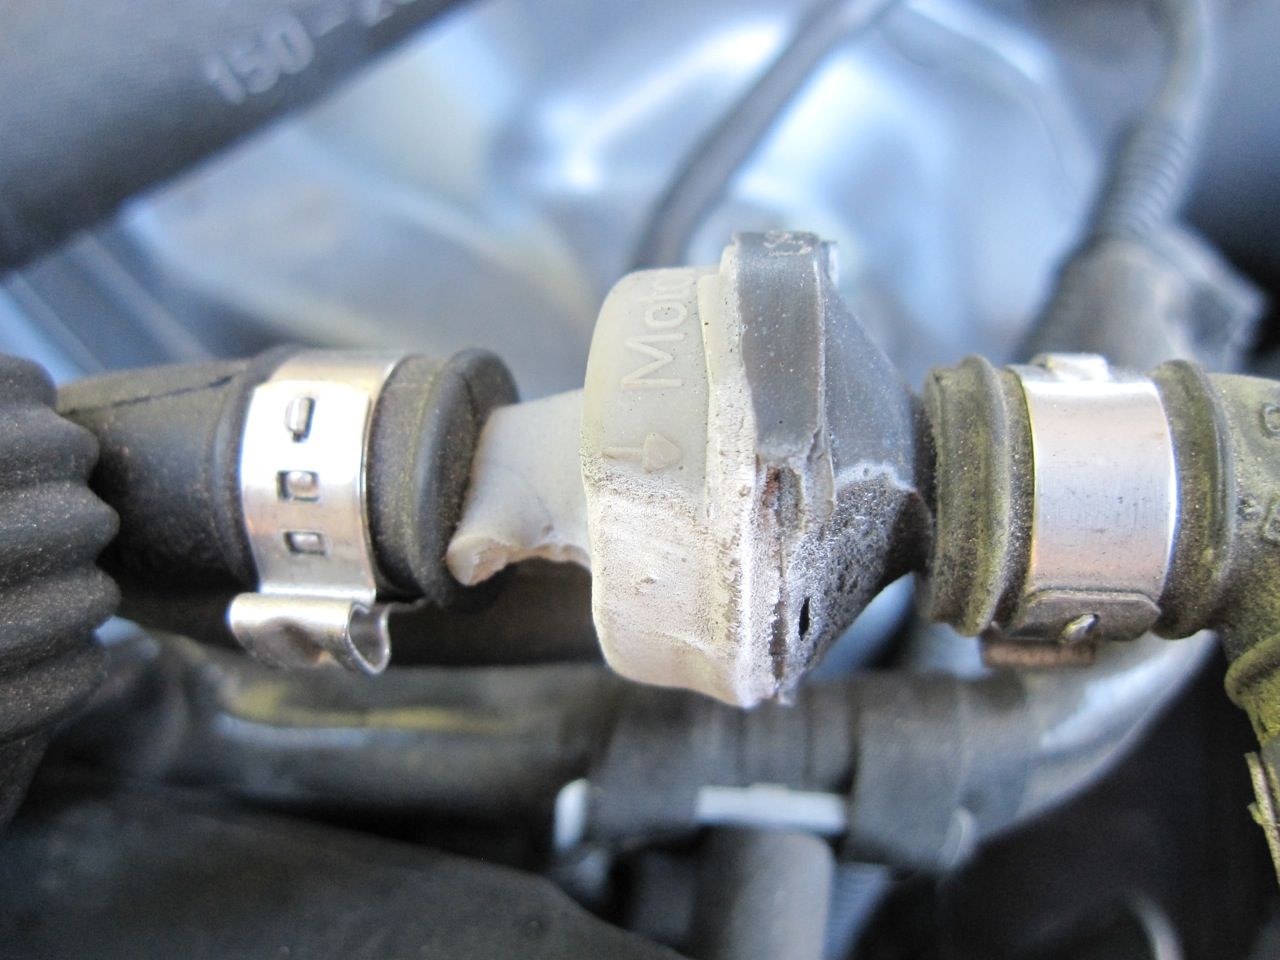
    Just what Keenan said and here's an example. See the arrow there right above the destroyed section? lol Also, I'm fairly certain that the actual shape of the OEM check valves indicates direction. See how it's flat on the left and 'pointing' to the right?


    You bring up an excellent point, we'll need to document the arrow / airflow direction for all check valves. Thanks man.

  24. #64
    Senior Member Four Rings spector's Avatar
    Join Date
    Sep 08 2009
    AZ Member #
    47478
    Location
    SE

    No problem, man. I started my car up after swapping all this stuff and my vac is still around -16 to -18, but I haven't yet put in my new suction jet pump.

    As for the heater hose, I'll tell you right now that trying to get the section of hose from the WTF valve (#67, wide check valve) onto wherever the fuck it goes (the side opposite the suction jet pump) is a PAIN, and i still can't get it all the way on. 3/8" is the right measurement (it fit fine in my GFs kitchen), but I have no leverage because I have no room to work in. Right now it's about 1/3" on there, which is not enough to make me comfortable.

    I saw you took off your intake manifold ** how much of a pain is that? edit: nm, that pic was from a4mods =p just got back from the gym, my blood is NOT in my brain...

    As for the heater hose, a few things:
    -I'm just using "heater hose" from Autozone for like $1 a foot.
    -Many of the connections are bigger than 3/8", I believe they are 1/2"
    -We should figure out how much 3/8" and how much 1/2" total is required
    -I don't know about the 90degree hoses.. I think you can accomplish a lot of that with heater hose, but maybe someone can chime in and tell us why we shouldn't.
    -the very last pic you posted going to the n249 or n112 is just regular silicon vac line (3.5mm?) and the heater hose would be too big for that. If you'll see in the picture above where I measured that one length of hose that was 18" going from the n112 to the SAI part on the engine, that was replaced with regular silicon vac line.

    Finally, I was considering putting together a google docs spreadsheet with all the parts we need to replace as well as the cheapest places to get them. We could include hose type and length there and show what part it is replacing. We'd have to be careful though, because there is a VIN split in '03, and some people will need different parts than others.

    Let me know how you progress, especially under the manifold.

    Glad you enjoy the blog, too!
    Last edited by spector; 09-19-2010 at 01:21 PM.

  25. #65
    Veteran Member Four Rings a4darkness's Avatar
    Join Date
    Dec 01 2007
    AZ Member #
    23015
    Location
    San Jose CA

    Quote Originally Posted by spector View Post
    No problem, man. I started my car up after swapping all this stuff and my vac is still around -16 to -18, but I haven't yet put in my new suction jet pump.
    Never even thought about measuring vac pressure, wish I had a boost gauge. Guess my point of success will be the absence of my CEL. Ha ha ha.

    Quote Originally Posted by spector View Post
    As for the heater hose, I'll tell you right now that trying to get the section of hose from the WTF valve (#67, wide check valve) onto wherever the fuck it goes (the side opposite the suction jet pump) is a PAIN, and i still can't get it all the way on. 3/8" is the right measurement (it fit fine in my GFs kitchen), but I have no leverage because I have no room to work in. Right now it's about 1/3" on there, which is not enough to make me comfortable.
    Heat Gun my friend. That's what ya need. It'll soften up the heater hose just enough to make it pliable.

    Quote Originally Posted by spector View Post
    I saw you took off your intake manifold ** how much of a pain is that?
    No no, not me. Should have specified, those are pics of other ppls engines. Have never removed the intake manifold myself, but don't plan on it... am gonna Gumby it around under there, I hope.

    Quote Originally Posted by spector View Post
    As for the heater hose, a few things:
    -I'm just using "heater hose" from Autozone for like $1 a foot.
    -Many of the connections are bigger than 3/8", I believe they are 1/2"
    -We should figure out how much 3/8" and how much 1/2" total is required
    Gotcha, and good call. But at $1p/foot, buying ~8 feet of each would likely cover what's needed in the engine bay.

    Quote Originally Posted by spector View Post
    -I don't know about the 90degree hoses.. I think you can accomplish a lot of that with heater hose, but maybe someone can chime in and tell us why we shouldn't.
    I'd have a better idea once it's in hand but I'm basically asking if when you bend a section of your heater hose to 90deg, does it pinch and collapse or maintain it's space?

    Quote Originally Posted by spector View Post
    -the very last pic you posted going to the n249 or n112 is just regular silicon vac line (3.5mm?) and the heater hose would be too big for that. If you'll see in the picture above where I measured that one length of hose that was 18" going from the n112 to the SAI part on the engine, that was replaced with regular silicon vac line.
    Actually, if you look at the a4mods pic, you can see the original braided vac line running from the underside of manifold (or where it should be). But I'm unsure the exact diameter but it appears to be very close to the 3/8" ID HH you are using.

    Quote Originally Posted by spector View Post
    Finally, I was considering putting together a google docs spreadsheet with all the parts we need to replace as well as the cheapest places to get them. We could include hose type and length there and show what part it is replacing. We'd have to be careful though, because there is a VIN split in '03, and some people will need different parts than others.
    More power to ya, but good call about the split. I think most of the pieces are quite similar so as long as we list out the part numbers it'll be okay. I was planning on posting some kind of a cumulative summary in the first post (and moving the rest elsewhere) down the road a bit. Once that's done, we can certainly add the spreadsheet. Excellent idea.

    Quote Originally Posted by spector View Post
    Let me know how you progress, especially under the manifold. Glad you enjoy the blog, too!
    Of course, and thank you it's great info. My progress will all be right here. Speaking of which, I gotta order some parts today.

  26. #66
    Veteran Member Four Rings old guy's Avatar
    Join Date
    Dec 28 2006
    AZ Member #
    14483
    My Garage
    '13 A5, '24 Tiguan SEL R-Line
    Location
    Western Maryland

    What an outstanding thread! Massive rep to a4darkness and spector ! I am pleased to see that many of you are taking the approach to maintain the block breathing/evap/SAI systems rather than just ripping it all out. I also really appreciate getting a part # on the "WTF" check valve. I guess I never looked at it close enough to realize it was for a different size hose.

    And as to the direction of the check valves: The flow should always be toward the intake manifold (vacuum source). The purpose of all the check valves is to provide a vacuum source when it is available but to also stop the boost signal when the manifold is under boost.
    Last edited by old guy; 09-19-2010 at 04:37 PM.
    '03 A4 5-MT Motoza tuned Frankenturbo F21L With full supporting mods. Sold (and missed dearly).
    '13 A5 6-MT Needs more Fun Stuff: Neuspeed PM / 3.0 TDI Intercooler / H&R OE Sport Springs / Bilstein B8 Shocks / TyrolSport Brake Stiffeners / ECS Short Shifter / S5 Side Skirts / RS Grille
  27. #67
    Senior Member Four Rings spector's Avatar
    Join Date
    Sep 08 2009
    AZ Member #
    47478
    Location
    SE

    The hose does seem to hold up pretty decent to bending, provided that you don't try to make a straight U-bend.

    That one hose you showed is definitely vac hose, which i think is 3.5mm ID (1/8" ?). Audi uses a really thick hose, so the OD (outer diameter) is similar to the OD of the heater hose I am using. But the internal diameter is the normal vac hose of the the type that runs to the manifold and such.

    I will work on this later: https://spreadsheets.google.com/ccc?...thkey=CIHGz68I

  28. #68
    Senior Member Four Rings spector's Avatar
    Join Date
    Sep 08 2009
    AZ Member #
    47478
    Location
    SE

    Oh, a boost gauge is definitely recommended... And what code are you getting with your CEL?

  29. #69
    Veteran Member Four Rings a4darkness's Avatar
    Join Date
    Dec 01 2007
    AZ Member #
    23015
    Location
    San Jose CA

    Quote Originally Posted by old guy View Post
    What an outstanding thread! Massive rep to a4darkness and spector ! I am pleased to see that many of you are taking the approach to maintain the block breathing/evap/SAI systems rather than just ripping it all out. I also really appreciate getting a part # on the "WTF" check valve. I guess I never looked at it close enough to realize it was for a different size hose.
    Yeah, regardless if I wanted to or not I'd fail Smog miserably and the ref would pretty much laugh me out of the inspection if I went in w/all this stuff ripped out. Besides, it seems to make sense to trust Audi engineers. Well, besides the cup holder. And you bet, least that can be done for all the help you've given everyone in the past.

    Quote Originally Posted by old guy View Post
    And as to the direction of the check valves: The flow should always be toward the intake manifold (vacuum source). The purpose of all the check valves is to provide a vacuum source when it is available but to also stop the boost signal when the manifold is under boost.
    See that, every time he posts I learn something. OGFTMFW.

  30. #70
    Veteran Member Four Rings a4darkness's Avatar
    Join Date
    Dec 01 2007
    AZ Member #
    23015
    Location
    San Jose CA

    Quote Originally Posted by spector View Post
    The hose does seem to hold up pretty decent to bending, provided that you don't try to make a straight U-bend.
    Got it, thank you for testing it. That's all I need. Rad.

    Quote Originally Posted by spector View Post
    That one hose you showed is definitely vac hose, which i think is 3.5mm ID (1/8" ?). Audi uses a really thick hose, so the OD (outer diameter) is similar to the OD of the heater hose I am using. But the internal diameter is the normal vac hose of the the type that runs to the manifold and such.
    Good to know. Related, I've been researching vac line for a while and have a viable replacement, will post it shortly. And nice work on the Google Doc!

    Side note, this pic is boss... appreciate it.


    Quote Originally Posted by spector View Post
    Oh, a boost gauge is definitely recommended... And what code are you getting with your CEL?
    Yeah, I always wanted a Podi but kinda wavered. Perhaps that'll be my reward after this project. And the code is P1868 - Maximum Engine Bay Zip Tie Allotment Exceeded.

  31. #71
    Veteran Member Four Rings a4darkness's Avatar
    Join Date
    Dec 01 2007
    AZ Member #
    23015
    Location
    San Jose CA

    Time for a parts list.

    The purpose of this project was to not only learn + identify but also find viable alternatives to (expensive) OEM parts. So then, I am going w/the US Plastics check valves for the 'standard #50', Heater Hose for non-specific OEM parts where applicable and silicone vac line. After the hours of research, I am confident to try these replacements. Props to spector-Keenan for the inspiration too, +Imaginary Rep for you.

    Besides, if it all goes wonky-monkey-balls you guys will get some entertainment out of watching me screw up. But more importantly, be informed of what not to do. Sweet.


    EDIT -> Parts list now lives in Post 1
    Last edited by a4darkness; 12-22-2011 at 07:40 PM. Reason: cleanup

  32. #72
    Senior Member Four Rings spector's Avatar
    Join Date
    Sep 08 2009
    AZ Member #
    47478
    Location
    SE

    Wow, dude, thanks. This parts list is epic.

    And I have to rescind my previous comment. I made a pretty hard kink in the hose when trying to re-install the WTF valve and it's attachments, and I think my vacuum may be WORSE now than it was a day or two ago... it's kinked so hard it's pulling the suction jet pump and such out of place.. You will probably need to replace the OEM parts for that. Fortunately, they are only a couple bucks. In answer to your previous question: you probably can't use heater hose for the real tight turns

    Edit: for what it's worth, I have ordered vac hose from Verocious motorsports before, when my boost gauge did not come with enough vac line. They have great service, are cheap, and have vac lines available in a variety of colors. I recommend getting a color you like, it looks cool AND lets you easily see what lines you have replaced and what you haven't (I chose silver).
    Last edited by spector; 09-19-2010 at 05:55 PM.

  33. #73
    Veteran Member Four Rings a4darkness's Avatar
    Join Date
    Dec 01 2007
    AZ Member #
    23015
    Location
    San Jose CA

    Ninja edit!

    Certainly, gotta come at this all kinda of effective. I'm not messin around.

    Bummed to hear that the heater hose is kinking on the WTF valve. Actually figured that one would be okay. Damn.

    Hate to ask, you mind taking a pic? I'm really curious to see this! (i.e. - pulling the suction jet pump out of place) Weird.

    Verocious is one of the companies I was considering in addition to the TurboLogic Performance Line here:
    http://www.boostcontroller.com/index.php?category=8

    Was hoping to buy some 3/8" I.D. reinforced heater hose at the same time, hopefully from the same company. And I have been plotting red hose from the get go, good call.

    Quote Originally Posted by spector View Post
    Wow, dude, thanks. This parts list is epic.

    And I have to rescind my previous comment. I made a pretty hard kink in the hose when trying to re-install the WTF valve and it's attachments, and I think my vacuum may be WORSE now than it was a day or two ago... it's kinked so hard it's pulling the suction jet pump and such out of place.. You will probably need to replace the OEM parts for that. Fortunately, they are only a couple bucks. In answer to your previous question: you probably can't use heater hose for the real tight turns

    Edit: for what it's worth, I have ordered vac hose from Verocious motorsports before, when my boost gauge did not come with enough vac line. They have great service, are cheap, and have vac lines available in a variety of colors. I recommend getting a color you like, it looks cool AND lets you easily see what lines you have replaced and what you haven't (I chose silver).
    Last edited by a4darkness; 09-19-2010 at 06:10 PM.
  34. #74
    Veteran Member Four Rings a4darkness's Avatar
    Join Date
    Dec 01 2007
    AZ Member #
    23015
    Location
    San Jose CA

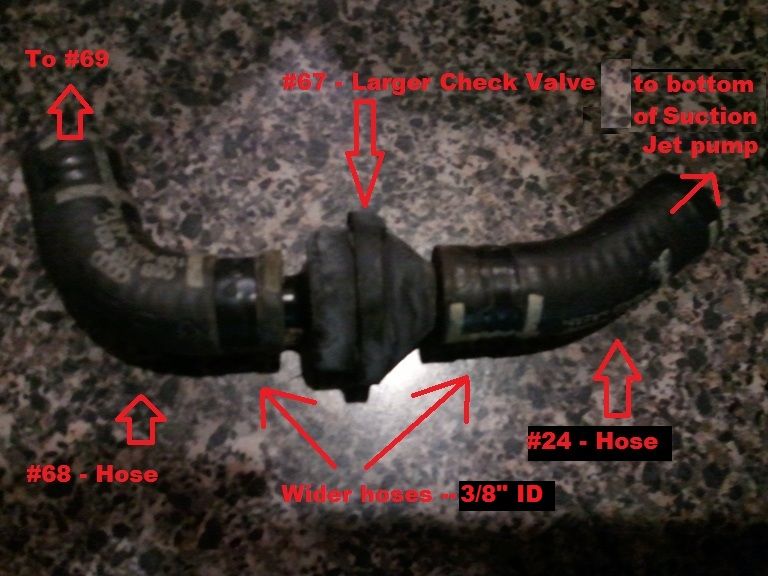
    Ohhh, I thought you were referencing the WTF Valve off the back of the valve cover. Went back and re-read. Now I get it.

    So then, it appears that this heater hose doesn't play nice when bent past 45deg. I'm thinking the Autozone stuff you picked up isn't quite as flexible as some of the silicone stuff. Hmmmm... I'll see what I can do about finding some more flexible heater hose.

    Last edited by a4darkness; 09-19-2010 at 08:28 PM.
  35. #75
    Veteran Member Four Rings a4darkness's Avatar
    Join Date
    Dec 01 2007
    AZ Member #
    23015
    Location
    San Jose CA

    The parts list in post #71 has been amended to not use heater hose for the short bending sections of hose. The parts are pretty inexpensive so it's no large loss. I'll look to use Heater Hose to try and replace some of the longer lines w/less curvature... probably this stuff here:

    Verocious Silicone 1 Ply Heater Hose - Sold by the Foot
    http://www.verociousmotorsports.com/...ld-by-the-Foot

  36. #76
    Veteran Member Four Rings a4darkness's Avatar
    Join Date
    Dec 01 2007
    AZ Member #
    23015
    Location
    San Jose CA

    And it's all been ordered. Now the exciting part... waiting for it to get here.

  37. #77
    Veteran Member Four Rings a4darkness's Avatar
    Join Date
    Dec 01 2007
    AZ Member #
    23015
    Location
    San Jose CA

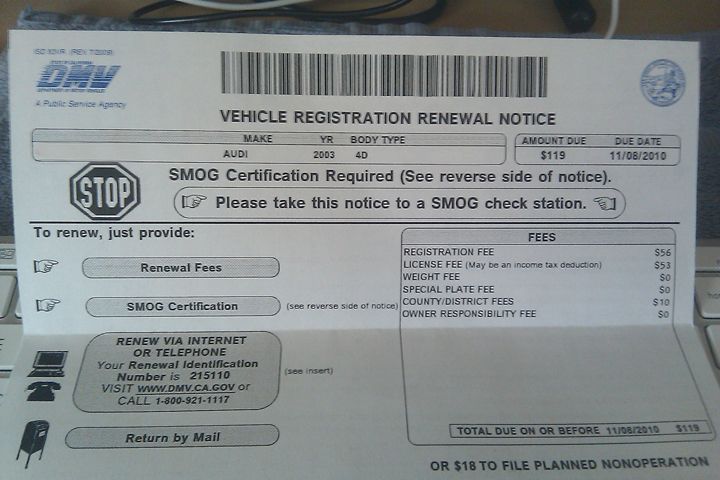
    Obviously the failure of my suction pump needed to be addressed, but I'm also staring down the barrel of this...


    Got some time, but still want to be sure I don't fail. Never fun, especially if you have to go and see the Smog Ref.

  38. #78
    Veteran Member Four Rings a4darkness's Avatar
    Join Date
    Dec 01 2007
    AZ Member #
    23015
    Location
    San Jose CA

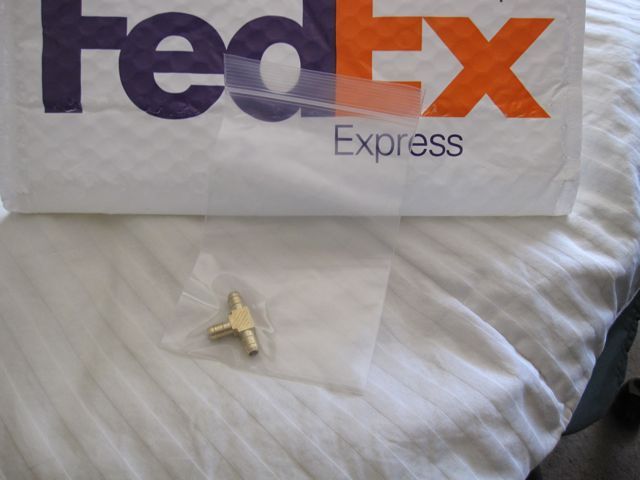
    Good news, the first piece (literally) has shown up. ATP wins the who's gonna get parts to noti the quickest contest.

    Sadly, it is highly anticlimactic.


  39. #79
    Senior Member Three Rings tapA4's Avatar
    Join Date
    Aug 25 2010
    AZ Member #
    63211
    My Garage
    2003 A4 1.8T FWD 5 speed
    Location
    Greenville, SC

    So just to confirm in my own mind, the valve with number 67 (large check valve) is in fact part number 06A 133 528 D?

  40. #80
    Senior Member Four Rings spector's Avatar
    Join Date
    Sep 08 2009
    AZ Member #
    47478
    Location
    SE

    yes:

    FYI, do NOT try and do what I did there with the heater hose. The angles don't work. I kinked the shit out of that hose when I tried it.

Tags for this Thread

Bookmarks

Posting Permissions

  • You may not post new threads
  • You may not post replies
  • You may not post attachments
  • You may not edit your posts
  •  


    © 2001-2025 Audizine, Audizine.com, and Driverzines.com
    Audizine is an independently owned and operated automotive enthusiast community and news website.
    Audi and the Audi logo(s) are copyright/trademark Audi AG. Audizine is not endorsed by or affiliated with Audi AG.