Global Parts List
If you're confused about what you're looking at, try printing out the labeled pictures and comparing them to your engine.
For myself, I need accurate visuals or my brain just will not process. While ETKA was a great start, labeling these pics really filled in the blanks.
Please remember that my A4 is an mid VIN split 2003. If yours is an 02 or early VIN split 03, there will be sizable differences (example PRV/Puck/Pancake Valve attached to the TIP).
If your A4 is like mine or an 04+, again there will be more changes (especially in the crankcase breather system, all the plastic piping under the intake manifold - this will be covered elsewhere ITT).
I've split the parts out by region to make the process easier.
Check Valves, Hoses and Vac Lines
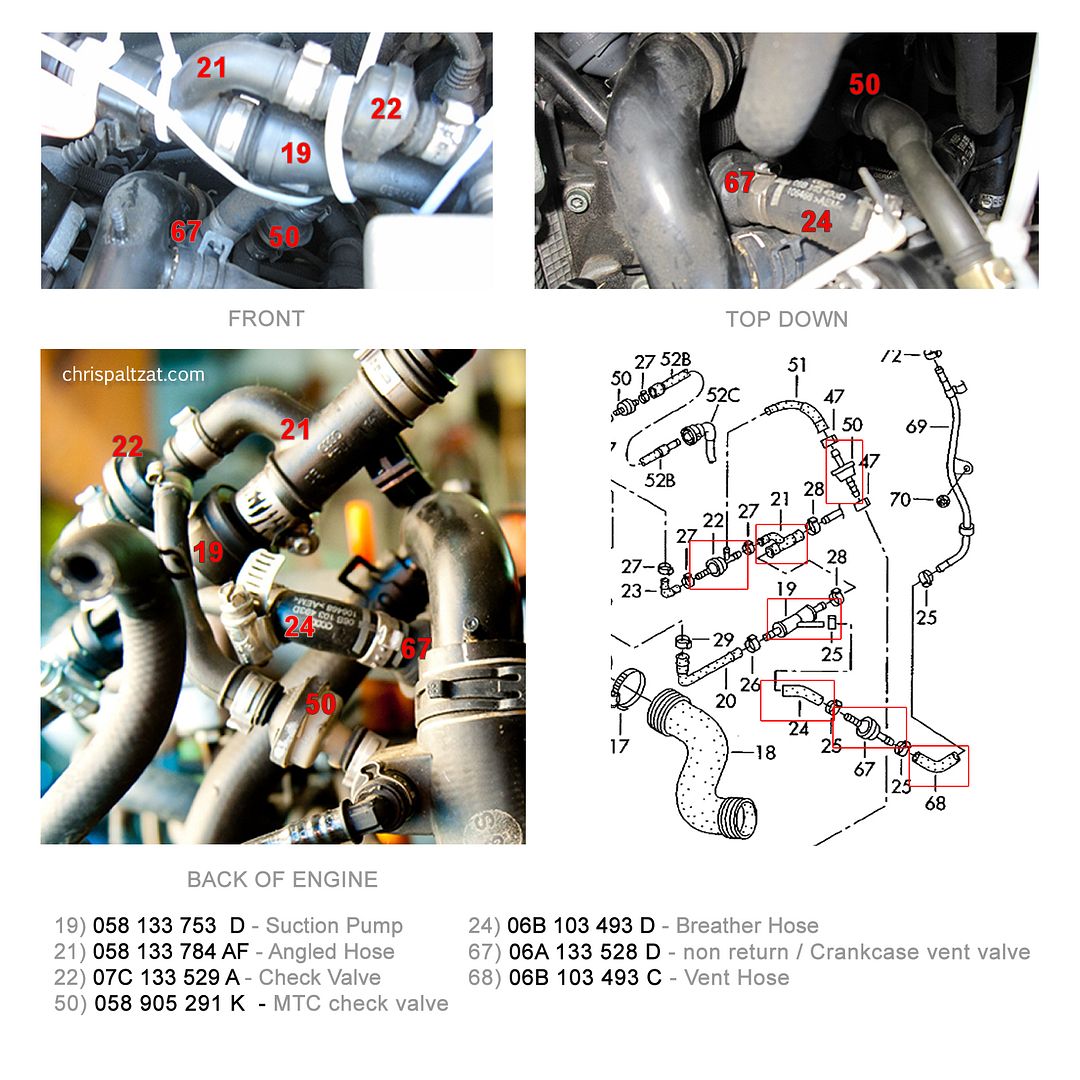
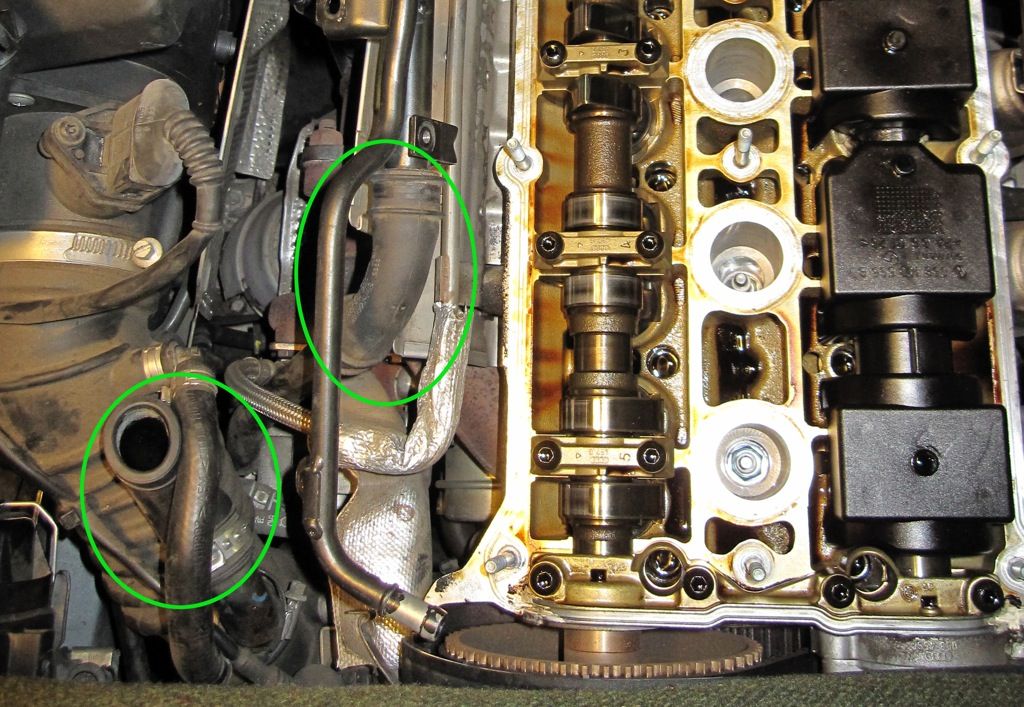
Region 1 -> Directly Behind Manifold

# 19: 058 133 753 D (Suction Pump)
# 21: 058 133 784 AF (3-Way Angled Hose)
# 22: 07C 133 529 A (3-Way Check Valve) -> ONLY use OEM (generic 3-ways are prone to leaking, thx Waldo)
or
US Plastics 1/4" Kynar® Check Valves#64174 and a
US Plastics Natural PVDF Tee 1/4" Tube ID #T0-4NK
# 23: 058 133 394 D (2-Way Angled Hose)
# 24: 06B 103 493 D (Breather Hose)
# 50: 058 905 291 K (2-Way Check Valve) -> use US Plastics
# 67: 06A 133 528 D (non return / crankcase vent valve) aka 'large check valve' -> use
US Plastics 3/8" Kynar® Standard Check Valves #64175
# 67: 06A 133 528 D (non return / crankcase vent valve) aka 'WTF check valve' -> use
US Plastics 3/8" Kynar® Standard Check Valves #64175
# 68: 06B 103 493 C (vent hose)

# 19: 058 133 753 D (Suction Pump)
# 21: 058 133 784 AF (3-Way Angled Hose)
# 22: 07C 133 529 A (3-Way Check Valve)
# 23: 058 133 394 D (2-Way Angled Hose)
# 24: 06B 103 493 D (Breather Hose)
# 50: 058 905 291 K (2-Way Check Valve) -> use US Plastics
# 67: 06A 133 528 D (non return / crankcase vent valve) aka 'large check valve' -> use
US Plastics 3/8" Kynar® Standard Check Valves #64175
# 67: 06A 133 528 D (non return / crankcase vent valve) aka 'WTF check valve' -> use
US Plastics 3/8" Kynar® Standard Check Valves #64175
# 68: 06B 103 493 C (vent hose)
** Note **
After my the initial testing, igo4uga0586 tested and confirmed use of the 3/8" US Plastics check valves. Thanks man.
Region 2 -> Above Airbox, Far Left Passenger Side
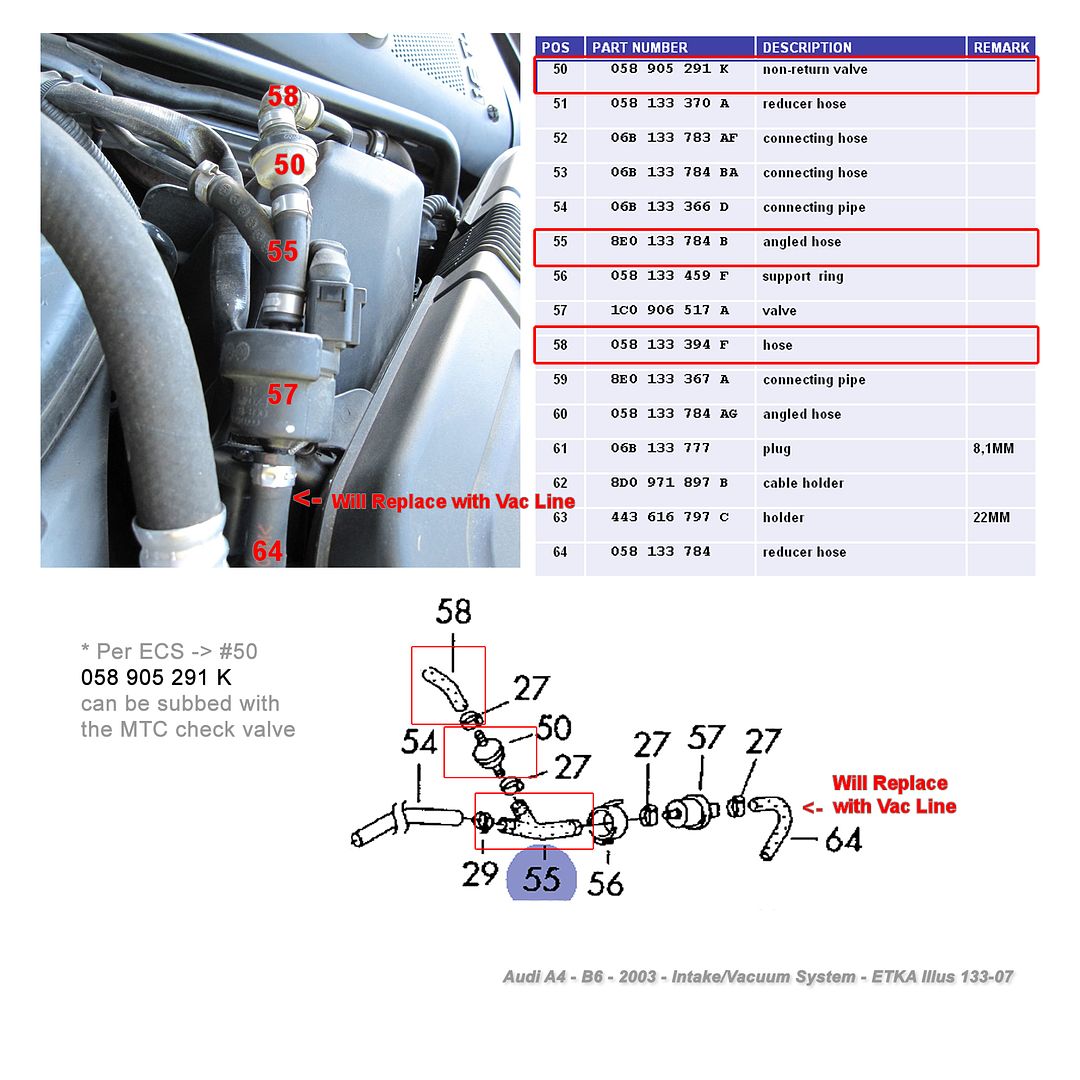
# 50: 058 905 291 K (2-Way Check Valve) -> use US Plastics
# 55: 8E0 133 784 B (Angled Hose, "Y" style)
# 57: 1C0 906 517 A (N80 Vapor Canister Purge Valve) - Search for BOSCH 0280142353 *
# 58: 058 133 394 F (hose, right angled, crank case breather)
# 64: 058 133 784 (Reducer Hose) -> EDIT: Ignore red text on pic above - vac line was too small - either replace with OEM or heater hose
* N80 Valve Info

Originally Posted by
old guy

Vapors from the fuel tank are collected in the carbon canister. The N80 valve is used to regulate the flow of fuel vapors that are drawn into the intake manifold from the carbon canister. The N80 valve is operated by the ECU and is controlled by a duty cycle. The duty cycle will vary depending on engine temperature, oxygen sensor signal, load and speed. When the engine is off, a check valve stops the flow of vapors from entering the engine. This keeps the fuel vapors from entering the intake manifold and causing a rich mixture on restart.
If power to the N80 valve is interrupted or cut off completely when the engine is running, vacuum from the engine will open the check valve to allow tank ventilation.
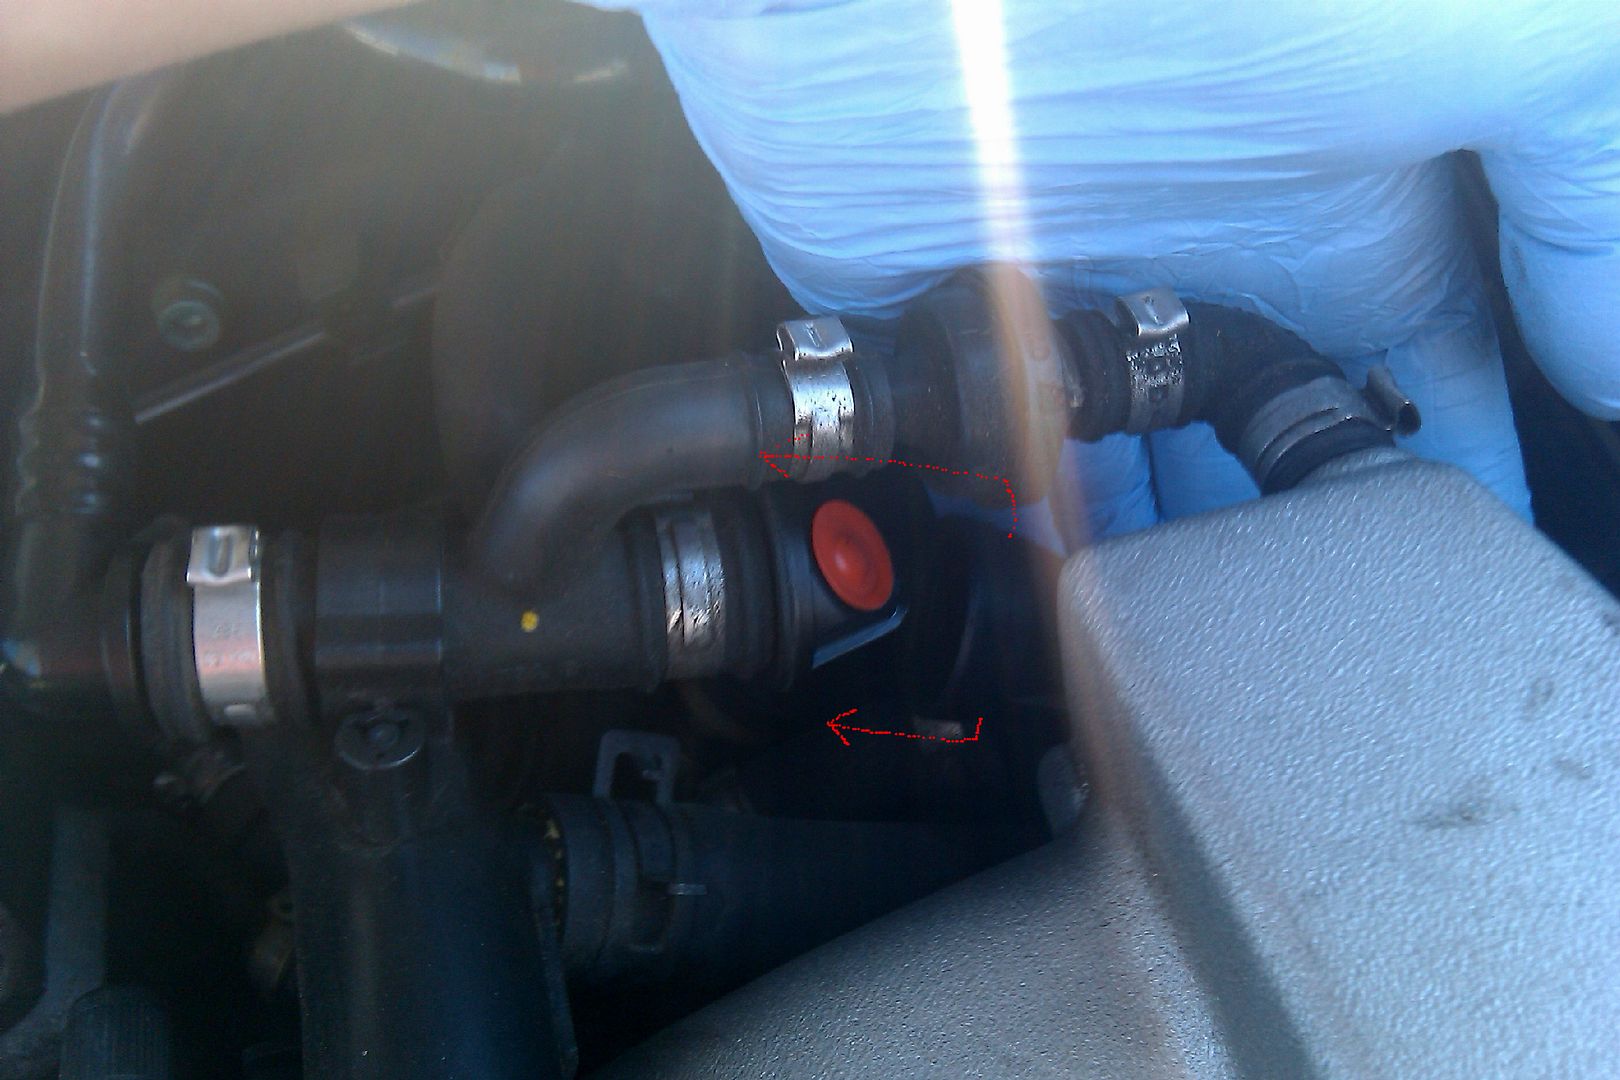
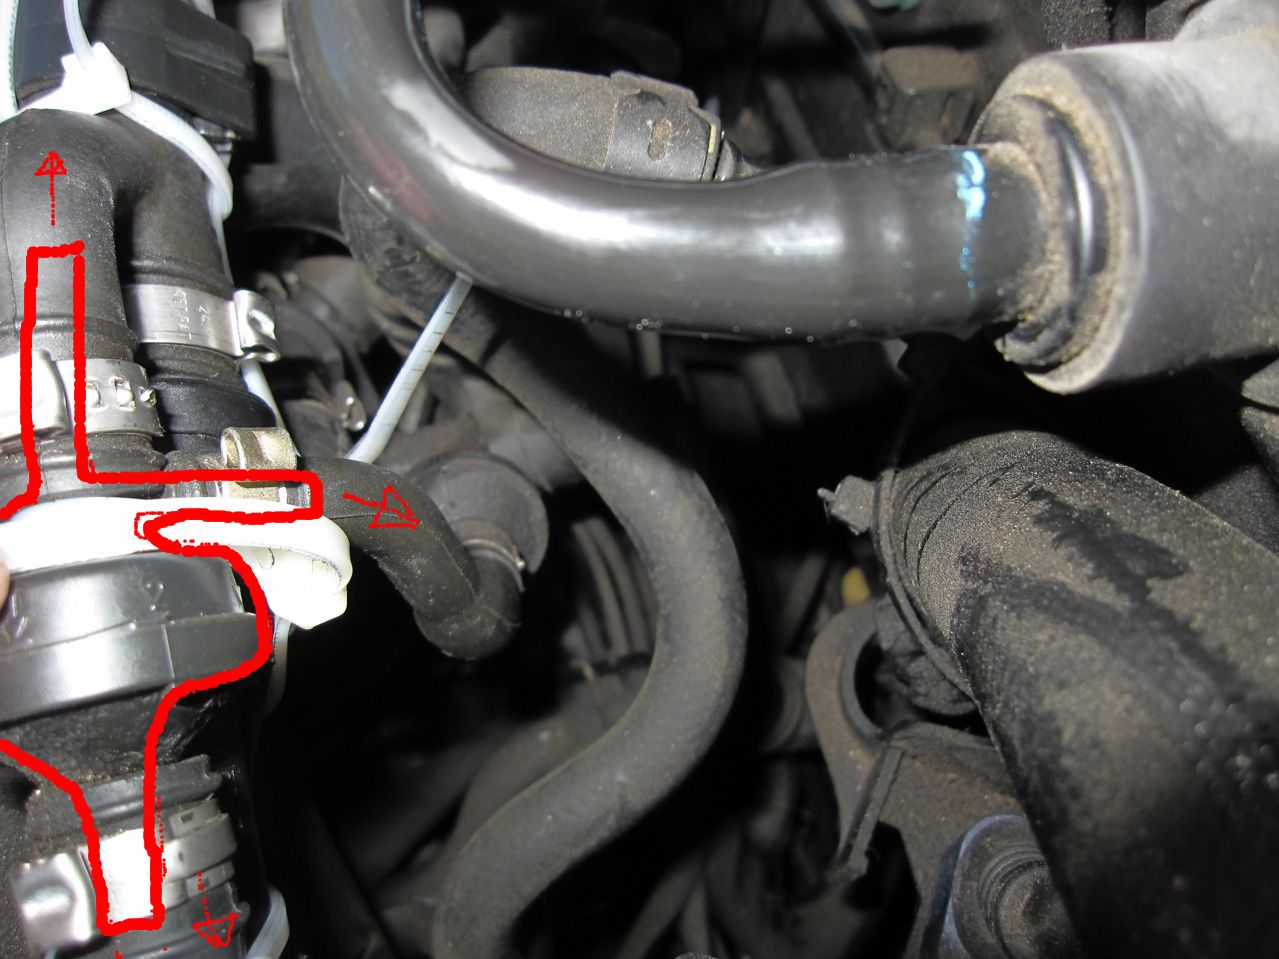
Region 3 -> Below Throttle Body Hose + Intake Manifold, Right Side of Engine
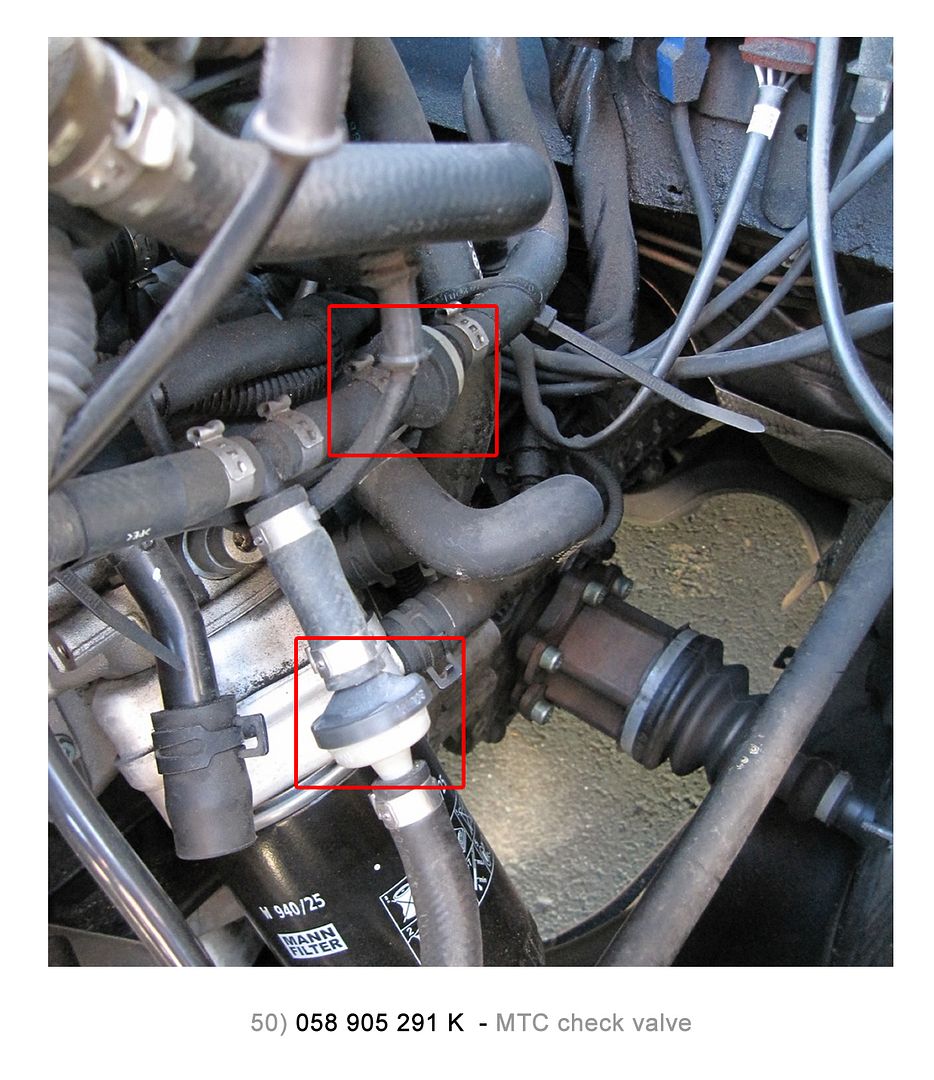
# 50: 058 905 291 K (2-Way Check Valve) -> use US Plastics
# 50: 058 905 291 K (2-Way Check Valve) -> use US Plastics
T-Fitting, black plastic, barbed ends approx 1/4" ID not labeled but in between the 3 lines shown above, can't find a part number for this anywhere.
EDIT 10/2: will be replacing w/one from US Plastics + updating info accordingly
************************************-
Parts Organized by Where to Buy
GAP
http://genuineaudiparts.com/
# 19: 058 133 753 D (Suction Pump)
# 21: 058 133 784 AF (3-Way Angled Hose)
# 22: 07C 133 529 A (3-Way Check Valve) -> only if you really want to, a check valve + tee from US Plastics is a safe alt.
# 23: 058 133 394 D (2-Way Angled Hose)
# 55: 8E0 133 784 B (Angled Hose, "Y" style)
# 58: 058 133 394 F (hose, right angled, crank case breather)
# 67: 06A 133 528 D (non return / crankcase vent valve) aka 'large check valve' -> can be subbed with 3/8" US Plastics
# 67: 06A 133 528 D (non return / crankcase vent valve) aka 'WTF check valve' -> can be subbed with 3/8" US Plastics
# 68: 06B 103 493 C (vent hose)
# 24: 06B 103 493 D (Breather Hose)
US Plastics
# 50: 058 905 291 K (2-Way Check Valve)
x8 (buying an extra set just in case)
US Plastic 1/4" Kynar® Standard Check Valves, Item #: 64174
http://www.usplastic.com/catalog/item.aspx?itemid=32234
# 67: 06A 133 528 D (non return / crankcase vent valve) aka 'large check valve' AND aka 'WTF check valve' -> use OEM or 3/8" US Plastics
x5 (depending on your year / engine configuration)
US Plastic 3/8" Kynar® Standard Check Valves
http://www.usplastic.com/catalog/item.aspx?itemid=36844
# 22: 07C 133 529 A (3-Way Check Valve)
US Plastics 1/4" Kynar® Check Valves#64174
US Plastics Natural PVDF Tee 1/4" Tube ID #T0-4NK
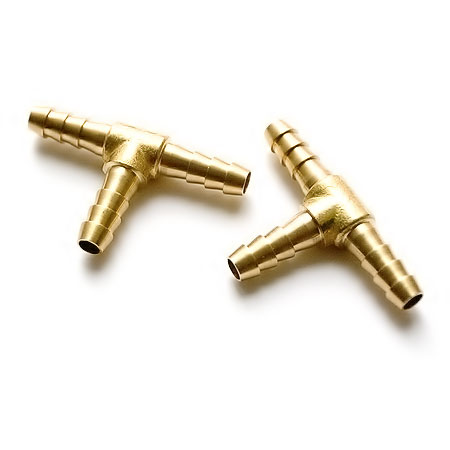
T-Fitting, black plastic, barbed ends approx 1/4" ID, located under intake manifold
Originally Posted by
Rirruto
For the brass 'T', I actually picked one up at AdvancedAuto for about $3. Worked great! It was 1/4" OD and works well with 1/4" hose in that area.
Pics of said Tee under manifold
http://www.audizine.com/forum/showth...=1#post5875659
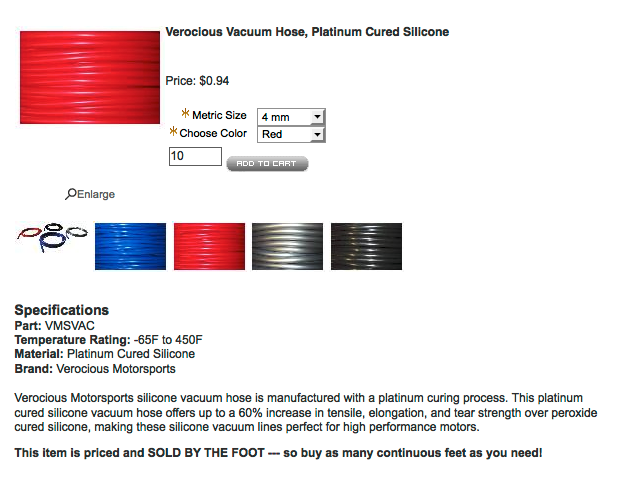
Silicone Vac Line from Verocious MotorSports 4mm ID
x10ft (more than enough)
EDIT: neglected to mention this here, I ordered 3.5mm ID (inner diameter) although 4mm ID is a more appropriate choice (
here's what fitting the 3.5mm ID looks like).
Thanks to idiotec777 for bringing this to my attention.
Verocious Vacuum Hose, Platinum Cured Silicone
https://www.verociousmotorsports.com...ld-by-the-Foot
And for quick reference, Verocious' Vac Line + Hose Inner Diameter Chart (in case you're curious about hose sizes you might already have)
************************************-
* If for some reason you'd rather not use the US Plastics check valves, the lowest prices for the "#50 standard 2-way MTC check valve" (058905291K) can be found below. But you'll be wasting your $$.
+++++++++++++++++++++++++++++++++
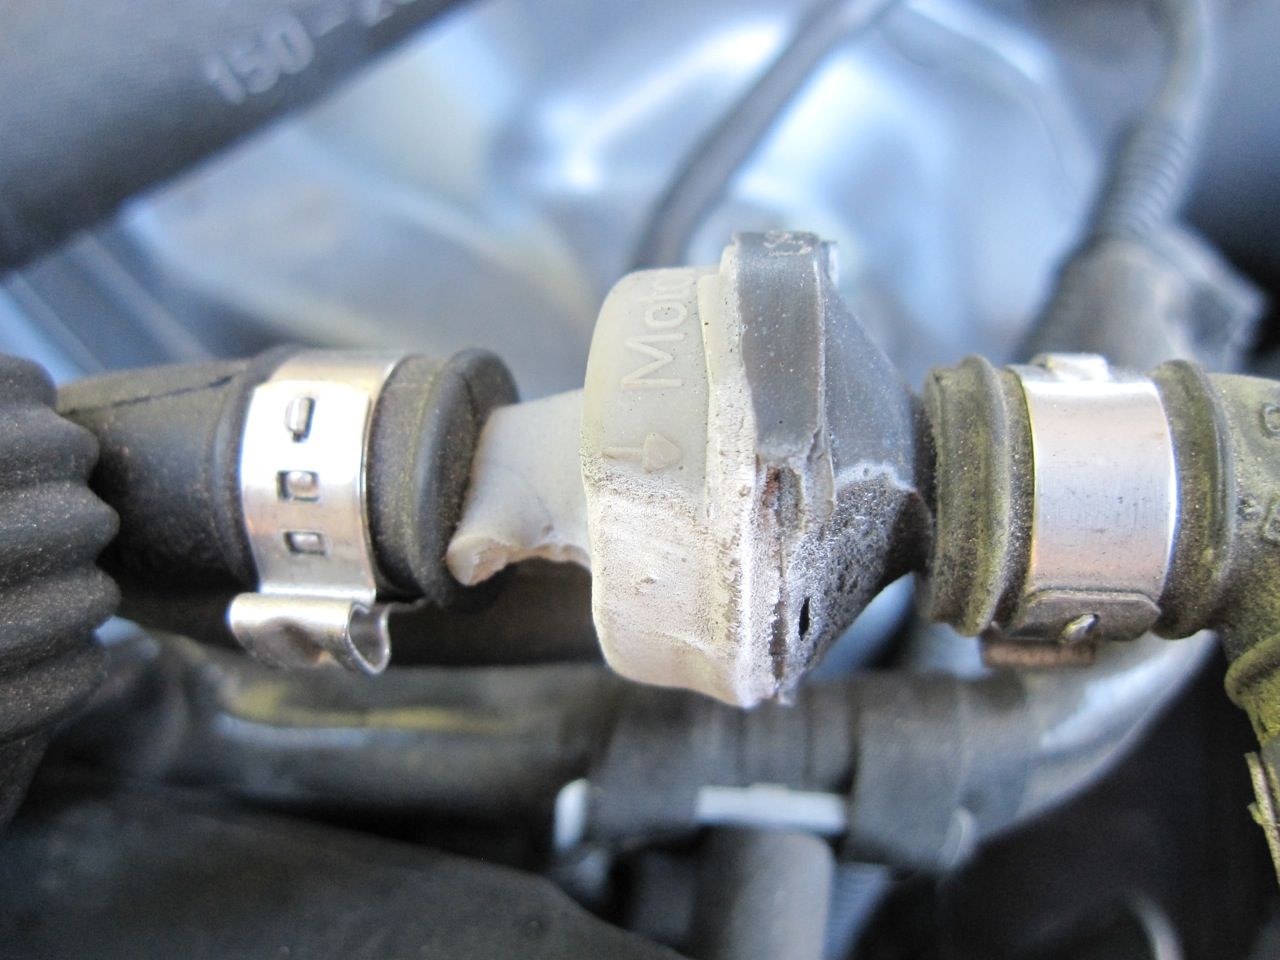
Misc Breather Hoses, Part Numbers etc.
Top: 058133785B
Bottom: 06B103493M
EDIT: 06/28/2017
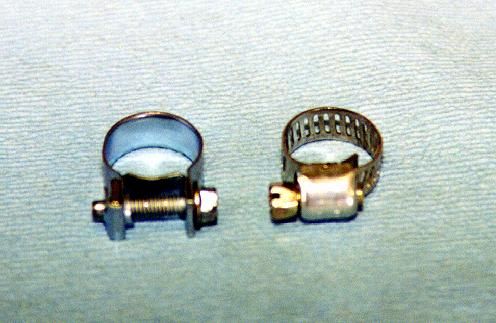
Hose Clamps -> Screw Down Hose Clamps aka Worm Drive Clamps or Fuel Hose Clamps
tl;dr Whenever possible use Fuel Hose Clamps
En route from Portland to Leavenworth WA for the annual drive in my buddy's B5 S4, we experienced some boost leak issues and were forced to hit up a Napa for supplies.
Had to pull the W/M lines and cap the inlet holes, wound up using Fuel Hose Clamps... they were infinitely better than Worm Drive.
There was about 1/4" of space on the end of each barb available to clamp the cap to the barb. It would not have held with Worm Drive, or likely shredded the rubber caps.
Yes they're more expensive but IMO very much worth it!
Fuel vs Worm
-----------
(old)
Never found a place online that's both inexpensive and sells the more durable Made in USA brands till now...
Amazon Supply.
Just search for worm clamps and you'll find everything you need.
================================================== =============
-- 09-07-2010 04:47 PM Original Post --
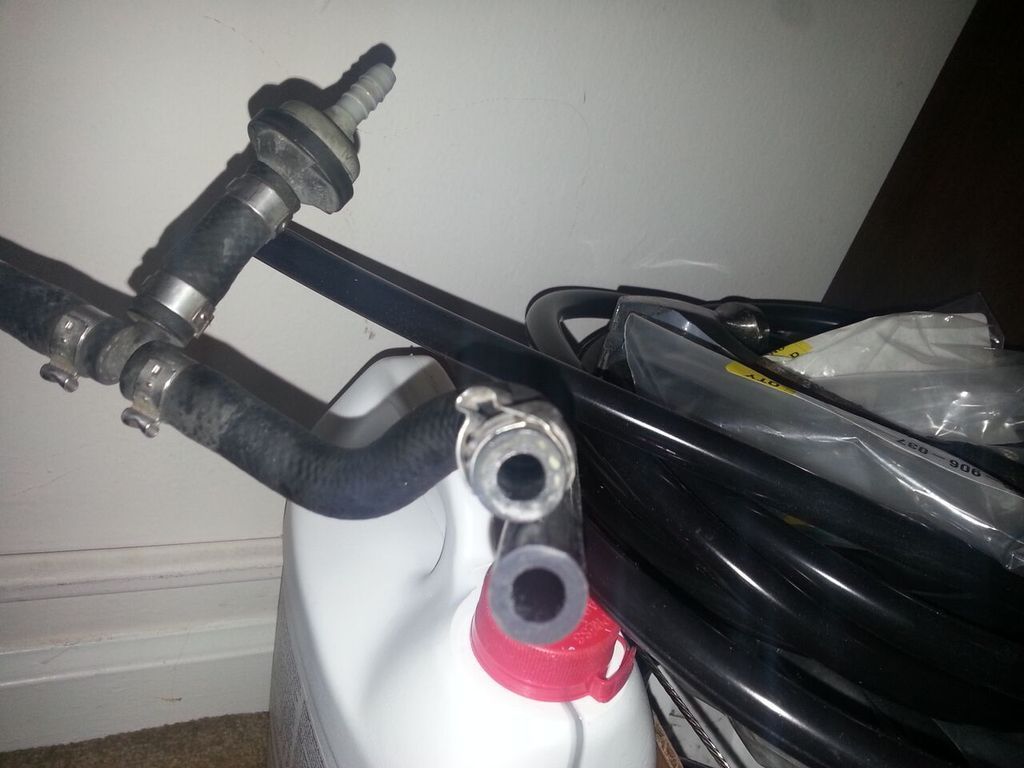
I've wanted to start this effort for some time - replacing components and documenting the progress - and on Friday my Suction Pump decided to split in half. So it's go time.
For now, this thread will have nothing to do with some of the more complex topics seen on the 'zine (rods, pistons, custom software mapping, full builds etc.) but rather some basic fixes and updates to keep your engine running well. And mine too.
So we'll start with my most recent point of failure... the infamous Suction Pump (#19 below)
It actually split open all the way around. Not so good. Apparently this is a common failure point from time to time with this engine. Glad the temp fix was easy. And as it turns out, it felt like I actually gained a little bit of power back.
In case you're wondering, yes, I am a frickin Zip Tie Ninja. I just went out for a spin and hammered the car a bit and it's holding well. Plus, there's more pep than before. This leads me to believe that before the failure, it must have been attached well enough but split along the seam as I never noticed any degradation. So, take a good look at yours and see if it's starting to go.
Im going to place an order for it and a few surrounding parts and then go section by section around the engine looking for weak points.
Seriously, this is ridiculous. Like I've got a black n white Lionfish in my engine bay

For some reason my brain goes a cold and foggy one whenever I look at ETKA illustrations. Always confuses the hell outta me. So, I'll be taking this opportunity to list them where applicable and try to match em up with pics like I've done above.
-----------------------------------------------
EDIT: 11-19-15
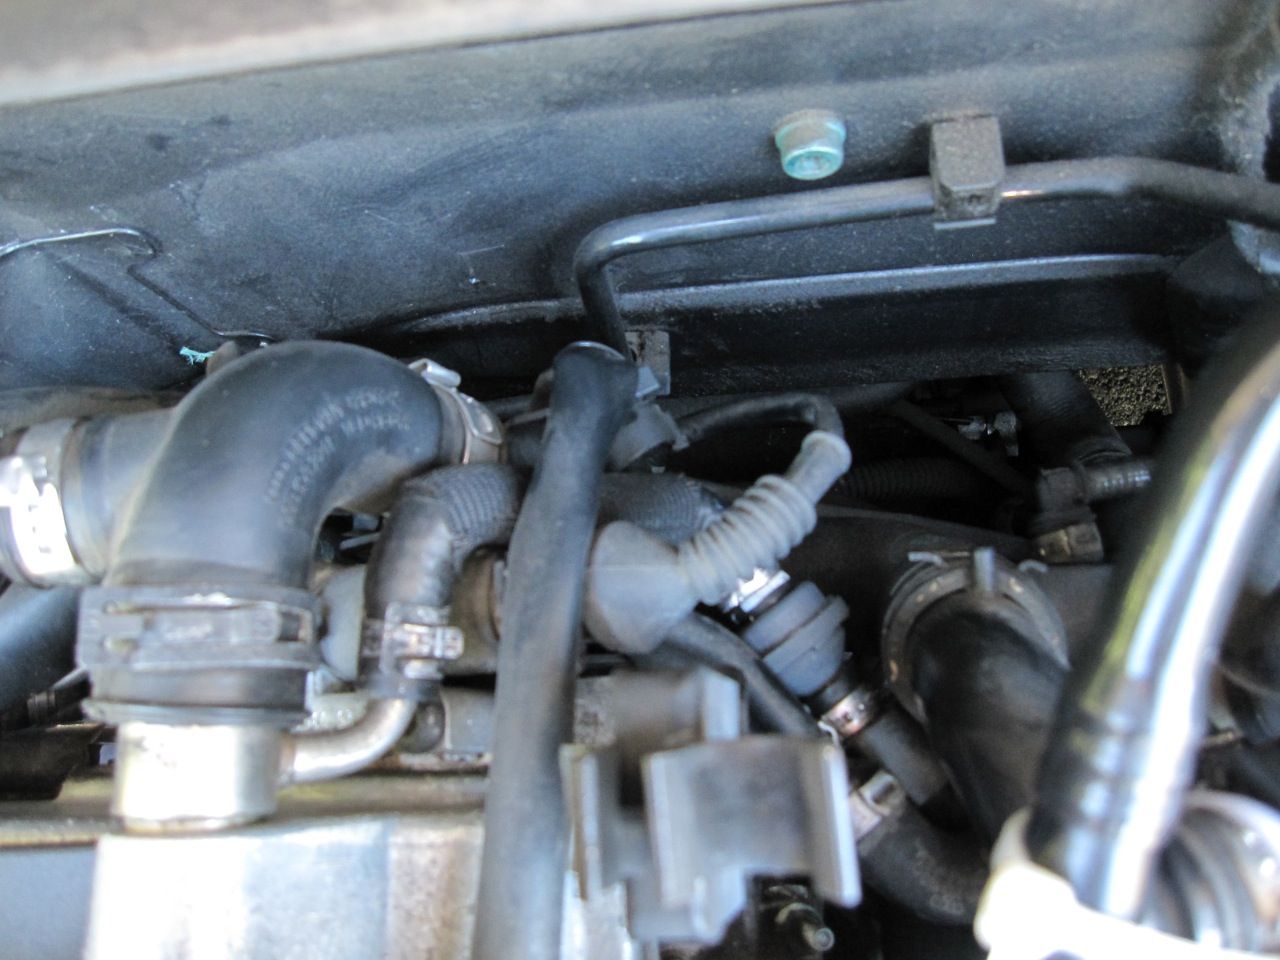
Props to jonan for taking the time to measure out and provide a pic of these hoses which reside under the intake manifold (and are the same if not roughly the same size as most hoses around the engine bay YMMV).
Originally Posted by
jonan
I just measured them and they are both 8mm
(remember that's ID aka Inner Diameter not OD aka Outer Diameter)
Pic of the hoses under the intake manifold for reference (red boxes were used to point out the check valves for another part of this thread)
Since these hoses are 8mm ID, this = ~.315" = ~
-6AN / 0.375" ID sized hose (.06 or ~1/20" difference, should be fine)
While other brands / styles of hoses can work, I can't speak to how they'll hold up to oil vapor in a super heated engine bay.
The Fragola hose that I've been using is still to this day in very solid shape (albeit a tad stiff).
Fragola 8600/8700 Series Parker Push-Lok Hose - Sold by the Foot (-6AN)
http://www.verociousmotorsports.com/...ld-by-the-Foot


 Reply With Quote


Bookmarks