Audizine - An Automotive Enthusiast Community

Page 1 of 3 123 LastLast
Results 1 to 40 of 105
  1. #1
    Veteran Member Four Rings gointoscott's Avatar
    Join Date
    Jan 26 2006
    AZ Member #
    9931
    My Garage
    2001 Audi S4
    Location
    Milwaukee, WI

    DIY: B5 S4 - Removing DP's to make Piggies (For 6spd)

    Guest-only advertisement. Register or Log In now!
    UPDATE: I renamed this post and added more pictures to make this Piggie DIY so easy that even a caveman can do it!

    This DIY can also be referenced for:
    1. How to remove Oxygen sensors
    2. How to remove Passenger side EGT sensor

    Note: This DIY is for 6 speed dp removal. For you tip guys it is more difficult to remove them and I hear you have to drop the sub frame a little to make room to slide the DP's out.

    First things first:

    Disclaimer: The modification described in this article is for OFF ROAD use only. It may render your vehicle non-street legal. Use at your own risk. I assume no responsibility for you performing this modification to your car.

    I guess I'm just covering my butt by putting that disclaimer in. I dont mean to scare anyone so basically to each his own.

    Anyway, MODS - feel free to move this post to a better place, or even make a sticky if you feel it worthy.

    I took on the project of removing downpipes to make them into piggies myself. I was excited to do this, but at the same time nervous because I didnt want to get into something I couldnt finish.

    A few notables:
    The hardest part that basically brought me to a halt in the project yesterday was the rusted clamp bolts holding the dp to the rear exhaust. I just didnt have the right tool to cut them off.

    I wasted a lot of time with much furstration to the point of almost punting and giving up. But then I asked around and found a friend willing to borrow me their grinder. Then it was a piece of cake.

    I had heard the heat shields were the hardest part of this project, but to me they werent bad at all. I had the misconception that you have to take heat shields off before taking dp's off. This is not true, I dont think its even possible. Just unscrew them and leave them in there loose and the dp's will slide down under the heat shields.

    I know there is a write up but I thought I'd give a little insight to how I approached it

    List of tools needed:
    Basics:
    Jack stands
    straight and phillips screw driver
    ratchet and various extensions
    13mm socket
    17 mm socket
    5 mm allen socket
    6 mm allen socket
    3 or 4 foot pipe to put over ratchet for leverage (mine is called the motivator)
    hammer
    pry bar
    vice (strongly recommended )
    wire brush for cleaning up inside of precat.
    grinder with cutting wheel, or torch for exhaust clamps

    extra's you might need to borrow or buy:
    22 mm 0xygen sensor socket ($9.99 - autozone)
    good size drill bit (I would make sure its sharp)

    I'll make sure and add more when I reinstall the dp's if I missed anything.

    Parts needed:
    4 new 2 and 1/4 exhaust clamps - 2.50 a piece
    4 spark plug defoulers (I bought from advanced autoparts - used 2 per cat) the 17mm kind there is post on second page with pic showing what part number and kind to get.
    Best part about these defoulers is price - $8.38 for all 4
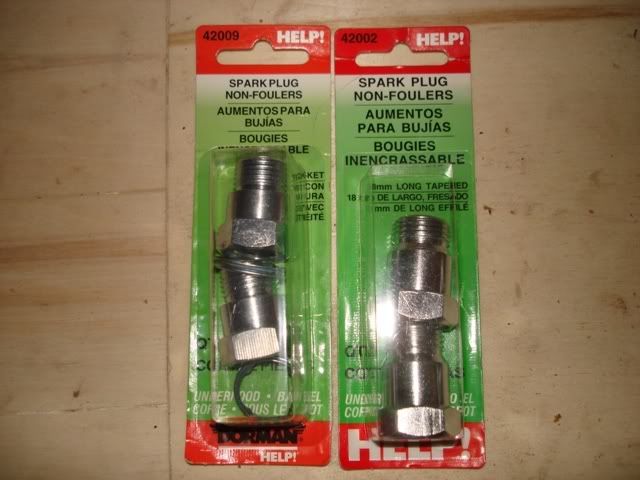


    Instructions:
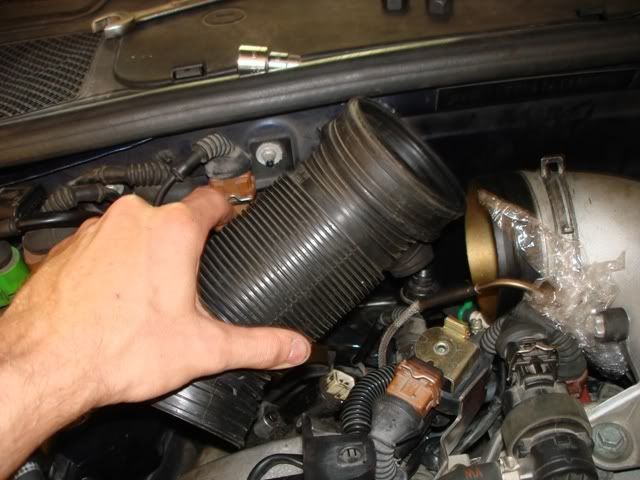
    1. Took off air box and plastic tube that goes to y pipe. (I left y pipe in place. Didnt see need to take it off)
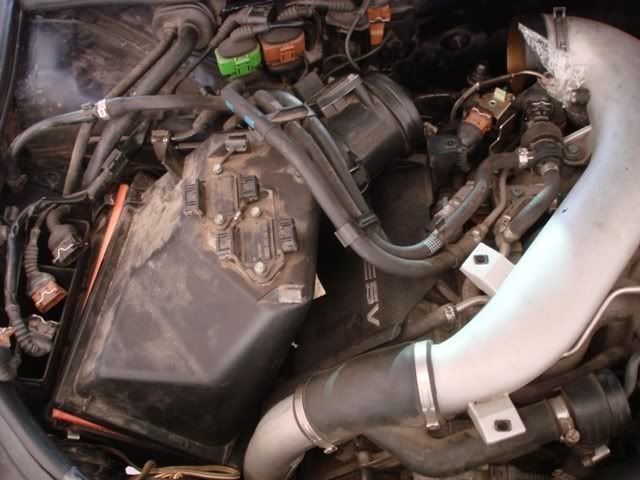

    1.5 Disconnected plastic pipe between Y pipe and air box. On 2001 models like mine and newer, this plastic pipe has a breather connected to brake booster (I think that is where it goes to) Anyway this can be a little tricky to take off, but use a screw driver to pry from bottom of connector and press with your thumb from inside and it will pop off. I was affraid of it busting off, but if you are gentle but firm it will come apart. (thanks Jerbal[Jordan] for insight on getting this piece off)

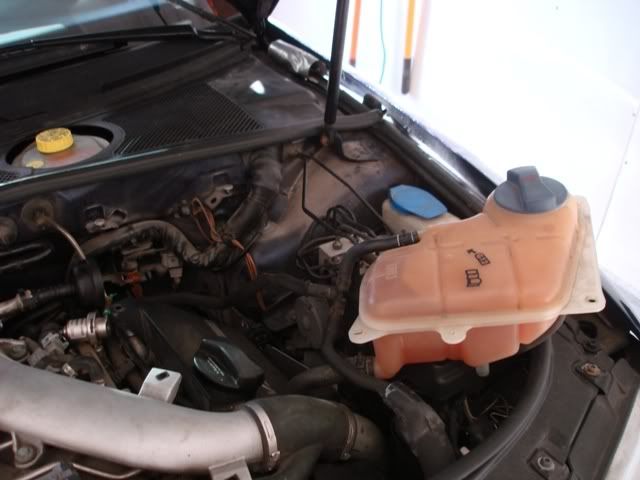
    2. Unscrew antifreeze overfill tank and moved it out of the way - take off sensor on bottom.

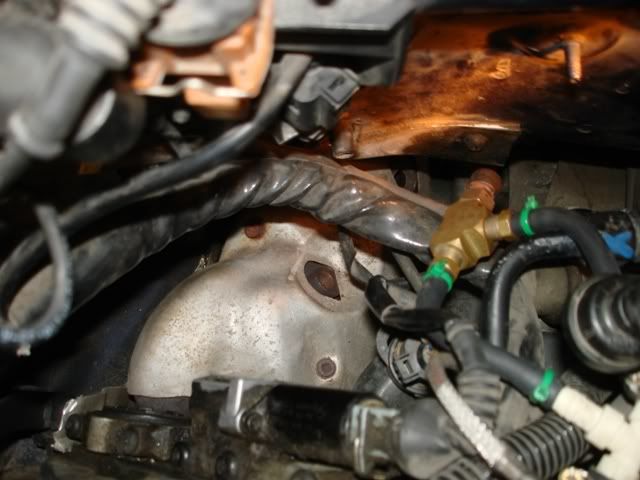
    3. Removed passenger side egt valve from dp. (I think 17mm wrench is what I used) to get the egt loose, I hooked another larger wrench to end of 17mm wrench for more leverage, this made it easy to get loose. I wrapped EGT in plastic to protect head.
    You see EGT in center of this picture:
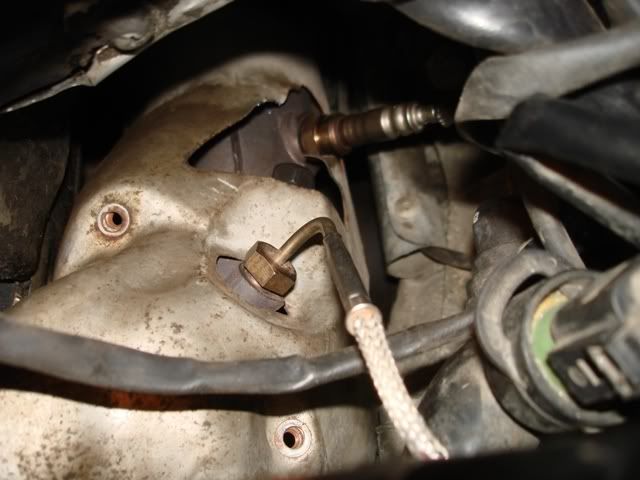

    4. take 2 bolts off both heat shields (You can see the two holes for heat shield in above pic) - (5 mm allen) important to use right allen because I could see these being stripped and much more of a pain if you do that. Do this for both sides.
    5. remove o2 sensors from both sides (22mm o2 sensor socket is a must) I bought the socket from autozone for 10 bucks. Both were real easy to take out once broke loose. I was able to remove with fingers once loose.
    Below pic shows O2 socket on passenger side O2:
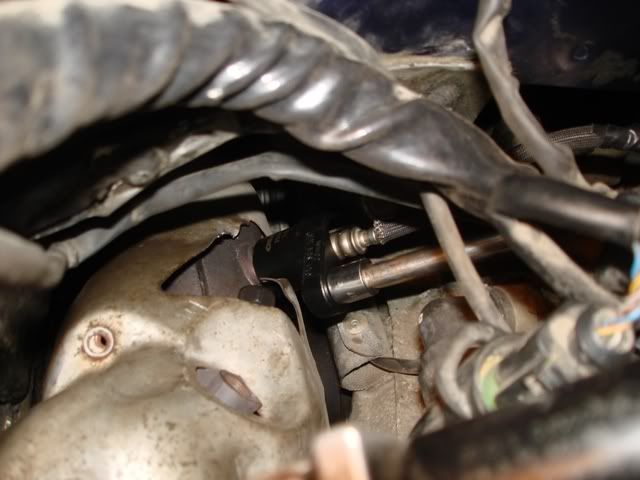

    Below Pic shows extensions and ratchet on Passenger side O2 - NOTE - I also put a 3 FT pipe over ratchet for leverage to break O2 loose. (Not pictured) Be careful not too push too hard so you dont strip anything or litterally break it. More leverage is great for loosening nuts and bolts, but also make it way easier to strip or break things if not seated correctly, or using wrong size socket.
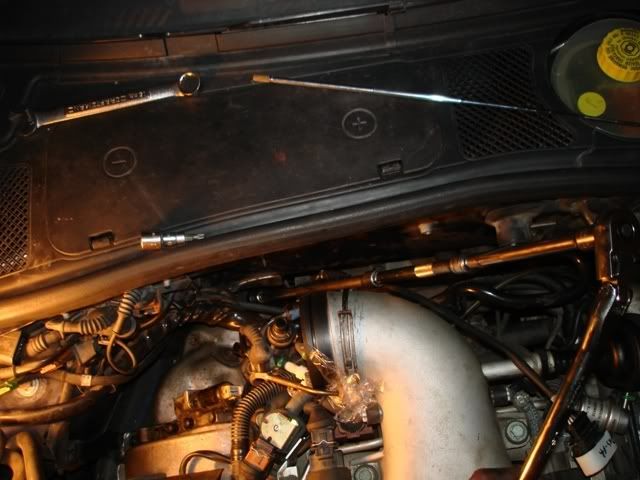

    This one is of driver side heat shield, you can see left allen easy, and part of right allen, then down you can see hole for 02 but have to look hard to see it.


    6. Now I jacked up the car and put it on jack stands. Had emercency brake on. Then left the jack in place as a 3rd support for safety.

    7. Next I crawled under the car (wishing I had a lift) and started on bottom side Woops forgot the right socket up on bench. Had to crawl out
    Got wrench then crawled back (still wishing I had a lift) Dang now I forgot the flashlight, crawled out again. I bet I did that 30 times. Such a pain
    Anyway, try and bring all the tools you need so you dont have to go back and forth so much.

    8. With the car jacked up, what I would do next is work on the clamps that hold the dp's to the exhaust. (I didn't do this next, but in hindsight it would of been the smart thing to do. If they look rusted at all, dont bother trying to unscrew, just get a grinder with cutting wheel and grind the clamps off. Or a torch will work too. If you dont have either, stop working and go buy one or find a buddy with one, because you will waste too much time and get no where except to get more frustrated.
    Once clamps are off, leave sleeves on loosly that hold the dp's to rear exhaust so dp's dont hang.
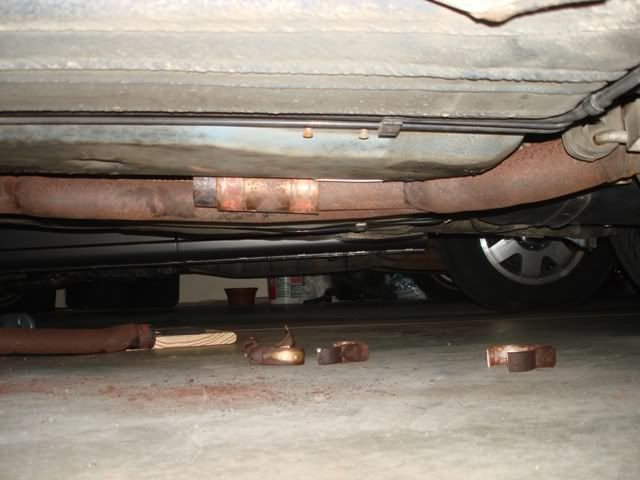

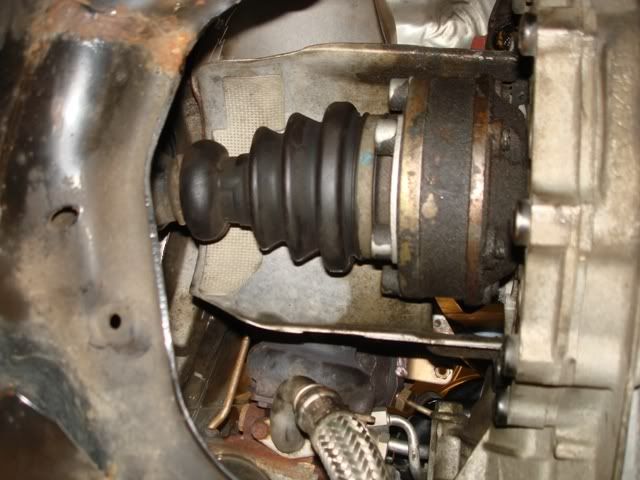
    9. Now you have to take the shield off above the front drive shafts. These are held on by 3 - 6mm allen screws. The side ones are easy, but the ones up on top is a little bit of a pain, but if you get some long extensions you can get the top one off with a little patience and determination.

    Here is a pic of it in place from underneath:

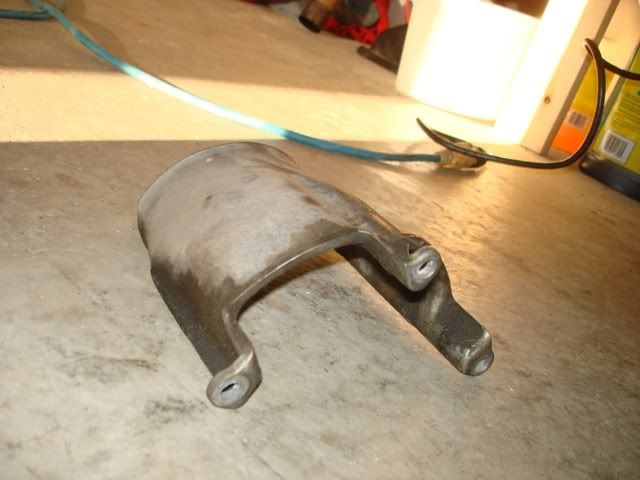
    Here is a pic of it out on the floor so you can see the 3 scew locations I think this is drivers side cover:

    10. With the cover for front drive axle off, you can see the bolts for dp's to the turbo's real easy. Take the bottom 3 bolts off holding the dp to the turbo (17mm wrench) Mine were real easy to loosen, once they were broke loose, i just unscrewed with fingers.
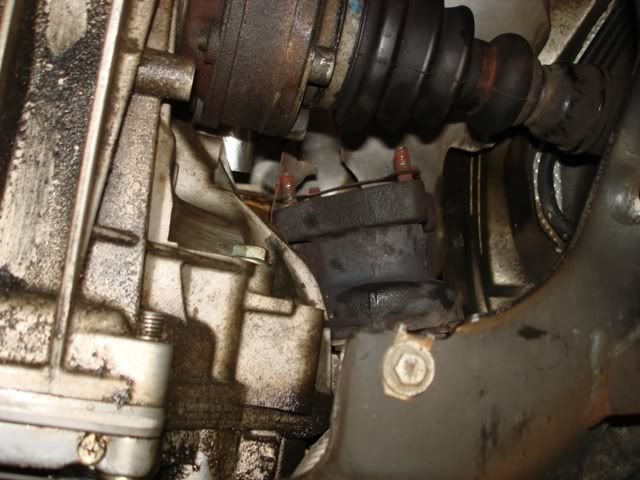
    Pic of drivers side turbo from underneath after dp removed:
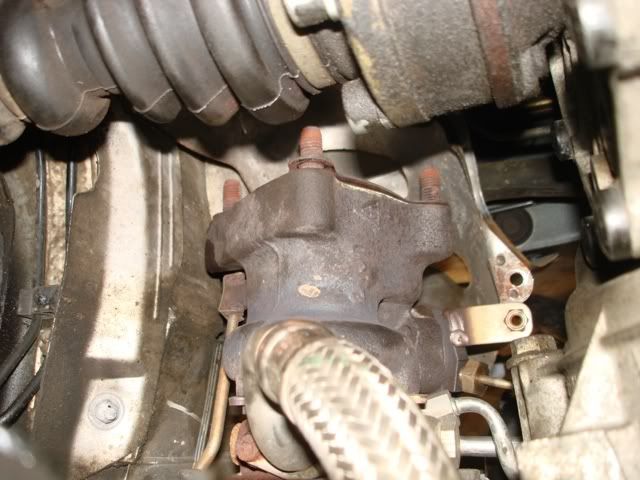

    Pic of passenger side turbo from underneath after dp removed:

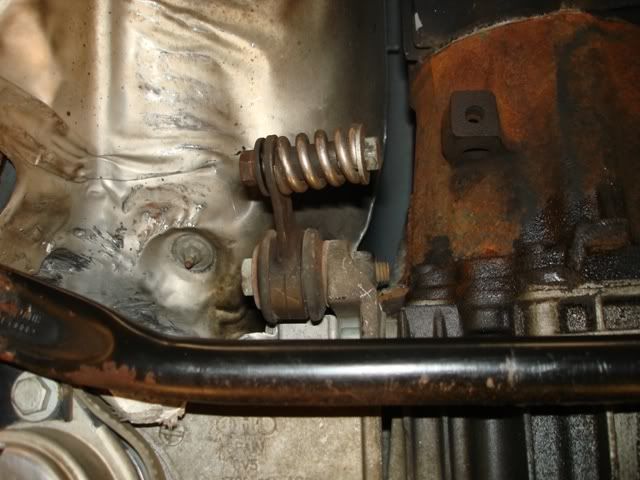
    11. Now there is a metal hanger that is spring loaded holding dp's to car. Unscrew this and take off (13mm socket)

    12. Next there is a hose clamp holding the bottom of the heat shield to the dp. take straight screw driver and loosen and slide off heat shield -No pic of this.

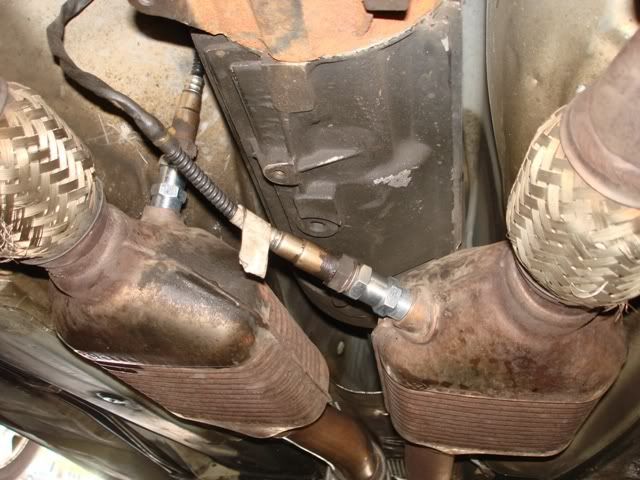
    13. Now take the rear O2 Sensors out of main cats. Remember to mark which side is which so you know where to put them back in. Again you'll use the O2 sensor socket, these are easier to get to. In pic below it shows the O2 with the new Defoulers in place already, but its a good pic to show where they are located:

    14. Now slide sleaves off holding the dp to the rear exhaust and the rear of the dp will fall to floor.
    Repeat pic but you see the sleaves/clamp holding dp and rear exhaust - just slide it towards back and dp will drop:


    14.3 Now if memory serves me right, your ready to wiggle the dp's out of car. They might not look like they will come out. But with enough twisting and movement, they will.
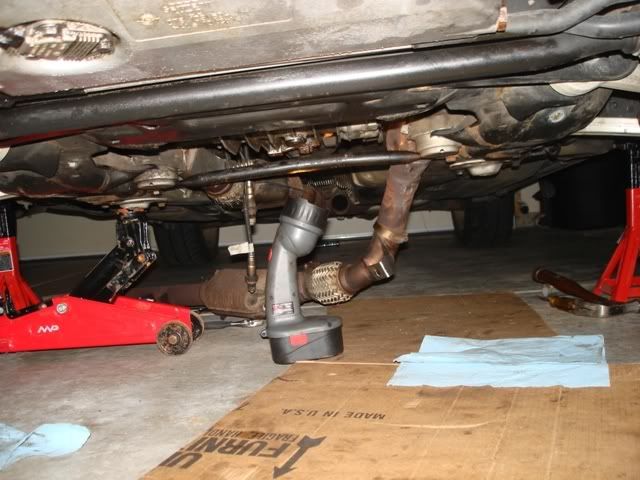

    14.5 - after the dp's are out its a good chance to reach up from bottom of car and feel the turbines for the turbo's for play in the shaft. At least thats what I did. There was little play, but felt solid and spun freely.

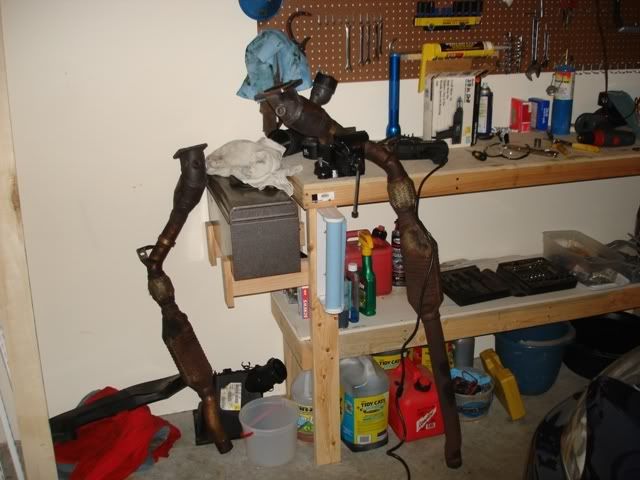
    14.7 With both cats out, you can start drilling:

    15. Before you start, make sure you put a mask on:
    Ok ok, yes I look like a geek, but my wife came out of house and quick grabbed the camera because she said I looked funny. Ah... she loves me.
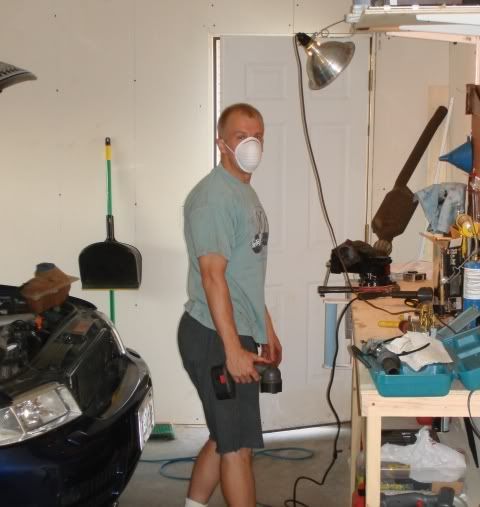

    Also be sure and have plenty of ventilation, I went and got a fan (not pictured) and had all doors open. This stuff is pretty toxic.

    16. Now some guys say cut the precat apart, then knock it out, then weld it back. Well I dont have a welder and I heard you can do it just fine without cutting it apart, so I started gutting it through the flange. The longer Cat is def easier then the shorter cat because the angle of the flange is more of a direct angle to the cone inside.

    16.5 Make sure and have the cat held up so the inside materials fall foward out the hole and not drop down and get caught in the main cat. (Notice picture of me again, you can see it propped up in background)

    17. Now find the longest drill bit you can(I would go with 1/2 or 3/4 inch if possible), and drill a number of holes into the center of the thing. My bit wasnt very big (no side comments) Anyway I tried to make one in center, then 4 around it. Also make sure the drill bit is sharp. I heard some guys say they got the bit stuck and couldnt get it out. I had no problems. It drilled through it real easy it was a new bit.

    I bought a small pry bar for 3.50 from menards, this is what I used to punch the stuffing out. It worked good, but wish it didnt have an angle at the end, would of been nicer to have a bar that was more straight. A little longer bar would of been nice too.
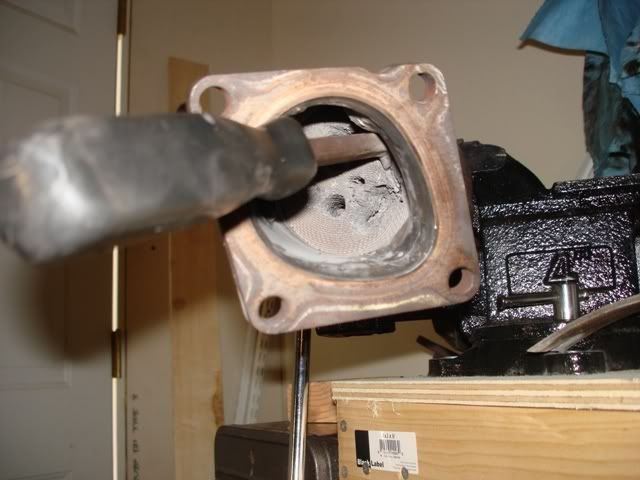


    18. I worked on getting a center of the cat cut out, this way I could pry the sides away from the wall of the precat:
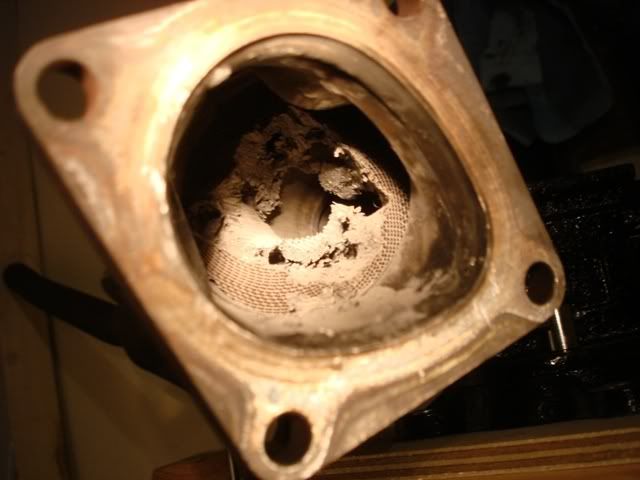

    19. So finally it was all gutted out:
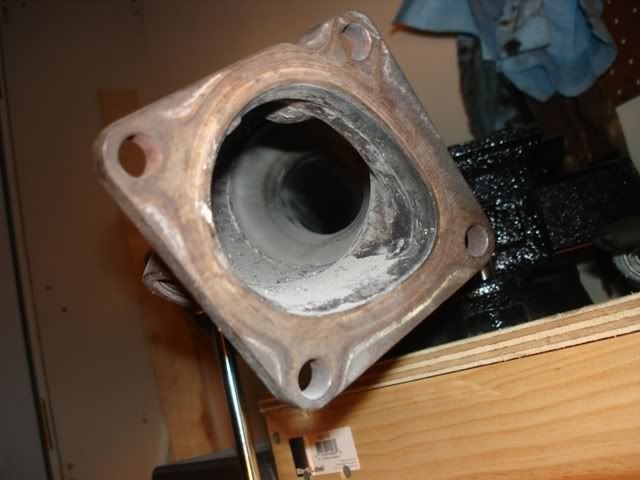

    Here is the insides in a bucket:
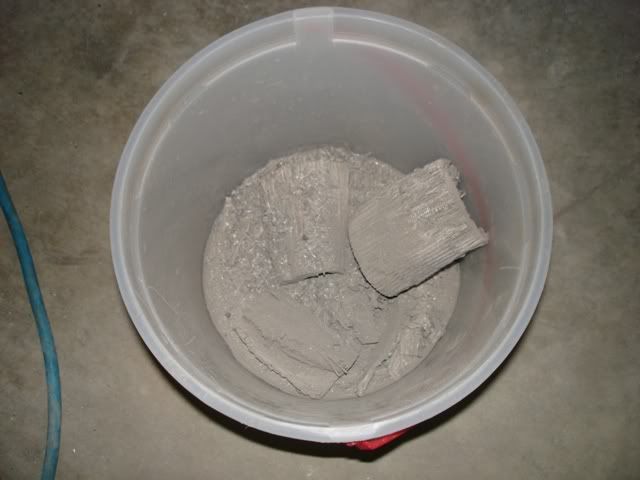

    It took me probably about an hour to drill and pound out 1 cat (I did longer easier one first)
    The shorter one took me hour and a half.

    I recommend to frequently take the cat out of vice and shake the loose stuff in a bucket so it keeps it clear and also less chance of getting any down to main cat. But shouldnt be a problem with main cat propped up in the air.

    20. Once gutted out you need to clean the sides so there is no loose particles. I spent some time working on both cats because I wanted the sides as clean as possible. I knew I was close to getting it done and back on road so I had to fight the tendancy to say "good enough" and put it back in. Be sure and take your time and get it clean so loose particles dont float down to main cats.
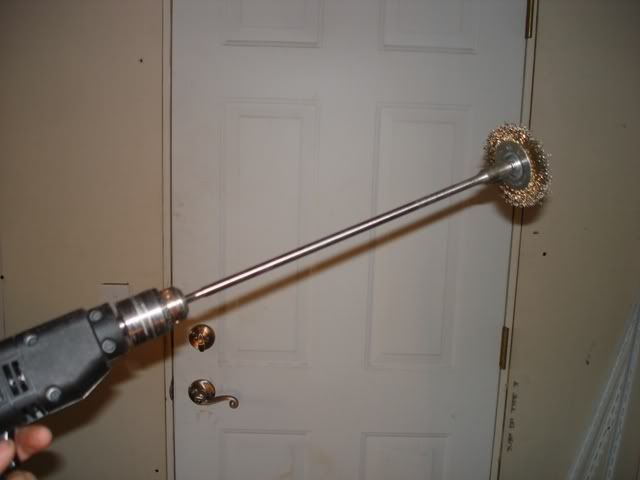
    I bought a 3" wirebrush wheel and attached it to a long skinny extension. I bought both parts from Menards was 7-8 bucks for both. It was kind of cobbled together but it worked for me. The 3" wire brush barely fit in the flanges of the cat's but they did fit. Just make sure the wirebrush wheel is attached tightly to the extension otherwise it could come off inside the cat and that would make it hard to get out. I didnt have a problem
    Pic of contraption I made up:

    Here is pic of sides all cleaned up:
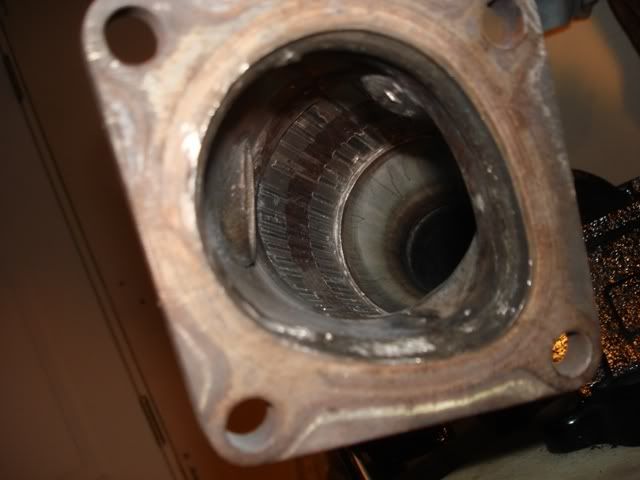

    21. I next fit the Sparkplug non foulers into the rear O2 sensor locations. I doubled them up on each side. the shorter defouler goes into cat, then longer defouler into the shorter defouler (hope that doesnt confuse you)
    Reason for this is you need to screw the O2 into the longer defouler. because the other one is too short and wont reach the threads of the 02.
    Note: Some O2's may not work in these defoulers because of how long the sensor part is. I had the factory ones and they barely screwed in, in fact it was only being held on by a few threads. But it was tight so I just used them this way. You may want to try drilling the holes out of the defouler so the O2 can fit in there all the way.
    Best part: NO CEL and NO CODES
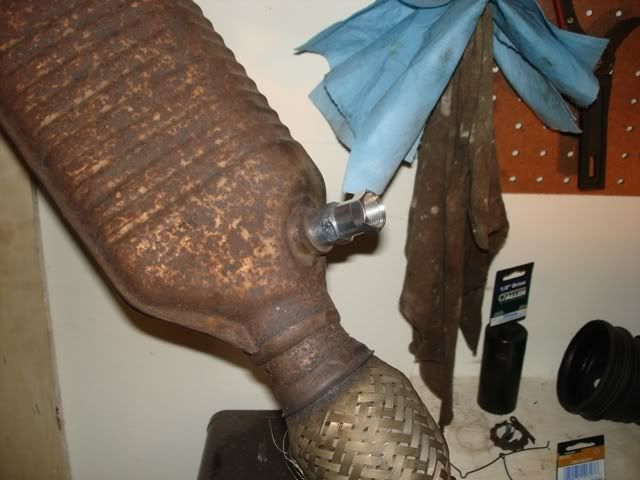

    22. Once you have the defoulers in place you can start putting it back together!
    What I did was fed dp's through openings to turbo's. For me the drivers side was the hardest, so i slid this one in back first. With a little twisting it went right through opening. (If it gest stuck, back it out and keep turning it different ways to find the easiest path.) I just pushed the heat shields up a little and flanges slid right under heat shields. I thought I would have to drop sub frame but didnt need to. Went through easier then I thought.
    I then fed the passenger side through. Did same thing.
    I hung each dp on the 4 bolts for the turbo's (basically back in place)

    23. I then went to rear of DP and slid the sleaves in place to connect dp to rear exhaust to just hold in place.

    24. I then went back to front of dp and screwed 3 bottom bolts on turbo's for both sides.

    25. I then went to top side of car and screwed the 1 top bolt onto turbo's for bothsides. Then took 17mm wrench and tightened all bolts on both turbo's.

    26. I then stayed on top (engine bay) and put O2's and passenger side EGT back in. Screwed down head shields (5mm allen), put air box back in, coolant tank.

    27. Once everything on top was done, I went under car again an I put the hose clamps back on the bottom part of the heat shields attaching them to dp. I thought of leaving these off, but I didnt want any rattling so I tightened them down.

    28. I next put drive shaft shields back on. (Personally I was tempted to leave these off, but I figured they are there for a purpose so put them back on. I did only use the 2 bolts per side and left the top bolt off. They were snug so I felt they were held on good enough. 6mm allen (Again you will want to use your own decision on this)

    29. Now you can tighten the spring loaded hangers 13mm socket that hold dp to car. I think these are used to help support dp so all weight isnt on turbo??? Not sure.

    30. Now you can put the rear O2's back in, again its 22mm O2 socket.

    31. Now put new clamps on sleaves holding dp to rear exhaust.


    32. You should be done! But now the most important step:
    Check your work and make sure you didnt forget something!!!
    I did this somewhat, but didnt look thouroughly and forgot I loosened some sensor that plugged into the engine on top by passenger side heat shield You can see the thing in this pic: its circled in green
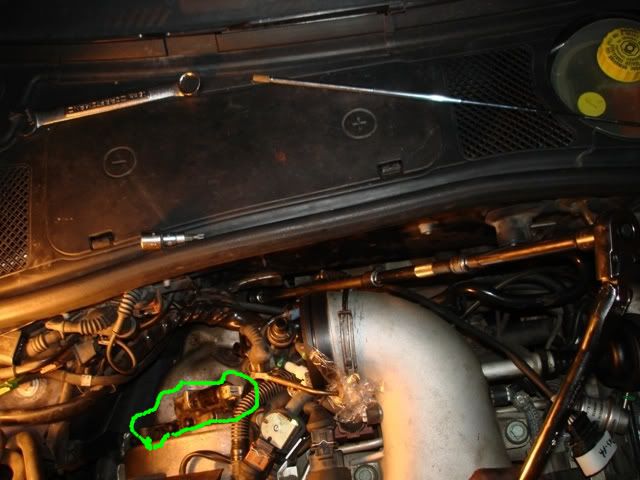

    Anyway you can see I loosened the screws but didnt tighten. Well this caused my car to drip oil (it was funny all week I seen a little puddle each day, but it was small and just thought my car was starting to leak now - to my dismay)

    Well I didnt tighten this up and when I took it for a drive, the car ran fine but after I got home I noticed smoke coming from engine. I then saw oil on ground and dripping at a good rate on passenger side, kind of by turbo (YIKES)

    I put it up on jacks and saw it all oily from under turbo (YIKES YIKES)

    then I cleaned up up, and started car again and saw that these bolts were loose and it was dripping from what ever thing that is. (Phew)

    I tighted that thing up, and now it runs like a champ. So moral of story, MAKE SURE AND CHECK OVER EVERYTHING!!!

    It took me about a week in my spare time. You could probably get it done in a day following my handy dandy instructions lol

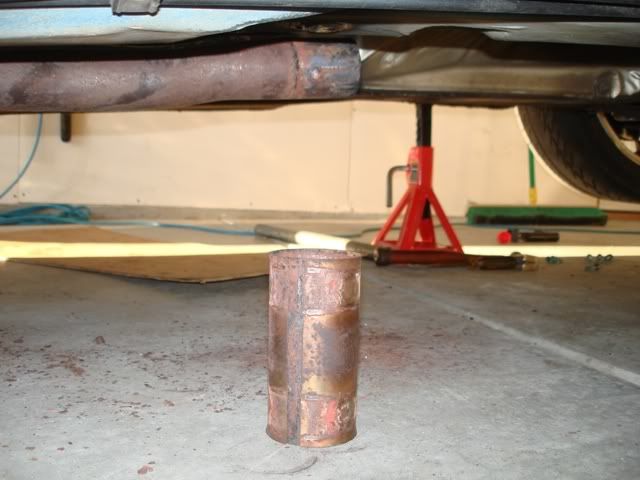
    Here are a few random pics of the rear exhaust, sleeve and clamps I cut off. Any pics help:
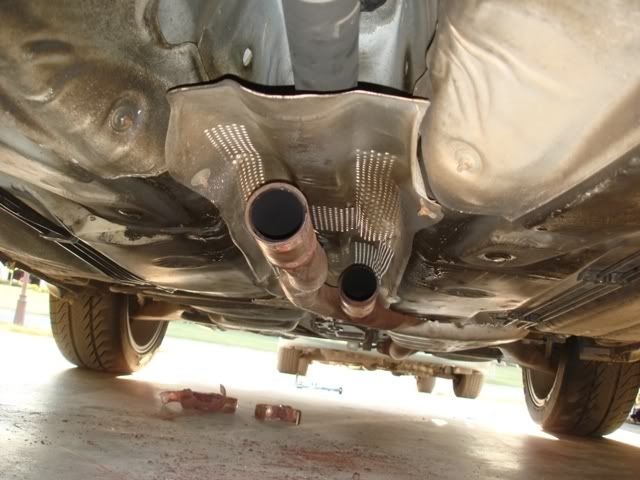


    Anyway I am proud that I was able to do this. It makes a world of difference when you have the right tools. If you dont have the right tools, then its better not to attempt this. And honestly I dont think it was that hard to do, just need to do things in the right process.

    It may look daunting, but dont be afraid. Its much cheaper then buying the piggies from vast (I think they are $450 plus core) and for those of us "on a budget" as my wife reminds me of frequently this is the easy way to do it. Its also fun and such a great feeling of accomplishment.

    I work in IT so have a desk job, but wrenching on cars isnt the hardest thing in the world, so I think if I can do it, anyone can.
    Last edited by gointoscott; 09-02-2008 at 11:21 PM. Reason: yada yada yada - additons and spelling corretions and yes there are more spelling corections to be made - someday
    Original K03's, Ecodes, H&R Coilovers, Inmotion Chip/MBC, Piggies

  2. #2
    Forum Moderator Four Rings Daft's Avatar
    Join Date
    Feb 17 2004
    AZ Member #
    620
    My Garage
    Stg 3 '04 A6 2.7T, Stg 2 '14 S4, 2016 SQ5, 2019 RS5 coupe
    Location
    Sterling, VA

    Re: Update of downpipe removal to make them into piggis - with pics

    Nice work man.

    You're lucky that your dp flange nuts are easy to loosen. The ones on my A6 are torqued on like nobody's business.
    Brett - Moderator
    Issue?: email me.
    _____________________
    Stage 3 2004 A6 2.7T 6M

  3. #3
    Senior Member Two Rings Jayco88's Avatar
    Join Date
    Jun 02 2008
    AZ Member #
    29487
    My Garage
    2000 S4
    Location
    Bay Area, CA

    Re: Update of downpipe removal to make them into piggis - with pics

    just be careful not to get pieces of junk stuck on the main cats.
    -It's got nothing to do with your vorsprung durch technic, you now.-

  4. #4
    Senior Member Three Rings Turn10's Avatar
    Join Date
    Jul 27 2008
    AZ Member #
    31322
    My Garage
    2007 B7 A4 2.0T
    Location
    Atlanta

    Re: Update of downpipe removal to make them into piggis - with pics

    Brave man to do that much work, good luck. I would never fuck with my exhaust. Also thats some rusty pipes. Maybe clean with a little CLR on the outside?
    When life passes you by, downshift.

    Tri-State Southern Audi Chapter

    http://www.audizine.com/forum/group.php?groupid=14

  5. #5
    Veteran Member Four Rings gointoscott's Avatar
    Join Date
    Jan 26 2006
    AZ Member #
    9931
    My Garage
    2001 Audi S4
    Location
    Milwaukee, WI

    Re: Update of downpipe removal to make them into piggis - with pics

    Quote Originally Posted by Jayco88 View Post
    just be careful not to get pieces of junk stuck on the main cats.
    Yeah I was wondering about that to. Its hard to see if anything gets stuck down there. I'll have to tip it back and shake it often.

    Any idea's to avoid getting crap stuck down there?


    Also, the only thing that was rusted was the clamps holding the two pipes together, everything else was very solid and in good shape.

    Also, I do plan to wear a mask and a fan blowing with doors open for ventilation. Thanks for the reminder though (Thumbs up)
    Original K03's, Ecodes, H&R Coilovers, Inmotion Chip/MBC, Piggies

  6. #6
    Veteran Member Three Rings
    Join Date
    Apr 18 2007
    AZ Member #
    17392
    My Garage
    b5 s4 nogaro , 1991 bmw 325is 5spd
    Location
    florida,wellington & hollywood

    Re: Update of downpipe removal to make them into piggis - with pics

    haha yeah man gut the main cats aswell haha thats what i did lol ... but then i again i live in fl and was forced to gut them since turbo oil broke one to pieces soo both came out oh and if both are gtted you'll get flames out the back haha fun fun

    cheers

    --daniel

  7. #7
    Veteran Member Four Rings gointoscott's Avatar
    Join Date
    Jan 26 2006
    AZ Member #
    9931
    My Garage
    2001 Audi S4
    Location
    Milwaukee, WI

    Re: Update of downpipe removal to make them into piggis - with pics

    any comments on my original question. is the carbon inside the precats normal?
    Original K03's, Ecodes, H&R Coilovers, Inmotion Chip/MBC, Piggies

  8. #8
    Veteran Member Four Rings mholme's Avatar
    Join Date
    Jan 29 2007
    AZ Member #
    15226
    My Garage
    08 S4 00 S4
    Location
    MD

    Re: Update of downpipe removal to make them into piggis - with pics

    Quote Originally Posted by gointoscott View Post
    any comments on my original question. is the carbon inside the precats normal?
    I've done a few sets and have never seen it to that level, no.

  9. #9
    Veteran Member Four Rings gointoscott's Avatar
    Join Date
    Jan 26 2006
    AZ Member #
    9931
    My Garage
    2001 Audi S4
    Location
    Milwaukee, WI

    Re: Update of downpipe removal to make them into piggis - with pics

    one of my egt's were bad and i replaced it so im thinking that may have been the cause from when it was running rich. it ran that way for a few months.
    Original K03's, Ecodes, H&R Coilovers, Inmotion Chip/MBC, Piggies

  10. #10
    Veteran Member Four Rings gointoscott's Avatar
    Join Date
    Jan 26 2006
    AZ Member #
    9931
    My Garage
    2001 Audi S4
    Location
    Milwaukee, WI

    Re: Update of downpipe removal to make them into piggis - with pics

    Quote Originally Posted by Turn10 View Post
    Brave man to do that much work, good luck. I would never fuck with my exhaust. Also thats some rusty pipes. Maybe clean with a little CLR on the outside?
    Honestly its not as hard as you think. Just need to follow right steps and have right size tools

    i had my entire exhaust on the ground at one point. just had to take the 14mm blts out holding the hangers in place. the to get it back in place just used the jack to get it back in place.

    i bet you could do it. but it is a little work so cant be afraid t get dirty :)
    Original K03's, Ecodes, H&R Coilovers, Inmotion Chip/MBC, Piggies

  11. #11
    Established Member Two Rings Moe's Avatar
    Join Date
    Jan 20 2007
    AZ Member #
    14997
    My Garage
    2000 S4
    Location
    Your Mom's house

    Re: Update of downpipe removal to make them into piggis - with pics

    Quote Originally Posted by gointoscott View Post
    Yeah I was wondering about that to. Its hard to see if anything gets stuck down there. I'll have to tip it back and shake it often.

    Any idea's to avoid getting crap stuck down there?

    Also, I do plan to wear a mask and a fan blowing with doors open for ventilation. Thanks for the reminder though (Thumbs up)
    You should be doing this with the main cat above the precat. That way gravity takes over and you don't get crap in the main cats. If you start letting pieces fall they could get stuck and now you have a whole new project.
    Also respiratory protection is very important. Glad to see you thought of that.

    -Moe
    MTM chip, 5 bar fpr, 710Ns, H&R/Eibach set up, 034 street mounts, poly snub, piggies, suitcase mod, and oh yeah, K04s and a RS4 clutch.

  12. #12
    Senior Member Two Rings
    Join Date
    Jul 11 2007
    AZ Member #
    19459
    Location
    Chicago

    Re: Update of downpipe removal to make them into piggis - with pics

    Are you going to cut and reweld to get them out or you going to pull of it through the flange? and I wouldnt worry too much about the deposits, unless you are pulling a code.


    To cut them i used a harbor freight cut wheel the 14 inch large cutter and then put a iron pipe on the honeycomb (flange side) and beat it like no other (to come out the cut side).. it comes out in one big piece and weld it back up together. Make sure you dimple a couple of spots so you know here the downpipe reattaches when you weld it back...
    Old "Casa - 01 S4 - Homebrew Stage X - K03/16 - FMIC - Autospeed Motor Mounts/Tranny Mounts/DTS - Stern Power Ring/Rear Differential Poly - XS Power Exhaust - JHM Shifter/Solid Link/Delrin/3rd Detent/Homebrew Shifter Knobbie weight - Homebrew SMOC -"
    New "07 Infiniti Black Sedan G35s 6MT"

  13. #13
    Senior Member Two Rings Jayco88's Avatar
    Join Date
    Jun 02 2008
    AZ Member #
    29487
    My Garage
    2000 S4
    Location
    Bay Area, CA

    Re: Update of downpipe removal to make them into piggis - with pics

    Quote Originally Posted by gointoscott View Post
    Yeah I was wondering about that to. Its hard to see if anything gets stuck down there. I'll have to tip it back and shake it often.

    Any idea's to avoid getting crap stuck down there?


    Also, the only thing that was rusted was the clamps holding the two pipes together, everything else was very solid and in good shape.

    Also, I do plan to wear a mask and a fan blowing with doors open for ventilation. Thanks for the reminder though (Thumbs up)
    this is how I did it... The easiest method to get the precats out and to avoid getting crap stuck in the main cats. Remember to draw lines crossing your intended saw line (alignment purposes). Then I just took the pipes to get welded at a muffler shop, I got ripped off and paid 50 bucks but you could get it done for waaay cheaper.

    -It's got nothing to do with your vorsprung durch technic, you now.-

  14. #14
    Veteran Member Four Rings gointoscott's Avatar
    Join Date
    Jan 26 2006
    AZ Member #
    9931
    My Garage
    2001 Audi S4
    Location
    Milwaukee, WI

    Re: Update of downpipe removal to make them into piggis - with pics

    Quote Originally Posted by S4-Casa View Post
    Are you going to cut and reweld to get them out or you going to pull of it through the flange? and I wouldnt worry too much about the deposits, unless you are pulling a code.


    To cut them i used a harbor freight cut wheel the 14 inch large cutter and then put a iron pipe on the honeycomb (flange side) and beat it like no other (to come out the cut side).. it comes out in one big piece and weld it back up together. Make sure you dimple a couple of spots so you know here the downpipe reattaches when you weld it back...
    actually i was planning on not cutting them and banging it out through the flange. i dont have a welder. otherwise i would.

    i was going to drill it with the cats higher then precats this way i dont clog up the cats with debree.

    if i can find somene who can weld them then i might cut them open but for right now i wasnt goig to do it that way
    Original K03's, Ecodes, H&R Coilovers, Inmotion Chip/MBC, Piggies

  15. #15
    Veteran Member Four Rings jasonsowers's Avatar
    Join Date
    Feb 18 2007
    AZ Member #
    15722
    Location
    Denver, Colorado

    Re: Update of downpipe removal to make them into piggis - with pics

    Quote Originally Posted by gointoscott View Post
    actually i was planning on not cutting them and banging it out through the flange. i dont have a welder. otherwise i would.

    i was going to drill it with the cats higher then precats this way i dont clog up the cats with debree.

    if i can find somene who can weld them then i might cut them open but for right now i wasnt goig to do it that way
    This is exactly how I have did it. I have did a few sets and this is the FASTEST and easiest way.

    Nice photos.
    2002 B5 S4 Laser Red Avant - Tial 605 EPL tuned
    2000 B5 S4 Brilliant Black - Stage 3 K04/RS6 hybrid sedan EPL tuned
    2006 Cayenne Turbo - Stage 2 EPL tuned
    2006 Audi B7 A4 Avant 2.0t 6mt - Stage 2 EPL tuned
    2013 Phantom Black Pearl Effect 3.0t Q5
    2014 Monsoon Grey SQ5 - Stage 2 EPL tuned

  16. #16
    Veteran Member Four Rings Slow4's Avatar
    Join Date
    Dec 02 2007
    AZ Member #
    23048
    My Garage
    2020 Ford PIU, 2017 D675R
    Location
    DC/MD/(VA)

    Re: Update of downpipe removal to make them into piggis - with pics

    Sweet!

    I don't have to go searching for piggie write-ups! I'm getting an extra set of stock DPs from someone and was going to work on them while I have my stock ones on right now...when I finish, I'm going to turn around and sell my stock ones...

    Let me/us know the results and more pics!
    2015 B8 SQ5
    Click Here
    ---
    Past
    2001 B5 S4 | 2005 B6 S4 AVANT | 2013 Allroad P+ | 2013 B8.5 A4 P+


  17. #17
    Veteran Member Four Rings Kruat's Avatar
    Join Date
    Nov 10 2004
    AZ Member #
    4121
    My Garage
    01 S4, 03 RS6, 15 A8L, 16 PSD F350
    Location
    Longview, WA

    Re: Update of downpipe removal to make them into piggis - with pics

    Man, I wish the PO wouldn't have welded my stock downpipes to the Forge exhaust, otherwise I'd be doing this right now.
    --Mike--

    01 Casa S4
    03 Mugello RS6
    15 Moonlight A8L TDI

    01 Aviator TT (sold)
    99.5 Santorin A4 (sold)
    04 Cobalt Allroad (sold)

  18. #18
    Veteran Member Three Rings
    Join Date
    Apr 11 2008
    AZ Member #
    27597
    My Garage
    00 s4 90 crx
    Location
    High Point, NC

    Re: Update of downpipe removal to make them into piggis - with pics

    I would definitely cut them and gut it then reweld them up. If you dont then you wont be able to get all the catalyst out and itll eventually break loose and head towards the main cat and cause more problems. I found the easiest way to gut it was to take an air chisel and seperate the catalyst from the side of the exhaust. It basically fell out after i did that and it only took me a total of 30min on each side including cutting, gutting, and welding.

    As far as the carbon build up is concerned...i wouldnt worry about it too much. Running rich for an extended period of time will cause that. I would be more worried about the melted catalyst because it takes ALOT of heat to melt that stuff. You were either detonating badly or the excess fuel in the exhaust(from running rich) was igniting right at the catalyst. The fact that its where the wg exhaust would be hitting leads me to believe that it was from excess fuel igniting, since it(liquid gas)would be more inclined to go out of the wg before entering the turbine blades.
    2000 Brilliant Black S4
    -DNA Catback, Piggies, Darintake w/ITG panel filter, 710n's, 034 TBB, 034 F hose, Vast clutch, JHM shifter & bushings, Vogtland/Koni's, Hotchkis Sways, ECS 12.5mm spacers

    2010 Honda Civic Ex Sport Auto
    -Stock daily driver/panty dropper

    2014 Fiat 500 Sport
    -Stock cone dodger for now. Suspension coming soon.

  19. #19
    Veteran Member Four Rings gointoscott's Avatar
    Join Date
    Jan 26 2006
    AZ Member #
    9931
    My Garage
    2001 Audi S4
    Location
    Milwaukee, WI

    Re: Update of downpipe removal to make them into piggis - with pics

    Quote Originally Posted by sCeRaXn View Post
    As far as the carbon build up is concerned...i wouldnt worry about it too much. Running rich for an extended period of time will cause that. I would be more worried about the melted catalyst because it takes ALOT of heat to melt that stuff. You were either detonating badly or the excess fuel in the exhaust(from running rich) was igniting right at the catalyst. The fact that its where the wg exhaust would be hitting leads me to believe that it was from excess fuel igniting, since it(liquid gas)would be more inclined to go out of the wg before entering the turbine blades.
    Where did you see melted catalyst? In the fist picture There were shavings at the bottom from when I drilled the honey comb center of the Precat. Maybe this looked like part of the catalyst that was melted but really this was just shavings from drilling the cat. Let me know which pic looks like it was melted?
    Original K03's, Ecodes, H&R Coilovers, Inmotion Chip/MBC, Piggies

  20. #20
    Veteran Member Four Rings gointoscott's Avatar
    Join Date
    Jan 26 2006
    AZ Member #
    9931
    My Garage
    2001 Audi S4
    Location
    Milwaukee, WI

    Re: The Ultimate DIY for making Piggies - with pics (Revision II)

    Bump. I updated the DIY and added a lot more pictures. Feel free to put this post in your favorites if you are looking to do your own piggies.
    Original K03's, Ecodes, H&R Coilovers, Inmotion Chip/MBC, Piggies

  21. #21
    Veteran Member Four Rings GramCracker's Avatar
    Join Date
    Mar 11 2007
    AZ Member #
    16317
    My Garage
    1990 R32 GT-R
    Location
    Somewhere in CT

    Re: The Ultimate DIY for removing dp's to make Piggies for 6spd manual-with pics (Rev

    Hehehe your bit isnt too big.

  22. #22
    Veteran Member Four Rings gointoscott's Avatar
    Join Date
    Jan 26 2006
    AZ Member #
    9931
    My Garage
    2001 Audi S4
    Location
    Milwaukee, WI

    Re: The Ultimate DIY for removing dp's to make Piggies for 6spd manual-with pics (Rev

    I did not have time to work on the piggies tonight. I plan to finish it tomorrow night.

    I have been reading in other posts that dropping the subframe down a bit it makes it easier to remove/take out dp's.

    Jerbal wrote in another post:
    "Remove the 4 13mm bolts and the 2 18mm bolts holding on the brackets at the rear of the subframe. This should allow it to drop down about 2 or 3 inches."

    So I might try loosening that up to replace the dp's. instead of wrestling with the tight space, but we'll see.

    If it works good, I'll take pics and add it to the instructions
    Original K03's, Ecodes, H&R Coilovers, Inmotion Chip/MBC, Piggies

  23. #23
    Veteran Member Four Rings Slow4's Avatar
    Join Date
    Dec 02 2007
    AZ Member #
    23048
    My Garage
    2020 Ford PIU, 2017 D675R
    Location
    DC/MD/(VA)

    Re: The Ultimate DIY for removing dp's to make Piggies for 6spd manual-with pics (Rev

    Any chance of listing all the tools and parts you used in your 1st post?

    Last question, if you're still in the learning stages of working on your S, will you automatically figure out where the O2 sensors are? I've taken the time to attempt and locate them but haven't really set aside the time to physically get back there and feel around.
    2015 B8 SQ5
    Click Here
    ---
    Past
    2001 B5 S4 | 2005 B6 S4 AVANT | 2013 Allroad P+ | 2013 B8.5 A4 P+


  24. #24
    Veteran Member Four Rings gointoscott's Avatar
    Join Date
    Jan 26 2006
    AZ Member #
    9931
    My Garage
    2001 Audi S4
    Location
    Milwaukee, WI

    Re: The Ultimate DIY for removing dp's to make Piggies for 6spd manual-with pics (Rev

    Quote Originally Posted by Slow4 View Post
    Any chance of listing all the tools and parts you used in your 1st post?

    Last question, if you're still in the learning stages of working on your S, will you automatically figure out where the O2 sensors are? I've taken the time to attempt and locate them but haven't really set aside the time to physically get back there and feel around.
    Actually I was planning on listing the tools. I just havnt gotten to it yet. I will get it done in the next few days. I was up till 1 am this morning writing these instructions.

    I will also pm you a pic of the 02's and where it goes. It really looks like a spark plug really, except the wire is attached instead of having a wire that pops off like a spark plug.
    There are 4 02 sensors. two you can see from the top in the back of the engine, you have to look down toward bottom of heat shields. Sorry I took the pic's with the 02's already out.

    In the picture below you can see the hole for the passenger side 02 directly to the left of the knob of my mbc.
    Then on the bottom part of the mbc you see a green tie strap holding thehose to the mbc - if you look to the left of this you see another hole, that is where the passenger side egt goes.


    Again I'll snap some pics of the o2 (for both sides) and where it goes in the manifold, as well as the egt as well.

    The other 02's you see from under the car, they plug into the bottom of the precat. my rear 02's are actually dangling in one of my pic's in first post.
    Last edited by gointoscott; 08-26-2008 at 09:28 PM.
    Original K03's, Ecodes, H&R Coilovers, Inmotion Chip/MBC, Piggies

  25. #25
    Veteran Member Four Rings JackalS4's Avatar
    Join Date
    Mar 01 2008
    AZ Member #
    25886
    Location
    Toronto, ON, Canada

    Re: The Ultimate DIY for removing dp's to make Piggies for 6spd manual-with pics (Rev

    Awesome contribution to the S4 community!

    I trust you'll enjoy the HP increase and sound when it's all done!

    And hopefully your wife will understand why all the work...
    Brilliant Black 2001 S4 - 6MT <3

  26. #26
    Veteran Member Three Rings alias747's Avatar
    Join Date
    Feb 19 2007
    AZ Member #
    15766
    Location
    La Crescent, MN

    Re: The Ultimate DIY for removing dp's to make Piggies for 6spd manual-with pics (Rev

    That's rockin dude! This is why I always come to your house to do any kind of big work on my car, I don't have any tools! haha
    2010 S4 Meteor Gray | S-Tronic | Sport Diff | Nav

  27. #27
    Veteran Member Four Rings gointoscott's Avatar
    Join Date
    Jan 26 2006
    AZ Member #
    9931
    My Garage
    2001 Audi S4
    Location
    Milwaukee, WI

    Re: The Ultimate DIY for removing dp's to make Piggies for 6spd manual-with pics (Rev

    Quote Originally Posted by alias747 View Post
    That's rockin dude! This is why I always come to your house to do any kind of big work on my car, I don't have any tools! haha
    Yeah having the right tools make a difference. But honestly the tools I use are the basic cheap tools you can get at Menards, Autozone. It really does pay to get a basic set of metric wrenches, sockets, extensions.

    I bet if you took 70-100 bucks you could have a nice set of tools, and be set for years.

    Anything else you might need you can probably borrow from a buddy.
    Original K03's, Ecodes, H&R Coilovers, Inmotion Chip/MBC, Piggies

  28. #28
    Senior Member Three Rings xx_s4quattro_xx's Avatar
    Join Date
    Mar 11 2008
    AZ Member #
    26302
    My Garage
    00 s4 and 00 bimmer 323ci
    Location
    san diego ca

    Re: The Ultimate DIY for removing dp's to make Piggies for 6spd manual-with pics (Rev

    Do Vast do the same thing? Or they weld high flow cats on theres?

  29. #29
    Veteran Member Four Rings gointoscott's Avatar
    Join Date
    Jan 26 2006
    AZ Member #
    9931
    My Garage
    2001 Audi S4
    Location
    Milwaukee, WI

    Re: The Ultimate DIY for removing dp's to make Piggies for 6spd manual-with pics (Rev

    Not exactly sure what you are asking, but I am planning on going with defoulers (cel eliminators) I will probably buy them from vast, but want to see if I can find them locally and cheaper, even if I do go through vast I think they are like $25 bucks a piece so not a horrible price either.

    I know a lot of people relocate the rear 02's to the back of the main cats but I dont have access to a welder, nor the knowledge of welding it right, so to me its easier to just do the cel eliminators.
    Original K03's, Ecodes, H&R Coilovers, Inmotion Chip/MBC, Piggies

  30. #30
    Veteran Member Three Rings alias747's Avatar
    Join Date
    Feb 19 2007
    AZ Member #
    15766
    Location
    La Crescent, MN

    Re: The Ultimate DIY for removing dp's to make Piggies for 6spd manual-with pics (Rev

    Quote Originally Posted by xx_s4quattro_xx View Post
    Do Vast do the same thing? Or they weld high flow cats on theres?
    Yes this is the same process that VAST does to do their piggies.

    Btw, everyone should give scott some rep for this post over on the left hand side. I gave you some man!
    2010 S4 Meteor Gray | S-Tronic | Sport Diff | Nav

  31. #31
    Senior Member Three Rings xx_s4quattro_xx's Avatar
    Join Date
    Mar 11 2008
    AZ Member #
    26302
    My Garage
    00 s4 and 00 bimmer 323ci
    Location
    san diego ca

    Re: The Ultimate DIY for removing dp's to make Piggies for 6spd manual-with pics (Rev

    Does vast use the stock cats or they use high flows? Oh and i hook scott up with a rep too.

  32. #32
    Established Member Two Rings kodycobra's Avatar
    Join Date
    Jul 15 2008
    AZ Member #
    30882
    My Garage
    00S4,07 ZX14,05 AcuraTL,Z32tt
    Location
    Jefferson City, Missouri

    Re: The Ultimate DIY for removing dp's to make Piggies for 6spd manual-with pics (Rev

    Repped!! For your help with this, and for that other thing you helped me with

    Good guy for sure.
    http://i94.photobucket.com/albums/l9...000_0009-1.jpg
    00 Nogaro~Two little GT28rs's on a mission

  33. #33
    Veteran Member Four Rings mholme's Avatar
    Join Date
    Jan 29 2007
    AZ Member #
    15226
    My Garage
    08 S4 00 S4
    Location
    MD

    Re: The Ultimate DIY for removing dp's to make Piggies for 6spd manual-with pics (Rev

    Quote Originally Posted by gointoscott View Post
    Not exactly sure what you are asking, but I am planning on going with defoulers (cel eliminators) I will probably buy them from vast, but want to see if I can find them locally and cheaper, even if I do go through vast I think they are like $25 bucks a piece so not a horrible price either.

    I know a lot of people relocate the rear 02's to the back of the main cats but I dont have access to a welder, nor the knowledge of welding it right, so to me its easier to just do the cel eliminators.
    You can stack two anti foulers, pick em up at autozone or pep boys for under 10 bucks for four. The one that screws directly onto the O2 sensor gets drilled out. The other one screws onto that and the whole assembly goes into the O2 bung. That's the route I took, no issues.

  34. #34
    Veteran Member Four Rings gointoscott's Avatar
    Join Date
    Jan 26 2006
    AZ Member #
    9931
    My Garage
    2001 Audi S4
    Location
    Milwaukee, WI

    Re: The Ultimate DIY for removing dp's to make Piggies for 6spd manual-with pics (Rev

    Quote Originally Posted by mholme View Post
    You can stack two anti foulers, pick em up at autozone or pep boys for under 10 bucks for four. The one that screws directly onto the O2 sensor gets drilled out. The other one screws onto that and the whole assembly goes into the O2 bung. That's the route I took, no issues.
    I was at autozone tonight and asked about defoulers and they said they didnt have them. The guy knew what they were but said they werent popular as much anymore. IDK, I should of had him check the system instead of just going by memory.

    Anyway, we dont have pep boys here, at least I havnt seen one around, but we do have advanced autoparts. I see online that they sell defoulers and that they are 17mm. Is that the right size?

    I know it takes a 22mm o2 socket to take our stock 02's out so wasnt sure if the 17mm refered to the socket size or the diameter of the hole.

    Anyway. let me know if you know anything if the 17mm defoulers will work.
    Original K03's, Ecodes, H&R Coilovers, Inmotion Chip/MBC, Piggies

  35. #35
    Veteran Member Four Rings mholme's Avatar
    Join Date
    Jan 29 2007
    AZ Member #
    15226
    My Garage
    08 S4 00 S4
    Location
    MD

    Re: The Ultimate DIY for removing dp's to make Piggies for 6spd manual-with pics (Rev

    Yeah, I got mine at advance auto parts. They were in the "HELP" section out on the floor, two to a pack. They were the same size as the O2 socket if I recall.


  36. #36
    Veteran Member Four Rings gointoscott's Avatar
    Join Date
    Jan 26 2006
    AZ Member #
    9931
    My Garage
    2001 Audi S4
    Location
    Milwaukee, WI

    Re: The Ultimate DIY for removing dp's to make Piggies for 6spd manual-with pics (Rev

    Excellent,

    I'll try them tomorrow! I havnt had time to work on the S for 2 days now! so frustrating. But hopefully I'll be able to work tomorrow night and maybe even finish it up, and then finish the DIY.

    I really want to get the defoulers so I can get them in now before I get it off the jack stands.


    Thanks again mholme You've been repped. lol (its funny, guys were mentioning that they repped me and I was like, what the heck is that Then I realized its the new feature for reputation. lol)
    Original K03's, Ecodes, H&R Coilovers, Inmotion Chip/MBC, Piggies

  37. #37
    Established Member Two Rings
    Join Date
    Mar 19 2008
    AZ Member #
    26601
    Location
    Tulsa, OK

    Re: The Ultimate DIY for removing dp's to make Piggies for 6spd manual-with pics (Rev

    Okay this is frustrating as fuck. Drill bit got too hot and wouldn't drill....shit wont come out now. This is why I went to college so I don't have to do this shit lol...

  38. #38
    Veteran Member Four Rings mholme's Avatar
    Join Date
    Jan 29 2007
    AZ Member #
    15226
    My Garage
    08 S4 00 S4
    Location
    MD

    Re: The Ultimate DIY for removing dp's to make Piggies for 6spd manual-with pics (Rev

    Quote Originally Posted by torment View Post
    Okay this is frustrating as fuck. Drill bit got too hot and wouldn't drill....shit wont come out now. This is why I went to college so I don't have to do this shit lol...
    Are you keeping the drill bit oiled? That is a MUST...

  39. #39
    Veteran Member Four Rings gointoscott's Avatar
    Join Date
    Jan 26 2006
    AZ Member #
    9931
    My Garage
    2001 Audi S4
    Location
    Milwaukee, WI

    Re: The Ultimate DIY for removing dp's to make Piggies for 6spd manual-with pics (Rev

    Quote Originally Posted by torment View Post
    Okay this is frustrating as fuck. Drill bit got too hot and wouldn't drill....shit wont come out now. This is why I went to college so I don't have to do this shit lol...
    Wow,

    I was able to drill through it pretty easily. how big of bit were you using? Mine was maybe 1/2 inch or a little bigger. So the bit is stuck.

    When I got mine a little stuck I just wiggled it back and forth to loosen it up and then it was able to come out.

    I still have to finish the second cat tonight. then I can start putting it back together
    Original K03's, Ecodes, H&R Coilovers, Inmotion Chip/MBC, Piggies

  40. #40
    Established Member Two Rings
    Join Date
    Mar 19 2008
    AZ Member #
    26601
    Location
    Tulsa, OK

    Re: The Ultimate DIY for removing dp's to make Piggies for 6spd manual-with pics (Rev

    I think the bit was just unsharp....I'm going to take it to my dad's work and have them cut the pipe off so i can knock it out and have them weld it back.

    Did NOT oil the drill bit....didn't have any available. I could only use a 3/8th bit because of the small chuck the drill had...all i had available at my house.

Bookmarks

Posting Permissions

  • You may not post new threads
  • You may not post replies
  • You may not post attachments
  • You may not edit your posts
  •  


    © 2001-2024 Audizine, Audizine.com, and Driverzines.com
    Audizine is an independently owned and operated automotive enthusiast community and news website.
    Audi and the Audi logo(s) are copyright/trademark Audi AG. Audizine is not endorsed by or affiliated with Audi AG.