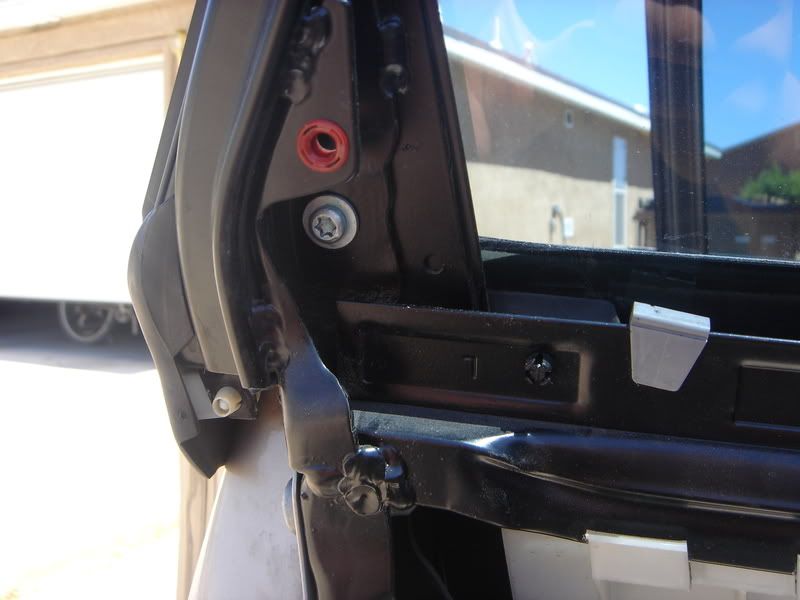
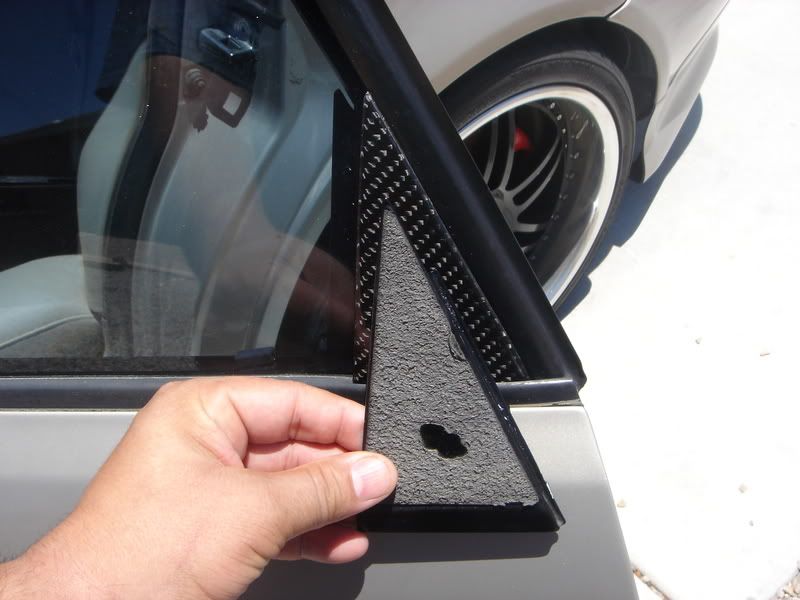
Here is the the rear C pillar. You will notice that there is a lip on the inside of the cover and this is the reason that you will need to push back on the pillar towards the rear seal. By showing you the lip you will have an idea on how much you will need to push back.

Here is the step by step removal process.
1) Remove the inside cover.

2) Remove the foam insulator. (to remove the insulator you may need to take off the door panel or you can just push it out of the way to get to the hex bolt. Be careful as they tear easily.)

3) With the insulator removed you now have access to the hex bolt. Remove it and put in a safe place.

4) Now with the door closed and the window rolled down you can begin the maneuvering process of removing the C pillar. The pictures will guide you through the process.
Push on front edge of pillar towards the rear seal:


Here is an exaggerated step by step of how the process will go.


As you get towards the bottom it will get a little harder as the two seals meet (the vertical window seal and the horizontal door seal) but just keep pulling slowly and as you get closer to the bottom pull out. Do not keep your pressure at the top of the pillar as you pull down. The metal is thin and will bend if you keep applying pressure from the top. As it gets harder move your hand down and this will help to maintain the shape of the pillar, but if you should happen to bend it a little you can just bend it back.
Now you can do whatever you like to the pillars, but you will need to get them back on so here is the fun part of putting them back.
Now if you did not take off the door panel to remove the insulator, you will have to do it now. Here are some pictures of the door with the panel off and of the bolts that will need to be removed and loosened.
The top bolts will need to be removed so that the window frame can slide out but the bottom bolts will only need to be loosened. The bottom front bolt has a shim on it, so make sure you keep in mind where it is situated. Also the bolt holes are bigger to allow for adjustment so you will need to mark the bolts so you know their exact orientation. I did this by just using a pen and circling the bolts before I removed and loosened them. Here are the pictures.

This rubber seal on the top corner of the door just snaps into place in two spots. One on the door and one on the frame. Just pull the snap on the door and push the one on the frame and it will come off.

This bolt will be removed. (top back)

This bolt will only be loosened. (bottom back)

This bolt will be removed. (top front)

This bolt will be loosened. (bottom front with shim)

Once you slide the window frame out away from the door the two seals on the outside of the door will separate, (the vertical from the horizontal.)


Just place the C pillar between the door and the window frame where it is supposed to be mounted. Place it lower and then slide it up into place.


There is a groove in the back vertical seal and that is where the 3 prongs and the back edge of the C pillar will slide into. (you can see them in this picture) You will also see the channel for the lip that is on the back of the C pillar (why you had to push it towards the rear seal to get it off)

You will know it is place when you can see the bolt hole from the other side where you removed the hex bolt. Now you are done and can put everything back together in the reverse order.
Feel free to ask any questions if I have not made something clear.
Have fun.


 Reply With Quote


Bookmarks