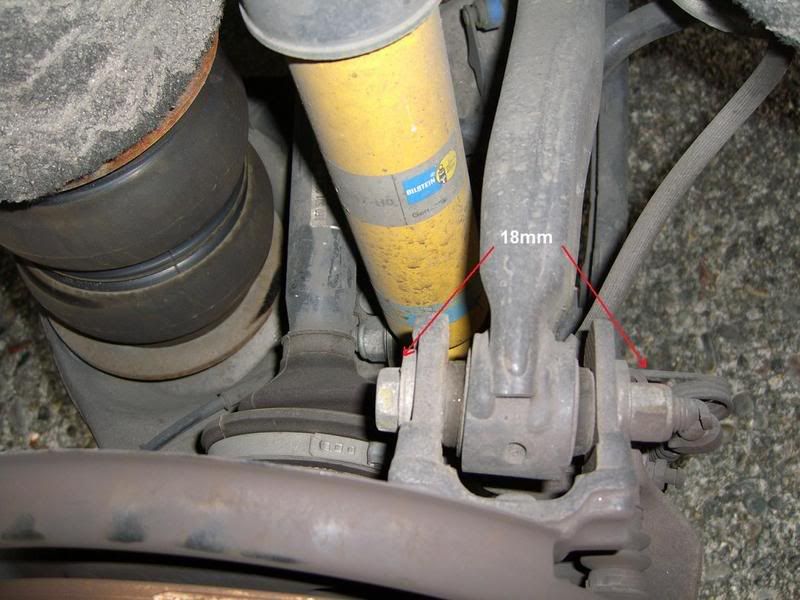
First off, this DIY is in regards to the REAR camber on the B6/B7 chassis cars (and maybe B5's, but I'm not sure). The front camber is not adjustable from the factory and in order to do so you will need aftermarket upper control arms or Kmac adjustable bushings.
To complete this project you will need minimal tools:
* Two 18mm sockets and/or wrenches
* A good floor jack (NOT the factory jack!)
* Another floor jack or a set of jack stands
* 1 or 2 beers
Moving right along...

Step 1: Jack the car up and remove one of the back wheels.
Step 1a: If you don't have a second jack, put the car up on a jackstand.
Step 2: Take a look at the rear suspension, the concentic bolt at the top of the rear hub (circled in red) is what is used to adjust the camber.


Step 3: Loosen (don't remove) the nut (loosen it just enough to be able to turn the bolt from the other end.
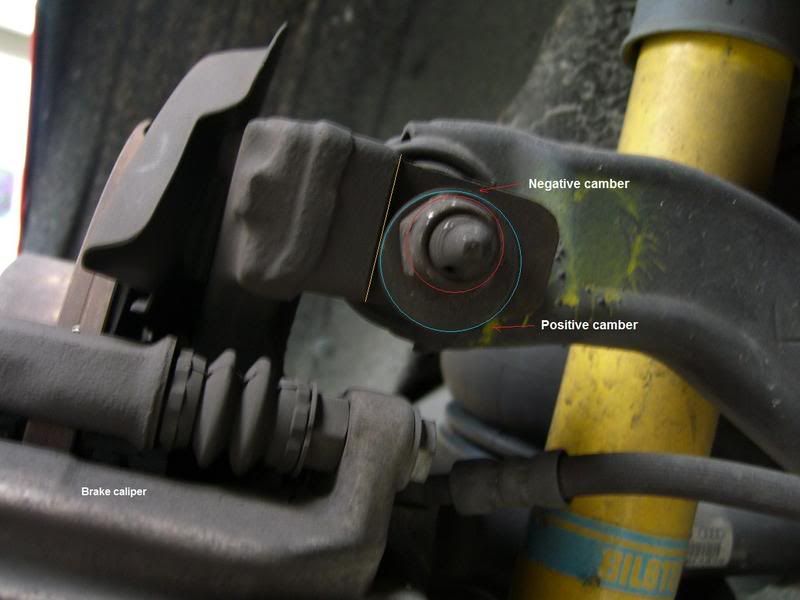
Step 4: This is where the magic happens. Consult the diagram below for the explaination to follow.

You should be able to see by looking at the picture about how this bolt adjusts the camber: As the bolt rotates on the axis (red circle), the concentric washer (blue circle) pushes the rear hub (orange line) in and out, giving you positive or negative camber. When the skinny part of the washer is against the hub, the hub is all the way inward, giving you negative camber. When the thick part of the washer is against the hub, it pushes it out giving you more positive camber.
Now, to actually adjust the camber, you want to load the suspension by putting a jack underneath the hub and lifting the suspension up about 6-8 inches. The reason for this is because as the suspension loads, it naturally wants to push inward, so this will keep the orange line pushing against the blue circle, allowing you to adjust it (instead of just turning the bolt in circles and accomplishing nothing). If it's hard to adjust, loosen the nut a little more. When you have the washer where you think it should be and the orange line is tightly up against the blue circle, retighten the bolt (keep the suspension loaded when you tighten it). Also, make sure that when your re-tighten the bolt that it doesn't rotate and change position. If loading the suspension doesn't get the hub to push against the washer the way it should, try smacking it with a rubber mallet or loading the suspension more.
Now here is the tedious part: where you should set the bolt at depends on how much your car is lowered and how much adjustment you need, so you might need to do this this a few times, since the only way to check your work is to retighten the bolt, put your wheel back on and then put the car back on the ground.


Once you've got the it where you want it on the first side, make a note of how the bolt is adjusted so you have a good baseline for adjusting the other side. Don't expect it to be exactly the same on both sides though, since the rear subframe isn't always perfectly centered on the car.
And if you've recently had an alignment and you're just trying to dial in the rear, you don't really need to worry too much about screwing it up and needing to get another alignment since you're only making a minor change and it's on the horizontal axis of the suspension.


Discuss this DIY: http://audizine.com/forum/showthread.php?t=209905


Bookmarks